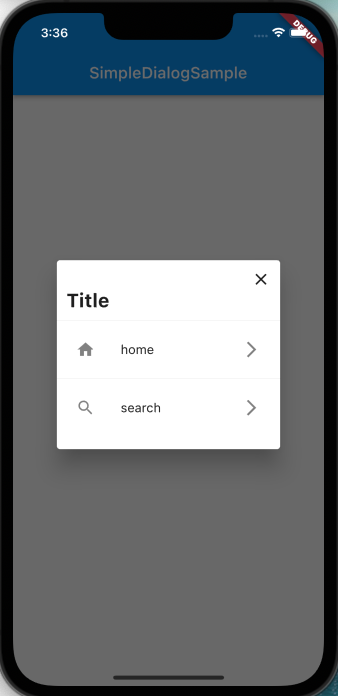
こんな感じのダイアログを作りたい時の参考になったら、幸いです!
サンプルコード
import 'package:flutter/material.dart';

void main() {
  runApp(const MyApp());
}

class MyApp extends StatelessWidget {
  const MyApp({Key? key}) : super(key: key);

  @override
  Widget build(BuildContext context) {
    return MaterialApp(
      home: Scaffold(
        appBar: AppBar(
          title: const Text('SimpleDialogSample'),
        ),
        body: const SimpleDialogSample(),
      ),
    );
  }
}

class SimpleDialogSample extends StatelessWidget {
  const SimpleDialogSample({Key? key}) : super(key: key);

  @override
  Widget build(BuildContext context) {
    return Center(
      child: ElevatedButton(
        child: const Text('SimpleDialogSample'),
        onPressed: () {
          showDialog(
            context: context,
            builder: (childContext) {
              return SimpleDialog(
                children: <Widget>[
                  GestureDetector(
                    onTap: () {
                      Navigator.pop(context);
                    },
                    child: const Align(
                      alignment: Alignment.topRight,
                      child: Padding(
                        padding: EdgeInsets.only(right: 12),
                        child: Icon(
                          Icons.close,
                          size: 24,
                        ),
                      ),
                    ),
                  ),
                  const Padding(
                    padding: EdgeInsets.only(left: 12, bottom: 10),
                    child: Text(
                      'Title',
                      style: TextStyle(
                        fontWeight: FontWeight.w700,
                        fontSize: 24,
                      ),
                    ),
                  ),
                  const Divider(
                    height: 1,
                  ),
                  SimpleDialogOption(
                    onPressed: () {
                      Navigator.pop(childContext);
                    },
                    child: const ListTile(
                      contentPadding: EdgeInsets.all(0),
                      leading: Icon(
                        Icons.home,
                      ),
                      title: Text('home'),
                      trailing: Icon(
                        Icons.arrow_forward_ios,
                      ),
                    ),
                  ),
                  const Divider(
                    height: 1,
                  ),
                  SimpleDialogOption(
                    onPressed: () {
                      Navigator.pop(childContext);
                    },
                    child: const ListTile(
                      contentPadding: EdgeInsets.all(0),
                      leading: Icon(
                        Icons.search,
                      ),
                      title: Text('search'),
                      trailing: Icon(
                        Icons.arrow_forward_ios,
                      ),
                    ),
                  ),
                ],
              );
            },
          );
        },
      ),
    );
  }
}
ダイアログが元々持っているtitleパラメータにtitleを設定してしまうとAlignを使っても右上に×ボタンを設置しにくいので、childrenの中に全部書き込んでしまうという方法で実装しています!
他にももっといい方法があると思いますが、誰かの参考になったら幸いです!
