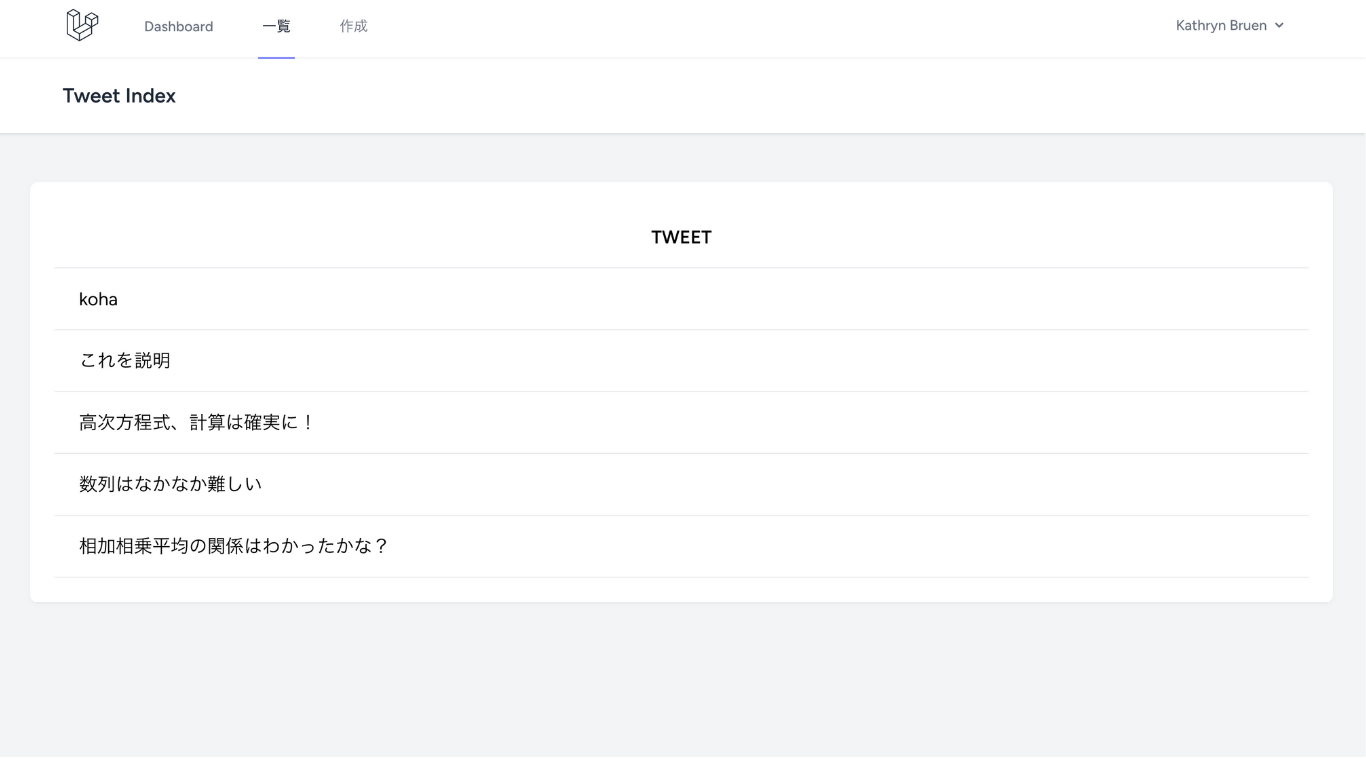
では、いよいよ実際のアプリ本体を作っていきましょう。例としてTwitterのような、ログインした人が自由に短文を投稿するアプリを作ってみたいと思います。今回は「投稿 → 一覧表示」までを作ります。
Step .1 何をどうしたいのか作りを考える。
実際にどのような動きでどうすればこれを実現できるのか。そのためにどのようなコード・ファイルが必要になるのかを考えます。
①ログイン後 Dashboardから「作成」をクリック。
→ TweetController.phpのcreateへ
②TweetController.phpのcreate
→ 短文投稿画面(create.blade.php)へ遷移
③ create.blade.php
→ 「inputタグ」へ短文(tweet)と説明(description)を入力
→ TweetController.phpのstoreへ
④ TweetController.phpのstore
→ 入力された短文(tweet)と説明(description)に、ログインしているユーザーのIDなどの情報を加えデータベースへ保存
→ TweetController.phpのindexへ
⑤TweetController.phpのindex
→ データベースから情報を受け取り、$tweetsに格納する
→ $tweetsを持ったまま一覧画面(index.blade.php)へ遷移
⑥index.blade.php
→ $tweetsとして受け取った情報を1つ1つに分解($tweet)して、for文を用いて表示
と、こんな感じです。もちろんこれらの間の遷移はすべてルーティングとして、web.phpにあらかじめ書いておかなくてはなりません。工程が多くて大変そうですが、Controllerを中心に回していくこの流れを理解すると、Laravelはとても便利なものと分かります。これに慣れましょう!
Step .2 実際に書いてみる。
では上の手順に従ってコードを書いていきます。
①ログイン後 Dashboardから「作成」をクリック。
→ TweetController.phpのcreateへ
今回はページのナビゲーションバー内に「作成ボタン」を作ったので、
views -> layouts -> navigation.blade.php を次のようにします。
<nav x-data="{ open: false }" class="bg-white  border-b border-gray-100">
  <!-- Primary Navigation Menu -->
  <div class="max-w-7xl mx-auto px-4 sm:px-6 lg:px-8">
    <div class="flex justify-between h-16">
      <div class="flex">
        <!-- Logo -->
        <div class="shrink-0 flex items-center">
          <a href="{{ route('dashboard') }}">
            <x-application-logo class="block h-9 w-auto fill-current text-gray-800 " />
          </a>
        </div>

        <!-- Navigation Links -->
        <div class="hidden space-x-8 sm:-my-px sm:ml-10 sm:flex">
          <x-nav-link :href="route('dashboard')" :active="request()->routeIs('dashboard')">
            {{ __('Dashboard') }}
          </x-nav-link>
        </div>
        <!-- 🔽 一覧ページへのリンクを追加 -->
        <div class="hidden space-x-8 sm:-my-px sm:ml-10 sm:flex">
          <x-nav-link :href="route('tweet.index')" :active="request()->routeIs('tweet.index')">
            {{ __('一覧') }}
          </x-nav-link>
        </div>
        <!-- 🔽 作成ページへのリンクを追加 -->
        <div class="hidden space-x-8 sm:-my-px sm:ml-10 sm:flex">
          <x-nav-link :href="route('tweet.create')" :active="request()->routeIs('tweet.create')">
            {{ __('作成') }}
          </x-nav-link>
        </div>

      </div>

      <!-- Settings Dropdown -->
      <div class="hidden sm:flex sm:items-center sm:ml-6">
        <x-dropdown align="right" width="48">
          <x-slot name="trigger">
            <button class="inline-flex items-center px-3 py-2 border border-transparent text-sm leading-4 font-medium rounded-md text-gray-500 bg-white hover:text-gray-700 focus:outline-none transition ease-in-out duration-150">
              <div>{{ Auth::user()->name }}</div>

              <div class="ml-1">
                <svg class="fill-current h-4 w-4" xmlns="http://www.w3.org/2000/svg" viewBox="0 0 20 20">
                  <path fill-rule="evenodd" d="M5.293 7.293a1 1 0 011.414 0L10 10.586l3.293-3.293a1 1 0 111.414 1.414l-4 4a1 1 0 01-1.414 0l-4-4a1 1 0 010-1.414z" clip-rule="evenodd" />
                </svg>
              </div>
            </button>
          </x-slot>

          <x-slot name="content">
            <x-dropdown-link :href="route('profile.edit')">
              {{ __('Profile') }}
            </x-dropdown-link>

            <!-- Authentication -->
            <form method="POST" action="{{ route('logout') }}">
              @csrf

              <x-dropdown-link :href="route('logout')" onclick="event.preventDefault();
                                                this.closest('form').submit();">
                {{ __('Log Out') }}
              </x-dropdown-link>
            </form>
          </x-slot>
        </x-dropdown>
      </div>

      <!-- Hamburger -->
      <div class="-mr-2 flex items-center sm:hidden">
        <button @click="open = ! open" class="inline-flex items-center justify-center p-2 rounded-md text-gray-400  hover:text-gray-500  hover:bg-gray-100 focus:outline-none focus:bg-gray-100 focus:text-gray-500 transition duration-150 ease-in-out">
          <svg class="h-6 w-6" stroke="currentColor" fill="none" viewBox="0 0 24 24">
            <path :class="{'hidden': open, 'inline-flex': ! open }" class="inline-flex" stroke-linecap="round" stroke-linejoin="round" stroke-width="2" d="M4 6h16M4 12h16M4 18h16" />
            <path :class="{'hidden': ! open, 'inline-flex': open }" class="hidden" stroke-linecap="round" stroke-linejoin="round" stroke-width="2" d="M6 18L18 6M6 6l12 12" />
          </svg>
        </button>
      </div>
    </div>
  </div>

  <!-- Responsive Navigation Menu -->
  <div :class="{'block': open, 'hidden': ! open}" class="hidden sm:hidden">
    <div class="pt-2 pb-3 space-y-1">
      <x-responsive-nav-link :href="route('dashboard')" :active="request()->routeIs('dashboard')">
        {{ __('Dashboard') }}
      </x-responsive-nav-link>
    </div>
    <!-- 🔽 一覧ページへのリンクを追加 -->
    <div class="pt-2 pb-3 space-y-1">
      <x-responsive-nav-link :href="route('tweet.index')" :active="request()->routeIs('tweet.index')">
        {{ __('一覧') }}
      </x-responsive-nav-link>
    </div>
    <!-- 🔽 作成ページへのリンクを追加 -->
    <div class="pt-2 pb-3 space-y-1">
      <x-responsive-nav-link :href="route('tweet.create')" :active="request()->routeIs('tweet.create')">
        {{ __('作成') }}
      </x-responsive-nav-link>
    </div>

    <!-- Responsive Settings Options -->
    <div class="pt-4 pb-1 border-t border-gray-200 dark:border-gray-600">
      <div class="px-4">
        <div class="font-medium text-base text-gray-800 dark:text-gray-200">{{ Auth::user()->name }}</div>
        <div class="font-medium text-sm text-gray-500">{{ Auth::user()->email }}</div>
      </div>

      <div class="mt-3 space-y-1">
        <x-responsive-nav-link :href="route('profile.edit')">
          {{ __('Profile') }}
        </x-responsive-nav-link>

        <!-- Authentication -->
        <form method="POST" action="{{ route('logout') }}">
          @csrf

          <x-responsive-nav-link :href="route('logout')" onclick="event.preventDefault();
                                        this.closest('form').submit();">
            {{ __('Log Out') }}
          </x-responsive-nav-link>
        </form>
      </div>
    </div>
  </div>
</nav>
②TweetController.phpのcreate
→ 短文投稿画面(create.blade.php)へ遷移
createには、単純にページ遷移を行うための文を書くだけです。
public function create()
    {
        return response()->view('tweet.create');
    }
'tweet.create' : viewsの中のtweetフォルダの中にあるcreate.blade.phpというファイル
という意味です。
③ create.blade.php
→ 「inputタグ」へ短文(tweet)と説明(description)を入力
→ TweetController.phpのstoreへ
中のコードは下のようにします。
q_<x-app-layout>
  <x-slot name="header">
    <h2 class="font-semibold text-xl text-gray-800 leading-tight">
      {{ __('Create New Tweet') }}
    </h2>
  </x-slot>

  <div class="py-12">
    <div class="max-w-xl mx-auto sm:w-6/12 md:w-2/5 lg:w-4/12">
      <div class="bg-white overflow-hidden shadow-sm sm:rounded-lg">
        <div class="p-6 bg-white border-b border-gray-200  ">
          @include('common.errors')
          <form class="mb-6" action="{{ route('tweet.store') }}" method="POST">
            @csrf
            <div class="flex flex-col mb-4">
              <x-input-label for="tweet" :value="__('Tweet')" />
              <x-text-input id="tweet" class="block mt-1 w-full" type="text" name="tweet" :value="old('tweet')" required autofocus />
              <x-input-error :messages="$errors->get('tweet')" class="mt-2" />
            </div>
            <div class="flex flex-col mb-4">
              <x-input-label for="description" :value="__('Description')" />
              <x-text-input id="description" class="block mt-1 w-full" type="text" name="description" :value="old('description')" required autofocus />
              <x-input-error :messages="$errors->get('description')" class="mt-2" />
            </div>
            <div class="flex items-center justify-end mt-4">
              <x-primary-button class="ml-3">
                {{ __('Create') }}
              </x-primary-button>
            </div>
          </form>
        </div>
      </div>
    </div>
  </div>
</x-app-layout>
「tweet」と「description」の2つを入力するinputタグがあり、それを囲むformタグに次のアクセスする「方法」と「場所(名前)」を書きます。
次はTweetController.phpのstore関数を動かすのでしたね。 ターミナルを立ち上げ、
php artisan toute:list
とすると、現在設定しているルーティング一覧が確認できます。
TweetController@storeを動かすためには、「POST」で「tweet.store」へアクセスすれば良い、と書いてありますので、
<form class="mb-6" action="{{ route('tweet.store') }}" method="POST">
となります。実際上のコードではそうなっていることを確認しましょう。
④ TweetController.phpのstore
→ 入力された短文(tweet)と説明(description)に、ログインしているユーザーのIDなどの情報を加え
データベースへ保存
→ TweetController.phpのindexへ
TweetController@storeでは、これからよく使うデータベースへの保存を行います。バリデーションなどもここに書きますので下のコードを参考に勉強を進めてください。
public function store(Request $request)
    {
         // バリデーション
        $validator = Validator::make($request->all(), [
            'tweet' => 'required | max:191',
            'description' => 'required',
        ]);
        // バリデーション:エラー
        if ($validator->fails()) {
            return redirect()
            ->route('tweet.create')
            ->withInput()
            ->withErrors($validator);
        }

        // ログインしているユーザーのidを取得し、$requestにマージ(合体)させる
        $data = $request->merge(['user_id' => Auth::user()->id])->all();
        // 送られてきたすべてのデータを配列として、$resultに格納する
        $result = Tweet::create($request->all());

        // web.phpで「tweet.index」と名前を付けたルーティングにリクエスト送信を行い、一覧ページに移動する
        return redirect()->route('tweet.index');
    }
最後の return redirect() でtweet.indexへ遷移していますね。
⑤TweetController.phpのindex
→ データベースから情報を受け取り、$tweetsに格納する
→ $tweetsを持ったまま一覧画面(index.blade.php)へ遷移
④でそれぞれが投稿したtweetをデータベースに保存できました。様々な人のいろいろなtweetが保存されているはずです。今度はそれをデータベースから引っ張ってきて、表示させたいページに渡します。
データベースからデータを取得するのはModelの役割でしたね。
 //すべてのデータをupdateの遅い順に並べて取得
 public static function getAllOrderByUpdated_at()
 {
      return self::orderBy('updated_at', 'desc')->get();
  }
こういった形で該当のModel(ここではtweetテーブルを操作するのでTweet.php)内に関数として、どのように取得するかを決めておくことができます。今回は新しいデータから順に表示したいので、あらかじめupdateの遅い順にデータを取得するgetAllOrderByOpdated_atという関数を作りました。同じデータでも複数の取り方を名前をつけて準備しておき、状況に合わせて使えるということですね。
TweetController.phpのindexは下のようにします。
public function index()
    {
        //model Tweet.phpで定義したgetAllOrderByUpdated_at()でとってきたデータを$tweetsに格納する
        $tweets = Tweet::getAllOrderByUpdated_at();
        //index.blade.phpへ$tweetのデータをオブジェクトとして渡し、ページを表示する
        return response()->view('tweet.index',compact('tweets'));
    }
⑥index.blade.php
→ $tweetsとして受け取った情報を1つ1つに分解($tweet)して、for文を用いて表示
$tweetsとしてデータを持ったままindex.blade.phpへ遷移することができました。あとはこれをfor文を使って上手に表示sましょう。
<!-- resources/views/tweet/index.blade.php -->

<x-app-layout>
  <x-slot name="header">
    <h2 class="font-semibold text-xl text-gray-800 leading-tight">
      {{ __('Tweet Index') }}
    </h2>
  </x-slot>

  <div class="py-12">
    <div class="max-w-7xl mx-auto sm:w-10/12 md:w-8/10 lg:w-8/12">
      <div class="bg-white overflow-hidden shadow-sm sm:rounded-lg">
        <div class="p-6 bg-white  border-b border-grey-200 ">
          <table class="text-center w-full border-collapse">
            <thead>
              <tr>
                <th class="py-4 px-6 bg-gray-lightest dark:bg-gray-darkest font-bold uppercase text-lg text-gray-dark dark:text-gray-200 border-b border-grey-light dark:border-grey-dark">tweet</th>
              </tr>
            </thead>
            <tbody>
              @foreach ($tweets as $tweet)
              <tr class="hover:bg-gray-lighter">
                <td class="py-4 px-6 border-b border-gray-light ">
                  <h3 class="text-left font-bold text-lg text-gray-dark ">{{$tweet->tweet}}</h3>
                  <div class="flex">
                    <!-- 更新ボタン -->
                    <!-- 削除ボタン -->
                  </div>
                </td>
              </tr>
              @endforeach
            </tbody>
          </table>
        </div>
      </div>
    </div>
  </div>
</x-app-layout>
laravelでは、繰り返し処理を@foreachで行います。
@foreach ($tweets as $tweet)
は$tweetsで受け取ったデータたちを$tweetとして1つ1つ分解して処理を行う、といった感じです。これで

上のような一覧表示画面まで無事遷移しました。
