概要
Quaggaを複数台立てる機会があったので、Vagrantを使って試してみました。
今回は、3台のQuaggaに対してeBGP接続されたネットワーク環境を構築していきます。
Quaggaとは
1999年頃に登場し、今でも世界中で使い続けられているソフトウェアルータの一つで、CiscoライクなCLIで操作・設定することができます。
下記のブログで詳しく紹介されているので、参考にしてください。
http://labs.gree.jp/blog/2014/06/10882/
構築環境
今回はMacBookAir上に仮想マシンとしてCentOSを構築し、そこにQuaggaをインストールしていきます。詳細のversionは下記の通りです。
- MacBookAir OSX Yosemite 10.10.4
- Vagrant 1.7.4
- Virtualbox 4.3.18
- CentOS 7.1.1503
- Quagga 0.99.22.4
Vagrant でCentOS7.0を構築
まずCentOS7.0を構築します。この章はQuaggaそのものとは直接関係ありませんので、適宜読み飛ばしてください。
ここではVagrant boxで公開されているCentOS7のイメージをダウンロードおよびインストールをします。
まずhttp://www.vagrantbox.es/ にて公開されているCentOS7のboxファイルのダウンロードを実施します。(完了までに数分かかります。)
% vagrant box add centos70 https://github.com/holms/vagrant-centos7-box/releases/download/7.1.1503.001/CentOS-7.1.1503-x86_64-netboot.box

==> box: Box file was not detected as metadata. Adding it directly...
==> box: Adding box 'centos70' (v0) for provider:
    box: Downloading: https://github.com/holms/vagrant-centos7-box/releases/download/7.1.1503.001/CentOS-7.1.1503-x86_64-netboot.box
==> box: Successfully added box 'centos70' (v0) for 'virtualbox'!
次にVagdantの設定ファイルであるVagrantfileを作成します。
% vagrant init centos70
A `Vagrantfile` has been placed in this directory. You are now
ready to `vagrant up` your first virtual environment! Please read
the comments in the Vagrantfile as well as documentation on
`vagrantup.com` for more information on using Vagrant.
作成されたVagrantfileを下記のように編集します。仮想マシンのIPアドレスは、他の仮想マシンと重複しないように設定してください。
Vagrant.configure(2) do |config|
  config.vm.box = "centos70"
  config.vm.network "private_network", ip: "192.168.33.13"
end
次に仮想マシンを起動させます。(完了までに数分かかります。)
% vagrant up
sshログインできれば、無事にCentOS7の構築が完了しています。
% vagrant ssh
Last login: Sun Aug 30 07:00:12 2015 from 10.0.2.2
Welcome to your Vagrant-built virtual machine.
[vagrant@localhost ~]$
[vagrant@localhost ~]$ cat /etc/centos-release
CentOS Linux release 7.1.1503 (Core)
念のため、Vagrantで用意されているホストマシンと仮想マシン間の共有機能が有効になっているか確認しておきます。
[ホストマシン]
% ls
Vagrantfile

% touch testfile

% ls
Vagrantfile  testfile
[仮想マシン]
[vagrant@localhost ~]$ ls /vagrant/
Vagrantfile  testfile (ホストマシンによって作成されたファイル)
上記のようにホストマシン側で作成したファイルが、仮想マシンでも共有できていれば問題ありません。
もし共有機能が有効になってない場合は、VirtualBox GuestAdditionsのversionがホストマシンと仮想マシンが一致していない可能性があります(よくハマるポイントです)
共有機能が使えないと不便ですので、下記ページなどを参照してGuestAdditionsのversionを上げるようにしてください。
http://qiita.com/isaoshimizu/items/e217008b8f6e79eccc85
1台のQuaggaを作る
まずは1台のQuaggaを対象に、作っていきます。
Quaggaをインストール
仮想マシンにQuaggaをyumコマンドでインストールしていきます。
[root@localhost vagrant]#sudo yum -y install quagga
Quaggaのコンフィグファイルが作成されたことを確認します。
[root@localhost vagrant]# cd /etc/quagga/
[root@localhost quagga]# ls
vtysh.conf  zebra.conf
今回は複数のQuaggaでeBGP接続されたネットワーク構築を構築するために、/etc/quaggaディレクトリにzebra.confとbgpd.confを設置・編集していきます。
各ファイルのsampleは、/usr/share/doc/quagga-0.99.22.4/のディレクトリに設置されていますので、参考にしてください。
[root@localhost quagga]# ls /usr/share/doc/quagga-0.99.22.4/
AUTHORS    NEWS            TODO                isisd.conf.sample   quagga.html
COPYING    README          babeld.conf.sample  mpls                ripd.conf.sample
ChangeLog  REPORTING-BUGS  bgpd.conf.sample    ospf6d.conf.sample  ripngd.conf.sample
INSTALL    SERVICES        bgpd.conf.sample2   ospfd.conf.sample   zebra.conf.sample
Quagga設定ファイルをホストマシンと共有する
ホストマシンから直接Quaggaの設定ファイルを編集できるように、Vagrantfileを以下の様に追加します。これによりホストマシンにある使い慣れたテキストエディタで、仮想マシン側のファイルを直接できるようになることに加えて、仮想マシンを削除した場合にも設定ファイルをホストマシン側に残しておくことができます。
[ホストマシン]
% mkdir quagga

% vi Vagrantfile

Vagrant.configure(2) do |config|
  config.vm.box = "centos70"
  config.vm.network "private_network", ip: "192.168.33.13"

  #### ここを追記 ####
  config.vm.synced_folder "./quagga", "/etc/quagga", owner: "root", group: "root"

end
設定内容を反映させるためにvagrantを再起動します。
[ホストマシン]
% vagrant reload
ここで注意点として、この設定で再起動させると既存の/etc/quagga配下のファイルを上書きして削除してしまいます。ただし今回はほぼ何も設定されていない初期ファイルしか存在していなかったので、このまま上書きさせ、新しくできた/etc/quaggaディレクトリにファイルを追加していきます。もし既存ファイルを復活させたい場合は、Vagrantfileで追加した部分を削除して、再度vagrat reloadすることで元のファイルを復活させることができます。
これでホストマシンの./quaggaディレクトリと仮想マシンの/etc/quaggaディレクトリが同期できた状態です。以降の章からホストマシンの./quaggaを使い慣れたテキストエディタで直接Quagga設定ファイルを編集することができます。
必要に応じて、仮想マシン上の/usr/share/doc/quagga-0.99.22.4/doc配下のsampleファイルも/vagrant配下にコピーしておくとホストマシン上から参照できるので便利です。
Quaggaを起動
まず最低限の機能で動作させてみます。
仮想マシンの/etc/quagga配下に下記の設定ファイルをおきます
# ls -la
total 20
-rw-r--r-- 1 root root  53 Aug 31 23:00 bgpd.conf
-rw-r--r-- 1 root root  53 Aug 31 23:00 zebra.conf
hostname router
password zebra
enable password zebra
hostname router
password zebra
enable password zebra
次に以下のコマンドで起動します。
# systemctl start zebra
# systemctl start bgpd
Quaggaのモジュールであるzebraとbgpdには、telnetでログインします。
CentOS7ではデフォルトでtelnetコマンドが使えないので、まずはTelnetをyumでインストールしてください。
[仮想マシン]
# sudo yum install telnet
Quaggaの各モジュールは下記のTCPポートを利用してアクセスすることができます。
zebra: 2601
ripd:  2602
ripng: 2603
ospfd: 2604
bgpd:  2605
ospf6d:2606
zebraにログインします。
[仮想マシン]
[vagrant@localhost ~]$ telnet localhost 2601

Trying ::1...
telnet: connect to address ::1: Connection refused
Trying 127.0.0.1...
Connected to localhost.
Escape character is '^]'.

Hello, this is Quagga (version 0.99.22.4).
Copyright 1996-2005 Kunihiro Ishiguro, et al.


User Access Verification

Password:
router>
次にbgpdにログインします。
[vagrant@localhost ~]$ telnet localhost 2605
Trying ::1...
telnet: connect to address ::1: Connection refused
Trying 127.0.0.1...
Connected to localhost.
Escape character is '^]'.

Hello, this is Quagga (version 0.99.22.4).
Copyright 1996-2005 Kunihiro Ishiguro, et al.


User Access Verification

Password:
bgpd> en
bgpd# sh run

Current configuration:
!
hostname bgpd
password zebra
!
line vty
!
end
これで最低限の設定でQuaggaを起動させることができました。
複数台のQuaggaを立ち上げる
次にQuaggaを3台立ち上げます。
Vagrantfileを下記のように編集します。ここではホスト名の設定と、ホストマシンの共有ディレクトリの作成機能を追加しています。
Vagrant.configure(2) do |config|
      config.vm.box = "centos70"

      config.vm.define :quagga01 do | quagga01 |
          quagga01.vm.hostname = 'quagga01'
          quagga01.vm.network "private_network", ip: "192.168.33.13"
          routeserver.vm.synced_folder "./quagga/quagga01 ", "/etc/quagga",
            create: true, owner: "root", group: "root"
      end
      config.vm.define :quagga02 do | quagga02 |
          quagga02.vm.hostname = 'quagga02'
          quagga02.vm.network "private_network", ip: "192.168.33.14"
          routeserver.vm.synced_folder "./quagga/quagga02", "/etc/quagga",
            create: true, owner: "root", group: "root"
      end
      config.vm.define :quagga03 do | quagga03 |
          quagga03.vm.hostname = 'quagga03'
          quagga03.vm.network "private_network", ip: "192.168.33.15"
          routeserver.vm.synced_folder "./quagga/quagga03", "/etc/quagga",
            create: true, owner: "root", group: "root"
      end
end
次に先ほど作った仮想マシンを削除した上で、新規に仮想マシン3台を立ち上げます。(実施完了まで10分程度かかります)
[ホストマシン]
% vagrant reload
正しく起動できると下記のように表示されます。
[ホストマシン]
% vagrant status
Current machine states:

quagga01                   running (virtualbox)
quagga02                   running (virtualbox)
quagga03                   running (virtualbox)

This environment represents multiple VMs. The VMs are all listed
above with their current state. For more information about a specific
VM, run `vagrant status NAME`.
ここから、一台ずつログインして、quaggaをyum installして、zebra,bgpdを起動いきます。
(あまりスマートなやり方ではないので、インストール手順をAnsibleなどで自動化した方が良いかもしれません。)
[ホストマシン]
% vagrant ssh quagga01
(ここからquagga02 や quagga03 についても同様の手順を実施します。)

[仮想マシン]
% sudo yum install -y quagga
仮想マシン上の/etc/quaggaディレクトリ(もしくは共有設定しているホストマシン上の./quagga/quagga_quagga01ディレクトリ ほか )に下記ファイルを設置します。
[仮想マシン]
# pwd
/etc/quagga

# ls -la
total 20
drwxr-xr-x   1 root root  170 Aug 31 22:54 .
drwxr-xr-x. 81 root root 8192 Aug 31 15:17 ..
-rw-r--r-- 1 root root  53 Aug 31 23:00 bgpd.conf
-rw-r--r-- 1 root root  32 Sep  1 02:41 vtysh.conf
-rw-r--r-- 1 root root  53 Aug 31 23:00 zebra.conf
hostname router
password zebra
enable password zebra
hostname router
password zebra
enable password zebra
service integrated-vtysh-config
なお、ここからはQuaggaを設定していくために、zebraとbgpdを統合的に設定できる仮想端末VTYSH機能を利用していくので、設定ファイルを追加しています。
次にzebra,bgpdを起動いきます。
[仮想マシン]
# SE-Linuxの許可
% sudo setsebool -P zebra_write_config 1

# zebra, bgpdの起動
% sudo systemctl start zebra
% sudo systemctl start bgpd

# zebra, bgpdの自動起動有効化
% sudo systemctl enable bgp
% sudo systemctl enable zebra
上記が完了したらQuaggaの仮想端末である、vtyshでログインします。vtyshを使うことでciscoライクなCLIで、zebraやbgpdなどを統合的に設定していくことができます。
[仮想マシン]
# vtysh

Hello, this is Quagga (version 0.99.22.4).
Copyright 1996-2005 Kunihiro Ishiguro, et al.

quagga01#
quagga01# sh run
Building configuration...

Current configuration:
!
hostname router
!
password zebra
enable password zebra
!
interface eth0
 ipv6 nd suppress-ra
!
interface eth1
 ipv6 nd suppress-ra
!
interface lo
!
line vty
!
end
なおvtyshで接続したした状態でコンフィグを保存すると、/etc/quaggaディレクトリに[Quagga.conf]というファイルが新規に作られます。
[quagga01]
quagga01# write  memory
Building Configuration...
Integrated configuration saved to /etc/quagga/Quagga.conf
[OK]
[仮想マシン]
# pwd
/etc/quagga

[root@quagga01 quagga]# ls -la
total 32
drwxr-xr-x   1 root root  238 Sep  1 02:48 .
drwxr-xr-x. 81 root root 8192 Aug 31 15:17 ..
-rw-------   1 root root  188 Sep  1 02:48 Quagga.conf
-rw-------   1 root root  188 Sep  1 02:48 Quagga.conf.sav
-rw-r--r--   1 root root   53 Aug 31 23:00 bgpd.conf
-rw-r--r--   1 root root   32 Sep  1 02:41 vtysh.conf
-rw-r--r--   1 root root   53 Aug 31 23:00 zebra.conf

Quagga.confは下記のようにルータ情報が保存されています。

# less Quagga.conf
hostname router
!
password zebra
enable password zebra
!
interface eth0
 ipv6 nd suppress-ra
!
interface eth1
 ip address 192.168.33.30/24
 ipv6 nd suppress-ra
!
interface lo
!
line vty
!
Quagga.conf (END)
ちなみに、仮想マシンを再起動した場合、再度vtyshを実行しても初期コンフィグ状態でしか立ち上がりません。その場合、保存されたQuagga.confを読み込むために以下の手順で起動します。
[仮想マシン]
[root@quagga01 quagga]# vtysh -b /etc/quagga/Quagga.conf

[root@quagga01 quagga]# vtysh
参考までに、初期状態ではインタフェースは下記のように設定されています。eth0には固定で10.0.2.15/24 (VirtualBoxのNAT機能でつくアドレス。複数のQuaggaで重複してしまうので注意が必要)、eth1にはvagrantfileで指定したprivate networkのIPアドレスが設定されています。
[仮想マシン]
[root@quagga01 quagga]# ip a
1: lo: <LOOPBACK,UP,LOWER_UP> mtu 65536 qdisc noqueue state UNKNOWN
    link/loopback 00:00:00:00:00:00 brd 00:00:00:00:00:00
    inet 127.0.0.1/8 scope host lo
       valid_lft forever preferred_lft forever
    inet6 ::1/128 scope host
       valid_lft forever preferred_lft forever
2: eth0: <BROADCAST,MULTICAST,UP,LOWER_UP> mtu 1500 qdisc pfifo_fast state UP qlen 1000
    link/ether 08:00:27:6b:57:88 brd ff:ff:ff:ff:ff:ff
    inet 10.0.2.15/24 brd 10.0.2.255 scope global dynamic eth0
       valid_lft 78743sec preferred_lft 78743sec
    inet6 fe80::a00:27ff:fe6b:5788/64 scope link
       valid_lft forever preferred_lft forever
3: eth1: <BROADCAST,MULTICAST,UP,LOWER_UP> mtu 1500 qdisc pfifo_fast state UP qlen 1000
    link/ether 08:00:27:6f:9c:bc brd ff:ff:ff:ff:ff:ff
    inet 192.168.33.30/24 brd 192.168.33.255 scope global eth1
       valid_lft forever preferred_lft forever
    inet6 fe80::a00:27ff:fe6f:9cbc/64 scope link
       valid_lft forever preferred_lft forever
[quagga01]
quagga01# show  interface
Interface eth0 is up, line protocol detection is disabled
  index 2 metric 1 mtu 1500
  flags: <UP,BROADCAST,RUNNING,MULTICAST>
  HWaddr: 08:00:27:6b:57:88
  inet 10.0.2.15/24 broadcast 10.0.2.255
  inet6 fe80::a00:27ff:fe6b:5788/64
Interface eth1 is up, line protocol detection is disabled
  index 3 metric 1 mtu 1500
  flags: <UP,BROADCAST,RUNNING,MULTICAST>
  HWaddr: 08:00:27:6f:9c:bc
  inet 192.168.33.30/24 broadcast 192.168.33.255
  inet6 fe80::a00:27ff:fe6f:9cbc/64
Interface lo is up, line protocol detection is disabled
  index 1 metric 1 mtu 65536
  flags: <UP,LOOPBACK,RUNNING>
  inet 127.0.0.1/8
  inet6 ::1/128
複数台のQaggaでeBGP接続を設定する
せっかくQuaggaを複数台作れるようになったので、ここでは立ち上げた3つのQuaggaを使って、Interface設定およびeBGP設定をしていきます。
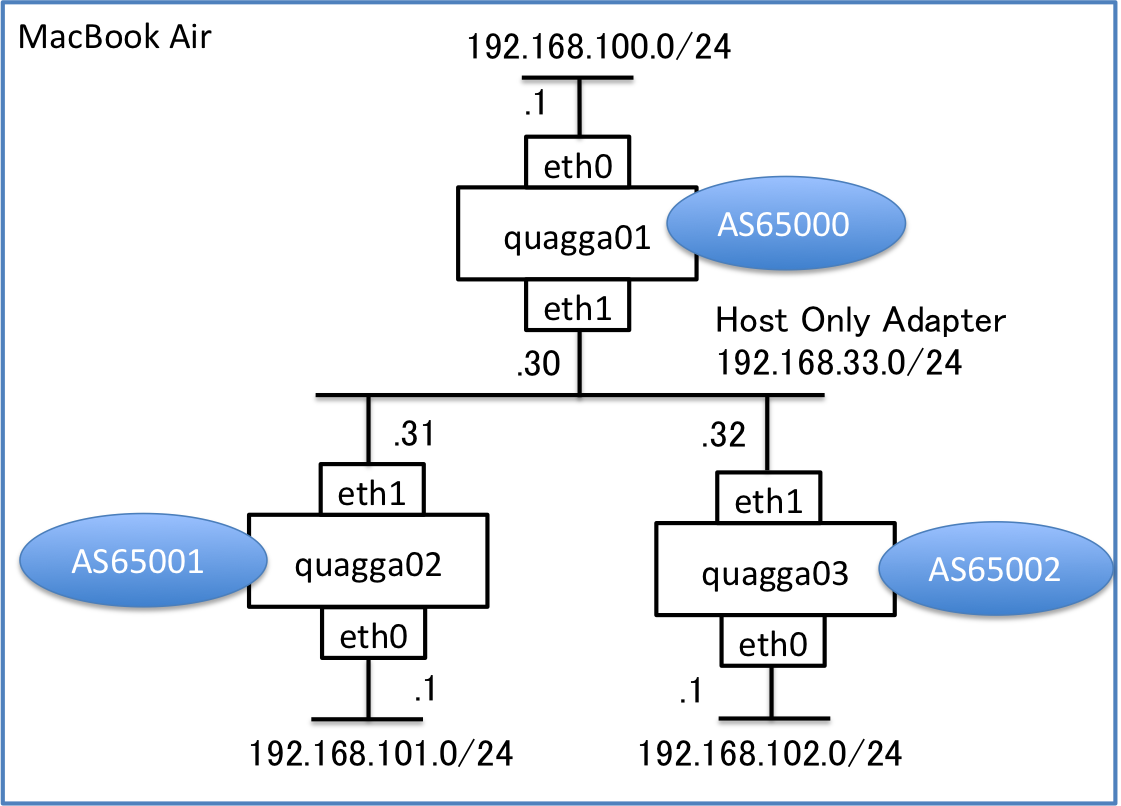
下記のようなネットワーク構成でやってみます。
ここではvtyshを使ってciscoライクに設定していきます。
仮想マシンのfirewallをoffにする
まずBGP設定の前に、仮想マシンのTCP 179ポートの通信を許可する必要があります。ここではCentOS7のfirewalld(iptables相当)そのものをオフにしています。
[仮想マシン]
# systemctl stop firewalld

# systemctl status firewalld

firewalld.service - firewalld - dynamic firewall daemon
   Loaded: loaded (/usr/lib/systemd/system/firewalld.service; enabled)
   Active: inactive (dead) since Tue 2015-09-01 07:03:35 UTC; 4min 2s ago
  Process: 482 ExecStart=/usr/sbin/firewalld --nofork --nopid $FIREWALLD_ARGS (code=exited, status=0/SUCCESS)
 Main PID: 482 (code=exited, status=0/SUCCESS)
(省略)
インタフェース&BGP設定を投入する
次にQuaggaたちに設定を投入していきます。
こちらはvtyshで設定したので、設定結果だけを表示しています。
[quagga01]
quagga01# show  running-config
Building configuration...

Current configuration:
!
hostname router
!
service integrated-vtysh-config
!
password zebra
enable password zebra
!
interface eth0
 ip address 192.168.100.1/24
 ipv6 nd suppress-ra
!
interface eth1
 ip address 192.168.33.30/24
 ipv6 nd suppress-ra
!
interface lo
 ip address 10.10.10.1/32
!
router bgp 65000
 bgp router-id 10.10.10.1
 network 192.168.100.0/24
 neighbor 192.168.33.31 remote-as 65001
 neighbor 192.168.33.31 next-hop-self
 neighbor 192.168.33.32 remote-as 65002
 neighbor 192.168.33.32 next-hop-self
!
line vty
!
end
[quagga02]
quagga02# show running-config
Building configuration...

Current configuration:
!
hostname router
!
service integrated-vtysh-config
!
password zebra
enable password zebra
!
interface eth0
 ip address 192.168.101.1/24
 ipv6 nd suppress-ra
!
interface eth1
 ip address 192.168.33.31/24
 ipv6 nd suppress-ra
!
interface lo
 ip address 10.10.10.2/32
!
router bgp 65001
 bgp router-id 10.10.10.2
 network 192.168.101.0/24
 neighbor 192.168.33.30 remote-as 65000
 neighbor 192.168.33.30 next-hop-self
!
line vty
!
end
[quagga03]
quagga03# show running-config
Building configuration...

Current configuration:
!
hostname localhost.localdomain
hostname router
!
service integrated-vtysh-config
!
password zebra
enable password zebra
!
interface eth0
 ip address 192.168.102.1/24
 ipv6 nd suppress-ra
!
interface eth1
 ip address 192.168.33.32/24
 ipv6 nd suppress-ra
!
interface lo
!
interface lo0
 ip address 10.10.10.3/32
 ipv6 nd suppress-ra
!
router bgp 65002
 bgp router-id 10.10.10.3
 network 192.168.102.0/24
 neighbor 192.168.33.30 remote-as 65000
 neighbor 192.168.33.30 next-hop-self
!
line vty
!
end
BGP接続確認
それぞれのQuaggaに対して正しくBGP sessionが確立し、経路を交換できていることが確認できます。
[quagga01]
quagga01# sh ip bgp summary
BGP router identifier 10.10.10.1, local AS number 65000
RIB entries 5, using 560 bytes of memory
Peers 2, using 9120 bytes of memory

Neighbor        V    AS MsgRcvd MsgSent   TblVer  InQ OutQ Up/Down
 State/PfxRcd
192.168.33.31   4 65001     104     110        0    0    0 00:25:57
        1
192.168.33.32   4 65002      17      21        0    0    0 00:14:25
        1

Total number of neighbors 2

quagga01# sh ip bgp
BGP table version is 0, local router ID is 10.10.10.1
Status codes: s suppressed, d damped, h history, * valid, > best, i
 - internal,
              r RIB-failure, S Stale, R Removed
Origin codes: i - IGP, e - EGP, ? - incomplete

   Network          Next Hop            Metric LocPrf Weight Path
*> 192.168.100.0    0.0.0.0                  0         32768 i
*> 192.168.101.0    192.168.33.31            0             0 65001
i
*> 192.168.102.0    192.168.33.32            0             0 65002
i

Total number of prefixes 3
(おまけ その1) Quaggaをホストマシンの物理nicと対応させる
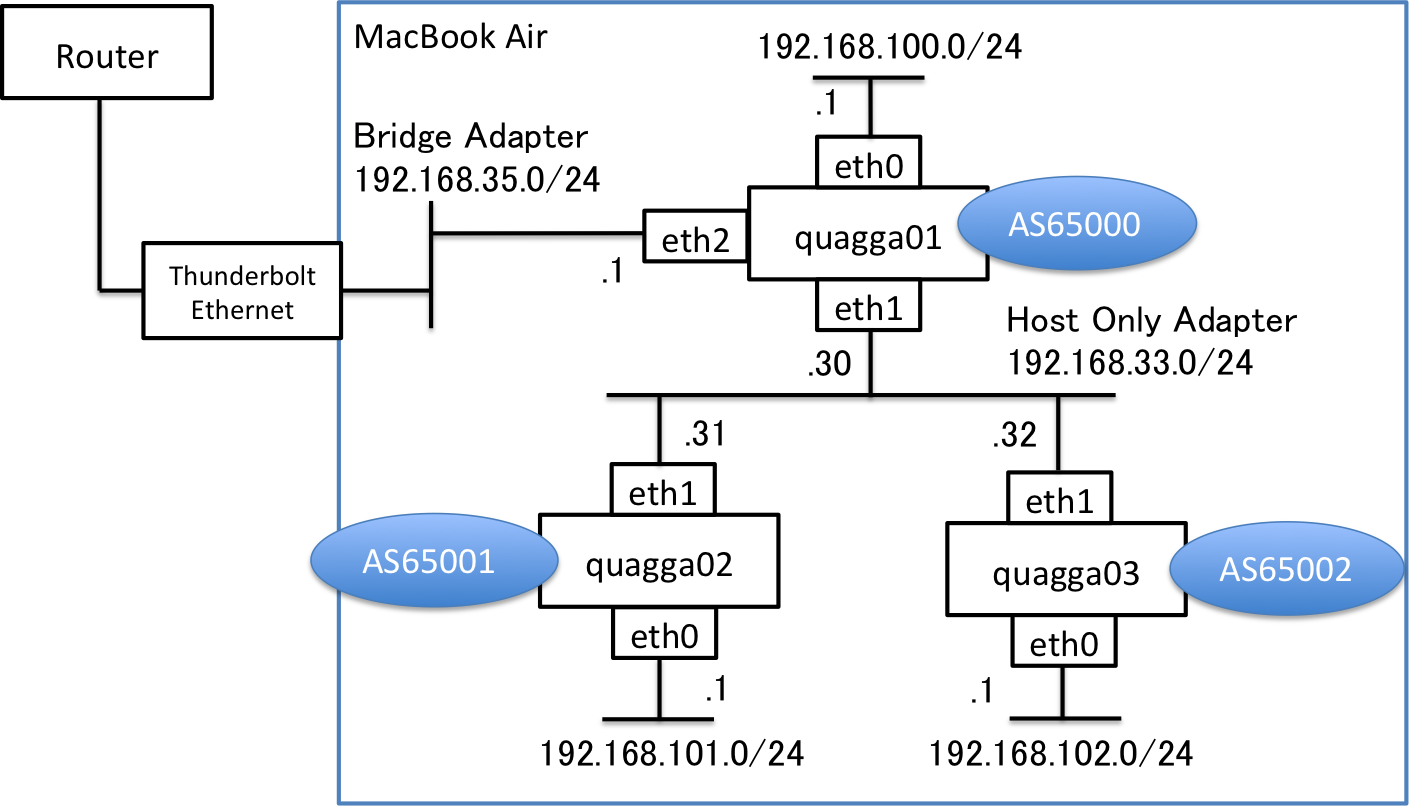
仮想マシン上のQuaggaとノートPCの物理NICをひも付けて、実機ルータと通信したいというケースは少なくないと思います。
いろいろ試してみましたが、うまく行ったのは下記の方法でした。
Vagrantfileにpublic-networkを追加
  Vagrant.configure(2) do |config|
      config.vm.box = "centos70"

      config.vm.define :quagga01 do | quagga01 |
          quagga01.vm.hostname = 'quagga01'
          quagga01.vm.network "private_network", ip: "192.168.33.30"
          quagga01.vm.network "public_network", ip: "192.168.35.1"
          quagga01.vm.network "public_network"
          quagga01.vm.synced_folder "./quagga/quagga_quagga01", "/etc/quagga",
            create: true, owner: "root", group: "root"
      end
一度仮想マシンをdestroyして作り直します。
[ホストマシン]
% vagrant up quagga01
Bringing machine 'routeserver' up with 'virtualbox' provider...
==> routeserver: Clearing any previously set forwarded ports...
==> routeserver: Clearing any previously set network interfaces...
==> routeserver: Available bridged network interfaces:
1) en0: Wi-Fi (AirPort)
2) en1: Thunderbolt 1
3) bridge0
4) p2p0
5) awdl0
6) vmnet1
7) vmnet8

(以下省略)
上記のように紐付けしたい物理nicを選択肢が表示されるので、使いたい物理nicを選択することが外部との通信が可能になります。。
上記に加えてQuaggaのBGP設定を正しく入れると下記のようなネットワーク構成を実現することができます。
(おまけ その2) BGP経路広告でハマった話
私の環境だけかもしれませんが、始め以下のように設定していて、他ASのQuaggaに対してうまく経路が広告できていませんでした。
router bgp 65000
 network 192.168.100.0/24
そこでcisco風にこんな感じで書いてみると正しく経路広告ができました。
router bgp 65000
 address-family  ipv4 unicast
   network 192.168.100.0/24
ただし、show running-configすると表示上はaddress-familyがない状態(つまり前述のコンフィグと同じ状態)が表示されてしまいます。もしかするとQuagga特有の問題かもしれません。