Goのgoroutine, channelがわからない
マルチスレッドってなんやねん!
go ステートメントってなんやねん!
<- なんやねんこれ!意味不明
これをやりましょう → Go by Example
やっていれば、なんとなくわかってくる。かも
以下は Go by Exampleを少し変更を加えて実行した例です。
Goroutineとは
Tour of go によると
goroutine (ゴルーチン)は、Goのランタイムに管理される軽量なスレッドです。
まず、スレッドがちゃんと理解してない
スレッド:一連のプログラムの流れ
シングルスレッド:1つのスレッドだけからなるプログラム
マルチスレッド:1つのプログラムで複数のスレッドを同時に実行する
マルチスレッド最強やんけ!ずっとこれ使えば小早川セナじゃん!
→ 実際には、しっかり理解して使わないとパフォーマンスが低下したり、デッドロックが生じる可能性がある。
Goroutinesを理解しよう
goroutineは、軽量のスレッドである。
goステートメントで関数を指定することで、並行実行される。 ※並列実行ではない。
ex) 関数fが並行実行される。
func f(value string) {
	for i := 0; i < 3; i++ {
		fmt.Println(value)
		time.Sleep(3 * time.Second)
	}
}

func main() {
	go f("goroutineを使って実行")
	f("普通に実行")
	fmt.Println("done")
}
こんなふうに出力が混ざった状態になる。
普通に実行
goroutineを使って実行
goroutineを使って実行
普通に実行
普通に実行
goroutineを使って実行
done
試したい方どうぞ → The Go Playground
Channelsを理解しよう
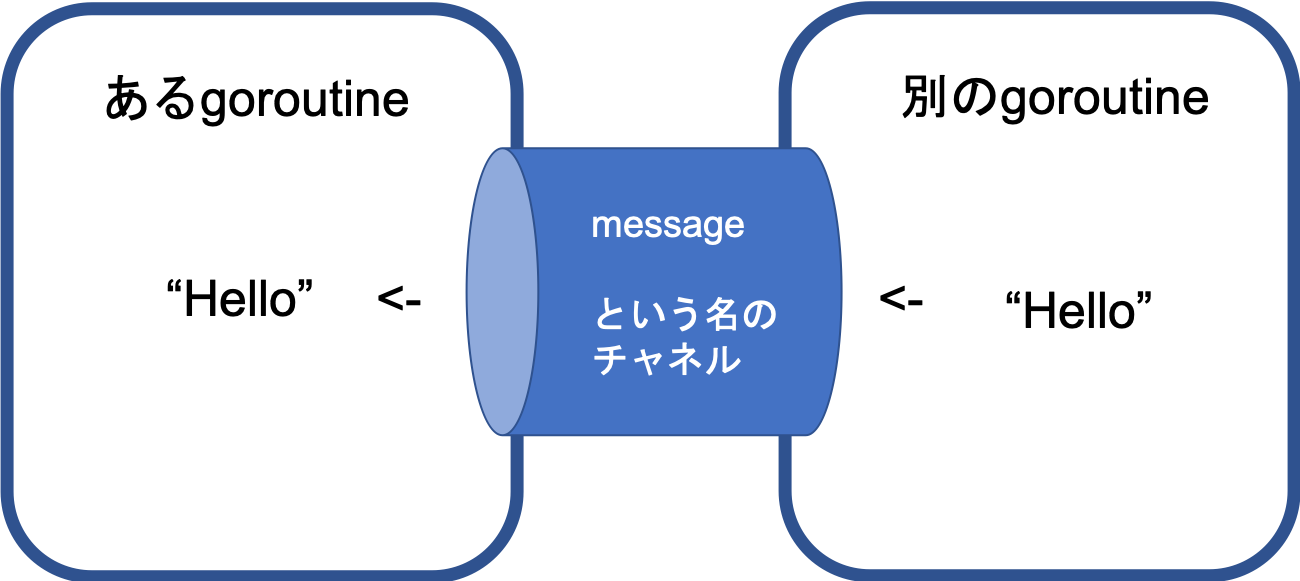
チャネルは、並行実行されるgoroutine間を接続するパイプ(トンネル)のイメージ。つまり、並行実行している関数から値を受信する。(あるgoroutineから別のgoroutineへ値を渡す。)
make(chan 型)で新しいチャネルを作成できる
channel <- 構文で、チャネルへ値を 送信 します。
<-channel 構文で、チャネルから値を 受信 します
つまり、上の例では、messageというパイプを使って、無名関数からmsgへ"ping"を渡している。
"ping"という値がmessageトンネルを通ってmsgへ届く
Goはデフォルトで、送る側と受ける側が準備できるまで、 送受信はブロックされる。
このため、同期処理的なものを書かなくても、"ping"がmsgに渡されるまで、待ってくれる
func main() {
  messages := make(chan string)
  go func() { messages <- "Hello" }()

  msg := <-messages
  fmt.Println(msg)
}
出力
Hello
チャネルはバッファとして使える。
- バッファ: 一時的に記憶する場所
バッファが詰まるとチャネルへの送信をブロックする
バッファが空のときは、チャネルの受信をブロックする
ex)
package main

import "fmt"

func main() {
	ch := make(chan int, 2)
	ch <- 1
	ch <- 2

	fmt.Println(<-ch)
	fmt.Println(<-ch)
}
出力
1
2
デッドロックが起こるように書き換え
  ch <- 1
  ch <- 2
  ch <- 3

  fmt.Println(<-ch)
  fmt.Println(<-ch)
  fmt.Println(<-ch)
fatal error: all goroutines are asleep - deadlock!
Buffering
バッファリングされたチャネルは、対応する受信側がいなくても決められた量までなら 値を送信することができる
make(chan string, 2)によって2つまでバッファリングするチャネルを作っている。
func main() {
  messages := make(chan string, 2)

  messages <- "Hello"
  messages <- "World"

  fmt.Println(<-messages)
  fmt.Println(<-messages)
}
出力
Hello
World
Directions
チャネルを関数の引数として使うと送信か受信のどちらを意図しているか指定(わかりやすく)することができる。

func ping(pings chan<- string, msg string) {
	pings <- msg
}

// この `pong` 関数は、1 つ目のチャネルを受信専用で (`pings`)、
// 2 つ目のチャネルを送信専用で (`pongs`) 受け取ります。
func pong(pings <-chan string, pongs chan<- string) {
	msg := <-pings
	pongs <- msg
}

func main() {
	pings := make(chan string, 1)
	pongs := make(chan string, 1)
	ping(pings, "Hello")
	pong(pings, pongs)
	fmt.Println(<-pongs)
}
出力
Hello
Select
selectを利用することで、複数のチャネル操作を待つことができる。
受信したものから、画面に表示される。
2つのチャンネルに対して selectをする例
func main() {

	c1 := make(chan string)
	c2 := make(chan string)

	go func() {
		time.Sleep(2 * time.Second)
		c2 <- "two"
	}()
	go func() {
		time.Sleep(1 * time.Second)
		c1 <- "one"
	}()

	for i := 0; i < 2; i++ {
		select {
		case msg1 := <-c1:
			fmt.Println("received", msg1)
		case msg2 := <-c2:
			fmt.Println("received", msg2)
		}
	}
}
出力
received one
received two
Timeouts
selectは最初に受信したものを処理するため、<-Time.Afterのほうが処理がはやければ、そちらの処理が走ります。
selectタイムアウトパターンを使用するためにはチャンネル経由でやりとりする必要がある。
func main() {
  c1 := make(chan string, 1)
	go func() {
		time.Sleep(2 * time.Second)
		c1 <- "result 1"
	}()

	select {
	case res := <-c1:
		fmt.Println(res)
	case <-time.After(1 * time.Second):
		fmt.Println("timeout 1")
	}
}
出力
timeout 1
Closing Channels
jobsチャネルをcloseします。
closeするとmoreの値がfalseになり、doneがtrueになります。
チャネルをクローズすることは、もう値を送信しないことを意味し、チャネルの受け手に完了を伝えるのに便利です。
func main() {
	jobs := make(chan int, 5)
	done := make(chan bool)

	go func() {
		for {
			j, more := <-jobs
			if more {
				fmt.Println("received job", j)
			} else {
				fmt.Println("received all jobs")
				done <- true
				return
			}
		}
	}()

	for j := 1; j <= 5; j++ {
		jobs <- j
		fmt.Println("sent job", j)
	}
	close(jobs)
	fmt.Println("sent all jobs")

	<-done
}
出力
sent job 1
sent job 2
received job 1
received job 2
sent job 3
sent job 4
sent job 5
sent all jobs
received job 3
received job 4
received job 5
received all jobs
Timers
将来のある時点や一定間隔で繰り返し、ある部分を実行したい際に利用する
タイマーは待ち時間を指定すると、その時間にチャネルが処理を実施します。
例では、5秒経過すると一定の処理を実施します。
func main() {
	start := time.Now()
	timer1 := time.NewTimer(5 * time.Second)
	<-timer1.C
	fmt.Println("It's time!")
	end := time.Now();
	fmt.Printf("%f秒\n",(end.Sub(start)).Seconds())
}
出力
It's time!
5.001331秒
Ticker
ティッカーは一定間隔で何かを実行した際に使用します。
ティッカーは、ticker.Stop()により停止するとそのチャネルから値を受信しなくなる
func main() {
	ticker := time.NewTicker(500 * time.Millisecond)
	go func() {
		for t := range ticker.C {
			fmt.Println("Tick at", t)
		}
	}()

	time.Sleep(1600 * time.Millisecond)
	ticker.Stop()
	fmt.Println("Ticker stopped")
}
出力
Tick at 2019-04-11 15:08:11.070217 +0900 JST m=+0.503669133
Tick at 2019-04-11 15:08:11.571622 +0900 JST m=+1.005080664
Tick at 2019-04-11 15:08:12.072034 +0900 JST m=+1.505498210
Ticker stopped
Worker Pools
workerは3つ分並列実行されます。
5つのジョブが送信されるため5秒分のタスクを実行します。
しかし、worker関数のtime.Sleepで5秒分のタスクを実行する似にかかわらず、2秒しかかかりません。
これは、3つのworkerが並列実行しているためです。
func worker(id int, jobs <-chan int, results chan<- int) {
	for j := range jobs {
		fmt.Println("worker", id, "started  job", j)
		time.Sleep(time.Second)
		fmt.Println("worker", id, "finished job", j)
		results <- j * 2
	}
}

func main() {
	start := time.Now()

	jobs := make(chan int, 100)
	results := make(chan int, 100)

	for w := 1; w <= 3; w++ {
		go worker(w, jobs, results)
	}

	for j := 1; j <= 5; j++ {
		jobs <- j
	}
	close(jobs)

	for a := 1; a <= 5; a++ {
		<-results
	}

	end := time.Now();
	fmt.Printf("%f秒\n",(end.Sub(start)).Seconds())
}
出力
worker 3 started  job 1
worker 1 started  job 2
worker 2 started  job 3
worker 1 finished job 2
worker 3 finished job 1
worker 3 started  job 4
worker 1 started  job 5
worker 2 finished job 3
worker 3 finished job 4
worker 1 finished job 5
2.006739秒
Worker Poolまで試せば、並列処理の速さがわかるはず!5秒の処理が2秒に!!
図とかのイメージはあっているのか...?
