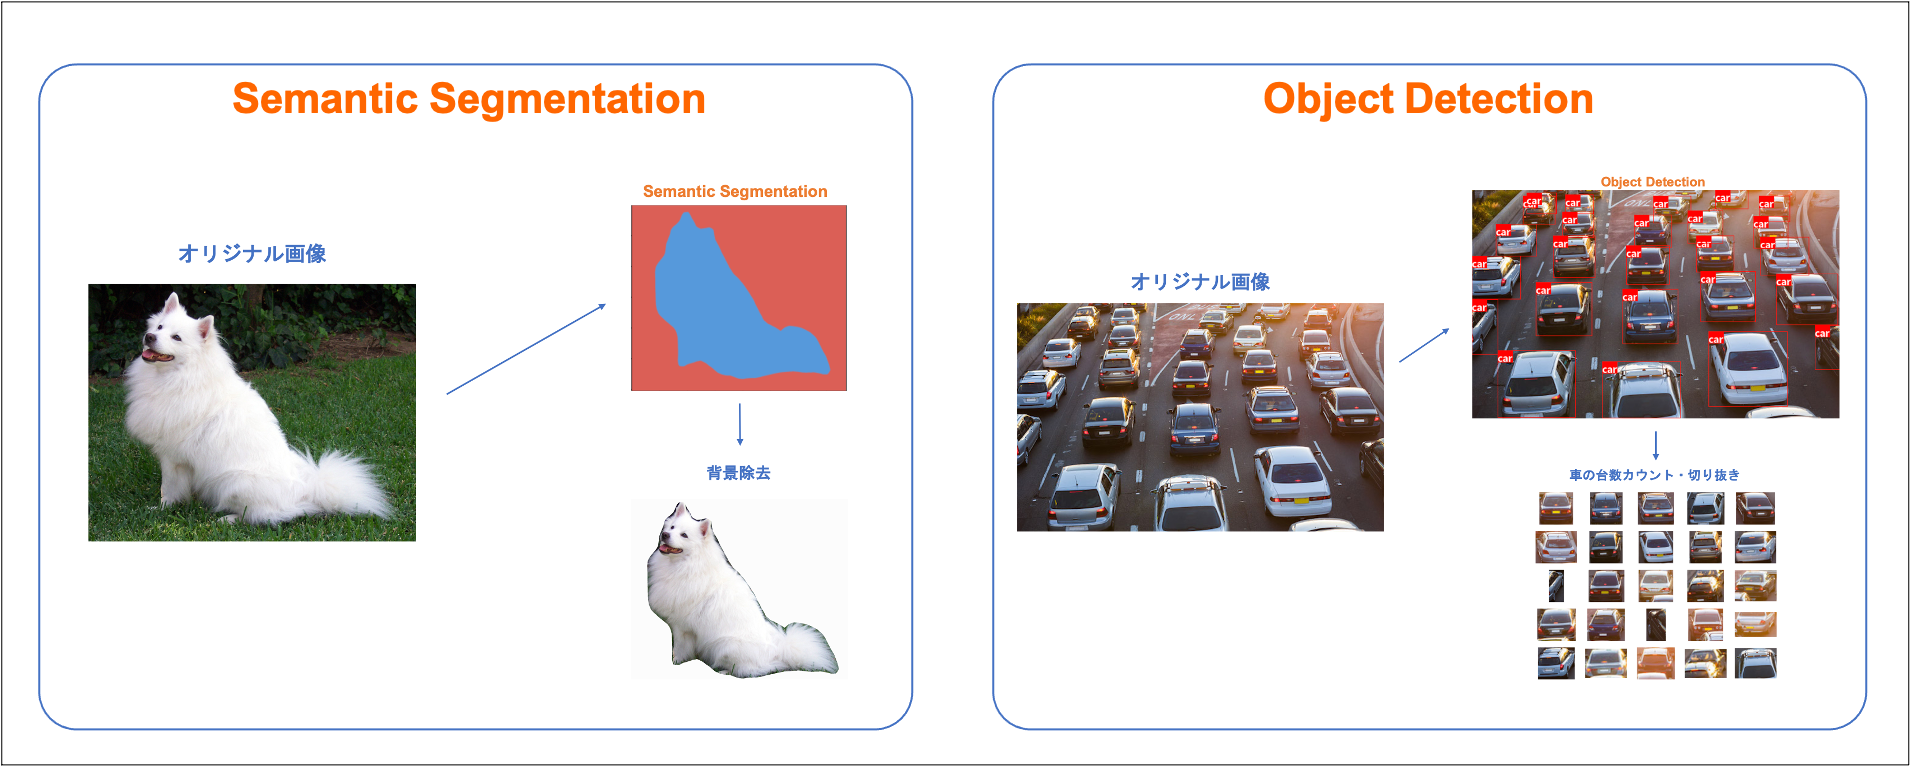
以下のような内容を実装します。
はじめに
本記事は機械学習・ディープラーニングを学び始めた方向けに作成しています。
本記事に登場するコードの理解が難しいと感じるかもしれませんが、「こんなことができるのか」と今後の学びのきっかけやモチベーション、実用化への第 1 歩になれば幸いです。
車の 自動運転技術 や 航空宇宙、医療研究 や 産業、エレクトロニクス など様々な分野への実用化が進んでいるディープラーニング技術ですが、コンピュータビジョン と呼ばれる人間の視覚的な世界の再現・解釈を目的とした領域があります。
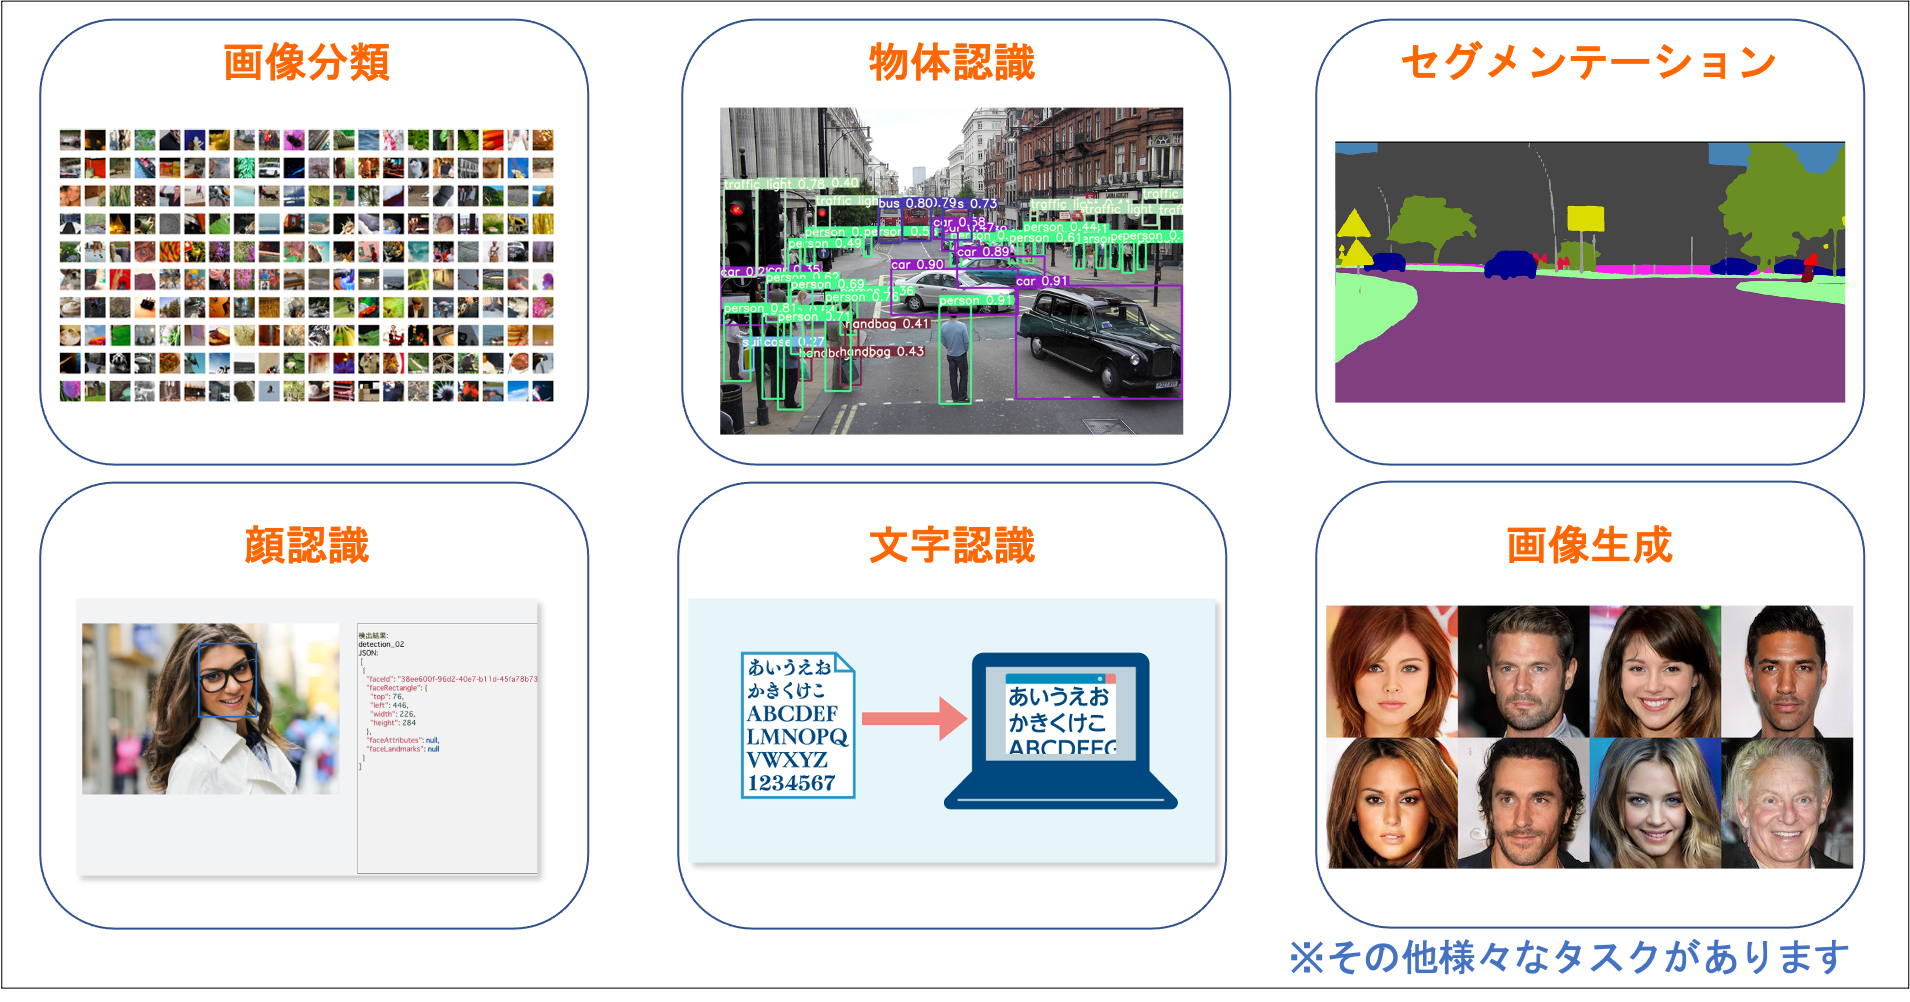
この他にも
- 超解像(Super Resolution)
- 画風変換(Style Transfer)
- 自動着色(Colorization)
- 姿勢推定(Pose Estimation)
といった様々なタスクがあります。
※ 画像内のセグメンテーションは、厳密には「インスタンスセグメンテーション」というタスクに分類されます。
本記事では、ディープラーニングを用いた セグメンテーション、物体認識(物体検出) について簡単な紹介をします。
以下、本記事では
- セマンティックセグメンテーション → Semantic Segmentation
- 物体認識(物体検出) → Object Detection
- 画像内の対象物 → オブジェクト
と表現します。
本記事で扱うこと
- 学習済みモデルを用いた Semantic Segmentation とその活用例
- 学習済みモデルを用いた Object Detection とその活用例
本記事で扱わないこと
- Semantic Segmentation / Object Detection 以外の活用例の紹介
- 各タスクの詳しい理論の解説
- モデルの学習方法やアーキテクチャ(構造)の解説
※ サンプルコードも載せますが、コメントアウトや簡単な解説のみにします。
各コードで何の処理を行っているのか把握できるようにディープラーニングフレームワークには PyTorch を使用しています。
目次
- Semantic Segmentation を活用した画像の背景除去
- Object Detection を活用したオブジェクト数のカウントとオブジェクトの切り抜き
環境
※ Google Colaboratory でも実装できます。
import numpy as np
import matplotlib.pyplot as plt
from glob import glob
from PIL import Image
import torch
import torchvision
from torchvision import models, transforms
print(f'torch_version:{torch.__version__}')
print(f'torchvision_version:{torchvision.__version__}')

>>>
torch_version:1.7.0
torchvision_version:0.8.1
1. Semantic Segmentation を活用した画像の背景除去
Semantic Segmentation はひとことで説明すると 画像の 1 ピクセルごとに分類を行う タスクです。
※ ピクセル (pixel) -> 画素
つまり、出力結果から 1 ピクセルごとに様々な活用ができます。オブジェクト以外のピクセルを真っ白(輝度 255) にすると画像から背景除去ができそうです。
サンプルデータ
こちらの画像に Semantic Segmentation でオブジェクトを抽出し、背景除去を実装します。
※ 今回使用している画像はあらかじめ (224, 224) のサイズです。
実装例
# 画像データパスの取得
image_paths = sorted(glob('dog_cat/*'))

# 前処理の定義
preprocess = transforms.Compose([
    transforms.ToTensor(),
    transforms.Normalize(mean=[0.485, 0.456, 0.406], std=[0.229, 0.224, 0.225])
])

# 使用可能なデバイスの指定
device = 'cuda' if torch.cuda.is_available() else 'cpu'
# pretrained=True で学習済みのパラメータを使用 / eval() で推論モード / 指定のデバイスへ転送
model = models.segmentation.deeplabv3_resnet101(pretrained=True).eval().to(device)

# 背景除去用関数
def remove_background(image, label):
    origin = np.array(image) # マスター画像
    img = preprocess(image) # 前処理
    pred = model(img.unsqueeze(0).to(device))['out'] # deeplabv3 で推論
    out = torch.argmax(pred[0], dim=0).cpu().detach().numpy()
    mask = np.stack([out, out, out], 2) # マスク画像作成
    res = np.where(mask==label, origin, 255) # 背景を 255 に(背景除去)
    return res

# 可視化
plt.figure(figsize=(20, 4))
for i, image_path in enumerate(image_paths):
    number = int(image_path.split('/')[-1].replace('.jpg', ''))
    image = Image.open(image_path)

    if number < 10: # 猫の画像に対しての処理
        result_cat = remove_background(image, label=8)
        plt.subplot(2, 10, i+1)
        plt.imshow(result_cat)
        plt.axis('off')

    else: # 犬の画像に対しての処理
        result_dog = remove_background(image, label=12)
        plt.subplot(2, 10, i+1)
        plt.imshow(result_dog)
        plt.axis('off')
今回使用しているモデルは TORCHVISION.MODELS に用意されている torchvision.models.segmentation.deeplabv3_resnet101 です。解説論文
自作した remove_background 関数の引数 label は以下に基づいています。
['__background__', 'aeroplane', 'bicycle', 'bird', 'boat', 'bottle', 'bus',
 'car', 'cat', 'chair', 'cow', 'diningtable', 'dog', 'horse', 'motorbike',
 'person', 'pottedplant', 'sheep', 'sofa', 'train', 'tvmonitor']
猫ならば 8 番、犬ならば 12 番となっています。
classes に存在しないオブジェクトを抽出したい場合にはデータを用意して学習済みモデルを構築する必要があります。
2. Object Detection を活用したオブジェクト数のカウントとオブジェクトの切り抜き
Object Detection はひとことで説明すると 画像内に存在するオブジェクトのクラス分類と位置座標の特定を行う タスクです。
※ クラス -> カテゴリ
つまり、分類問題と回帰問題を同時に行っています。
オブジェクトの位置がわかるだけでなく、画像内にいくつのオブジェクトが存在するかカウントすることも可能です。
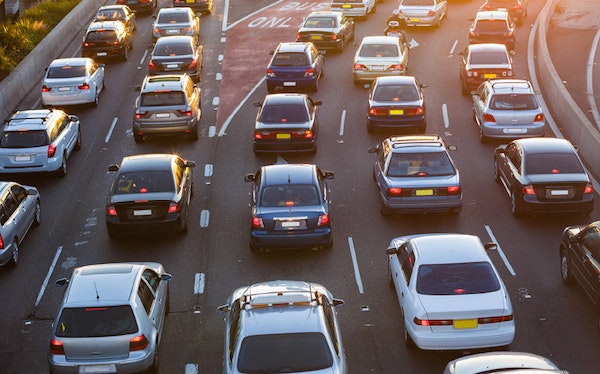
例えば以下の画像データから車の台数をカウントできれば、道路の混雑状況を把握できるのではないでしょうか。
サンプルデータ
以下の画像データ 1 枚を使用します。
動画(リアルタイムデータ)に対して Object Detection を活用するケースもあります。
動画を扱う場合でも、一般的には動画の 1 フレームごとの画像に対して処理を行うため、まずは画像データに対する活用方法から学ぶのがおすすめです。
実装例
from PIL import ImageDraw, ImageFont
%%capture
!if [ ! -d fonts ]; then mkdir fonts && cd fonts && wget https://noto-website-2.storage.googleapis.com/pkgs/NotoSansCJKjp-hinted.zip && unzip NotoSansCJKjp-hinted.zip && cd .. ;fi
img = Image.open('car.jpg') # 画像の読み込み
transform = transforms.ToTensor() # 前処理定義
x = transform(img) # 前処理

# モデルの用意
device = 'cuda' if torch.cuda.is_available() else 'cpu'
model = torchvision.models.detection.retinanet_resnet50_fpn(pretrained=True).eval().to(device)

# 推論
y = model(x.unsqueeze(0))[0]

# ラベル用意
COCO_INSTANCE_CATEGORY_NAMES = [
    '__background__', 'person', 'bicycle', 'car', 'motorcycle', 'airplane', 'bus',
    'train', 'truck', 'boat', 'traffic light', 'fire hydrant', 'N/A', 'stop sign',
    'parking meter', 'bench', 'bird', 'cat', 'dog', 'horse', 'sheep', 'cow',
    'elephant', 'bear', 'zebra', 'giraffe', 'N/A', 'backpack', 'umbrella', 'N/A', 'N/A',
    'handbag', 'tie', 'suitcase', 'frisbee', 'skis', 'snowboard', 'sports ball',
    'kite', 'baseball bat', 'baseball glove', 'skateboard', 'surfboard', 'tennis racket',
    'bottle', 'N/A', 'wine glass', 'cup', 'fork', 'knife', 'spoon', 'bowl',
    'banana', 'apple', 'sandwich', 'orange', 'broccoli', 'carrot', 'hot dog', 'pizza',
    'donut', 'cake', 'chair', 'couch', 'potted plant', 'bed', 'N/A', 'dining table',
    'N/A', 'N/A', 'toilet', 'N/A', 'tv', 'laptop', 'mouse', 'remote', 'keyboard', 'cell phone',
    'microwave', 'oven', 'toaster', 'sink', 'refrigerator', 'N/A', 'book',
    'clock', 'vase', 'scissors', 'teddy bear', 'hair drier', 'toothbrush'
]

# 結果可視化用関数
# input -> torch の tensor 型の image
# output -> モデルの推論結果
# threshold -> モデルの出力結果(信頼度スコア)の閾値
def visualize_results(input, output, threshold):
    image= input.permute(1, 2, 0).numpy() # 配列変更 (C, H, W) -> (H, W, C)
    image = Image.fromarray((image*255).astype(np.uint8)) # バウンディングボックス、クラス名を書き込むための image

    boxes = output['boxes'].cpu().detach().numpy() # バウンディングボックスの取得
    labels = output['labels'].cpu().detach().numpy() # ラベル番号の取得

    if 'scores' in output.keys():
        scores = output['scores'].cpu().detach().numpy() # 信頼度スコアの取得
        boxes = boxes[scores > threshold] # 閾値以上のバウンディングボックスの選択
        labels = labels[scores > threshold] # 閾値以上のラベル選択

    draw = ImageDraw.Draw(image) # image に描画することを宣言
    font = ImageFont.truetype('fonts/NotoSansCJKjp-Bold.otf', 16) # フォント選択
    for box, label in zip(boxes, labels):
        # box
        draw.rectangle(box, outline='red') # バウンディングボックスの描画
        # label
        text = COCO_INSTANCE_CATEGORY_NAMES[label] # ラベルに対応するクラス名の取得
        w, h = font.getsize(text) # クラス名のサイズ取得
        draw.rectangle([box[0], box[1], box[0]+w, box[1]+h], fill='red') # クラス名の周囲に塗りつぶしボックス描画
        draw.text((box[0], box[1]), text, font=font, fill='white') # クラス名の描画

    return image

# 関数の実行
visualize_results(x, y, 0.5)
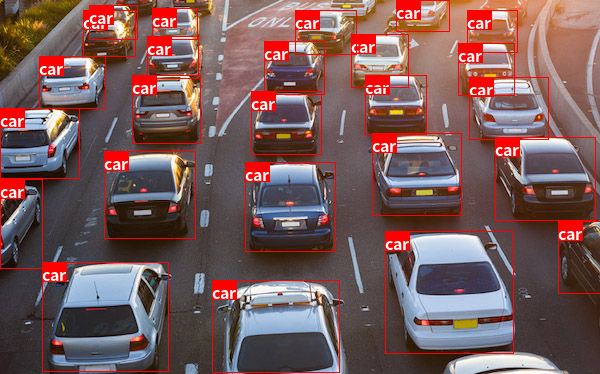
うまく検出できています。
今回使用したモデルは TORCHVISION.MODELS に用意されている RetinaNet という学習済みモデルです。
コードについてはコメントアウトによる解説とします。
image = Image.open(path)
threshold = 0.5

boxes = y['boxes'].cpu().detach().numpy()
labels = y['labels'].cpu().detach().numpy()
scores = y['scores'].cpu().detach().numpy()

boxes = boxes[scores > threshold]
labels = labels[scores > threshold]

objects = []

count = 0
for box, label in zip(boxes, labels):
    if label == 3: # 車 (car) に対応するラベルは 3
        count += 1
        img = image.crop(box)
        objects.append(np.array(img))

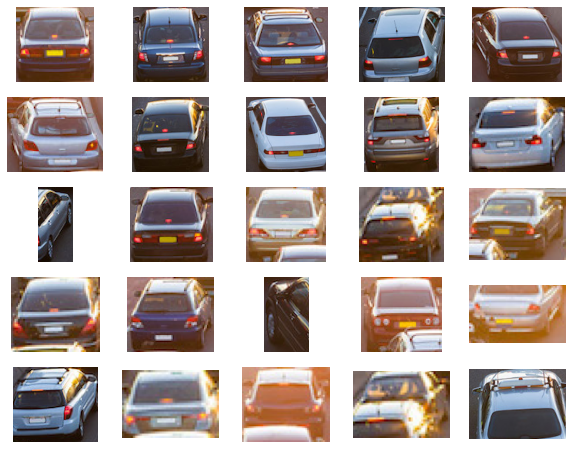
print(f'車の台数 {count}')

plt.figure(figsize=(10, 8))
for n, obj in enumerate(objects):
    plt.subplot(5, 5, n+1)
    plt.imshow(obj)
    plt.axis('off')

>>> 車の台数 25
※ 今回の実装では切り抜いたオブジェクトと実際の画像の位置は一致していません。
オブジェクト数のカウントと対象位置の切り抜きができました。
切り抜いた画像に対して分類モデルを使用し、車種判別も追加できそうです。
この画角内に 25 台の車があることがわかります。渋滞していると判断できるのではないでしょうか。
たとえ、動画によるリアルタイムデータでなくても、定期的に道路状況を撮影し推論することで混雑状況の把握ができそうです。
このプログラムを駐車場に設置すれば「満車」or「空車」を把握できるでしょう。
※ ある程度高い位置から車を撮影した画像では、モデルはオブジェクトを車 (car) ではなく、携帯電話 (cell phone) と判定することが多かったです。
駐車場には発券機もありますし、そちらを使用して情報を取得するルールベースのほうが楽でしょう。これが 「そもそも AI で解決すべき問題か」 という議論のポイントですね。
まとめ
今回はディープラーニングの活用(画像データ)として、2 つのタスクの活用方法を紹介しました。
活用していくには、モデルの入出力の関係を把握すること が重要です。
また、学習済みモデルで判定できないデータを扱う場合には、教師データの形式、精度向上のための データ拡張 方法、ハイパーパラメータ調整方法 を理解し、カスタマイズしたモデルを構築する必要があります。
さらに、実用化の際には 推論速度とモデルの精度というトレードオフの関係 にうまく線引きが必要になるケースもあります。
様々なデータセットでカスタマイズしたモデルはきっと生活をより豊かにしてくれるでしょう。
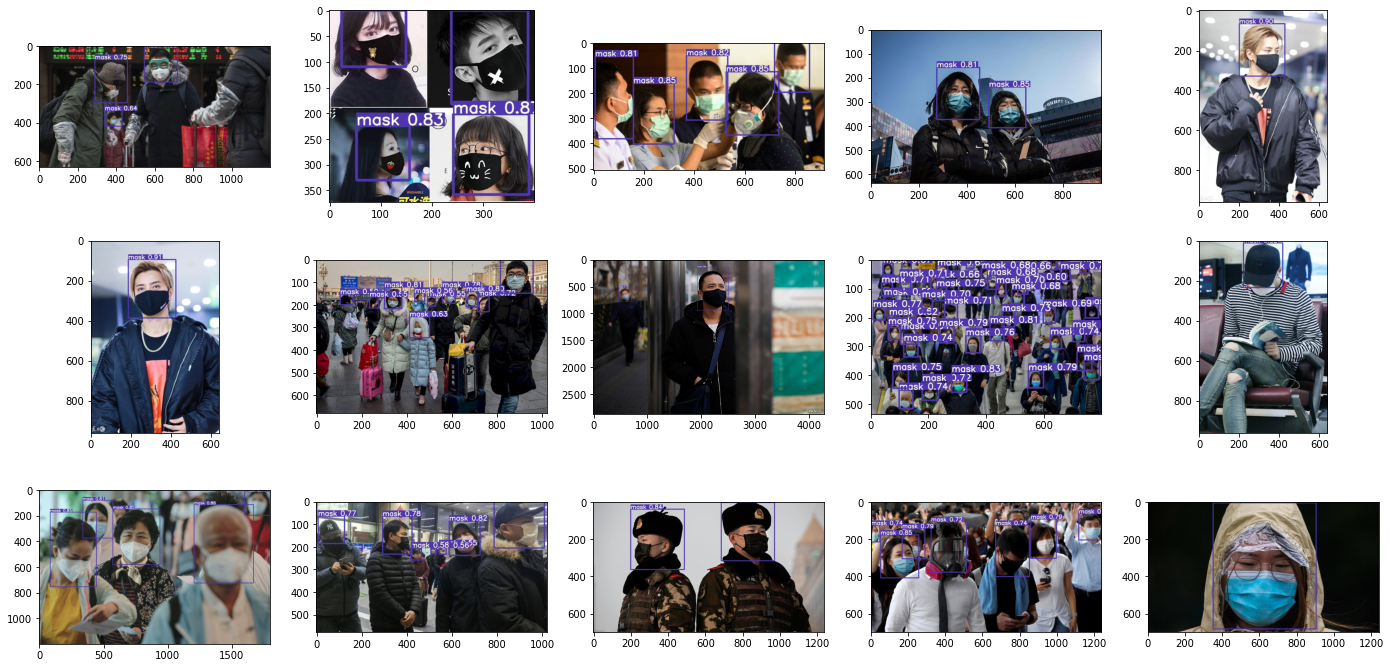
以下:マスクをしている・していないを判別するようにカスタマイズしたモデルの出力結果
コンピュータビジョン(画像分野)に限らず、ディープラーニングの活用方法は様々です。
他にも様々なタスクがありますが、ディープラーニングの基礎を学び終え、コンピュータビジョン(画像分野)に興味がある方は次のステップとして Semantic Segmentation / Object Detection を学んでみるのはいかがでしょうか。
また、実際のゴールイメージ(活用方法)を明確にしておくことで、学び(スキル習得)の順序、モチベーションにもつながるのではないかと考えます。
本記事を読んでいただいた方の何かのきっかけになれば幸いです。
参考資料
