やりたいこと
タイトルの通り、AWSのCloudWatchで利用可能なSynthetics Canriesを使って外部監視をするのに、Basic認証がかかっているページを監視します。
ClassMethodさんの記事 のように環境変数などで設定する情報はいくつか在ったのですが、こちらの記事内の注意書きにもある通りSecrets Managerを使うなどして秘匿情報を隠す形でのやり方をそのもの紹介しているページが見つけられなかったので、自分で試行錯誤して実践できた方法をまとめました。
必要なもの
AWS Consoleが扱える必要があります。
IAMの設定等も必要となりますので、そうした権限を持っているアカウントをご用意ください。
やったこと
以下、実際のソースコードを修正していきますが、基本的には、できるだけAWS上で生成されるSampleコードをいじらずに実装してます。
1. Canariesの設定
まずは、認証などがない通常のサイトを監視するのと同じ設定でCanariesの設定を行います。

AWS Console上で ハートビートのモニタリング を指定して画面操作を続けると生成される、puppeteerのコードが以下のものです。
const { URL } = require('url');
const synthetics = require('Synthetics');
const log = require('SyntheticsLogger');
const syntheticsConfiguration = synthetics.getConfiguration();
const syntheticsLogHelper = require('SyntheticsLogHelper');

const loadBlueprint = async function () {

    const urls = [''];

    // Set screenshot option
    const takeScreenshot = true;

    /* Disabling default step screen shots taken during Synthetics.executeStep() calls
     * Step will be used to publish metrics on time taken to load dom content but
     * Screenshots will be taken outside the executeStep to allow for page to completely load with domcontentloaded
     * You can change it to load, networkidle0, networkidle2 depending on what works best for you.
     */
    syntheticsConfiguration.disableStepScreenshots();
    syntheticsConfiguration.setConfig({
       continueOnStepFailure: true,
       includeRequestHeaders: true, // Enable if headers should be displayed in HAR
       includeResponseHeaders: true, // Enable if headers should be displayed in HAR
       restrictedHeaders: [], // Value of these headers will be redacted from logs and reports
       restrictedUrlParameters: [] // Values of these url parameters will be redacted from logs and reports

    });

    let page = await synthetics.getPage();

    for (const url of urls) {
        await loadUrl(page, url, takeScreenshot);
    }
};

// Reset the page in-between
const resetPage = async function(page) {
    try {
        await page.goto('about:blank',{waitUntil: ['load', 'networkidle0'], timeout: 30000} );
    } catch(ex) {
        synthetics.addExecutionError('Unable to open a blank page ', ex);
    }
}

const loadUrl = async function (page, url, takeScreenshot) {
    let stepName = null;
    let domcontentloaded = false;

    try {
        stepName = new URL(url).hostname;
    } catch (error) {
        const errorString = `Error parsing url: ${url}.  ${error}`;
        log.error(errorString);
        /* If we fail to parse the URL, don't emit a metric with a stepName based on it.
           It may not be a legal CloudWatch metric dimension name and we may not have an alarms
           setup on the malformed URL stepName.  Instead, fail this step which will
           show up in the logs and will fail the overall canary and alarm on the overall canary
           success rate.
        */
        throw error;
    }

    await synthetics.executeStep(stepName, async function () {
        const sanitizedUrl = syntheticsLogHelper.getSanitizedUrl(url);

        /* You can customize the wait condition here. For instance, using 'networkidle2' or 'networkidle0' to load page completely.
           networkidle0: Navigation is successful when the page has had no network requests for half a second. This might never happen if page is constantly loading multiple resources.
           networkidle2: Navigation is successful when the page has no more then 2 network requests for half a second.
           domcontentloaded: It's fired as soon as the page DOM has been loaded, without waiting for resources to finish loading. Can be used and then add explicit await page.waitFor(timeInMs)
        */
        const response = await page.goto(url, { waitUntil: ['domcontentloaded'], timeout: 30000});
        if (response) {
            domcontentloaded = true;
            const status = response.status();
            const statusText = response.statusText();

            logResponseString = `Response from url: ${sanitizedUrl}  Status: ${status}  Status Text: ${statusText}`;

            //If the response status code is not a 2xx success code
            if (response.status() < 200 || response.status() > 299) {
                throw `Failed to load url: ${sanitizedUrl} ${response.status()} ${response.statusText()}`;
            }
        } else {
            const logNoResponseString = `No response returned for url: ${sanitizedUrl}`;
            log.error(logNoResponseString);
            throw new Error(logNoResponseString);
        }
    });

    // Wait for 15 seconds to let page load fully before taking screenshot.
    if (domcontentloaded && takeScreenshot) {
        await page.waitFor(15000);
        await synthetics.takeScreenshot(stepName, 'loaded');
        await resetPage(page);
    }
};

const urls = [];

exports.handler = async () => {
    return await loadBlueprint();
};
その他、画面上の設定は基本はデフォルトのままで問題有りませんし、必要に応じて監視間隔を変更していただければ良いと思います。
初めのうちは継続実行ではなく 1回実行 にして動作確認しながら作業するほうが良いかもしれません。(うまくいかないうちは余計なエラーログが大量に生成されることになるため)
このとき、 アクセス許可 の欄で、デフォルトでは 新しいIAMを作成する が選択されています。

このままでもいいですし、既存のIAMを使ってもよいのですが、この時に指定したIAMに対して、続いてSecrets Managerの権限を指定することになりますので、どのIAMロールを指定したかを覚えておいてください。
2.IAMロールに権限を付与
先程作成したCanariesに設定したIAMロールに対して、Secrets Managerの権限を設定します。
必要な権限は、Secrets Managerの GetSecretValue だけです。
まずは以下のようなポリシーを作成し、対象のロールにポリシーをアタッチしてください。
{
    "Version": "2012-10-17",
    "Statement": [
        {
            "Sid": "VisualEditor0",
            "Effect": "Allow",
            "Action": "secretsmanager:GetSecretValue",
            "Resource": "arn:aws:secretsmanager:ap-northeast-1:〓:secret:*"
        }
    ]
}
上のサンプルではアカウントは伏せ字とさせていただきました。また対象リソースについては * としましたが、シークレットのリソースIDを指定して特定の値のみ読める形にした方が安全だと思います。
3. Secrets Managerに値を作成
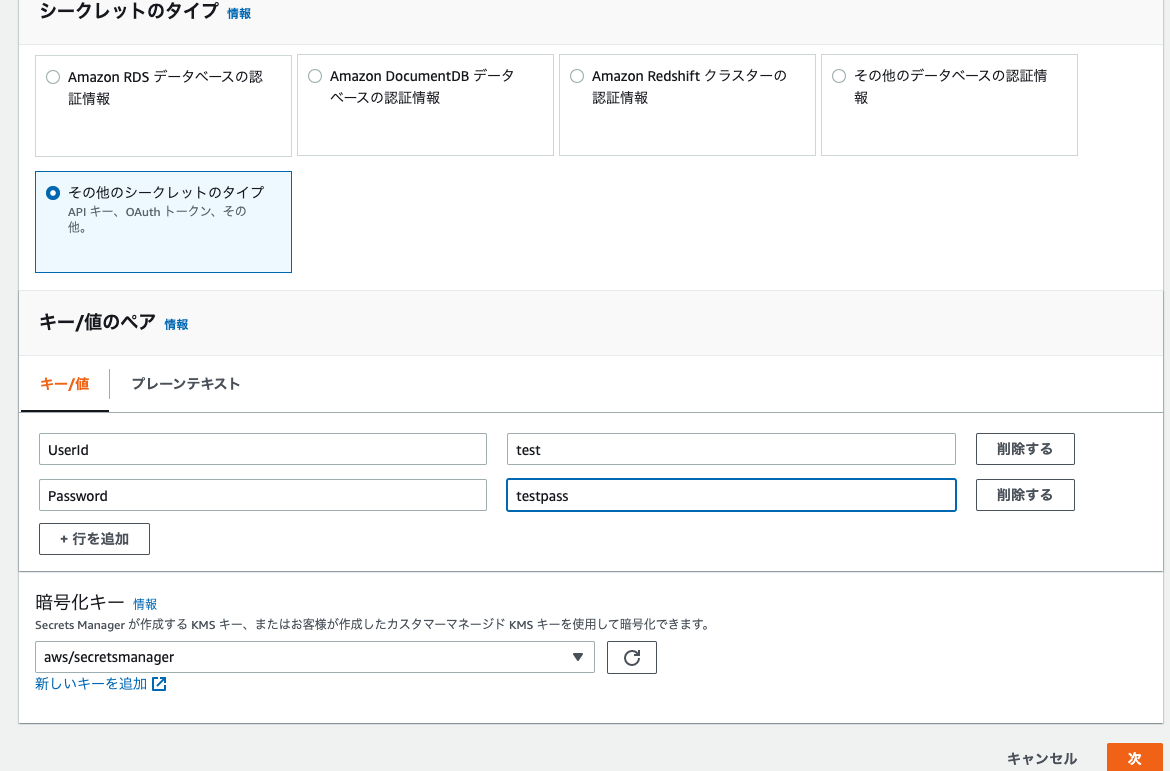
次に Secrets Manager の画面で新しい秘匿情報を作成します。
今回使いたいのはBasic認証のユーザーIDとパスワードに関する情報なので、 その他のシークレットタイプ を指定して、キー/値のペアとして、UserID/Passwordを記録します。
他の項目が画面の指示に従って適切に入力を行い、最後の画面に来たところで、サンプルコードが表示される欄のJavascriptを選んで、該当のコードをコピーしておいてください。
以下のようなコードが記載されているはずです。
// Use this code snippet in your app.
// If you need more information about configurations or implementing the sample code, visit the AWS docs:
// https://aws.amazon.com/developers/getting-started/nodejs/

// Load the AWS SDK
var AWS = require('aws-sdk'),
    region = "ap-northeast-1",
    secretName = "test",
    secret,
    decodedBinarySecret;

// Create a Secrets Manager client
var client = new AWS.SecretsManager({
    region: region
});

// In this sample we only handle the specific exceptions for the 'GetSecretValue' API.
// See https://docs.aws.amazon.com/secretsmanager/latest/apireference/API_GetSecretValue.html
// We rethrow the exception by default.

client.getSecretValue({SecretId: secretName}, function(err, data) {
    if (err) {
        if (err.code === 'DecryptionFailureException')
            // Secrets Manager can't decrypt the protected secret text using the provided KMS key.
            // Deal with the exception here, and/or rethrow at your discretion.
            throw err;
        else if (err.code === 'InternalServiceErrorException')
            // An error occurred on the server side.
            // Deal with the exception here, and/or rethrow at your discretion.
            throw err;
        else if (err.code === 'InvalidParameterException')
            // You provided an invalid value for a parameter.
            // Deal with the exception here, and/or rethrow at your discretion.
            throw err;
        else if (err.code === 'InvalidRequestException')
            // You provided a parameter value that is not valid for the current state of the resource.
            // Deal with the exception here, and/or rethrow at your discretion.
            throw err;
        else if (err.code === 'ResourceNotFoundException')
            // We can't find the resource that you asked for.
            // Deal with the exception here, and/or rethrow at your discretion.
            throw err;
    }
    else {
        // Decrypts secret using the associated KMS key.
        // Depending on whether the secret is a string or binary, one of these fields will be populated.
        if ('SecretString' in data) {
            secret = data.SecretString;
        } else {
            let buff = new Buffer(data.SecretBinary, 'base64');
            decodedBinarySecret = buff.toString('ascii');
        }
    }

    // Your code goes here.
});
実際には secretName 欄などが、ご自身で入力された値になっているはずなので、ご自分の環境でコピーされたコードはほぼそのまま活用できるはずです。
このサンプルコードを、先程Canariesの設定の際に生成されたpuppeteerのコードに組み込むことで実装が完了です。
4. 合体
上述の通り、puppeteerのコードの中に組み込めばよいのですが、私がJavascriptは不慣れなので非同期処理の流れにどう組み込めばいいのか一見しただけではよくわからず、試行錯誤した結果、以下のようにすることでうまく動くようになりました。
puppeteerのコードをベースに、修正した箇所に //-- --// 形式でコメントを付けています。
const { URL } = require('url');
const synthetics = require('Synthetics');
const log = require('SyntheticsLogger');
const syntheticsConfiguration = synthetics.getConfiguration();
const syntheticsLogHelper = require('SyntheticsLogHelper');

const loadBlueprint = async function () {

    const urls = ['https://manage.messageplus.jp/kanshi.html'];

    // Set screenshot option
    const takeScreenshot = true;

    /* Disabling default step screen shots taken during Synthetics.executeStep() calls
     * Step will be used to publish metrics on time taken to load dom content but
     * Screenshots will be taken outside the executeStep to allow for page to completely load with domcontentloaded
     * You can change it to load, networkidle0, networkidle2 depending on what works best for you.
     */
    syntheticsConfiguration.disableStepScreenshots();
    syntheticsConfiguration.setConfig({
       continueOnStepFailure: true,
       includeRequestHeaders: true, // Enable if headers should be displayed in HAR
       includeResponseHeaders: true, // Enable if headers should be displayed in HAR
       restrictedHeaders: [], // Value of these headers will be redacted from logs and reports
       restrictedUrlParameters: [] // Values of these url parameters will be redacted from logs and reports

    });

    let page = await synthetics.getPage();

    for (const url of urls) {
        await loadUrl(page, url, takeScreenshot);
    }
};

// Reset the page in-between
const resetPage = async function(page) {
    try {
        await page.goto('about:blank',{waitUntil: ['load', 'networkidle0'], timeout: 30000} );
    } catch(ex) {
        synthetics.addExecutionError('Unable to open a blank page ', ex);
    }
}

const loadUrl = async function (page, url, takeScreenshot) {
    let stepName = null;
    let domcontentloaded = false;
    //--- まずはここで、UserIDとPasswordを受け取るための適切な変数を定義 -------//
    let USERNAME = null;
    let PASSWORD = null;

    //--- 続いて、この位置にSecrets Managerで生成されたサンプルコードの前段を貼り付け -------//
    // Use this code snippet in your app.
    // If you need more information about configurations or implementing the sample code, visit the AWS docs:
    // https://aws.amazon.com/developers/getting-started/nodejs/

    // Load the AWS SDK
    var AWS = require('aws-sdk'),
        region = "ap-northeast-1",
        secretName = "test",
        secret,
        decodedBinarySecret;

    // Create a Secrets Manager client
    var client = new AWS.SecretsManager({
        region: region
    });

    // In this sample we only handle the specific exceptions for the 'GetSecretValue' API.
    // See https://docs.aws.amazon.com/secretsmanager/latest/apireference/API_GetSecretValue.html
    // We rethrow the exception by default.

    await client.getSecretValue({SecretId: secretName}, function(err, data) {
        if (err) {
            if (err.code === 'DecryptionFailureException')
                // Secrets Manager can't decrypt the protected secret text using the provided KMS key.
                // Deal with the exception here, and/or rethrow at your discretion.
                throw err;
            else if (err.code === 'InternalServiceErrorException')
                // An error occurred on the server side.
                // Deal with the exception here, and/or rethrow at your discretion.
                throw err;
            else if (err.code === 'InvalidParameterException')
                // You provided an invalid value for a parameter.
                // Deal with the exception here, and/or rethrow at your discretion.
                throw err;
            else if (err.code === 'InvalidRequestException')
                // You provided a parameter value that is not valid for the current state of the resource.
                // Deal with the exception here, and/or rethrow at your discretion.
                throw err;
            else if (err.code === 'ResourceNotFoundException')
                // We can't find the resource that you asked for.
                // Deal with the exception here, and/or rethrow at your discretion.
                throw err;
        }
        else {
            // Decrypts secret using the associated KMS key.
            // Depending on whether the secret is a string or binary, one of these fields will be populated.
            if ('SecretString' in data) {
                secret = data.SecretString;
            } else {
                let buff = new Buffer(data.SecretBinary, 'base64');
                decodedBinarySecret = buff.toString('ascii');
            }
        }

        // Your code goes here.
        //--- ここに、読み込んだ secret から文字列を受け取り変数に設定する処理を追加 -------//
        const secretObj = JSON.parse(secret);
        USERNAME = secretObj.USERNAME;
        PASSWORD = secretObj.PASSWORD;

    });

    try {
        stepName = new URL(url).hostname;
    } catch (error) {
        const errorString = `Error parsing url: ${url}.  ${error}`;
        log.error(errorString);
        /* If we fail to parse the URL, don't emit a metric with a stepName based on it.
           It may not be a legal CloudWatch metric dimension name and we may not have an alarms
           setup on the malformed URL stepName.  Instead, fail this step which will
           show up in the logs and will fail the overall canary and alarm on the overall canary
           success rate.
        */
        throw error;
    }

    //--- 非同期処理で動くため、そのまま実行すると、秘匿情報を読み込む前にページを開こうとしてしまい、うまく認証が通らなかったので、3秒ほどwait時間をもたせることで対処しました -------//
    // シークレットを読み込むまで3秒待つ
    await page.waitFor(3000);
    await synthetics.executeStep(stepName, async function () {
        const sanitizedUrl = syntheticsLogHelper.getSanitizedUrl(url);

        //--- ここにBasic認証を行うためのヘッダー情報を設定する処理を追加 -------//
        //Basic認証のAuthorizationヘッダーを設定
        page.setExtraHTTPHeaders({
            Authorization: `Basic ${new Buffer(`${USERNAME}:${PASSWORD}`).toString('base64')}`
        });


        /* You can customize the wait condition here. For instance, using 'networkidle2' or 'networkidle0' to load page completely.
           networkidle0: Navigation is successful when the page has had no network requests for half a second. This might never happen if page is constantly loading multiple resources.
           networkidle2: Navigation is successful when the page has no more then 2 network requests for half a second.
           domcontentloaded: It's fired as soon as the page DOM has been loaded, without waiting for resources to finish loading. Can be used and then add explicit await page.waitFor(timeInMs)
        */
        const response = await page.goto(url, { waitUntil: ['domcontentloaded'], timeout: 30000});
        if (response) {
            domcontentloaded = true;
            const status = response.status();
            const statusText = response.statusText();

            logResponseString = `Response from url: ${sanitizedUrl}  Status: ${status}  Status Text: ${statusText}`;

            //If the response status code is not a 2xx success code
            if (response.status() < 200 || response.status() > 299) {
                throw `Failed to load url: ${sanitizedUrl} ${response.status()} ${response.statusText()}`;
            }
        } else {
            const logNoResponseString = `No response returned for url: ${sanitizedUrl}`;
            log.error(logNoResponseString);
            throw new Error(logNoResponseString);
        }
    });

    // Wait for 15 seconds to let page load fully before taking screenshot.
    if (domcontentloaded && takeScreenshot) {
        await page.waitFor(15000);
        await synthetics.takeScreenshot(stepName, 'loaded');
        await resetPage(page);
    }
};

const urls = [];

exports.handler = async () => {
    return await loadBlueprint();
};
Basic認証に関連する処理のコードは、初めに挙げたClassMethodさんの記事からお借りしたものです。
非同期処理の対応として、一定秒数待たせるというところがあまりスマートなやり方ではないな〜とは思いながら、Javascriptに不慣れなのでひとまずこれで良しとしました。
Javascriptをしっかり使いこなされている方が別のやり方できるようでしたらぜひ教えていただきたいです!