EC2を複数台構築することなったので、CloudFromationを使って構築を進めていきたいと思います。
AWS CloudFromationとは
AWS CloudFormation は、インフラストラクチャをコードとして扱うことで、AWS およびサードパーティーのリソースをモデル化、プロビジョニング、管理することができます。
https://aws.amazon.com/jp/cloudformation/
とのことで、簡単に言うと「AWSのリソースをコードで作成・管理できるもの」といえると思います。
AWSのマネジメントコンソールからリソースの作成はできますが、すべてのリソースを削除したり、再作成するのは、大変です。なので、CloudFormation使ってリソースをコードで管理するのはとても便利です。
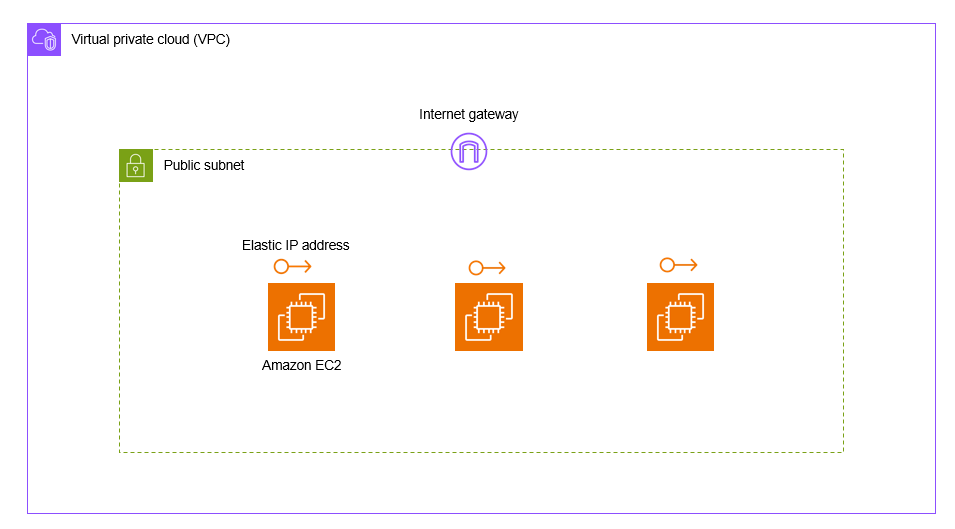
作成イメージ
パブリックサブネットにEC2を3台設置しようと思います。
Stackごとに選択したいリソースがあるとき
Parametersブロックを使えば、Stack作成時に選択させたい項目を作ることができます。
こちらの例では、「インスタンスタイプ」と「キーペア」と「AmiID」を選択できるようにしています。「キーペア」と「AmiID」は、事前にマネジメントコンソール上でつくってたものを指定できるようにしています。
AWSTemplateFormatVersion: '2010-09-09'

Parameters:
  InstanceType:
    Description: EC2 instance type
    Type: String
    Default: t2.micro
    AllowedValues:
    - t2.micro
    - t2.small
    - t2.medium
    ConstraintDescription: must be a vaild EC2 instance type
  KeyName:
    Description: Name of an existing EC2 Keypair
    Type: AWS::EC2::KeyPair::KeyName
    Default: study-node
    ConstraintDescription: Can Contain only ASCII characters
  AmiId:
    Description: Name of an existing AMI ID
    Type: String
    Default: XXXXX
    ConstraintDescription: must be a vaild image ID
リソースを定義
・Resourcesブロック内必要なリソースを定義していきます。
VPCを定義
Resources:
  VPC:
    Type: AWS::EC2::VPC
    Properties:
      CidrBlock: 10.0.0.0/16
      Tags:
      - Key: Name
        Value: study-vpc
パブリックサブネットを定義
パブリックサブネットとはインターネットゲートウェイが紐づいているサブネットのことを指すので、インターネットゲートウェイとそれをアタッチするリソースを定義します。
  PublicSubnet:
    Type: AWS::EC2::Subnet
    Properties:
      CidrBlock: 10.0.5.0/24
      MapPublicIpOnLaunch: true
      VpcId: !Ref VPC
      AvailabilityZone: us-east-1a
      Tags:
        - Key: Name
          Value: studyPublicSubnet

  InternetGateway:
    Type: AWS::EC2::InternetGateway
    Properties:
      Tags:
        - Key: Name
          Value: studyInternetGateway

  AttachInternetGateway:
    Type: AWS::EC2::VPCGatewayAttachment
    Properties:
      InternetGatewayId: !Ref InternetGateway
      VpcId: !Ref VPC
ルートテーブルを定義
ルートテーブルとルートを定義し、それらを関連付けるリソースを定義します。
  RouteTableForPublicSubnet:
    Type: AWS::EC2::RouteTable
    Properties:
      VpcId: !Ref VPC
      Tags:
        - Key: Name
          Value: studyRouteTableForPublicSubnet

  RouteForPublicSubnet:
    Type: AWS::EC2::Route
    Properties:
      RouteTableId: !Ref RouteTableForPublicSubnet
      DestinationCidrBlock: 0.0.0.0/0
      GatewayId: !Ref InternetGateway

  AssociateRouteTableForPublicSubnet:
    Type: AWS::EC2::SubnetRouteTableAssociation
    Properties:
      RouteTableId: !Ref RouteTableForPublicSubnet
      SubnetId: !Ref PublicSubnet
セキュリティグループを定義
・インバウンドルールはポート22,80,443,3000を0.0.0.0/0で空けてます
  SecurityGroupForPublicServer:
    Type: AWS::EC2::SecurityGroup
    Properties:
      GroupName: SecurityGroupForPublicServer
      GroupDescription: SecurityGroupForPublicServer
      VpcId: !Ref VPC
      SecurityGroupIngress:
        - IpProtocol: tcp
          FromPort: 22
          ToPort: 22
          CidrIp: 0.0.0.0/0
        - IpProtocol: tcp
          FromPort: 80
          ToPort: 80
          CidrIp: 0.0.0.0/0
        - IpProtocol: tcp
          FromPort: 443
          ToPort: 443
          CidrIp: 0.0.0.0/0
        - IpProtocol: tcp
          FromPort: 3000
          ToPort: 3000
          CidrIp: 0.0.0.0/0
      Tags:
        - Key: Name
          Value: studySecurityGroupForPublicServer
EC2インスタンスを定義(3台分)
EC2インスタンスとElastic IPを定義し、それらを関連付けるリソースを定義します。
今回はシャットダウンしてもIPアドレスが変わらないようにElastic IPを紐づけるためにElastic IPを使用します。
  InstanceNo1:
    Type: AWS::EC2::Instance
    Properties:
      ImageId: !Ref AmiId
      InstanceType: !Ref InstanceType
      KeyName: !Ref KeyName
      NetworkInterfaces:
      - SubnetId: !Ref PublicSubnet
        GroupSet:
          - !Ref SecurityGroupForPublicServer
        AssociatePublicIpAddress: true
        DeviceIndex : 0
      Tags:
        - Key: Name
          Value: study-node-No1

  ElasticIPNo1:
    Type: AWS::EC2::EIP
    Properties:
      Domain: vpc
      Tags:
        - Key: Name
          Value: study-node-No1

  ElasticIPAssociateNo1:
    Type: AWS::EC2::EIPAssociation
    Properties:
      AllocationId: !GetAtt ElasticIPNo1.AllocationId
      InstanceId: !Ref InstanceNo1

  InstanceNo2:
    Type: AWS::EC2::Instance
    Properties:
      ImageId: !Ref AmiId
      InstanceType: !Ref InstanceType
      KeyName: !Ref KeyName
      NetworkInterfaces:
      - SubnetId: !Ref PublicSubnet
        GroupSet:
          - !Ref SecurityGroupForPublicServer
        AssociatePublicIpAddress: true
        DeviceIndex : 0
      Tags:
        - Key: Name
          Value: study-node-No2

  ElasticIPNo2:
    Type: AWS::EC2::EIP
    Properties:
      Domain: vpc
      Tags:
        - Key: Name
          Value: study-node-No2

  ElasticIPAssociateNo2:
    Type: AWS::EC2::EIPAssociation
    Properties:
      AllocationId: !GetAtt ElasticIPNo2.AllocationId
      InstanceId: !Ref InstanceNo2

  InstanceNo3:
    Type: AWS::EC2::Instance
    Properties:
      ImageId: !Ref AmiId
      InstanceType: !Ref InstanceType
      KeyName: !Ref KeyName
      NetworkInterfaces:
      - SubnetId: !Ref PublicSubnet
        GroupSet:
          - !Ref SecurityGroupForPublicServer
        AssociatePublicIpAddress: true
        DeviceIndex : 0
      Tags:
        - Key: Name
          Value: study-node-No3

  ElasticIPNo3:
    Type: AWS::EC2::EIP
    Properties:
      Domain: vpc
      Tags:
        - Key: Name
          Value: study-node-No3

  ElasticIPAssociateNo3:
    Type: AWS::EC2::EIPAssociation
    Properties:
      AllocationId: !GetAtt ElasticIPNo3.AllocationId
      InstanceId: !Ref InstanceNo3
これらをまとめて、CloudFormationでStackを作成すると、リソースが立ち上がります。
stackの作成方法
-
マネジメントコンソールから、スタック作成をクリック
-
「テンプレートの準備完了」・「テンプレートファイルのアップロード」を選択し、ファイルの選択から作成したYAMLファイルをアップロードし、「次へ」をクリック。

-
stack名を入力し、パラメータを設定し、「次へ」をクリック。(パラメータは、Parametersブロックで定義したから、出てきている)

-
そのまま「次へ」、「送信」の流れで、stackが作成される
削除は、完成したstackを選択し、「削除」ボタンをクリックするだけ!
マネジメントコンソールなんとなーくでやっていたことをコードで示すので、理解が深まると思います。消すときはボタン一つで消せるので、無駄遣いも発生しづらいはず。