概要
Github Actionsのセルフホステッド ランナーでUnityをIOSビルドしてDeployGateに上げるまでの手順です。
Appleの証明書周りのやりかたや各機能などは解説しません。手順と必要なコードのみ記載します。
おおまかな手順
- GithubActionsにセルフホストランナーを登録
- Unityにビルド用のコードを追加
- IPAを手動でビルド
- プロジェクトにExportOptions.plistを追加
- main.ymlを追加
1.プロジェクト情報を追加
2. DeployGateの情報追加 - (おまけ)GitHubAppでslackに通知する
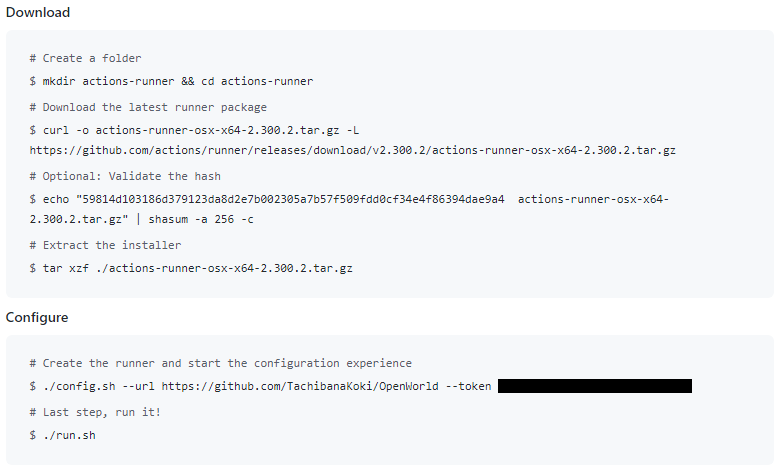
1.GithubActionsにセルフホストランナーを登録
リポジトリもしくはorganizationsのSettingsのRunnnersからNew runnerを選択。必要な環境を選択してDownloadとConfigureのコマンドを実行。
この時すでにactions-runner導入済みであればDownload部分は不要です。
新しいリポジトリなどに登録したい場合はconfig.shをコマンドでremoveする必要があるようです。(警告がでるのでそれに従えばOK)
2.Unityにビルド用のコードを追加
こちらのコードをEditorフォルダに追加してください。
(こちらの記事のものをお借りしました。Unity2022.2向けに一部修正しています。Unity2019などで利用する場合はこちらの記事を参考にしてください)
https://qiita.com/johro/items/0a846bebfe3899410164
using System;
using System.Linq;
using UnityEngine;
using UnityEditor;
using UnityEditor.Build.Reporting;

public class MobileBuild
{
    static string[] GetEnabledScenes()
    {
        return (
                   from scene in EditorBuildSettings.scenes
                   where scene.enabled
                   where !string.IsNullOrEmpty(scene.path)
                   select scene.path
               ).ToArray();
    }
    [MenuItem("CI/Build Android")]
    private static void BuildAndroid()
    {
        // Setting for Android
        EditorPrefs.SetBool("NdkUseEmbedded", true);
        EditorPrefs.SetBool("SdkUseEmbedded", true);
        EditorPrefs.SetBool("JdkUseEmbedded", true);
        EditorUserBuildSettings.androidBuildSystem = AndroidBuildSystem.Gradle;
        PlayerSettings.SetScriptingBackend(BuildTargetGroup.Android, ScriptingImplementation.IL2CPP);

        // Build
        bool result = Build(BuildTarget.Android);

        // Exit Editor
        EditorApplication.Exit(result ? 0 : 1);
    }

    [MenuItem("CI/Build IOS")]
    private static void BuildIOS()
    {
        // Setting for iOS
        PlayerSettings.SetScriptingBackend(BuildTargetGroup.iOS, ScriptingImplementation.IL2CPP);
        EditorUserBuildSettings.iOSXcodeBuildConfig = XcodeBuildConfig.Debug;

        // Build
        bool result = Build(BuildTarget.iOS);

        // Exit Editor
        EditorApplication.Exit(result ? 0 : 1);
    }

    private static bool Build(BuildTarget buildTarget)
    {
        // Get Env
        string   outputPath   = GetEnvVar("OUTPUT_PATH");               // Output path
        string   bundleId     = GetEnvVar("BUNDLE_ID");                 // Bundle Identifier
        string   productName  = GetEnvVar("PRODUCT_NAME");              // Product Name
        string   companyName  = GetEnvVar("COMPANY_NAME");              // Company Name

        outputPath = AddExpand(buildTarget, outputPath);


        Debug.Log("[MobileBuild] Build OUTPUT_PATH :" + outputPath);
        Debug.Log("[MobileBuild] Build BUILD_SCENES :" + String.Join("", GetEnabledScenes()));

        // Player Settings
        BuildOptions buildOptions;
        buildOptions = BuildOptions.Development | BuildOptions.CompressWithLz4;

        if (!string.IsNullOrEmpty(companyName)) { PlayerSettings.companyName = companyName; }

        if (!string.IsNullOrEmpty(productName)) { PlayerSettings.productName = productName; }

        if (!string.IsNullOrEmpty(bundleId)) { PlayerSettings.applicationIdentifier = bundleId; }

        // Build
        var report = BuildPipeline.BuildPlayer(GetEnabledScenes(), outputPath, buildTarget, buildOptions);
        var summary = report.summary;

        // Build Report
        for (int i = 0; i < report.steps.Length; ++i)
        {
            var step = report.steps[i];
            Debug.Log($"{step.name} Depth:{step.depth} Duration:{step.duration}");

            for (int d = 0; d < step.messages.Length; ++d)
            {
                Debug.Log($"{step.messages[d].content}");
            }
        }

        if (summary.result == BuildResult.Succeeded)
        {
            Debug.Log("<color=white>[MobileBuild] Build Success : " + outputPath + "</color>");
            return true;
        }
        else
        {
            Debug.Assert(false, "[MobileBuild] Build Error : " + report.name);
            return false;
        }
    }

    private static string GetEnvVar(string pKey)
    {
        return Environment.GetEnvironmentVariable(pKey);
    }

    private static string AddExpand(BuildTarget buildTarget, string outputPath)
    {
        switch (buildTarget)
        {
            case BuildTarget.Android :
                outputPath += ".apk";
                break;
        }

        return outputPath;
    }
}
3. IPAを手動でビルド 4.プロジェクトにExportOptions.plistを追加
ここはまとめて説明します。
GithubActionsでビルドする前に一度手動でビルドを行ってこの時に出力されるExportOptions.plistをプロジェクトのAssetsと同じ階層にBuildフォルダを作成して置いてください。
こちらのパスを変更したい場合は後述のmain.ymlの-exportOptionsPlistのファイルパスを編集してください。
5. main.ymlを追加
GithubのリポジトリページのActionsからset up a workflow yourself で新規のmain.ymlを作成します。プロジェクトごとの編集する場所の説明をします。書き換えの際に{}は不要です。削除してください。
プロジェクト情報を追加
- あればサブディレクトリ名を設定。サブディレクトリがない場合(.gitとAssetsが同じ階層の場合)はSUB_DIRECTORY: ""に書き換えてください。
- 使いたいUnityのバージョンにUNITY_VERSION: "2022.2.1f1"を書き換えてください。
- osxでなかったりエディターのインストール先がデフォルトから変更されている場合はビルドコマンドのパスを書き換えてください。
/Applications/Unity/Hub/Editor/$UNITY_VERSION/Unity.app/Contents/MacOS/Unity
DeployGateの情報を追加
- {DepolyGame API key}をアカウント設定またはグループ設定ページにあるAPI keyに書き換えてください。
- {distribution key}に一度手動で配布ページを作成したあとのURL
https://deploygate.com/distributions/以下のkeyに書き換えてください。 - {ユーザー名orグループ名}を配布ページのユーザー名またはグループ名に書き換えてください。
name: ApplicationBuild

on: [push,workflow_dispatch]

env:
  SUB_DIRECTORY: {サブディレクトリ名}/
  OUTPUT_PATH: Build
  BUNDLE_ID: ""
  PRODUCT_NAME: ""
  COMPANY_NAME: ""
  ARCHIVE_PATH : ./ios/temp/Unity-iPhone.xcarchive
  UNITY_VERSION: "2022.2.1f1"
jobs:
  ios-build:
    runs-on: self-hosted
    steps:
    - uses: actions/checkout@v2
      with:
        path: ios
        clean: false
    - name: iOS Build
      run: |
        /Applications/Unity/Hub/Editor/$UNITY_VERSION/Unity.app/Contents/MacOS/Unity -quit -batchmode -nographics -silent-crashes -logFile \
          -projectPath ./ios/$SUB_DIRECTORY -executeMethod MobileBuild.BuildIOS -buildTarget iOS
    - name: xcodebuild clean
      run: |
        xcodebuild clean -project ./ios/$SUB_DIRECTORY$OUTPUT_PATH/Unity-iPhone.xcodeproj -target Unity-iPhone -configuration Release
    - name: xcodebuild Archive
      run: |
        xcodebuild -project ./ios/$SUB_DIRECTORY$OUTPUT_PATH/Unity-iPhone.xcodeproj -scheme Unity-iPhone archive -archivePath $ARCHIVE_PATH -configuration Release -destination 'generic/platform=iOS'
    - name: Xcode Build
      run: |
        xcodebuild \
          -exportArchive \
          -archivePath $ARCHIVE_PATH \
          -exportPath ./ios/$SUB_DIRECTORY$OUTPUT_PATH/ \
          -exportOptionsPlist ./ios/$SUB_DIRECTORY$OUTPUT_PATH/ExportOptions.plist
    - name: Upload DeployGate
      run: |
          curl \
            -H "Authorization: token {DepolyGame API key}" \
            -F "file=@./ios/$SUB_DIRECTORY$OUTPUT_PATH/${GITHUB_REPOSITORY#${GITHUB_REPOSITORY_OWNER}/}.ipa" \
            -F "distribution_name= {distribution key}" \
            -F "message=from github actions" \
            -v "https://deploygate.com/api/users/{ユーザー名orグループ名}/apps"
6. (おまけ)GitHubAppでslackに通知する
slackにビルド結果を通知する方法ですがslackにAppを追加して通知したいチャンネルで/github subscribe オーナー名/リポジトリ名 workflowsと入力することで通知できます。
- slackにGithubAppを追加
- GitHubとのアカウント連携
- 通知したいチャンネルで'/github subscribe オーナー名/リポジトリ名 workflows'と入力
- 他の通知も受け取ってしまうためcommitなどの余計な通知を受け取りたくない場合は'/github ubsubscribe オーナー名/リポジトリ名 commit'などで除外しておく
詳細はこちら
https://developer.mamezou-tech.com/blogs/2022/12/12/notify-github-actions-workflow-to-slack/
7. 補足
IOSの自動ビルドをする際はPlayerSettingsのSigningTeamIDを入れておいてください。
IOSビルドをする際はbitcodeを無効化しておくとビルド時間が半分くらいになるので無効化しておくのをオススメします。
https://gist.github.com/ina-amagami/bc0556ae6e2ce0e0cb9923977e962d76
参考