はじめに
システムを構築した後、運用の中でいろいろな指標値を基に「そのシステムが正常に動作しているか?」を継続的にモニタリングする必要があります。これは、AWS Well-Architected Framework 信頼性の柱の「REL6:ワークロードリソースをモニタリングするにはどうすればよいですか?」の中でもベストプラクティスとして定義されています。
AWS以外のサービスを利用し、モニタリングすることも可能ですが、今回は、Amazon CloudWatch Syntheticsを利用して継続的モニタリングの1つとしてシンセティック監視を行います。
シンセティック監視とは
システムを利用するユーザと同じルートを辿り、システムへアクセスし監視することです。外形監視とも言いますかね。
Amazon CloudWatch Syntheticsとは
Canary(カナリア)を作成して、サービスのエンドポイントとAPIを監視する機能です。継続的にテスト用のリクエストを送信し、サービスに問題がないことをチェックし続けます。その中でURL/APIアクセスによるリンク切れ、エラー、配信モジュールのロード遅延、ページの改ざん検知などを行うことができます。
詳しいところは以下を読んでみてください。
CloudFormationで構築する
AWSマネジメントコンソールで構築することも可能ですが、今後簡単に構築できるようにCloudFormationテンプレート化しました。(コードの部分は手動作成した時のものです。)
AWSTemplateFormatVersion: '2010-09-09'
Description: 'CloudWatch Synthetics Canary Template'

# Parameters
Parameters:
  # 対象エンドポイント
  TargetUrl:
    Type: String
    Default: 'https://'
    MinLength: 1

# Resources
Resources:

  # S3 - Bucket
  SyntheticsCanaryArtifactBucket:
    Type: AWS::S3::Bucket
    Properties:
      BucketName: !Sub '${AWS::StackName}-artifact'
      LifecycleConfiguration:
        Rules:
          - ExpirationInDays: 90
            Status: Enabled
      PublicAccessBlockConfiguration:
        BlockPublicAcls: true
        BlockPublicPolicy: true
        IgnorePublicAcls: true
        RestrictPublicBuckets: true

  # Role
  ExecutionRole:
    Type: AWS::IAM::Role
    Properties:
      RoleName: !Sub '${AWS::StackName}-execution-role'
      AssumeRolePolicyDocument:
        Version: 2012-10-17
        Statement:
          - Action:
              - sts:AssumeRole
            Effect: Allow
            Principal:
              Service:
                - lambda.amazonaws.com
      Path: /
      Policies:
        - PolicyName: synthetics-canary-policy
          PolicyDocument:
            Version: 2012-10-17
            Statement:
              - Action:
                  - s3:PutObject
                  - s3:GetObject
                Effect: Allow
                Resource:
                  - !Sub '${SyntheticsCanaryArtifactBucket.Arn}/*'
              - Action:
                  - s3:GetBucketLocation
                Effect: Allow
                Resource:
                  - !Sub '${SyntheticsCanaryArtifactBucket.Arn}'
              - Action:
                  - s3:ListAllMyBuckets
                  - xray:PutTraceSegments
                Effect: Allow
                Resource:
                  - '*'
              - Action:
                  - logs:CreateLogGroup
                  - logs:CreateLogStream
                  - logs:PutLogEvents
                Effect: Allow
                Resource:
                  - !Sub 'arn:aws:logs:${AWS::Region}:${AWS::AccountId}:log-group:/aws/lambda/cwsyn-*'
              - Action:
                  - cloudwatch:PutMetricData
                Effect: Allow
                Resource:
                  - '*'
                Condition:
                  StringEquals:
                    cloudwatch:namespace: CloudWatchSynthetics

  # Canary
  SyntheticsCanary:
    Type: AWS::Synthetics::Canary
    Properties:
      ArtifactConfig:
        # アーティファクト保存時の暗号化設定
        # Syntheticsランタイムバージョンsyn-nodejs-puppeteer-3.3以降を使用するカナリアでのみ使用可
        S3Encryption:
          EncryptionMode: SSE_S3
      ArtifactS3Location: !Sub 's3://${SyntheticsCanaryArtifactBucket}'
      # カナリアのコード
      Code:
        Handler: loadBlueprint.handler
        Script: !Sub >
          const { URL } = require('url');
          const synthetics = require('Synthetics');
          const log = require('SyntheticsLogger');
          const syntheticsConfiguration = synthetics.getConfiguration();
          const syntheticsLogHelper = require('SyntheticsLogHelper');

          const loadBlueprint = async function () {

              const urls = ['${TargetUrl}'];

              // Set screenshot option
              const takeScreenshot = true;

              /* Disabling default step screen shots taken during Synthetics.executeStep() calls
              * Step will be used to publish metrics on time taken to load dom content but
              * Screenshots will be taken outside the executeStep to allow for page to completely load with domcontentloaded
              * You can change it to load, networkidle0, networkidle2 depending on what works best for you.
              */
              syntheticsConfiguration.disableStepScreenshots();
              syntheticsConfiguration.setConfig({
                continueOnStepFailure: true,
                includeRequestHeaders: true, // Enable if headers should be displayed in HAR
                includeResponseHeaders: true, // Enable if headers should be displayed in HAR
                restrictedHeaders: [], // Value of these headers will be redacted from logs and reports
                restrictedUrlParameters: [] // Values of these url parameters will be redacted from logs and reports

              });

              let page = await synthetics.getPage();

              for (const url of urls) {
                  await loadUrl(page, url, takeScreenshot);
              }
          };

          // Reset the page in-between

          const resetPage = async function(page) {
              try {
                  await page.goto('about:blank',{waitUntil: ['load', 'networkidle0'], timeout: 30000} );
              } catch(ex) {
                  synthetics.addExecutionError('Unable to open a blank page ', ex);
              }
          }

          const loadUrl = async function (page, url, takeScreenshot) {
              let stepName = null;
              let domcontentloaded = false;

              try {
                  stepName = new URL(url).hostname;
              } catch (error) {
                  const errorString = `Error parsing url: ${!url}.  ${!error}`;
                  log.error(errorString);
                  /* If we fail to parse the URL, don't emit a metric with a stepName based on it.
                    It may not be a legal CloudWatch metric dimension name and we may not have an alarms
                    setup on the malformed URL stepName.  Instead, fail this step which will
                    show up in the logs and will fail the overall canary and alarm on the overall canary
                    success rate.
                  */
                  throw error;
              }

              await synthetics.executeStep(stepName, async function () {
                  const sanitizedUrl = syntheticsLogHelper.getSanitizedUrl(url);

                  /* You can customize the wait condition here. For instance, using 'networkidle2' or 'networkidle0' to load page completely.
                    networkidle0: Navigation is successful when the page has had no network requests for half a second. This might never happen if page is constantly loading multiple resources.
                    networkidle2: Navigation is successful when the page has no more then 2 network requests for half a second.
                    domcontentloaded: It's fired as soon as the page DOM has been loaded, without waiting for resources to finish loading. Can be used and then add explicit await page.waitFor(timeInMs)
                  */
                  const response = await page.goto(url, { waitUntil: ['domcontentloaded'], timeout: 30000});
                  if (response) {
                      domcontentloaded = true;
                      const status = response.status();
                      const statusText = response.statusText();

                      logResponseString = `Response from url: ${!sanitizedUrl}  Status: ${!status}  Status Text: ${!statusText}`;

                      //If the response status code is not a 2xx success code
                      if (response.status() < 200 || response.status() > 299) {
                          throw `Failed to load url: ${!sanitizedUrl} ${!response.status()} ${!response.statusText()}`;
                      }
                  } else {
                      const logNoResponseString = `No response returned for url: ${!sanitizedUrl}`;
                      log.error(logNoResponseString);
                      throw new Error(logNoResponseString);
                  }
              });

              // Wait for 15 seconds to let page load fully before taking screenshot.
              if (domcontentloaded && takeScreenshot) {
                  await page.waitFor(15000);
                  await synthetics.takeScreenshot(stepName, 'loaded');
                  await resetPage(page);
              }
          };

          const urls = [];

          exports.handler = async () => {
              return await loadBlueprint();
          };
      ExecutionRoleArn: !GetAtt ExecutionRole.Arn
      # 失敗時の実行に関するデータ保持期間
      FailureRetentionPeriod: 30
      Name: !Sub '${AWS::StackName}'
      RunConfig:
        ActiveTracing: true
        MemoryInMB: 960
        TimeoutInSeconds: 60
      # ランタイムバージョン
      RuntimeVersion: syn-nodejs-puppeteer-3.4
      # 実行スケジュール
      Schedule:
        DurationInSeconds: 0
        # 1分間隔で実行
        Expression: 'cron(* * ? * *)'
      # カナリアが作成された直後に実行を開始
      StartCanaryAfterCreation: true
      # 成功時の実行に関するデータ保持期間
      SuccessRetentionPeriod: 30
構築できたものを確認する
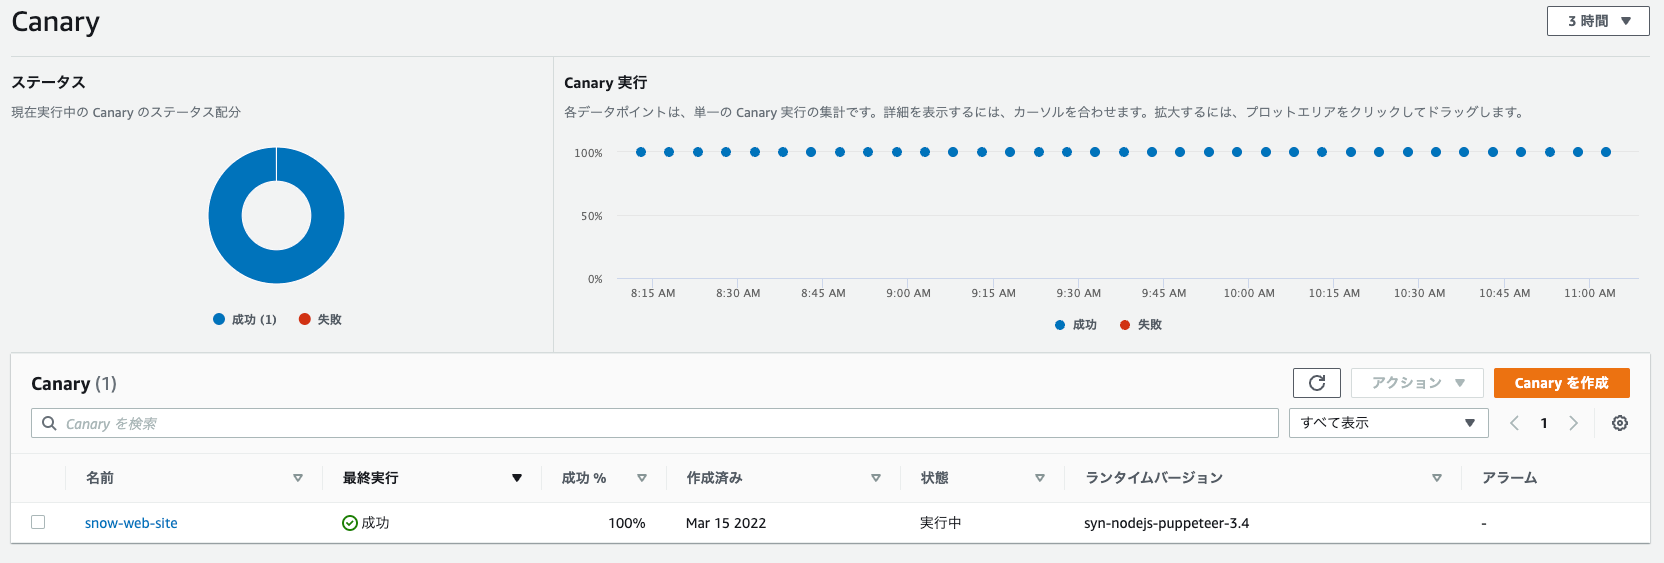
ダッシュボード
Amazon CloudWatch Syntheticsのページを開くと以下のダッシュボードが表示されます。
これを見るだけでエラーがなく、動作していることがわかります。
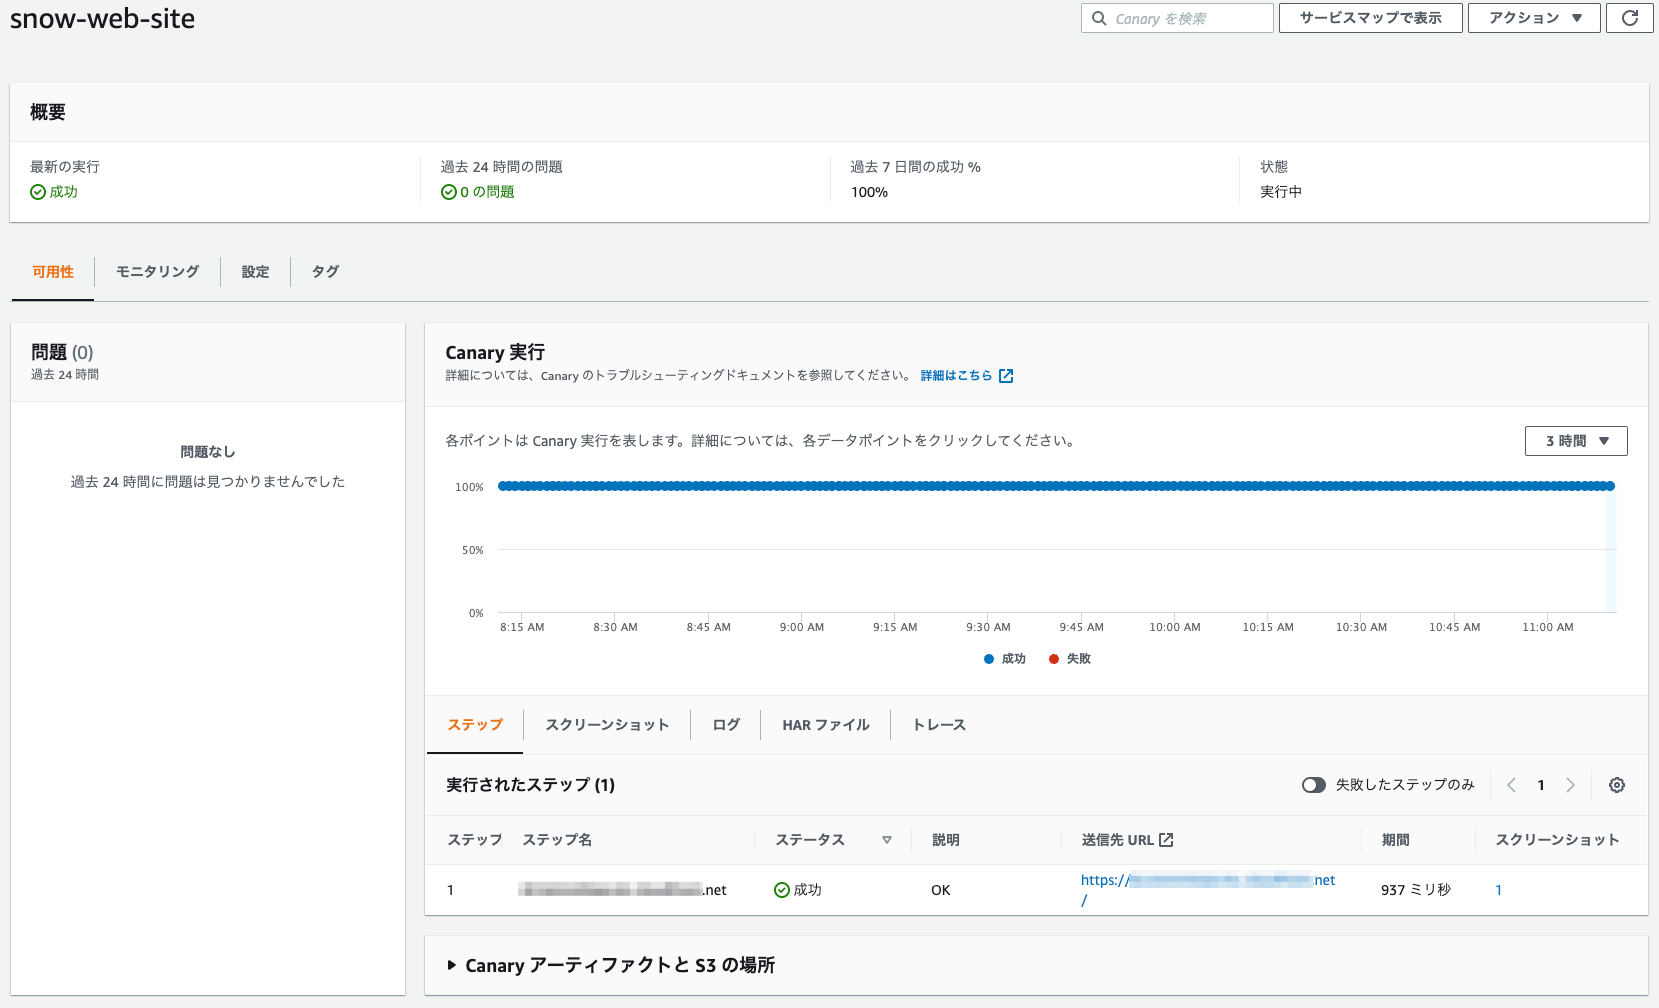
Canary詳細
Canary「snow-web-site」を選択し、開くとCanary単独の実行結果や実行されたステップが確認できます。
スクリーンショット
右下のタブでスクリーションを選択すると、実行ステップの中で取得したスクリーショットを確認することができます。

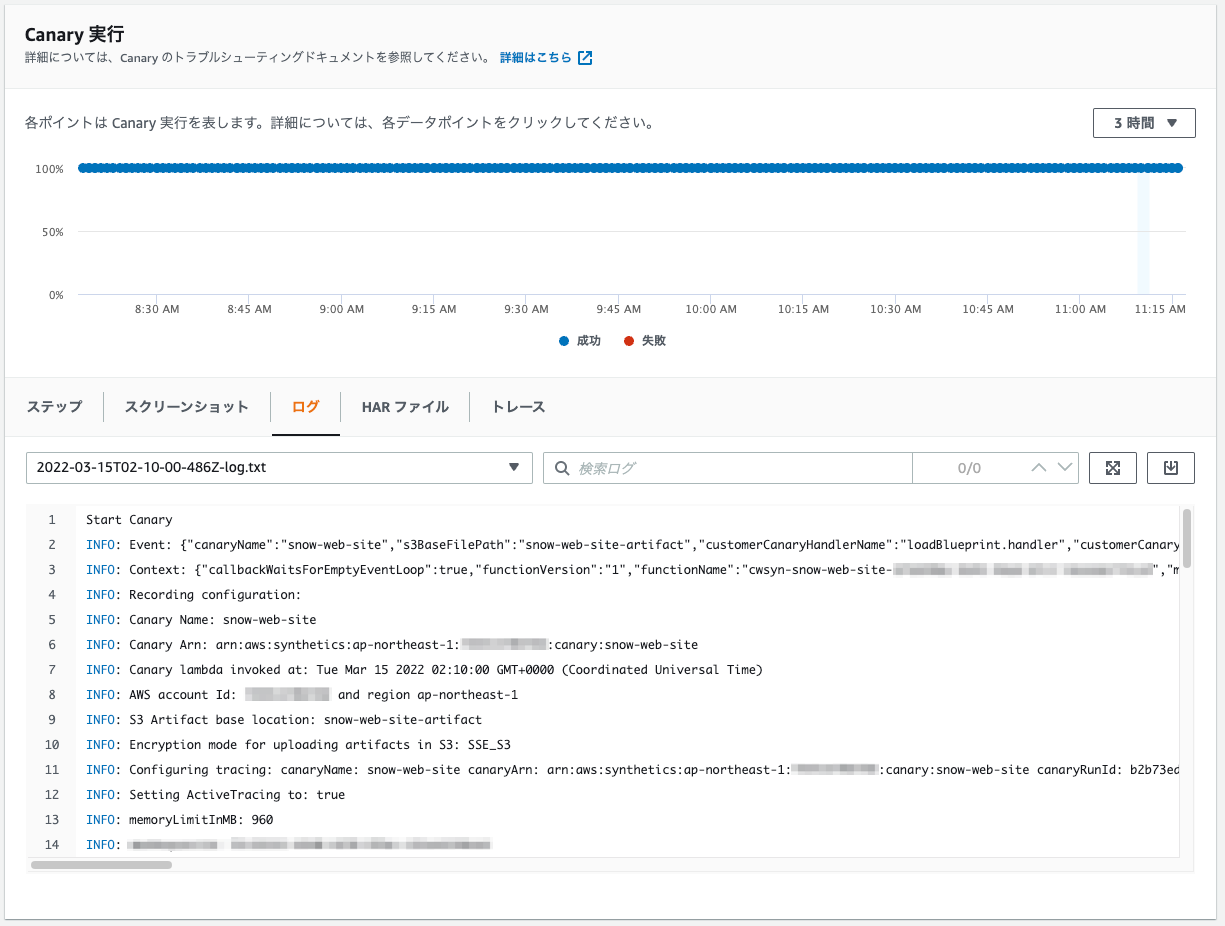
ログ
右下のタブでログを選択すると、Canary実行時のログを確認することができます。
HARファイル
右下のタブでHARファイルを選択すると、アクセス時のリクエスト状況を確認することができます。

「+」でリクエストヘッダーやレスポンスヘッダーも確認できます。

トレース
右下のタブでトレースを選択すると、Canary実行のトレースとセグメントの詳細を確認することができます。(X-Rayを有効にした場合)

トレースを1件選択すると、セグメントの詳細が下段に表示されます。

最後に
Amazon CloudWatch Syntheticsを使うことでシステムの状態を監視することができました。 Lambdaでイチから作るより簡単に設定でき、X-Rayを有効化することでさらに細かいところを見ることもできて便利です。運用する上でも必要なサービス、機能が揃っているのは良いポイントですねー
実際に運用してみて、物足りなかったらサードパーティ製のツールを使う、という流れでやってみるとよいかと思いました。
CloudFormationテンプレートにしておくと、どのアカウントでもすぐに使えるのでぜひご活用いただければと思います。
では。