目的
昔はよくやってたのに最近ブログとかQiitaでアウトプットしてないなぁと思ったのでアウトプットしたいと思います。
お題はドメイン駆動設計です。
これからのアウトプットの拠点としたいブログ型CMS構築を進めていく形式で具体的なコード一緒に考え方を書いていきたいと思います。
DDDそのものについての説明はweb上にたくさん資料があるので省きまして、実際に実装に落とす時にどうするかという点で誰かの参考になれば良いなという感じで書いていきます。
DB設計
DDDとはあまり関係が無いですが、DB設計する時にはまずはパクれる(参考にできる)設計が無いか、ということ考えるようにしています。
今回ならブログなのでwordpressのDB設計が参考になります。
自分で考えてると0から色んなこと考えなきゃいけなくてめんどくさいので、基本的にはつくりたいものに近いもので有名なオープンソースを探して参考にすると良いです。
データベース構造 - WordPress Codex 日本語版
postsテーブル、commentsテーブルをつくる
↑の設計を参考に必要なカラムだけ定義します。
そんなたくさんデータ入らないためインデックスは省略します。
$ php artisan make:migration create_posts_table --create=posts
    public function up()
    {
        Schema::create('posts', function (Blueprint $table) {
            $table
                ->bigIncrements('id')
                ->unsigned()
                ->comment('投稿ID(保存順に自動採番)');
            $table
                ->string('post_name', 200)
                ->comment('投稿スラッグ');
            $table
                ->string('post_title', 200)
                ->comment('タイトル');
            $table
                ->longText('post_content')
                ->comment('本文');
            $table
                ->string('post_status', 20)
                ->default('publish')
                ->comment('publish: 公開 private: 非公開');
            $table
                ->string('post_type', 20)
                ->default('post')
                ->comment('post: 投稿 page: ページ');
            $table
                ->dateTime('post_date')
                ->comment('投稿日時');
            $table
                ->dateTime('post_modified')
                ->comment('更新日時');
        });
    }
    public function up()
    {
        Schema::create('comments', function (Blueprint $table) {
            $table
                ->bigIncrements('comment_id')
                ->unsigned()
                ->comment('コメントID(投稿順に自動採番)');

            $table
                ->unsignedBigInteger('comment_post_id')
                ->comment('コメントが属する投稿ID');
            $table
                ->foreign('comment_post_id')
                ->references('id')
                ->on('posts');

            $table
                ->ipAddress('comment_author_ip')
                ->comment('コメント投稿者の IPアドレス');

            $table
                ->longText('comment_content')
                ->comment('コメント内容');

            $table
                ->string('comment_agent', 255)
                ->comment('コメント投稿者のユーザエージェント');

            $table
                ->dateTime('comment_date')
                ->comment('コメント投稿日時');
        });
    }
$ php artisan migrate

出来ました。
実装
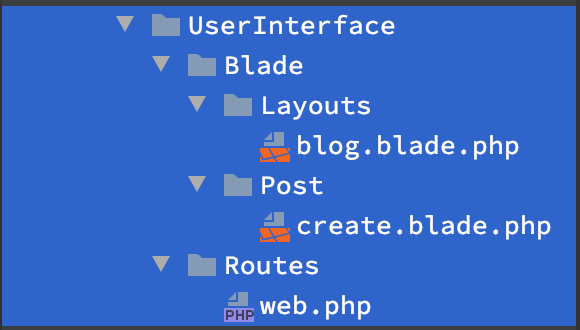
独自に切り出したディレクトリ配下に実装を入れていきます。

フレームワークのコードと自分のコードが混らないようにしてつくっていきます。
考え方としてはフレームワークを土台としてその上に乗って開発してしまうのではなく、しっかりフレームワークと分離した場所に展開する自分のコードの中から必要な時にフレームワークのリソースを活用していく感じです。(Laravelはこれがやりやすいです)
レイヤードアーキテクチャ
レイヤードアーキテクチャをめちゃくちゃ雑に説明するとこんな感じで層を分けてドメインをくっきりさせるということをやる分け方です。上は下に依存していいけど下は上に依存しないようにします。
- UserInterface: ユーザに情報を表示するところ。ユーザや外部システムの入力を解釈する責任をもつ。
- Application: ソフトウェアが行うことになっている仕事を定義するところ。ここにはいっぱいコード書かない。やるべきことを調整するだけ。
- Domain: ビジネスの概念が集中するとか言われてもピンとこないやつ。上手にDDDできてるとここの中に置くモデルにそのアプリケーション特有の仕様がギュッと集まって幸せになれる。
- Infrastructure:DBとやりとりしてドメインモデルを永続化したり、取り出したデータをドメインモデルに変換して返したりするところ。
上からいった方がイメージしやすいんじゃないか説があるので上からいきます。
ユーザインターフェイス層
ユーザに情報を表示したり入力を解釈したりするやつ。
Laravelでviewファイルはデフォルトではresources/views/配下に置きますが、config/view.phpで変更できます。
この層でif文が多いとロジックが漏れ出してます。
テンプレートをいじるHTMLコーダーにとってわかりやすくていじりやすくなってれば良い状態と言えるでしょう。
例えば↓こんな感じです
<p>
@if($user->gender == 'men')
  私は男です
@elseif($user->gender == 'women')
  私は女です
@endif
</p>
<p>{{ $user->sayGender() }}</p>
前者はviewにロジックが書いてありますが後者ではロジックがUserモデルのsayGender関数に隠れてます。
後者の方がフロント係が触りやすいですね。
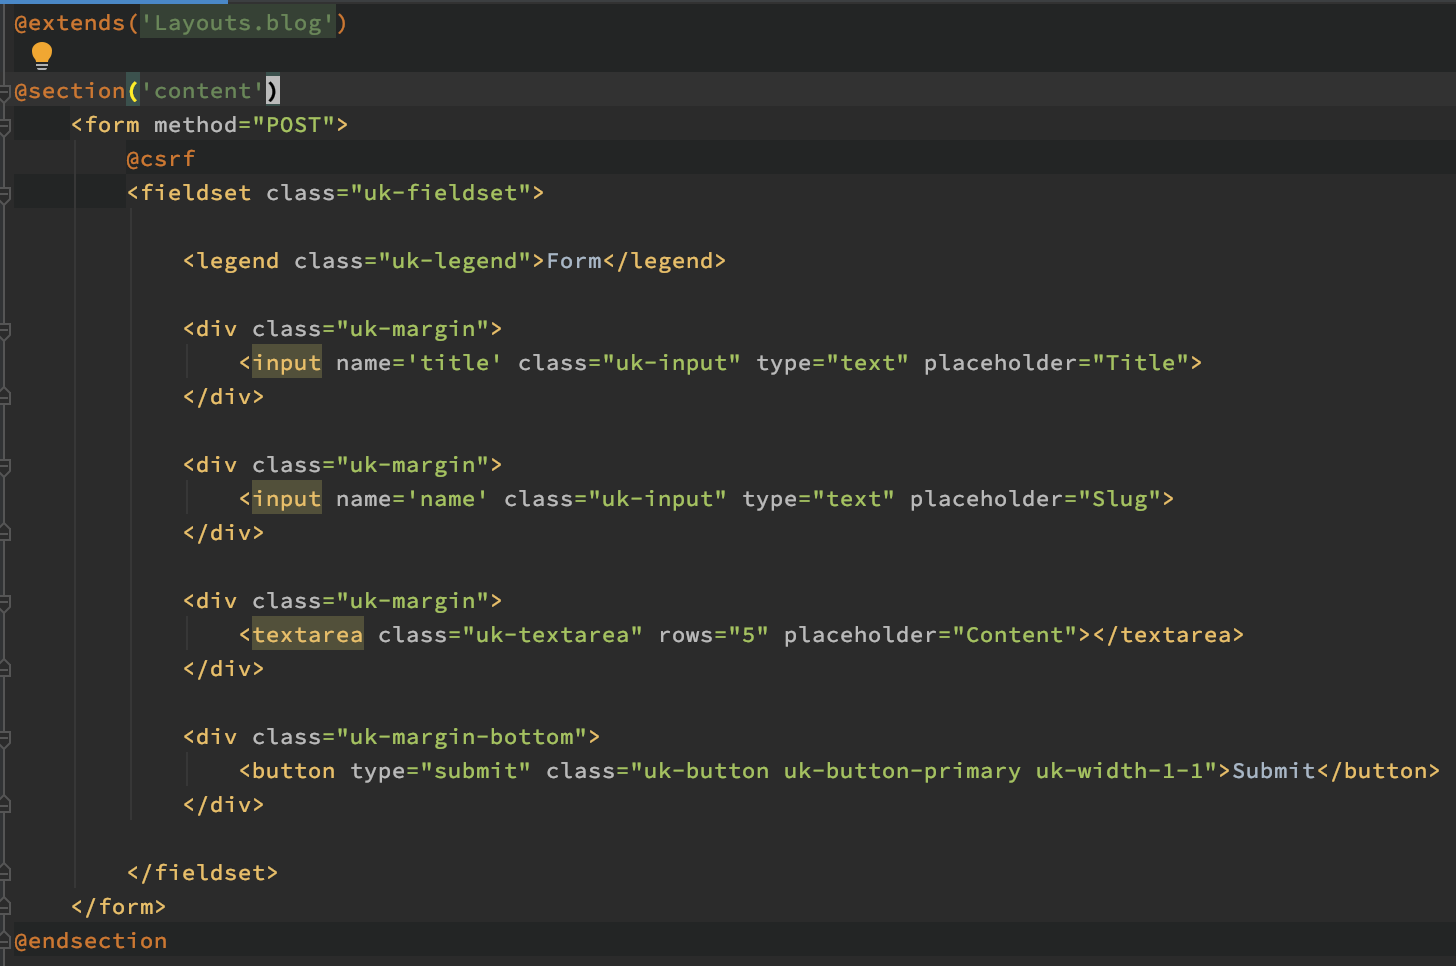
以下、初期設定〜投稿フォームの実装です。
...
   "autoload": {
        "psr-4": {
            "App\\": "app/",
            "Blog\\": "packages/Blog/"
        },
...
...
    'paths' => [
//        resource_path('views'),
        base_path('packages/Blog/UserInterface/Blade'),
    ],
...
...
    protected $namespace = 'Blog\Application\Http\Controllers';
...
    protected function mapWebRoutes()
    {
        Route::middleware('web')
             ->namespace($this->namespace)
             ->group(base_path('packages/Blog/UserInterface/Routes/web.php'));
    }
...
そういえば認証つけないと誰でも投稿できるんですが、一旦気にしないことにします。
(次回以降のお題としたいと思います)

<?php

use Illuminate\Support\Facades\Route;

Route::prefix('blog')->group(function () {
    Route::resource('posts', 'PostController');
});


アプリケーション層
この層は「どんな仕事をするのかだけ書いて薄くシンプルに保つ」を気をつけて書きましょう。
「誰が」「何を」するのか主語述語をハッキリとわかりやすく表現したシングルメソッドのUseCaseクラスを書き、入出力のインターフェイスとしてValueObjectを利用します。
<?php
namespace Blog\Application\Http\Controllers;

use Blog\Application\UseCase\AuthorPublishPost;
use Blog\Application\UseCase\UserGetNewPosts;
use Blog\Domain\Object\Post\PostContent;
use Blog\Domain\Object\Post\PostName;
use Blog\Domain\Object\Post\PostTitle;
use Illuminate\Http\Request;

class PostController extends BlogController
{
    public function create()
    {
        return view('Post.create');
    }

    public function index(UserGetNewPosts $userGetNewPosts)
    {
        $posts = ($userGetNewPosts)();
        return view('Post.index', compact('posts'));
    }

    public function store(Request $request, AuthorPublishPost $authorPublishPost)
    {
        $name = PostName::of($request->input('name'));
        $title = PostTitle::of($request->input('title'));
        $content = PostContent::of($request->input('content'));
        ($authorPublishPost)($name, $title, $content);
        return redirect()->route('posts.index');
    }
}
<?php


namespace Blog\Application\UseCase;


use Blog\Infrastructure\Repositories\PostRepository;

class UserGetNewPosts
{
    /** @var PostRepository */
    private $postRepo;

    public function __construct(PostRepository $postRepo)
    {
        $this->postRepo = $postRepo;
    }

    public function __invoke()
    {
        $posts = $this->postRepo->all();
        return $posts;
    }
}
油断するとバリデーション処理とかレスポンスつくる処理だけでも結構行数増えてしまうところです。
今はやりませんが投稿処理にバリデーションを付けたくなったらFormRequestを継承したPostFormRequestを実装してその中でバリデーションやらを処理します。
何でもかんでもUseCaseとかServiceクラスとして実装してカオスと化したクラス墓場みたいなのよく見ますが、そうはならないようにしましょう。
実装したいものの役割、責任をしっかりイメージしてどこに何を置いてどんな仕事をさせるのか。
これをしっかり考えて整理していけば自然とドメイン層に重要な情報が集中して書けば書くほど後の実装が楽になっていきます。
ドメイン層
↑で実行していたValueObjectの生成とPostEntityの生成について。
EntityもValueObjectも原則constructerをprivateにして守り、どこでも自由にインスタンス生成されるのを防ぎます。
こんな感じ。
<?php
namespace Blog\Domain\Object\Post;

use Blog\Domain\Exceptions\TooLongStringException;
use Blog\Domain\Object\ValueObject;

final class PostName extends ValueObject
{
    /** @var string */
    protected $value;
    /** @var int  */
    private const MAX_STRING_NUM = 200;

    private function __construct() {}

    /**
     * @param string $name
     * @return PostName
     * @throws TooLongStringException
     */
    public static function of(string $name):PostName
    {
        if (self::MAX_STRING_NUM < mb_strlen($name)) {
            throw new TooLongStringException();
        }
        $postName = new PostName();
        $postName->value = $name;
        return $postName;
    }
}
↑PostNameという値の仕様がクラスで表現されています。
MVC的な文脈で言われるFatControllerやFatModel(Fat=コード量多い)の問題って大体適当にサービスクラス増やしたりして結局どっかがしわ寄せ食らって終わるみたいなイメージがありますが、DDDでは
- ControllerはHTTPリクエスト検査し、ValueObjectを作成して適切なUseCase,Serviceに渡し得た値をレスポンスするだけ
- ModelはModel本来の仕様に集中し、値の仕様はValueObjectに逃し、データのIOはRepositoryが行う
↑こうするのでControllerもModelも太らずにすみます。
全ての値をValueObjectにする必要は無いと思いますが、Modelが本質的な仕様の実装に集中するために非常に重要な手段なのでめんどくさがらずに丁寧に実装することをおすすめします。
<?php
namespace Blog\Application\UseCase;

use Blog\Domain\Object\Post\PostContent;
use Blog\Domain\Object\Post\PostEntity;
use Blog\Domain\Object\Post\PostName;
use Blog\Domain\Object\Post\PostTitle;
use Blog\Infrastructure\Repositories\PostRepository;

class AuthorPublishPost
{
    /** @var PostRepository */
    private $postRepo;

    public function __construct(PostRepository $postRepo)
    {
        $this->postRepo = $postRepo;
    }

    public function __invoke(PostName $postName, PostTitle $postTitle, PostContent $postContent)
    {
        $postEntity = PostEntity::newPost($postName, $postTitle, $postContent);
        $this->postRepo->store($postEntity);
    }
}
<?php
namespace Blog\Domain\Object\Post;

final class PostEntity
{
    /** @var PostId */
    private $id;
    /** @var PostName */
    private $postName;
    /** @var PostTitle */
    private $postTitle;
    /** @var PostContent */
    private $postContent;
    /** @var PostStatus */
    private $postStatus;
    /** @var PostType */
    private $postType;
    /** @var PostDate */
    private $postDate;
    /** @var PostModified */
    private $postModified;

    private function __construct() {}

    public static function of
    (
        PostId $postId,
        PostName $postName,
        PostTitle $postTitle,
        PostContent $postContent,
        PostStatus $postStatus,
        PostType $postType,
        PostDate $postDate,
        PostModified $postModified
    ):PostEntity
    {
        $postEntity = new PostEntity();
        $postEntity->id = $postId;
        $postEntity->postName = $postName;
        $postEntity->postTitle = $postTitle;
        $postEntity->postContent = $postContent;
        $postEntity->postStatus = $postStatus;
        $postEntity->postType = $postType;
        $postEntity->postDate = $postDate;
        $postEntity->postModified = $postModified;
        return $postEntity;
    }

    public static function newPost(PostName $postName, PostTitle $postTitle, PostContent $postContent):PostEntity
    {
        $postEntity = new PostEntity();
        $postEntity->postName = $postName;
        $postEntity->postTitle = $postTitle;
        $postEntity->postContent = $postContent;
        return $postEntity;
    }

    public function id():PostId
    {
        return $this->id;
    }

    public function postName():PostName
    {
        return $this->postName;
    }

    public function postTitle():PostTitle
    {
        return $this->postTitle;
    }

    public function postContent():PostContent
    {
        return $this->postContent;
    }
}
インフラ層
上位のレイヤを支える一般的な技術的機能を提供する
とエバンス本には書いてあります。
つまりドメインモデルをインスタンス化するためにストレージからデータを取り出したり、逆にアプリケーションの実行するユースケースがEntityに対して加えた状態変化をストレージで永続化したりする時に利用する一般的な技術的機能についての実装がここに入るということで、MySQLやRedisなどのIOを実装します。
ここで複雑な実装が入ってしまうとドメインが扱うべきビジネスロジックが漏れてるってことになるので良くないみたいに言われています。
1つのEntityを表現したい時にテーブル設計にもよりますがjoinしたい時はままあるのでjoinは許容して良いと思います。
ただ値に関してcaseやif、REPLACEで値を置き換えてしまうような処理は、あとで変えたくなった時のことを考えるとValueObjectなどで吸収した方が変更コストが少なくて幸せそうです。
<?php
namespace Blog\Infrastructure\Repositories;

use Blog\Domain\Object\Post\PostContent;
use Blog\Domain\Object\Post\PostDate;
use Blog\Domain\Object\Post\PostEntity;
use Blog\Domain\Object\Post\PostId;
use Blog\Domain\Object\Post\PostModified;
use Blog\Domain\Object\Post\PostName;
use Blog\Domain\Object\Post\PostStatus;
use Blog\Domain\Object\Post\PostTitle;
use Blog\Domain\Object\Post\PostType;
use Blog\Infrastructure\Eloquents\PostEloquent;
use Illuminate\Support\Collection;

class PostRepository
{
    /** @var PostEloquent */
    private $postElo;

    public function __construct(PostEloquent $postElo)
    {
        $this->postElo = $postElo;
    }

    public function store(PostEntity $postEntity)
    {
        $postElo = new PostEloquent();
        $postElo->post_name = $postEntity->postName();
        $postElo->post_title = $postEntity->postTitle();
        $postElo->post_content = $postEntity->postContent();
        $postElo->save();
    }

    public function all():Collection
    {
        $posts = $this->postElo::query()
            ->orderByDesc('post_date')
            ->get()
            ->map(function($post){
                return PostEntity::of(
                    PostId::of($post->id),
                    PostName::of($post->post_name),
                    PostTitle::of($post->post_title),
                    PostContent::of($post->post_content),
                    PostStatus::of($post->post_status),
                    PostType::of($post->post_type),
                    PostDate::of($post->post_date),
                    PostModified::of($post->post_modified)
                );
            });
        return $posts;
    }
}
投稿一覧の実装
UserInterface層に戻って、リポジトリから取り出したEntityで投稿一覧を実装します。
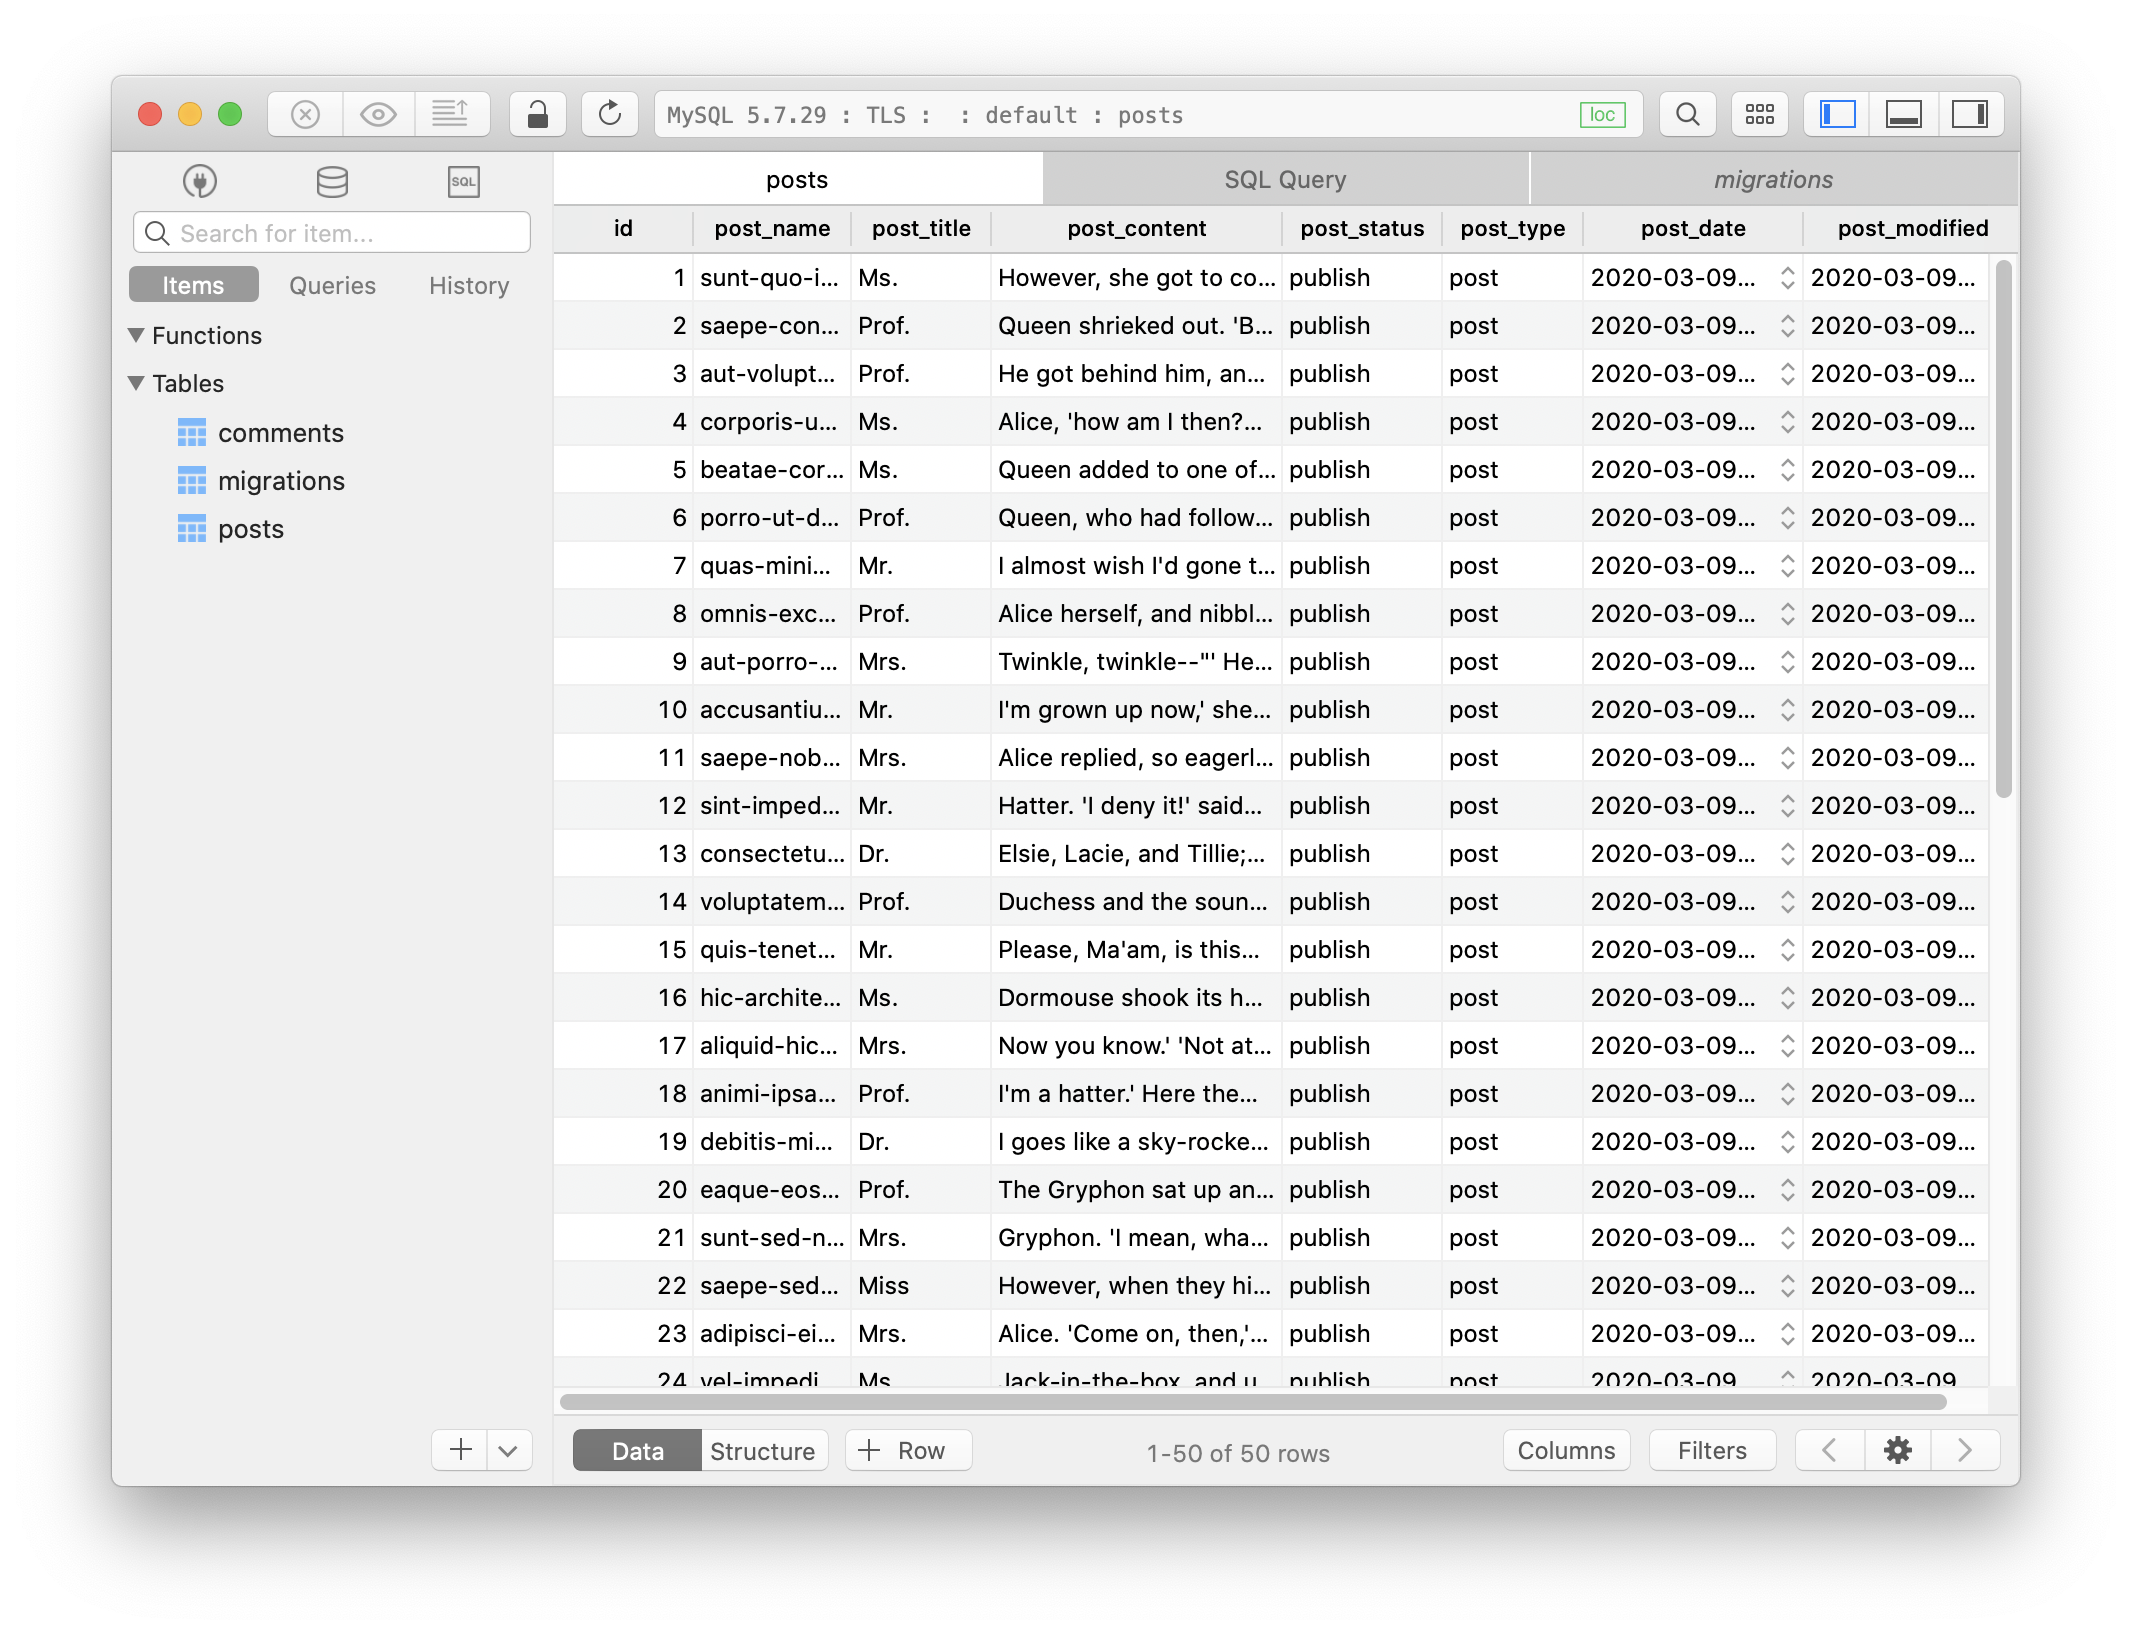
テストデータ欲しい
SeederとFactoryを使ってテストデータを生成します。
$ php artisan make:seeder PostsTableSeeder
<?php

use Illuminate\Database\Seeder;
use Blog\Infrastructure\Eloquents\PostEloquent;

class PostsTableSeeder extends Seeder
{
    /**
     * Run the database seeds.
     *
     * @return void
     */
    public function run()
    {
        factory(PostEloquent::class, 50)->create();
    }
}
<?php

/** @var \Illuminate\Database\Eloquent\Factory $factory */

use Blog\Infrastructure\Eloquents\PostEloquent;
use Faker\Generator as Faker;

/*
|--------------------------------------------------------------------------
| Model Factories
|--------------------------------------------------------------------------
|
| This directory should contain each of the model factory definitions for
| your application. Factories provide a convenient way to generate new
| model instances for testing / seeding your application's database.
|
*/

$factory->define(PostEloquent::class, function (Faker $faker) {
    return [
        'post_name' => $faker->slug,
        'post_title' => $faker->title,
        'post_content' => $faker->realText(),
    ];
});
$ composer dump-autoload
$ php artisan db:seed --class=PostsTableSeeder

入りました。
@extends('Layouts.blog')

@section('content')
    <div class="uk-grid" data-ukgrid>
        <div class="uk-width-2-3@m">
            <h4 class="uk-heading-line uk-text-bold"><span>Latest Posts</span></h4>
            @foreach($posts as $post)
                <article class="uk-section uk-section-small uk-padding-remove-top">
                    <header>
                        <h2 class="uk-margin-remove-adjacent uk-text-bold uk-margin-small-bottom">
                            <a title="Fusce facilisis tempus magna ac dignissim." class="uk-link-reset" href="#">
                                {{ $post->postName() }}
                            </a>
                        </h2>
                        <p class="uk-article-meta">Written on {{ $post->postDate()->diff() }}</p>
                    </header>
                    <p>{{ $post->postContent() }}</p>
                    <a href="#" title="Read More" class="uk-button uk-button-default uk-button-small">READ MORE</a>
                    <hr>
                </article>
            @endforeach
        </div>
        <div class="uk-width-1-3@m">
            <h4 class="uk-heading-line uk-text-bold"><span>About</span></h4>
            <div class="uk-tile uk-tile-small uk-tile-muted uk-border-rounded">
                Lorem ipsum dolor sit amet, consectetur adipisicing elit, sed do eiusmod
                tempor incididunt ut labore et dolore magna aliqua. Ut enim ad minim veniam,
                quis nostrud exercitation ullamco laboris nisi ut aliquip ex ea commodo
                consequat. Duis aute irure dolor in.
            </div>
        </div>
    </div>
@endsection
投稿個別ページの実装
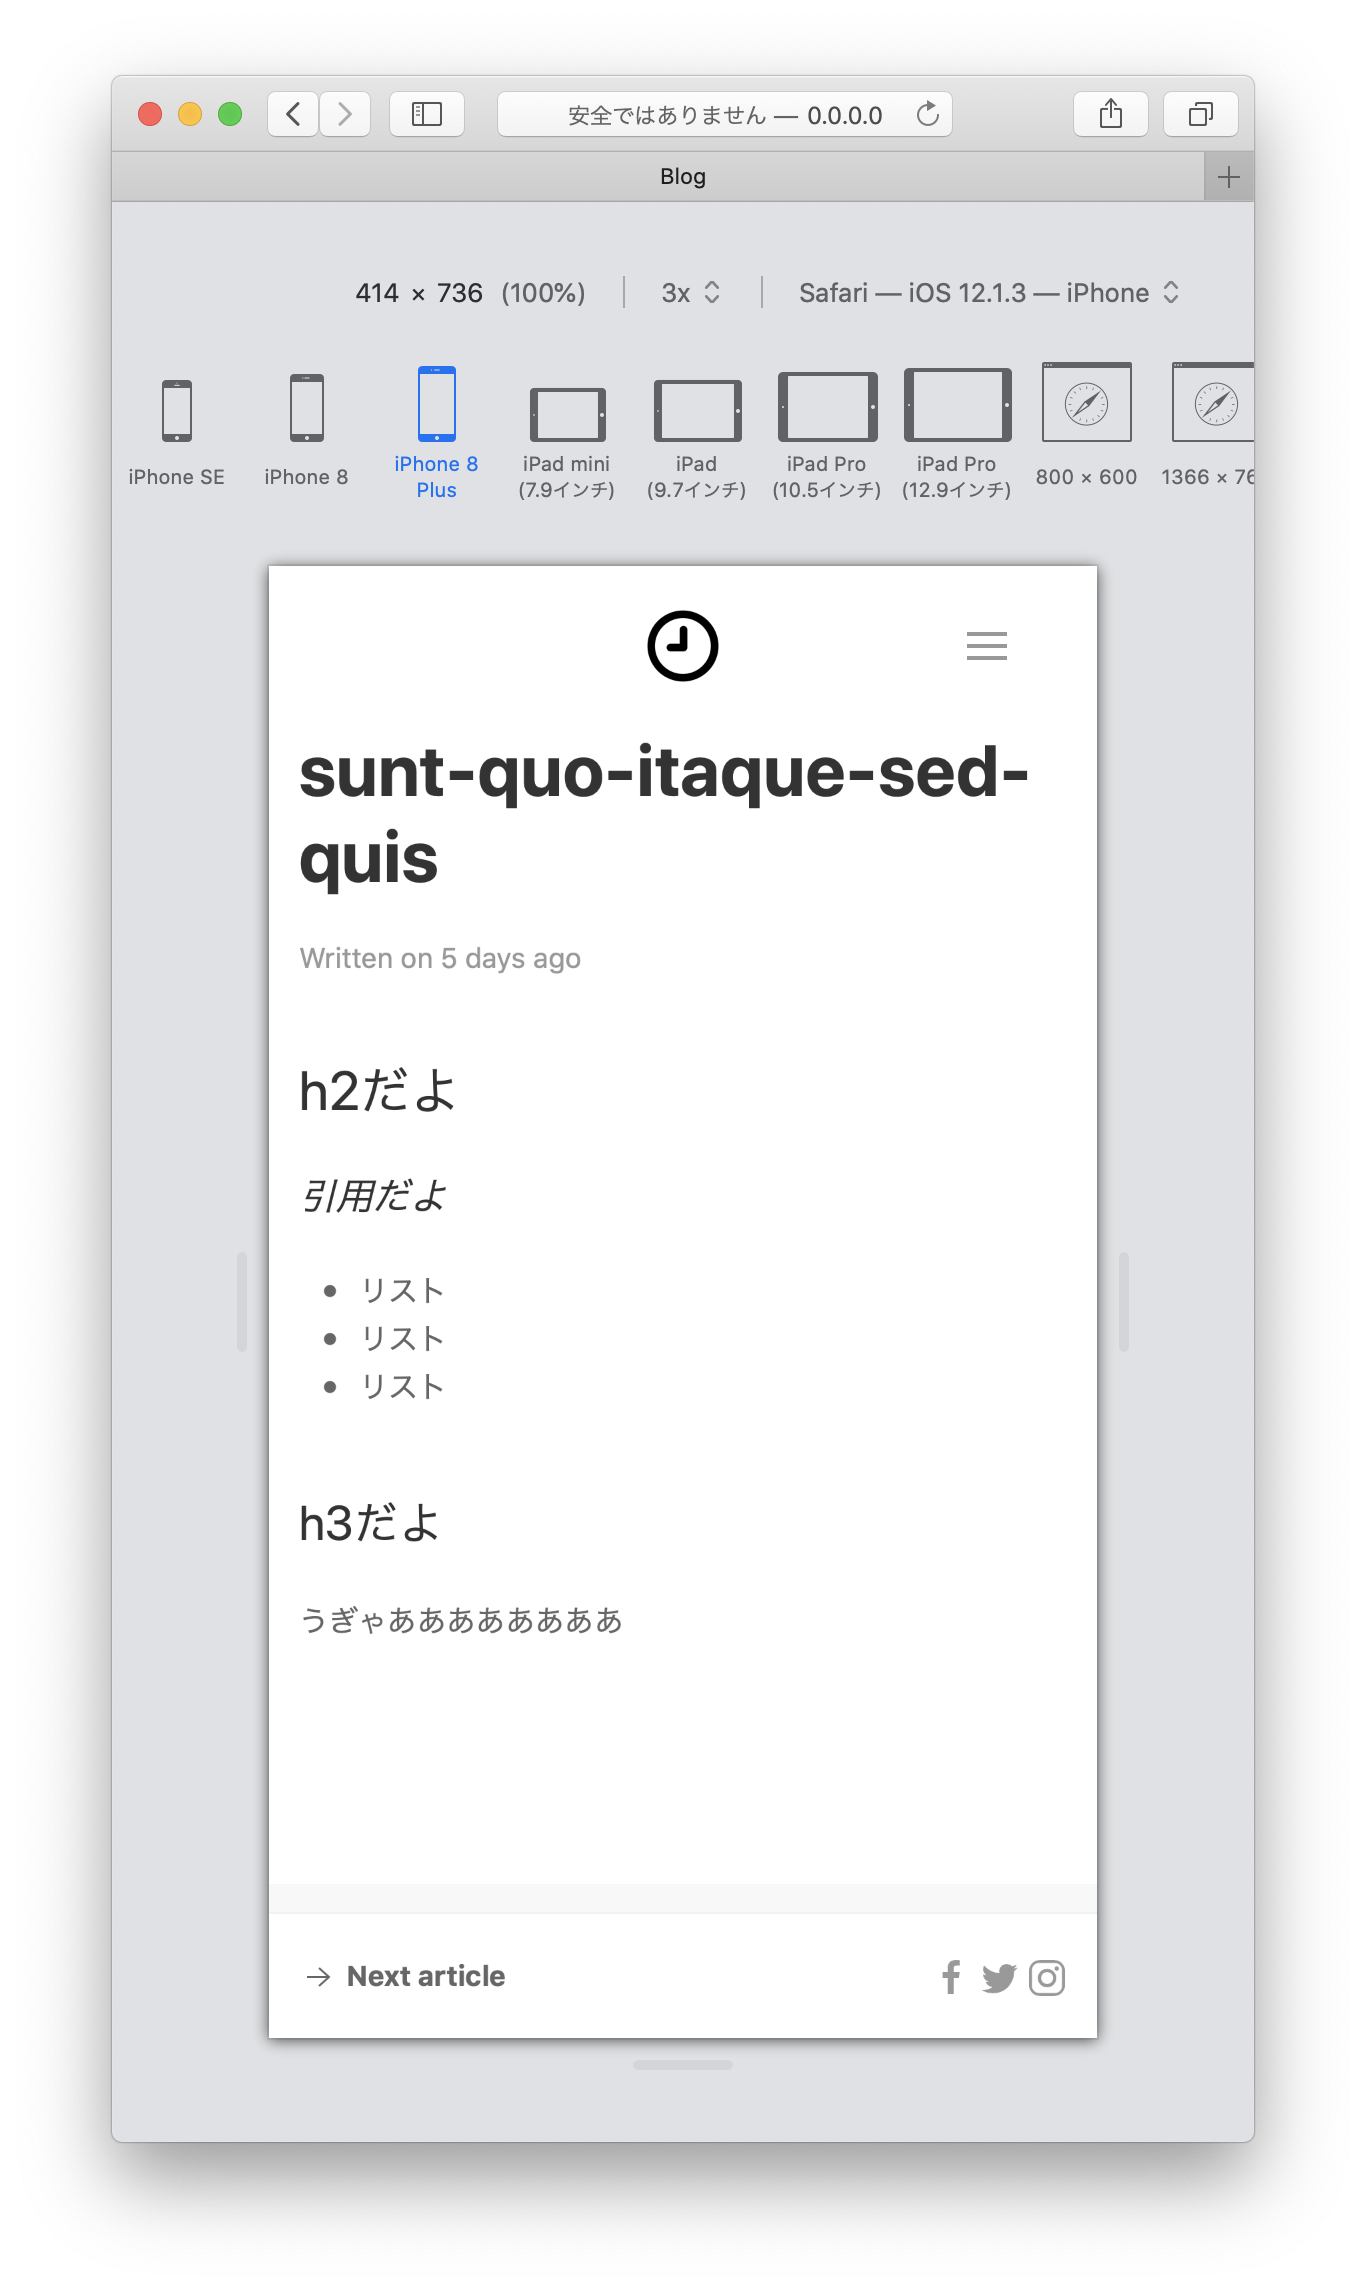
マークダウンで投稿したいのでライブラリ調べました。
そしたら↓コレ
Laravel: There is a Markdown parser and you don’t know it
Laravelにはマークダウンパーサーがあるのに知られてない
だって、マークダウンでEmailを書けるじゃん!
確かに。
ということでインストールする必要ないので実装していきます。
<?php


namespace Blog\Domain\Object\Post;


use Blog\Domain\Object\ValueObject;
use Illuminate\Mail\Markdown;

final class PostContent extends ValueObject
{
    /** @var PostContent */
    protected $value;

    public static function of(string $content): PostContent
    {
        $postContent = new PostContent();
        $postContent->value = $content;
        return $postContent;
    }

    public function __toString():string
    {
        return Markdown::parse($this->value)->toHtml();
    }
}
↑の記事の内容と少し違いますが、コード読んだらコレで十分なのがわかったのでコレでいきます。
PostContentのValueObjectに実装しました。
普通にEloquentをモデルとして実装してるとこの実装はPostEloquentに入ることになると思うのですが、ValueObjectで実装しているとMarkdownクラスを誰が必要としているのか(ないし依存しているのか)が明確になります。
その分、PostEntityは記述が減って、自身が複数もつValueObjectの集合でしか表現できないより重要な仕様を表現することに集中することができます。
## h2だよ

>引用だよ

- リスト
- リスト
- リスト

### h3だよ

うぎゃああああああああ

リリース
DDD関係ないけどherokuにデプロイしてドメイン当てて公開するとこまでやりたいと思います。
Getting Started with Laravel on Heroku
Laravelはログファイルをstorageディレクトリの下に吐くんですが、herokuは仕様的にデプロイしたアプリケーションがファイルシステムへ書き込めないようになっているのでその辺の設定を書き換える必要があります。
<?php
return [
    'default' => env('LOG_CHANNEL', 'stack'),
    'channels' => [
        'stack' => [
            'driver' => 'stack',
            'channels' => ['single'],
        ],
        'single' => [
            'driver' => 'errorlog',
            'level' => 'debug',
        ],
…
MySQL設定
$ heroku addons:create cleardb:ignite
$ heroku config:get CLEARDB_DATABASE_URL
mysql://****
$ heroku config:set \
DB_CONNECTION=mysql \
DB_HOST=**** \
DB_DATABASE=**** \
DB_USERNAME=**** \
DB_PASSWORD=**** \
$ heroku run php artisan migrate
Custom Domain
完成
おわり
コードも書いて文章も書いてリリースまでできて満足です。
2020年はアウトプットするぞー!
