pixi.js シーンの切り替え制御
pixi勉強中です。
コンテンツ内で使われるシーンの切り替えやサイズ調整について次のサイトhttp://ezelia.com/2013/pixi-tutorial
が参考になったので、自分用の忘備録と最新のバージョンでの書き換え用も兼ねて加筆加えて転載していきたいと思います。3回くらいに分割予定です。現在書いているスワイプクイズの参考にします^^;
転載許可はいただいております。
最終的な完成品は以下からダウンロードできます。
http://ezelia.com/wp-content/uploads/labs/PixiTutorial1/PixiTuto.zip
注意:
ScenesManager.class.js(ts)
pixi4では以下のメソッド名が変更となっていますので、
requestAnimFrame
を
requestAnimationFrame
に書き換えてください。
序章
ゲームのチュートリアルでは、オブジェクトの書き方やゲームのロジックの作り方を学ぶのが一般的ですが、
本記事では、UIやシーンの切り替えについて書いていきます。
記事を通して、シーンの処理、ゲームの一時停止、再開やディスプレイをスマホやタブレットに適合させる方法を書いて学ぶことができます。
完成品
http://ezelia.com/wp-content/uploads/labs/PixiTutorial1/index4.html
tips pixiはWebGLとCanvas2Dの両方を使うことができる。基本は、WebGLの方を使っています
筆者は、言語として、TypeScript またIDEとして Visual Studeio 2012 for Web※ を使用しています。
※執筆時2013年7月 現在Visual Studio Codeで代用可能かと思われます。
また本記事では、pixi.d.ts (https://github.com/pixijs/pixi-typescript) を使うことを推奨しています。
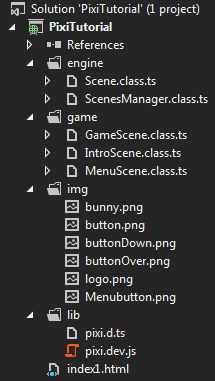
下記は、pixiライブラリやサードパーティを含んだプロジェクトの構造ツリーです。

GameScene
まずはゲームシーンを作るところから始めていきます。
シーンは一般的な更新、停止そして再開処理のできるPixi Stage Objectで作っていきます。。
注意
pixi.js v1,v2 はTypeScriptで書かれていません。TypeScript extendsを使用しています。
新しいバージョンのv4やv5は、TS使われています。
onUpdate()関数メソッドはゲーム内のオブジェクトを更新するために使われています。
gameStageは、基本、onUpdateの継続更新処理のほか、一時停止及び再開が可能です。
///<reference path="../lib/pixi.d.ts" />
// Module
module tuto.Ezelia {

    export class Scene extends PIXI.Stage {
        private paused: bool = false;
        private updateCB = function () { };

        constructor(background:number) {
            super(background);
        }
        public onUpdate(updateCB: () => void ) {
            this.updateCB = updateCB;
        }

        public update() {
            this.updateCB();
        }
        public pause() {
            this.paused = true;
        }
        public resume() {
            this.paused = false;
        }
        public isPaused() {
            return this.paused;
        }

    }

}
注意 今回 PIXI.Stage object はTypeScriptで書かれていないが、 PIXI.Stageを継承しています。
ScenesManager class
シーンを管理する、ScenesManagerを作ります。複数あるシーンの切り替えの制御元になります。
///<reference path="../lib/pixi.d.ts" />
///<reference path="Scene.class.ts" />

// Module
module tuto.Ezelia {
    export class ScenesManager {
        private static scenes: any = {}; // should be hashmap but a JS object is fine too :)
        public static currentScene: Scene;
        public static renderer: PIXI.IRenderer;

        public static create(width: number, height: number) {
            if (ScenesManager.renderer) return this;

            ScenesManager.renderer = PIXI.autoDetectRenderer(width, height);
            document.body.appendChild(ScenesManager.renderer.view);
            requestAnimFrame(ScenesManager.loop);
            return this;
        }
        private static loop() {
            requestAnimFrame(function () { ScenesManager.loop() });

            if (!currentScene || currentScene.isPaused()) return;
            currentScene.update();
            ScenesManager.renderer.render(currentScene);
        }
     }
     //# next code block
}
一つのゲームの中でScenesManagerは1つであることが想定されています。そのため、staticで全ての関数を宣言しています。create()メソッドは、pixiレンダラーの初期化とゲームループの開始を行う役割を担っています。Loopメソッドは、現在のシーンが存在し停止されていないかを確認します。シーンの生成と切り替えをするための2つのメソッドを //# next code block"の上に実装していきます。
        public static createScene(id: string): Scene {
            if (ScenesManager.scenes[id]) return undefined;

            var scene = new Scene();
            ScenesManager.scenes[id] = scene;

            return scene;
        }

        public static goToScene(id: string): bool {

            if (ScenesManager.scenes[id]) {
                if (ScenesManager.currentScene) ScenesManager.currentScene.pause();
                ScenesManager.currentScene = ScenesManager.scenes[id];
                ScenesManager.currentScene.resume();
                return true;
            }
            return false;
        }
このコードのメソッドの名前は非常に明確なので、説明の必要もないと思われます^^。
GotoScene()メソッドは、他のシーンに桐和って移動する前に、現在のシーンを一度停止させます。一度、pixiJSを読み込んだHTMLファイルを作って、SceneManagerとSceneクラスをテストしてみましょう。
    <script src="lib/pixi.dev.js"></script>
    <script src="engine/ScenesManager.class.js"></script>
    <script src="engine/Scene.class.js"></script>
HTMLファイルには以下のタグを埋め込んでください。
<script>
        //get reference of ScenesManager;
        var scenesManager = tuto.Ezelia.ScenesManager;

        //create
        scenesManager.create(300, 400);

        //create a the game scene
        var game = scenesManager.createScene('game');

        //add a bunny :)
        var bunny = PIXI.Sprite.fromImage("img/bunny.png");
        // center the sprites anchor point
        bunny.anchor.x = 0.5;
        bunny.anchor.y = 0.5;
        // move the sprite t the center of the screen
        bunny.position.x = 50;
        bunny.position.y = 50;
        game.addChild(bunny);

        //switch to 'game' Scene
        scenesManager.goToScene('game');

        //register update event
        game.onUpdate(function () {
            bunny.rotation += 0.1;
        });
    </script>
おまけ
Version相違 関数についてメモ
v3は不明です。
.on('touchstart', onDragStart);
2.x では使用不可だったが
4.8 使用可能でした。
setBackgroundColor(color code);
4.8では使用不可。以前のバージョンv2などでは可能であった
PIXI.Spriteに与えるプロパティ
2.x系
.setInteractive(true);
4.x系
.interactive = true;