はじめに
あけまして、、、ではなく寒中お見舞い申し上げます。
年末年始は今まで放置していた k8s 本を頑張って3冊程読みました。
Qiita などの記事はさらっと読めるのに、書籍になると途端に読むスピードが遅くなるのは何故でしょう・・・
今年もよろしくお願いいたします。
今回はタイトルの通り、Ansible で minikube を構築しようと思います。
簡単に k8s 環境が欲しいって時にコードから簡単に起動できると楽かなと思いまして。
最低限の手順で再利用性もあるように、IaC を活かしてみようかと思います。
手順は以下の記事を参考にさせて頂きました。
Ubuntu20.04.1 LTSにminikubeをインストールする
https://qiita.com/yuichi1992_west/items/571016084c110d15320e
環境情報
Vagrant で VirtualBox に VM(ubuntu)構築してインストールします。
ホストマシン
OS:Windows10 Pro
VirtualBox:6.1.16
Vagrant:2.2.14
ゲストマシン
OS:ubuntu 18.04.5 LTS
Python:3.6.9
Ansible:2.9.16
minikube:1.16.0
kubernetes:v1.20.0
kubectl:v1.20.1
VM 構築
適当なフォルダを作って以下のファイルを作って、vagrant up !
※CPU:2Core、Memory:4G で指定しています
# -*- mode: ruby -*-
# vi: set ft=ruby :

Vagrant.configure("2") do |config|
  config.vm.define "ubuntu" do |server|
    server.vm.box = "ubuntu/bionic64"
    server.vm.hostname = "ubuntu"

    server.vm.provider "virtualbox" do |vb|
      vb.customize [
        "modifyvm", :id,
        "--memory", "4096",
        "--cpus", "2"
      ]
    end
  end
end
Ansible インストール
vagranter teraterm でサーバにログインし、まずは Ansible のインストールします。
# Python のバージョン確認
$ python3 -V
Python 3.6.9

# Python モジュールインストール用のツールをインストール
# pip インストールは意外と時間がかかります(5~10分)・・・
$ sudo apt-get update
$ sudo apt-get install python3-pip -y

# pip で Ansible インストール(バージョンはお好みで)
$ pip3 install ansible==2.9.16

# パス再読み込み
$ source .profile

# VM 起動後、再ログインして Ansible のバージョン確認
$ ansible --version
ansible 2.9.16
Ansible 準備
Ansible の実行準備をします。
# SSH 鍵作成
$ ssh-keygen
Generating public/private rsa key pair.
Enter file in which to save the key (/home/vagrant/.ssh/id_rsa): ★Enter
Enter passphrase (empty for no passphrase): ★Enter
Enter same passphrase again: ★Enter
・・・

# 公開鍵を追加
$ cat .ssh/id_rsa.pub >> .ssh/authorized_keys

# ssh ログイン確認
$ ssh localhost
・・・
Are you sure you want to continue connecting (yes/no)? ★yes
・・・

# ログアウト
$ exit

# minikube 用にディレクトリ作成
$ mkdir minikube; cd minikube
Ansible で利用する接続先設定用のファイル(inventory)を作成します。
localhost ansible_host=127.0.0.1
作った inventory ファイルを使って接続確認を行います。
$ ansible -i inventory localhost -m ping
・・・
Are you sure you want to continue connecting (yes/no)?  ★yes
localhost | SUCCESS => {
    "ansible_facts": {
        "discovered_interpreter_python": "/usr/bin/python3"
    },
    "changed": false,
    "ping": "pong" ★pong が表示されていれば OK
}
minikube インストール
minikube 構築用の Playbook(minikube.yaml)を作成し、minikube をインストールしていきます。
今回は Role や複数の yaml ファイルを利用せず、1つのファイルにタスクをまとめました。
※作業内容はコメント(#~)やタスクの name 属性を参照ください
---
# file: minikube.yaml
- hosts: localhost
  gather_facts: no
  become: yes
  tasks:
  #_/_/_/ Install kubectl _/_/_/
  - name: Install requirements for kubectl
    apt:
      name: ["apt-transport-https", "gnupg2"]
      update_cache: yes
      state: present

  - name: Add apt signing key
    apt_key:
      url: https://packages.cloud.google.com/apt/doc/apt-key.gpg
      state: present

  - name: Add repoliset for kubenetes
    apt_repository:
      repo: deb https://apt.kubernetes.io/ kubernetes-xenial main
      state: present

  - name: Install kubectl
    apt:
      name: kubectl
      update_cache: yes
      state: present

  - name: Add kubectl alias(kc) and register completion
    blockinfile:
      path: /home/vagrant/.bashrc
      block: |
        source <(kubectl completion bash)
        alias kc=kubectl
        complete -F __start_kubectl kc
      insertafter: EOF

  #_/_/_/ Install docker-ce _/_/_/
  - name: Install requirements for docker-ce
    apt:
      name: ["ca-certificates", "software-properties-common"]
      update_cache: yes
      state: present

  - name: Add apt signing key
    apt_key:
      url: https://download.docker.com/linux/ubuntu/gpg
      state: present

  - name: Add repoliset for docker
    apt_repository:
      repo: deb [arch=amd64] https://download.docker.com/linux/ubuntu bionic stable
      state: present

  - name: Install docker-ce
    apt:
      name: docker-ce
      update_cache: yes
      state: present

  - name: Start and enable docker service
    systemd:
      name: docker
      enabled: yes
      state: started

  - name: Append the group docker to the vagrant
    user:
      name: vagrant
      groups: docker
      append: yes

  #_/_/_/ Install minikube _/_/_/
  - name: Download minikube
    get_url:
      url: https://storage.googleapis.com/minikube/releases/latest/minikube-linux-amd64
      dest: /usr/local/sbin/minikube
      mode: '0755'
      owner: root
      group: root
ファイルの用意ができたら、早速 Playbook を実行します。
※2回目ですべて OK であれば、Playbook のタスクが正常に実施されました
# 1回目実行(インストール)
$ ansible-playbook -i inventory minikube.yaml
PLAY RECAP ******************************************************************************************
localhost   : ok=12   changed=10   unreachable=0    failed=0    skipped=0    rescued=0    ignored=0

# 2回目実行(確認)
$ ansible-playbook -i inventory minikube.yaml
・・・
PLAY RECAP ******************************************************************************************
localhost   : ok=12   changed=0    unreachable=0    failed=0    skipped=0    rescued=0    ignored=0
minikube の配置まで完了したので、一度 VM を再起動(sudo reboot)します。
※追加グループの反映がされていなかったので再起動を実施しています、再ログインだけでも良さそう。
※SSH でログインした際にも表示されていましたが、再起動を推奨されていたので念のため。
VM 起動後、minikube を起動してみましょう。
$ minikube start --driver=docker
* minikube v1.16.0 on Ubuntu 18.04 (vbox/amd64)
* Using the docker driver based on user configuration
* Starting control plane node minikube in cluster minikube
* Pulling base image ...
* Downloading Kubernetes v1.20.0 preload ...
    > preloaded-images-k8s-v8-v1....: 491.00 MiB / 491.00 MiB  100.00% 71.83 Mi
* Creating docker container (CPUs=2, Memory=2200MB) ...
* Preparing Kubernetes v1.20.0 on Docker 20.10.0 ...
  - Generating certificates and keys ...
  - Booting up control plane ...
  - Configuring RBAC rules ...
* Verifying Kubernetes components...
* Enabled addons: storage-provisioner, default-storageclass
* Done! kubectl is now configured to use "minikube" cluster and "default" namespace by default

$ minikube status
minikube
type: Control Plane
host: Running
kubelet: Running
apiserver: Running
kubeconfig: Configured
timeToStop: Nonexistent
無事に起動することが出来ました。
動作確認
以下のページを参考に動作確認を行います。
Minikubeを使用してローカル環境でKubernetesを動かす
https://kubernetes.io/ja/docs/setup/learning-environment/minikube/
# Deployment の作成
$ kubectl create deployment hello-minikube --image=k8s.gcr.io/echoserver:1.10
deployment.apps/hello-minikube created

# Service の作成
$ kubectl expose deployment hello-minikube --type=NodePort --port=8080
service/hello-minikube exposed

# Pod の確認
$ kubectl get pod
NAME                              READY   STATUS    RESTARTS   AGE
hello-minikube-5d9b964bfb-klkzx   1/1     Running   0          54s

# アクセス URL の確認
$ URL=$(minikube service hello-minikube --url)

# Pod へアクセス(上記 URL に curl でアクセス)
$ curl $URL


Hostname: hello-minikube-5d9b964bfb-klkzx

Pod Information:
        -no pod information available-

Server values:
        server_version=nginx: 1.13.3 - lua: 10008

Request Information:
        client_address=172.17.0.1
        method=GET
        real path=/
        query=
        request_version=1.1
        request_scheme=http
        request_uri=http://192.168.49.2:8080/

Request Headers:
        accept=*/*
        host=192.168.49.2:31175
        user-agent=curl/7.58.0

Request Body:
        -no body in request-

# 後始末(Deployment / Service の削除)
$ kubectl delete services hello-minikube
service "hello-minikube" deleted

$ kubectl delete deployment hello-minikube
deployment.apps "hello-minikube" deleted
おわりに
minikube を Ansible を用いて構築してみました。
github などに Ansible の資材を push しておくことで、必要な時に VM 作成 ⇒ Ansible 実行で開発環境の準備がスムーズに用意できるのではと思います。
※ローカルの開発環境は、不具合あった際に壊して作ってを繰り返したりもすると思うので。
補足1:リソースについて
起動後のリソースは以下の通りでした。
$ top -n1
top - XX:XX:XX up 11 min,  1 user,  load average: 0.07, 0.16, 0.15
Tasks: 138 total,   1 running,  90 sleeping,   0 stopped,   0 zombie
%Cpu(s):  3.1 us,  2.5 sy,  0.0 ni, 92.9 id,  1.2 wa,  0.0 hi,  0.3 si,  0.0 st
KiB Mem :  4039208 total,   526520 free,   781468 used,  2731220 buff/cache
KiB Swap:        0 total,        0 free,        0 used.  3075680 avail Mem
・・・

$ df -hT /
Filesystem     Type  Size  Used Avail Use% Mounted on
/dev/sda1      ext4  9.7G  5.1G  4.6G  53% /
となっています。
※必要に応じて、docker / minikube を停止し、 /var/lib/docker に別のディスクをマウントし直すのが良いと思います。
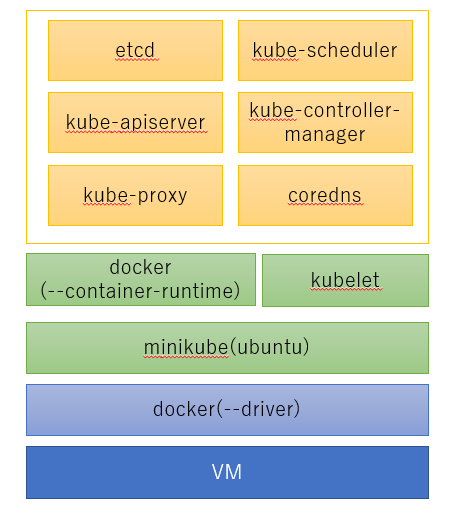
補足2:構成
今回構築した minikube は以下の通りでした。
kubelet 以外のコンポーネントは minikube コンテナ内の docker 上でコンテナとして起動していました。