やること
Amazon SageMakerの組み込みアルゴリズムを使ってMNISTデータセットを分類してみたい!
色々アルゴリズムを見ていると、線形学習アルゴリズムなるものが分類に使えるようなので、以下の内容に沿って試してみました。備忘録的に書きます。
できること:
MNISTデータセットで与えられた手書き数字が0であるかのYes,Noを予測する。
0であると判断した場合は1を、0以外と判断した場合は0を返す。
前提条件
- ドメイン,Roleは作成済み
- (Amazon SageMaker Studioの画面が表示できている)

やってみる
以降、学習時やデプロイ後などに料金が発生します。
ノートブックの作成
「Create Notebook」からJyupiterノートブックを作成します。
Image:Data Science , Kernel:Python 3で動きました。

前準備
SageMaker Python SDK ,S3バケットおよびRoleのセッティングを行います。
S3バケットはMNISTデータセットが保存されているバケット(AWS管理下)と、モデルなどのアーティファクトが保管されるバケット(ユーザ管理下)を設定します。
デフォルトだとsagemaker-<region>-<accountid>バケットに保管されます。
import re
import boto3
import sagemaker
from sagemaker import get_execution_role

sess = sagemaker.Session()

region = boto3.Session().region_name

# S3 bucket where the original mnist data is downloaded and stored.
downloaded_data_bucket = f"sagemaker-sample-files"
downloaded_data_prefix = "datasets/image/MNIST"

# S3 bucket for saving code and model artifacts.
# Feel free to specify a different bucket and prefix
bucket = sess.default_bucket()
prefix = "sagemaker/DEMO-linear-mnist"

# Define IAM role
role = get_execution_role()
MNISTデータセットのダウンロード
上記で設定したS3バケットからデータをローカルにダウンロードし、train_set,valid_set,test_setに格納します。
%%time
import pickle, gzip, numpy, json

# Load the dataset
s3 = boto3.client("s3")
s3.download_file(downloaded_data_bucket, f"{downloaded_data_prefix}/mnist.pkl.gz", "mnist.pkl.gz")
with gzip.open("mnist.pkl.gz", "rb") as f:
    train_set, valid_set, test_set = pickle.load(f, encoding="latin1")
実行するとファイルブラウザからローカルのmnist.pkl.gzを確認できます。

データの確認
ダウンロードしたデータをmatplotlibで描画し、確認してみます。
31番目のテストデータを確認してみると、3であることがわかります。
%matplotlib inline
import matplotlib.pyplot as plt

plt.rcParams["figure.figsize"] = (2, 10)


def show_digit(img, caption="", subplot=None):
    if subplot is None:
        _, (subplot) = plt.subplots(1, 1)
    imgr = img.reshape((28, 28))
    subplot.axis("off")
    subplot.imshow(imgr, cmap="gray")
    plt.title(caption)


show_digit(train_set[0][30], f"This is a {train_set[1][30]}")

データの変換
前処理としてデータセットを線形学習アルゴリズムの入力要件に合うように変換します。
ドキュメントに基づいてrecordIO-wrapped protobuf 形式に変換します。
トレーニングについては、線形学習者アルゴリズムは、recordIO-wrapped protobuf と CSV の両方の形式をサポートします。application/x-recordio-protobuf 入力タイプの場合は、Float32 テンソルのみがサポートされます。text/csv 入力タイプの場合、最初の列はラベルと見なされ、これが予測のターゲット変数です。ファイルモードまたはパイプモードを使用すると、recordIO-wrapped-protobuf または CSV の形式のデータについて線形学習者モデルをトレーニングできます。
import io
import numpy as np
import sagemaker.amazon.common as smac

train_set_vectors = np.array([t.tolist() for t in train_set[0]]).astype("float32")
train_set_labels = np.where(np.array([t.tolist() for t in train_set[1]]) == 0, 1, 0).astype(
    "float32"
)

validation_set_vectors = np.array([t.tolist() for t in valid_set[0]]).astype("float32")
validation_set_labels = np.where(np.array([t.tolist() for t in valid_set[1]]) == 0, 1, 0).astype(
    "float32"
)

train_set_buf = io.BytesIO()
validation_set_buf = io.BytesIO()
smac.write_numpy_to_dense_tensor(train_set_buf, train_set_vectors, train_set_labels)
smac.write_numpy_to_dense_tensor(validation_set_buf, validation_set_vectors, validation_set_labels)
train_set_buf.seek(0)
validation_set_buf.seek(0)
トレーニング用データのアップロード
変換したデータをS3にアップロードします。
Trainingデータ、Validation データされたアップロードされたS3パスが表示されるかと思います。
学習アーティファクトが保存されるパスも表示されます。
import boto3
import os

key = "recordio-pb-data"
boto3.resource("s3").Bucket(bucket).Object(os.path.join(prefix, "train", key)).upload_fileobj(
    train_set_buf
)
boto3.resource("s3").Bucket(bucket).Object(os.path.join(prefix, "validation", key)).upload_fileobj(
    validation_set_buf
)
s3_train_data = f"s3://{bucket}/{prefix}/train/{key}"
print(f"uploaded training data location: {s3_train_data}")
s3_validation_data = f"s3://{bucket}/{prefix}/validation/{key}"
print(f"uploaded validation data location: {s3_validation_data}")

output_location = f"s3://{bucket}/{prefix}/output"
print(f"training artifacts will be uploaded to: {output_location}")
デフォルト設定のままだとs3://sagemaker-<region>-<accountId>/sagemaker/DEMO-linear-mnist/train/recordio-pb-dataに保管されます。
Amazon SageMaker Trainingを利用した学習
学習に使用するコンテナイメージを指定します。
私の環境ではバージニア北部を利用している為、利用する線形学習アルゴリズムのコンテナイメージは382416733822.dkr.ecr.us-east-1.amazonaws.com/linear-learnerになります。
frameworkにlinear-learnerを指定するだけで利用できるようです。
from sagemaker import image_uris

container = image_uris.retrieve(region=boto3.Session().region_name, framework="linear-learner")
deploy_amt_model = False
以下を実行することで学習が行えます。
Estimatorを利用して学習を行います。学習用環境・ハイパーパラメータの設定を行います。
import boto3
import sagemaker

sess = sagemaker.Session()

linear = sagemaker.estimator.Estimator(
    container,
    role,
    instance_count=1,
    instance_type="ml.c4.xlarge",
    output_path=output_location,
    sagemaker_session=sess,
)
linear.set_hyperparameters(feature_dim=784, predictor_type="binary_classifier", mini_batch_size=200)

linear.fit({"train": s3_train_data})
学習は数分で終了します。
アーティファクト保管用のS3バケットを確認すると
s3://sagemaker-<region>-<accountId>/sagemaker/DEMO-linear-mnist/output/linear-learner-~~/output/内にmodel.tar.gzが保管されていました。
モデルのホスティングセットアップ
上記で作成したモデルをホスティングするためにセットアップを行います。
以下を実行するとエンドポイントが作成され、モデルが利用できるようになります。
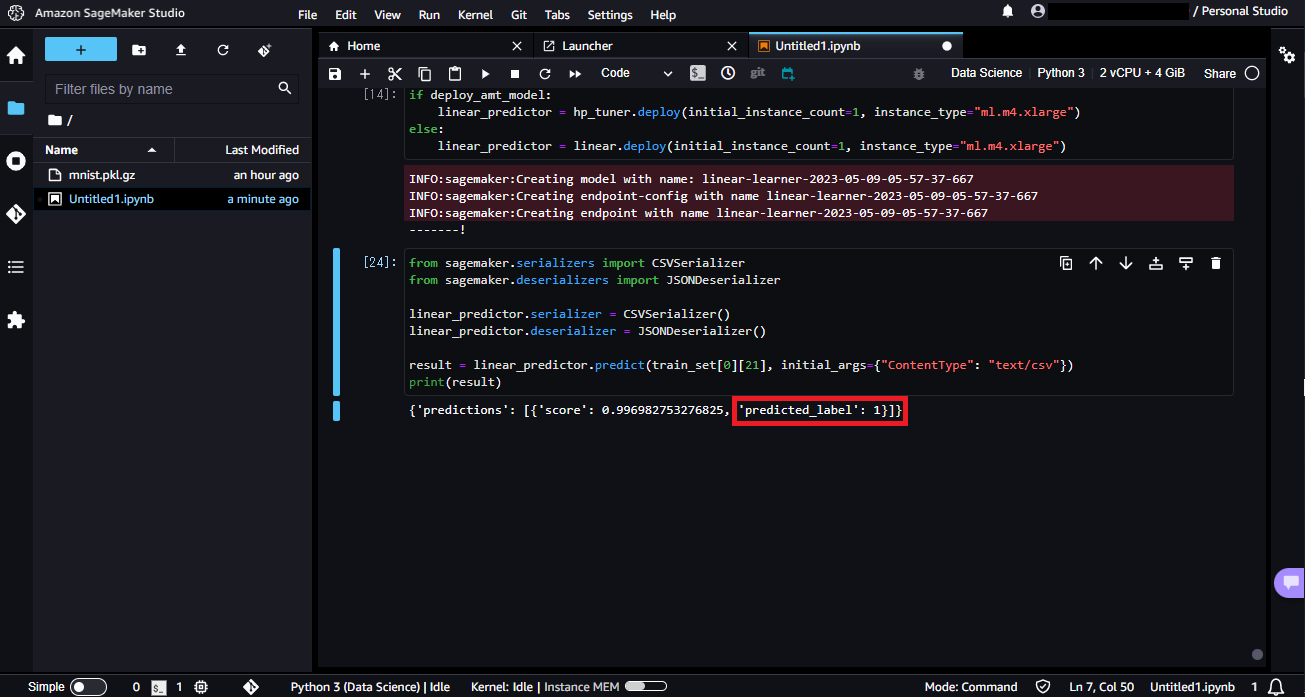
if deploy_amt_model:
    linear_predictor = hp_tuner.deploy(initial_instance_count=1, instance_type="ml.m4.xlarge")
else:
    linear_predictor = linear.deploy(initial_instance_count=1, instance_type="ml.m4.xlarge")
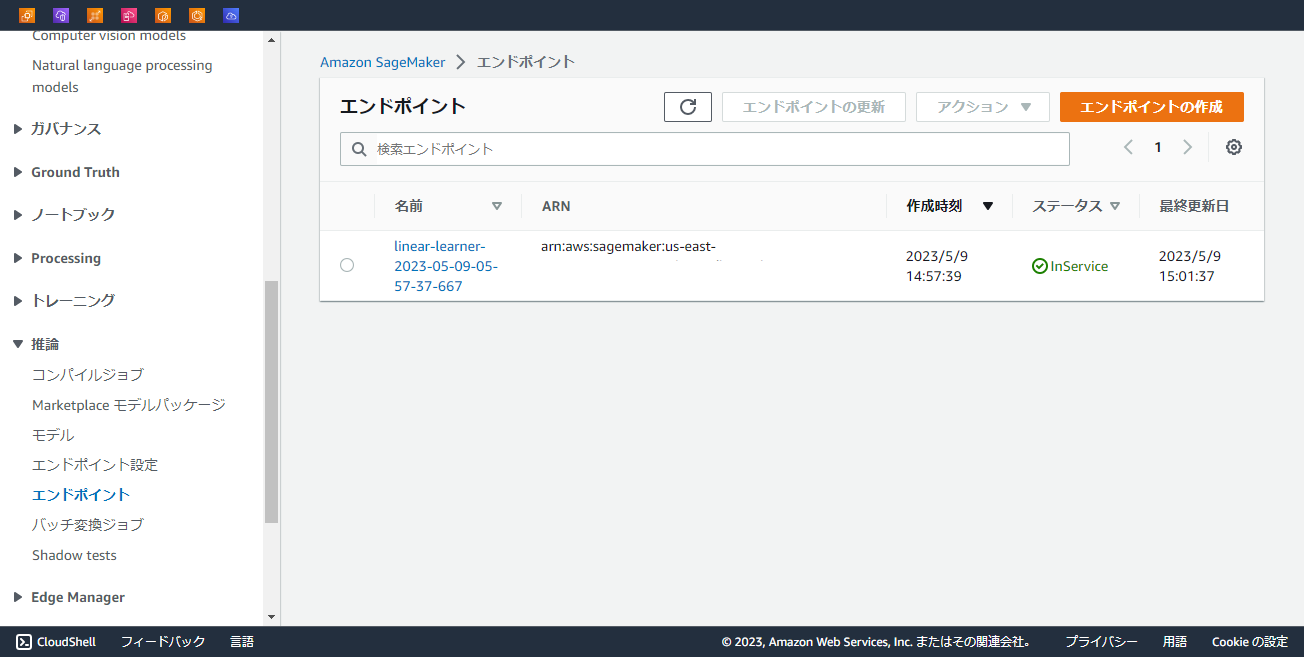
「推論」→「エンドポイント」を開くとマネコンからも作成されたエンドポイントが確認できます。
モデルの使用
実際にモデルを使用してみます。エンドポイントにリクエストを送ると結果が返ってきます。
from sagemaker.serializers import CSVSerializer
from sagemaker.deserializers import JSONDeserializer

linear_predictor.serializer = CSVSerializer()
linear_predictor.deserializer = JSONDeserializer()

result = linear_predictor.predict(train_set[0][30], initial_args={"ContentType": "text/csv"})
print(result)
上記で確認した通り31番目は3であるため、今回は0が返ってきています。
また、22番目は0なのですが、リクエストを送ると1が返ってきました。
精度測定
最後にテストデータを利用し、精度を確認します。
以下を実行するとテストデータの混合行列が出力されます。
import numpy as np

predictions = []
for array in np.array_split(test_set[0], 100):
    result = linear_predictor.predict(array)
    predictions += [r["predicted_label"] for r in result["predictions"]]

predictions = np.array(predictions)
import pandas as pd

pd.crosstab(
    np.where(test_set[1] == 0, 1, 0), predictions, rownames=["actuals"], colnames=["predictions"]
)

後片付け
以下を実行するとモデルがホストされているコンピューティングリソースとエンドポイントが削除され、課金が止まります。
linear_predictor.delete_model()
linear_predictor.delete_endpoint()
終わりに
サンプルの流れに沿って組み込みアルゴリズムで学習,デプロイまでを試してみました。
組み込みアルゴリズムを用いるとアルゴリズムを書かずに実装できるので、学習、デプロイの流れがつかみやすかったです。
他にも大量にサンプルがあるので、試せるものは試してみたいと思います。