はじめに
この記事では、Next.jsとTypescriptを使用して、OpenAIのChatGPTとの会話が可能なアプリケーションを作成してみたので紹介します。
全量は下記に挙げています
アプリの概要
アプリといっても本当に入力したテキストをChatGPTのAPIへリクエストをして、回答をチャット画面に表示するといった至ってシンプルなものとなっています。
前提
今回はnext.jsを利用しますがバージョンが13になりさまざまな機能が追加されているため、こちらのAPP Routerを使って実装していきます
サーバサイド
次にgptからの結果を返すサーバのAPIを実装します。
今回は/api/gptでアクセスできるように作っていきます。
OpenAIのAPIとアクセスするサービスクラス
まずは、OpenAIが提供するライブラリを用いてchatGPTでの回答を行うサービスクラスの作成です
OpenAIの設定については下記部分でConfigurationにAPIキーを設定し、OpenAIApiのインスタンスを作成します
APIキーの取得については下記を参考にしてください。最初は18ドルまで無料で利用できるため、ハードル低く試すことができます
https://nbaboston.net/wp-admin/post.php?post=1824&action=edit
const configuration = new Configuration({
      apiKey: process.env.OPENAI_API_KEY,
    });
    this.instance = new OpenAIApi(configuration);
次にAPIへのアクセスを行い、結果を取得します
createChatCompletionメソッドを利用してmodelには使用したいモデル名(他にはgpt-3.5-turboなど)、messagesに役割(role)と質問内容(content)を設定することでGPTからの回答が得られます
レスポンスはresponse.data.choices[0].message?.contentで取得することができます
参照)https://platform.openai.com/docs/api-reference/chat
const response = await this.OpenAIApiInstance.createChatCompletion({
        model: 'gpt-4',
        messages: [{ role: 'user', content: prop.prompt }],
      });
      if (response.status !== 200) {
        console.log(`status = ${response.status} : `, response.statusText);
      }

      return response.data.choices[0].message?.content;
下記はサービスクラスの全量になります
- ai_chat_flow/src/services/openai-service.ts
import { Configuration, OpenAIApi } from 'openai';

export class OpenaiService {
  private static instance: OpenAIApi | undefined;
  private static get OpenAIApiInstance(): OpenAIApi {
    if (this.instance) {
      return this.instance;
    }
    const configuration = new Configuration({
      apiKey: process.env.OPENAI_API_KEY,
    });
    this.instance = new OpenAIApi(configuration);
    return this.instance;
  }

  static async postChat(prop: { prompt: string }): Promise<string | undefined> {
    try {
      const response = await this.OpenAIApiInstance.createChatCompletion({
        model: 'gpt-4',
        messages: [{ role: 'user', content: prop.prompt }],
      });
      if (response.status !== 200) {
        console.log(`status = ${response.status} : `, response.statusText);
      }

      return response.data.choices[0].message?.content;
    } catch (e) {
      console.log(e);
    }
  }
}
上記コードではpostChatメソッドで引数に指定されたプロンプトから結果を返すようにしています。
また、openAIのAPIキーは.envから取得するようにしています
APIのルーティングファイル
次はAPIのルーティングファイルについてです
今回はPOSTメソッドでのみアクセスを受け付けるようにします
- ai_chat_flow/src/app/api/gpt
import { OpenaiService } from '@/services/openai-service';
import { NextResponse } from 'next/server';
export async function POST(request: Request) {
  const { prompt } = await request.json();
  const result = await OpenaiService.postChat({ prompt });
  if (result == undefined) {
    throw new Error();
  }
  return NextResponse.json({ result });
}
上記ではプロンプトから結果をresultをレスポンスに設定するようにしています
チャット画面
まずはクライアントサイドのチャット画面からルーティングとして/chatでアクセスできるようにしました
- ai_chat_flow/src/app/chat/page.tsx
"use client";
import { useState } from "react";

type Message = {
  userId: number;
  text: string;
};
export default function Home() {
  const [messages, setMessages] = useState<Message[]>([]);
  const [input, setInput] = useState("");

  const sendMessage = (e: { preventDefault: () => void }) => {
    e.preventDefault();

    if (input !== "") {
      messages.push({ userId: 0, text: input });
      setMessages([...messages]);
      fetch(`/api/gpt`, {
        method: "POST",
        headers: {
          "content-type": "application/json;charset=UTF-8",
        },
        body: JSON.stringify({
          prompt: input,
        }),
      }).then(async (data) => {
        const result = await data.json();
        messages.push({
          userId: 1,
          text: result.result || "sorry not response gpt",
        });
        setMessages([...messages]);
      });
      setInput("");
    }
  };

  return (
    <div className="flex flex-col h-screen bg-gray-100">
      <div className="flex flex-row justify-center items-center bg-green-500 p-4">
        <h1 className="text-white text-2xl">Next.js Chat App</h1>
      </div>
      <div className="flex flex-col flex-grow overflow-y-scroll bg-white">
        {messages.map((message, index) => (
          <div
            key={index}
            className={`flex flex-row ${
              message.userId === 0 ? "justify-end" : "justify-start"
            } items-end p-4`}
          >
            <p
              className={`max-w-xs ${
                message.userId === 0 ? "bg-green-100" : "bg-gray-300"
              } rounded-lg p-2 mb-2`}
            >
              {message.text}
            </p>
          </div>
        ))}
      </div>
      <form
        onSubmit={sendMessage}
        className="flex flex-row items-center p-4 bg-gray-200"
      >
        <input
          value={input}
          onChange={(e) => setInput(e.target.value)}
          placeholder="Type a message"
          className="flex-grow rounded-full p-2 mr-4 bg-white"
        />
        <button
          type="submit"
          className="bg-green-500 text-white rounded-full p-2"
        >
          Send
        </button>
      </form>
    </div>
  );
}
上記コードは、ユーザIDが0の場合は自分が送信したメッセージで1の場合はGPTからの回答になります
実行
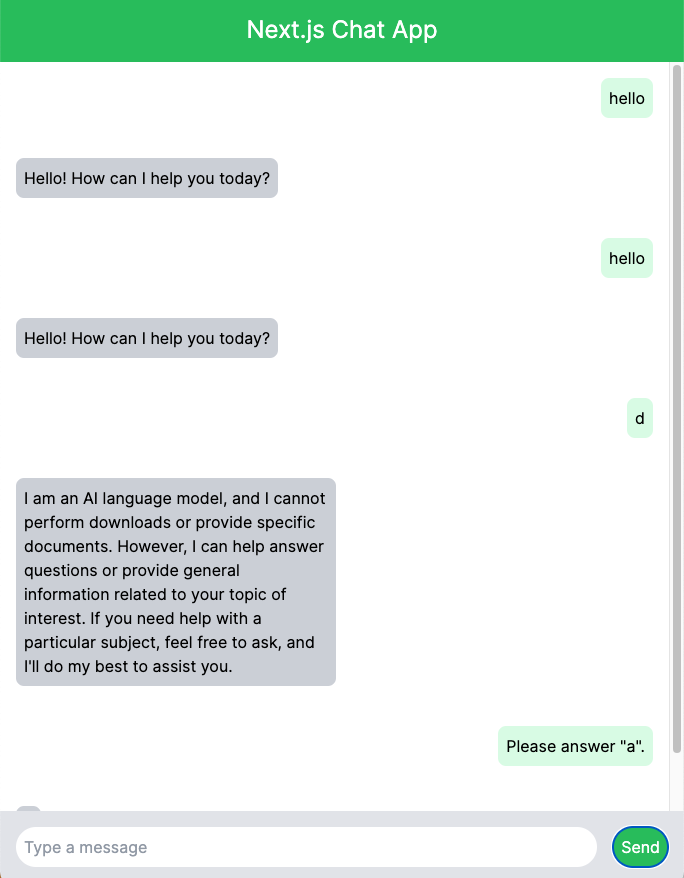
npm run devで実行して、「http://localhost:3000/chat 」にアクセスすると下記のようにチャット画面が表示されて、画面下部の入力欄に入力して、sendボタンを押下するとチャットが始まり右側が自分が入力した内容、左側がGPTからの回答結果になっています

最後に
このようにOpenAIとTypescriptは公式のライブラリがPythonとともに提供されていることから、かなり使いやすくなっています。テキストの他にもDall・Eの画像生成も使えるため、さまざまな部分をAIを用いて使用することができるようになりそうです