はじめに
今週と来週の二回に分けてUdemyで学んだJavaScriptの非同期処理の書き方を投稿します。
今週は非同期処理実装時にコールバック地獄を回避できるPromiseについて書きます。
非同期処理とは?
多くのプログラミング言語にはコードの評価の仕方として、**同期処理(sync)と非同期処理(async)**という大きな分類があります。
※並列処理は省略します。
同期処理はコードを順番に処理していき、ひとつの処理が終わるまで次の処理は行いません。
その為、重たい処理が間にあると、そこで大きな待ち時間が生まれ、画面の操作が一切行えないといった悪影響がでます。
非同期処理はコードを順番に処理していきますが、ひとつの非同期処理が終わるのを待たずに次の処理を評価します。
つまり、非同期処理では同時に実行している処理が複数あります。
今回、以下のように料理レシピのIDとレシピ作成者をsetTimeOutを使ってコンソールに出力するという実装をします。
コールバック地獄とは?
非同期処理を実装する際に気をつけたいのが、
複数のデータの読み込みが完了してから読み込んだデータに対して処理をかけたいという場合です。
以下のように処理を書くとします。
function getRecipe(){
                setTimeout(() => {
                    const recipeID = [523, 883, 473, 974];
                    console.log(recipeID)

                    setTimeout((id) => {
                        const recipe = {title: 'Udon', publisher: 'Jacob'};
                        console.log(`${id}:${recipe.title}`);

                        setTimeout(publisher =>
                            const recipe = {title: 'Ramen', publisher: 'Tony'}
                            console.log(recipe)
                        }, 1500, recipe.publisher)
                    } ,1500, recipeID[2]);

                }, 1500);
            }
            getRecipe();
このようにコールバック関数が連続することを**”コールバック地獄”**と言います。
上記コードは
深いネストにより可読性が低い処理の追加/削除が大変
と言えるでしょう。
このコールバック地獄を回避できるのがPromiseです。
Promiseを使った書き方
const getRelated = publisher =>{
return new Promise((resolve, reject) =>{
setTimeout(pub =>{
const recipe = { title: 'Ramen', publisher: 'Tony' }
resolve(`${pub}: ${recipe.title}`);
}, 2000, publisher);
});
};
const getIDs = new Promise((resolve, reject) =>{
setTimeout(() =>{
resolve([523, 883, 473, 974]);
}, 1500);
});
const getRecipe = recId =>{
return new Promise((resolve, reject) =>{
setTimeout(ID =>{
const recipe = { title: 'Udon', publisher: 'Taro' };
resolve(`${ID}: ${recipe.title}`)
}, 2000, recId);
});
};
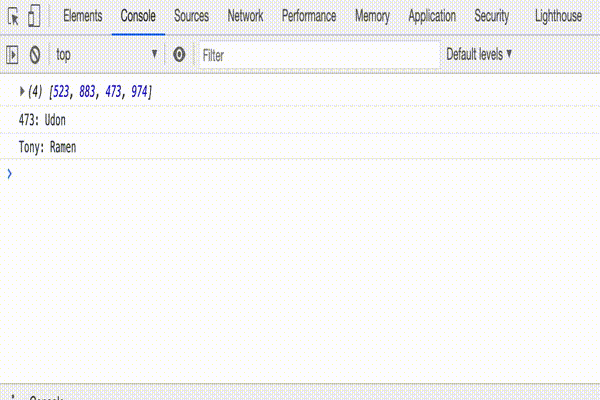
getIDs
.then(IDs => {
console.log(IDs);
return getRecipe(IDs[2]);
})
.then(recipe => {
console.log(recipe);
return getRelated('Tony');
})
.then(recipe => {
console.log(recipe);
})
.catch(e => {
console.log(e);
});
結果は、成功と失敗の2つに分かれます。
成功時には引数で渡される関数resolveを、失敗時には引数で渡されるrejectを呼び出すように記述します。
(今回はrejectは省略)
resolve()した値はthen()で受け取れ、reject()した値はcatch()で受け取れます。
次週はpromiseよりも簡潔に書けるように導入されたasync/awaitという機能について書きます。
参考
Udemy: The Complete JavaScript Course 2020: From Zero to Expert! (Lecture No.434)