概要
今までpodman v4.xの時には自分のM1 Macではpodman machine startが失敗してほとんどpodmanが起動しませんでした。
周りにはそういう人はあまりいなかったので、おそらく自分のM1 Macの環境依存の問題の気もします。
(podmanを綺麗に入れ直したり、バージョンを変えたり、VMのCPU、メモリを変えたり、unset SSH_AUTO_SOCKをしてやり直したり、、、などネットにある色々なワークアラウンドを試しましたがなかなかうまくいきませんでした。。)
そんな中、少し前の2024年3月後半に、Podman v5.0.0が出ました。
Podman v5.0.0からは、podman machineは、qemuではなく、Apple Hypervisor(applehv)がデフォルトになったり色々変わったようですので、気分新たに、再チャレンジしてみました。
結果としては、podman v5.0.0でも、今までと同じようにpodman machine startで失敗してしまいました。。
ですが、その後色々と試していたところ、ついにpodman machine startが成功するところまで持っていくことができたので、自分用のメモとして実施した手順を残しておきます。
(おそらく他の人には起こらないと思うのであまり参考にはならないと思います。)
環境
検証実施バージョン
2024/03/25時点の最新バージョンを使用しています。
- MacBook Air, M1 2020 (macOS Sonoma 14.4)
- podman v5.0.0
(補足)検証時(2024/03/25)の最新バージョン
検証時のpodmanのlatestはv5.0.0でした。
また、podman-desktopのlatestは1.8.0で、中に含まれているpodmanのバージョンは4.9.3でした。
今回はpodman v5.0.0を使ってみたかったので、単体のpodmanをインストーラで導入しました。
(補足)2024/04/30の最新バージョン
2024/04/30現在は、podmanのlatestはv5.0.2です。
また、podman-desktopのlatestは1.9.1で、中に含まれているpodmanのバージョンはv5.0.1またはv4.9.4になった模様なのでpodman-desktopでもpodman v5.xが利用できると思います。
podmanの起動 (失敗)
podmanのインストーラのダウンロード
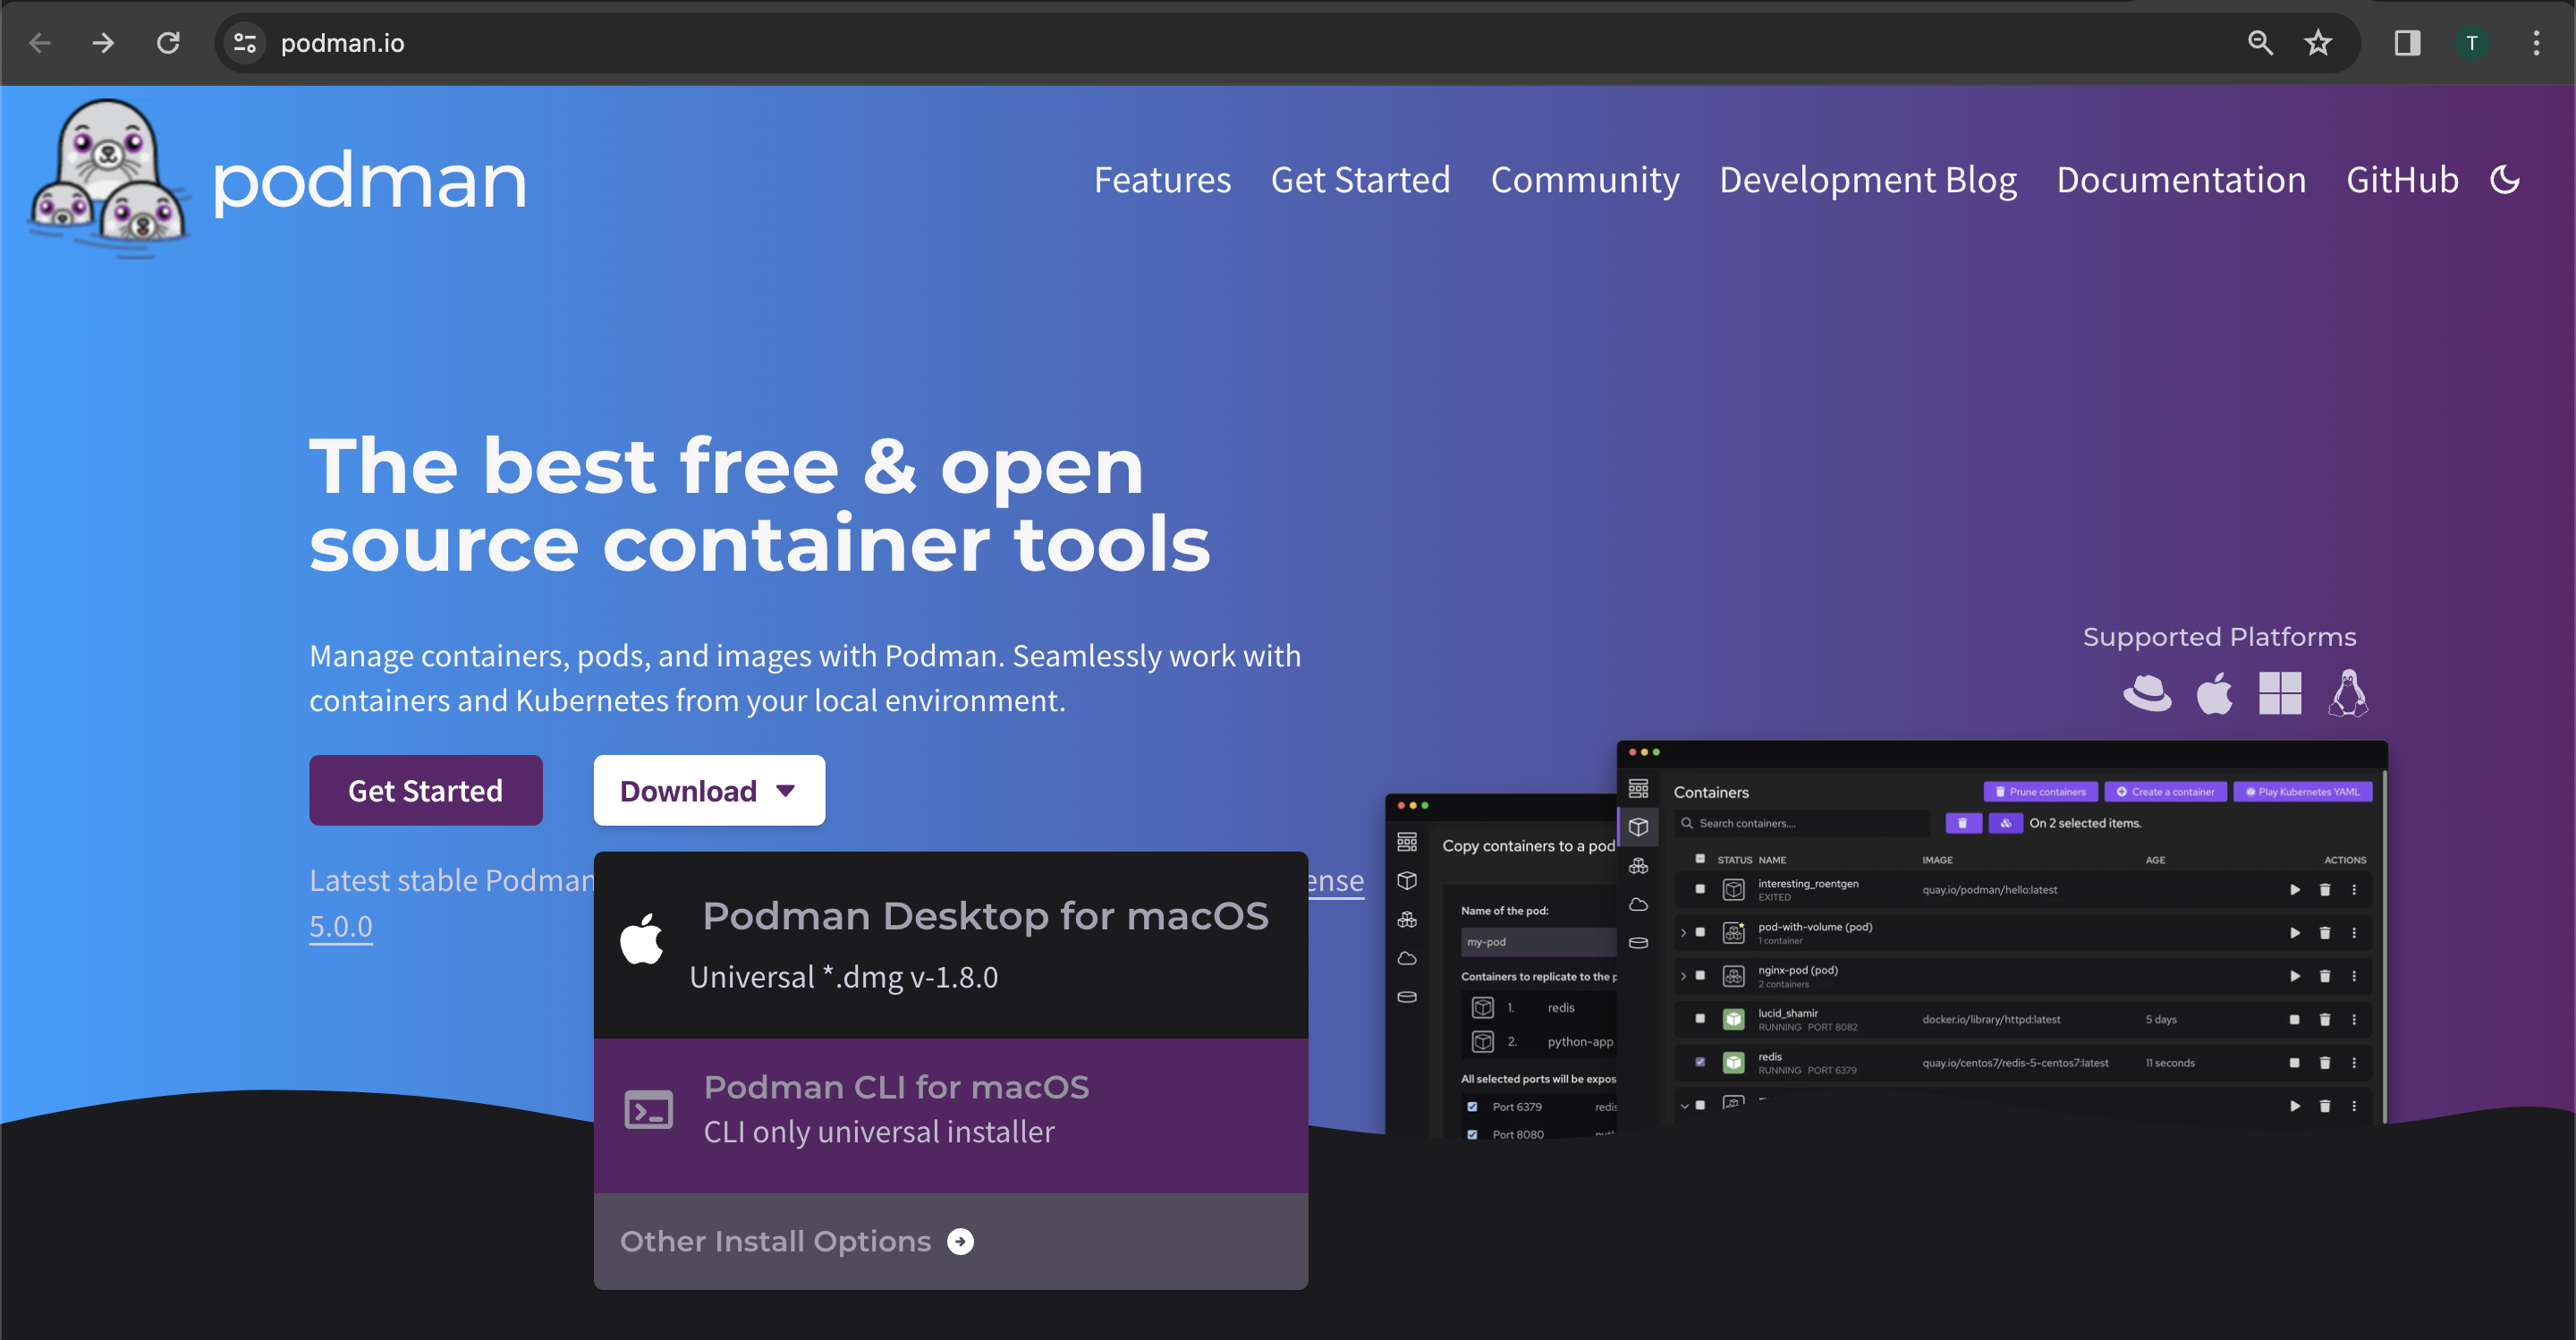
まず、以下のサイトからpodmanのインストーラをダウンロードします。
画面の中央の「Download」から「Podman CLI for macOS」を選択すると、podman-installer-macos-universal.pkgがダウンロードされます。
もしくは、以下のサイトからpodmanのインストーラをダウンロードすることもできます。
「v5.0.0」欄の下部にある「Assets」欄のところから、podman-installer-macos-universal.pkgをダウンロードします。
podmanのインストール
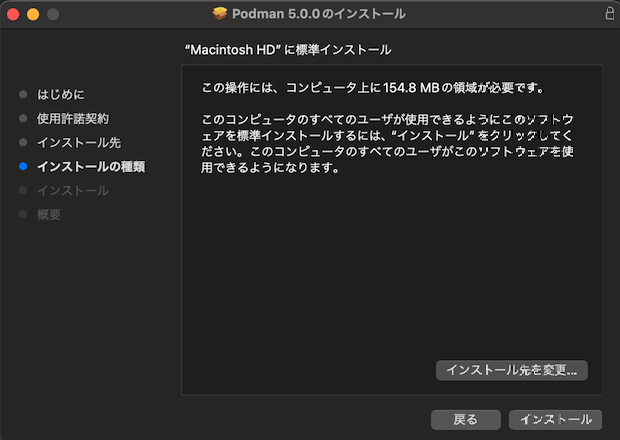
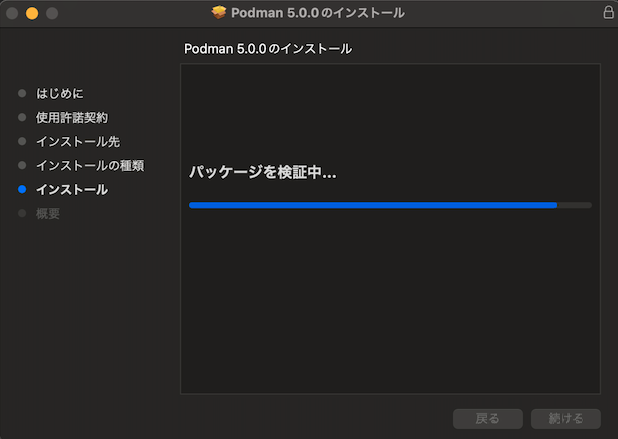
ダウンロードしたpodman-installer-macos-universal-v5.0.0.pkgをダブルクリックします。
Podman 5.0.0のインストーラが起動します。「続ける」をクリックします。
「使用許諾契約」画面で「続ける」をクリックします。
確認の画面が表示されるので、「同意する」をクリックします。
インストール先の選択画面でデフォルトのまま「次へ」をクリックします。
確認画面が出るので、「インストール」をクリックします。
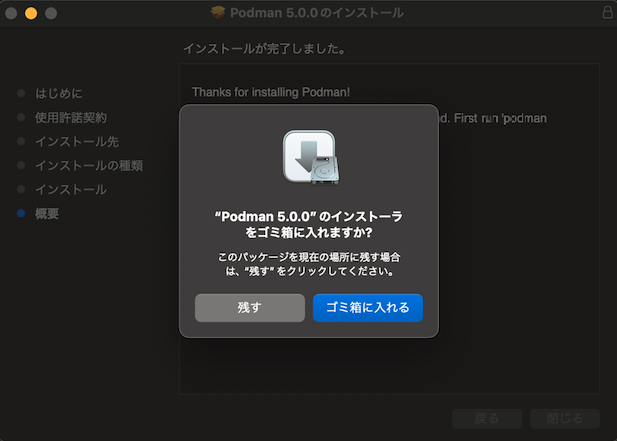
インストールが完了するので「閉じる」をクリックします。
インストーラをゴミ箱に入れるかを聞かれるので、「残す」か「ゴミ箱に入れる」のいずれかをクリックします。
(何回か入れ直したいので、「残す」を選択しました。)
podman v5.0.0が導入されていることを確認します。
Mac: ~ % which podman
/opt/podman/bin/podman
Mac: ~ %
Mac: ~ % podman -v
podman version 5.0.0
Mac: ~ %
補足として以下のようなコマンドも導入されています。
Mac: ~ % ls -l /opt/podman/bin
total 302288
-rwxr-xr-x  1 root  wheel  23179008  3 20 02:29 gvproxy
-rwxr-xr-x  1 root  wheel  87072688  3 20 02:29 podman
-rwxr-xr-x  1 root  wheel  10658976  3 20 02:29 podman-mac-helper
-rwxr-xr-x  1 root  wheel  33854288  3 20 02:29 vfkit
Mac: ~ %
podman machineの初期化
podman machine initで初期設定を行います。
初回は仮想マシンのイメージのダウンロードが行われます。
Mac: ~ % podman machine init
Looking up Podman Machine image at quay.io/podman/machine-os:5.0 to create VM
Getting image source signatures
Copying blob 0c74f573281e done   |
Copying config 44136fa355 done   |
Writing manifest to image destination
0c74f573281ebcefdded409a6384313afbbfd993bfc8e92d48b066b31ca941b0
Extracting compressed file: podman-machine-default-arm64.raw: done
Machine init complete
To start your machine run:

	podman machine start

Mac: ~ %
初期化が完了するとpodman machine listで仮想マシンがリストされます。
podman v5.0.0なので、デフォルトでVM TYPEがapplehvになっています。
Mac: ~ % podman machine list
NAME                     VM TYPE     CREATED         LAST UP     CPUS        MEMORY      DISK SIZE
podman-machine-default*  applehv     10 minutes ago  Never       4           2GiB        100GiB
Mac: ~ %
podman system connection listも確認しておきます。
デフォルトでは、VMにcoreユーザでSSH接続してpodman.sockに接続しているようです。
coreユーザなのでデフォルトではルートレスで動作しています。
SSH接続で使用するSSH秘密鍵は$HOME/.local/share/containers/podman/machineで、公開鍵はmachine.pubということがわかります。
Mac: ~ % podman system connection list
Name                         URI                                                         Identity                                                   Default     ReadWrite
podman-machine-default       ssh://core@127.0.0.1:49354/run/user/501/podman/podman.sock  /Users/ayu/.local/share/containers/podman/machine/machine  true        true
podman-machine-default-root  ssh://root@127.0.0.1:49354/run/podman/podman.sock           /Users/ayu/.local/share/containers/podman/machine/machine  false       true
Mac: ~ %
(補足)podmanの仮想マシンの設定ファイルは$HOME/.config/containers/podman/machine/applehv/podman-machine-default.jsonにあり、中身を確認すると仮想マシンのイメージファイルは$HOME/.local/share/containers/podman/machine/applehv/podman-machine-default-arm64.rawにダウンロードされたことがわかります。)
Mac: ~ % ls -l .local/share/containers/podman/machine/applehv/
total 7311008
drwxr-xr-x  3 ayu  staff            96  4 15 20:24 cache
-rw-------  1 ayu  staff        131072  4 15 21:02 efi-bl-podman-machine-default
-rw-r--r--  1 ayu  staff  107374182400  4 15 21:04 podman-machine-default-arm64.raw
srwxr-xr-x  1 ayu  staff             0  4 15 20:27 podman-machine-default-ignition.sock
Mac: ~ %
podman machineの起動(失敗)
podman machine startでpodman machineを起動します。
ここで、自分の環境ではSSH接続がtime outしてpodman machine startがSSHのエラーで終了します。
Mac: ~ % podman machine start
Starting machine "podman-machine-default"

This machine is currently configured in rootless mode. If your containers
require root permissions (e.g. ports < 1024), or if you run into compatibility
issues with non-podman clients, you can switch using the following command:

	podman machine set --rootful

Error: machine did not transition into running state: ssh error: exit status 255
Mac: ~ %
問題判別(その1)
ここから問題判別をしていきます。
状態確認(仮想マシン)
VMの状態を確認します。
一応Currently runningと表示されているのでVM自体は起動はしている模様です。
Mac: ~ % podman machine list
NAME                     VM TYPE     CREATED         LAST UP            CPUS        MEMORY      DISK SIZE
podman-machine-default*  applehv     22 minutes ago  Currently running  4           2GiB        100GiB
Mac: ~ %
podman machine sshでVMにSSH接続してみます。
これを実行すると、SSH接続はできていない模様です。
Mac: ~ % podman machine ssh
Connecting to vm podman-machine-default. To close connection, use `~.` or `exit`
ssh: connect to host localhost port 49354: Connection refused
Mac: ~ %
Mac: ~ % podman machine ssh --log-level debug
INFO[0000] podman filtering at log level debug
DEBU[0000] Using Podman machine with `applehv` virtualization provider
DEBU[0000] socket length for /Users/ayu/.config/containers/podman/machine/applehv is 52
DEBU[0000] socket length for /Users/ayu/.local/share/containers/podman/machine/applehv is 57
DEBU[0000] socket length for /Users/ayu/.local/share/containers/podman/machine/applehv/cache is 63
DEBU[0000] socket length for /var/folders/z3/ggmm70591934m0b07r4rspkw0000gn/T/podman is 55
DEBU[0000] socket length for /Users/ayu/.config/containers/podman/machine/applehv/podman-machine-default.json is 80
Connecting to vm podman-machine-default. To close connection, use `~.` or `exit`
DEBU[0000] Executing: ssh [-i /Users/ayu/.local/share/containers/podman/machine/machine -p 49354 core@localhost -o IdentitiesOnly=yes -o StrictHostKeyChecking=no -o LogLevel=ERROR -o SetEnv=LC_ALL= -t]
ssh: connect to host localhost port 49354: Connection refused
DEBU[0000] Called machine ssh.PersistentPostRunE(podman machine ssh --log-level debug)
DEBU[0000] Shutting down engines
Mac: ~ %
podman machineの起動(--log-level debugオプション)
次にlog-levelをdebugにしてVMを起動したいので、一旦podman machine stopでVMを停止します。
Mac: ~ % podman machine stop
Machine "podman-machine-default" stopped successfully
Mac: ~ %
今度は、log-levelをdebugにしてpodman machine startをしてみます。
--log-level debugオプションをつけると、vfkitで、VMのコンソールも表示されます。
podman machine startコマンドは前回と同様にSSH接続の失敗で終わりますが、VMのコンソールからはVM自体はちゃんと起動していることがわかります。
コマンド出力を見ていると、VMが起動してからも、何回かSSH接続を試みているもののfailedになっています。
(コマンド出力)
Mac: ~ % podman machine start --log-level debug
INFO[0000] podman filtering at log level debug
DEBU[0000] Using Podman machine with `applehv` virtualization provider
DEBU[0000] socket length for /Users/ayu/.config/containers/podman/machine/applehv is 52
DEBU[0000] socket length for /Users/ayu/.local/share/containers/podman/machine/applehv is 57
DEBU[0000] socket length for /Users/ayu/.local/share/containers/podman/machine/applehv/cache is 63
DEBU[0000] socket length for /var/folders/z3/ggmm70591934m0b07r4rspkw0000gn/T/podman is 55
DEBU[0000] socket length for /Users/ayu/.config/containers/podman/machine/applehv/podman-machine-default.json is 80
Starting machine "podman-machine-default"
DEBU[0000] socket length for /Users/ayu/.config/containers/podman/machine/applehv is 52
DEBU[0000] socket length for /Users/ayu/.local/share/containers/podman/machine/applehv is 57
DEBU[0000] socket length for /Users/ayu/.local/share/containers/podman/machine/applehv/cache is 63
DEBU[0000] socket length for /var/folders/z3/ggmm70591934m0b07r4rspkw0000gn/T/podman is 55
DEBU[0000] socket length for /Users/ayu/.config/containers/podman/machine/applehv/podman-machine-default.json is 80
DEBU[0000] connection refused: http://localhost:49521/vm/state
DEBU[0000] writing configuration file "/Users/ayu/.config/containers/podman/machine/applehv/podman-machine-default.json"
DEBU[0000] socket length for /var/folders/z3/ggmm70591934m0b07r4rspkw0000gn/T/podman/gvproxy.pid is 67
DEBU[0000] socket length for /Users/ayu/.config/containers/podman/machine/applehv is 52
DEBU[0000] socket length for /Users/ayu/.local/share/containers/podman/machine/applehv is 57
DEBU[0000] socket length for /Users/ayu/.local/share/containers/podman/machine/applehv/cache is 63
DEBU[0000] socket length for /var/folders/z3/ggmm70591934m0b07r4rspkw0000gn/T/podman is 55
DEBU[0000] socket length for /var/folders/z3/ggmm70591934m0b07r4rspkw0000gn/T/podman/podman-machine-default-api.sock is 87
DEBU[0000] socket length for /Users/ayu/.local/share/containers/podman/machine/podman.sock is 61
DEBU[0000] {true 1500 map[forward-dest:[/run/user/501/podman/podman.sock] forward-identity:[/Users/ayu/.local/share/containers/podman/machine/machine] forward-sock:[/var/folders/z3/ggmm70591934m0b07r4rspkw0000gn/T/podman/podman-machine-default-api.sock] forward-user:[core]] [] map[] /var/folders/z3/ggmm70591934m0b07r4rspkw0000gn/T/podman/gvproxy.log /var/folders/z3/ggmm70591934m0b07r4rspkw0000gn/T/podman/gvproxy.pid 49354}
DEBU[0000] socket length for /var/folders/z3/ggmm70591934m0b07r4rspkw0000gn/T/podman/podman-machine-default-gvproxy.sock is 91
DEBU[0000] gvproxy command-line: /opt/podman/bin/gvproxy -debug -mtu 1500 -ssh-port 49354 -listen-vfkit unixgram:///var/folders/z3/ggmm70591934m0b07r4rspkw0000gn/T/podman/podman-machine-default-gvproxy.sock -forward-sock /var/folders/z3/ggmm70591934m0b07r4rspkw0000gn/T/podman/podman-machine-default-api.sock -forward-dest /run/user/501/podman/podman.sock -forward-user core -forward-identity /Users/ayu/.local/share/containers/podman/machine/machine -pid-file /var/folders/z3/ggmm70591934m0b07r4rspkw0000gn/T/podman/gvproxy.pid -log-file /var/folders/z3/ggmm70591934m0b07r4rspkw0000gn/T/podman/gvproxy.log
DEBU[0000] socket length for /var/folders/z3/ggmm70591934m0b07r4rspkw0000gn/T/podman/podman-machine-default-gvproxy.sock is 91
DEBU[0000] checking that "gvproxy" socket is ready
DEBU[0000] socket length for /var/folders/z3/ggmm70591934m0b07r4rspkw0000gn/T/podman/podman-machine-default.log is 82
DEBU[0000] socket length for /var/folders/z3/ggmm70591934m0b07r4rspkw0000gn/T/podman/podman-machine-default.sock is 83
DEBU[0000] vfkit path is: /opt/podman/bin/vfkit
DEBU[0000] listening for ready on: /var/folders/z3/ggmm70591934m0b07r4rspkw0000gn/T/podman/podman-machine-default.sock
DEBU[0000] waiting for ready notification
DEBU[0000] vfkit command-line: [/opt/podman/bin/vfkit --cpus 4 --memory 2048 --bootloader efi,variable-store=/Users/ayu/.local/share/containers/podman/machine/applehv/efi-bl-podman-machine-default,create --device virtio-blk,path=/Users/ayu/.local/share/containers/podman/machine/applehv/podman-machine-default-arm64.raw --device virtio-rng --device virtio-serial,logFilePath=/var/folders/z3/ggmm70591934m0b07r4rspkw0000gn/T/podman/podman-machine-default.log --device virtio-vsock,port=1025,socketURL=/var/folders/z3/ggmm70591934m0b07r4rspkw0000gn/T/podman/podman-machine-default.sock,listen --device virtio-net,unixSocketPath=/var/folders/z3/ggmm70591934m0b07r4rspkw0000gn/T/podman/podman-machine-default-gvproxy.sock,mac=5a:94:ef:e4:0c:ee --device virtio-fs,sharedDir=/Users,mountTag=Users --device virtio-fs,sharedDir=/private,mountTag=private --device virtio-fs,sharedDir=/var/folders,mountTag=var-folders --restful-uri tcp://localhost:49521 --device virtio-gpu,width=800,height=600 --device virtio-input,pointing --device virtio-input,keyboard --gui]
DEBU[0007] ready ack received
DEBU[0007] ready notification received

This machine is currently configured in rootless mode. If your containers
require root permissions (e.g. ports < 1024), or if you run into compatibility
issues with non-podman clients, you can switch using the following command:

	podman machine set --rootful

DEBU[0007] Executing: ssh [-i /Users/ayu/.local/share/containers/podman/machine/machine -p 49354 core@localhost -o IdentitiesOnly=yes -o StrictHostKeyChecking=no -o LogLevel=ERROR -o SetEnv=LC_ALL= true]
DEBU[0009] SSH readiness check for machine failed: exit status 255
DEBU[0009] Executing: ssh [-i /Users/ayu/.local/share/containers/podman/machine/machine -p 49354 core@localhost -o IdentitiesOnly=yes -o StrictHostKeyChecking=no -o LogLevel=ERROR -o SetEnv=LC_ALL= true]
DEBU[0012] SSH readiness check for machine failed: exit status 255
DEBU[0013] Executing: ssh [-i /Users/ayu/.local/share/containers/podman/machine/machine -p 49354 core@localhost -o IdentitiesOnly=yes -o StrictHostKeyChecking=no -o LogLevel=ERROR -o SetEnv=LC_ALL= true]
DEBU[0016] SSH readiness check for machine failed: exit status 255
DEBU[0018] Executing: ssh [-i /Users/ayu/.local/share/containers/podman/machine/machine -p 49354 core@localhost -o IdentitiesOnly=yes -o StrictHostKeyChecking=no -o LogLevel=ERROR -o SetEnv=LC_ALL= true]
DEBU[0020] SSH readiness check for machine failed: exit status 255
DEBU[0024] Executing: ssh [-i /Users/ayu/.local/share/containers/podman/machine/machine -p 49354 core@localhost -o IdentitiesOnly=yes -o StrictHostKeyChecking=no -o LogLevel=ERROR -o SetEnv=LC_ALL= true]
DEBU[0027] SSH readiness check for machine failed: exit status 255
DEBU[0035] Executing: ssh [-i /Users/ayu/.local/share/containers/podman/machine/machine -p 49354 core@localhost -o IdentitiesOnly=yes -o StrictHostKeyChecking=no -o LogLevel=ERROR -o SetEnv=LC_ALL= true]
DEBU[0038] SSH readiness check for machine failed: exit status 255
DEBU[0038] writing configuration file "/Users/ayu/.config/containers/podman/machine/applehv/podman-machine-default.json"
Error: machine did not transition into running state: ssh error: exit status 255
DEBU[0038] Shutting down engines
Mac: ~ %
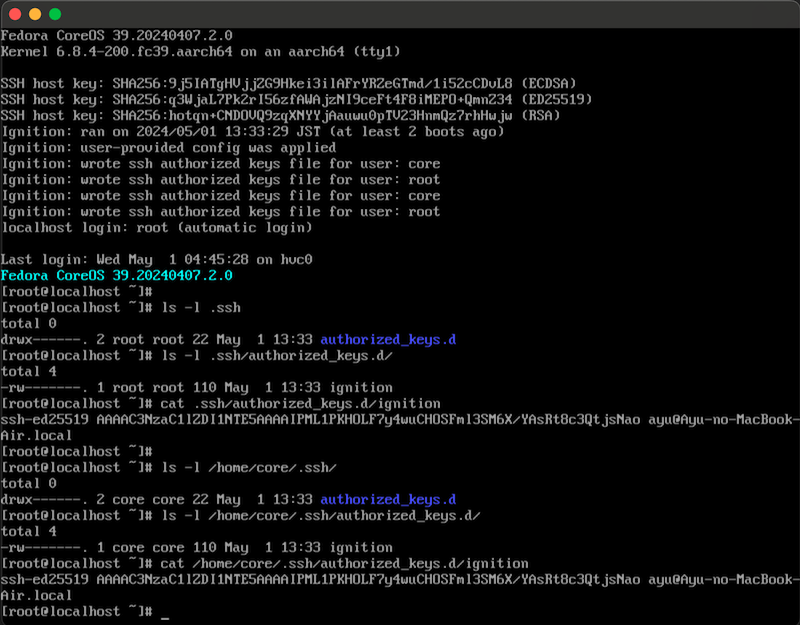
(VMコンソール)
ログの確認(podman machine startコマンドログ)
先ほどのコマンドログを見ると、最終的にはSSH鍵ペアを使って、coreユーザでSSH接続に失敗しています。
DEBU[0035] Executing: ssh [-i /Users/ayu/.local/share/containers/podman/machine/machine -p 49354 core@localhost -o IdentitiesOnly=yes -o StrictHostKeyChecking=no -o LogLevel=ERROR -o SetEnv=LC_ALL= true]
DEBU[0038] SSH readiness check for machine failed: exit status 255
DEBU[0038] writing configuration file "/Users/ayu/.config/containers/podman/machine/applehv/podman-machine-default.json"
Error: machine did not transition into running state: ssh error: exit status 255
DEBU[0038] Shutting down engines
SSH鍵の設定の確認
SSH鍵は上述のコマンド出力やpodman system connection listの出力から$HOME/.local/share/containers/podman/machine/以下にあります。
Mac: ~ % ls -l /Users/ayu/.local/share/containers/podman/machine/
total 24
drwxr-xr-x  6 ayu  staff  192  5  1 13:33 applehv
-rw-------  1 ayu  staff  419  5  1 13:13 machine
-rw-r--r--  1 ayu  staff    0  5  1 13:33 machine-start.lock
-rw-r--r--  1 ayu  staff  110  5  1 13:13 machine.pub
lrwxr-xr-x  1 ayu  staff   87  5  1 13:33 podman.sock -> /var/folders/z3/ggmm70591934m0b07r4rspkw0000gn/T/podman/podman-machine-default-api.sock
-rw-r--r--  1 ayu  staff    8  5  1 13:13 port-alloc.dat
-rw-r--r--  1 ayu  staff    0  5  1 13:13 port-alloc.lck
Mac: ~ %
SSH公開鍵の中身を見ておきます。
Mac: ~ % cat /Users/ayu/.local/share/containers/podman/machine/machine.pub
ssh-ed25519 AAAAC3NzaC1lZDI1NTE5AAAAIPML1PKHOLF7y4wuCHOSFml3SM6X/YAsRt8c3QtjsNao ayu@Ayu-no-MacBook-Air.local
Mac: ~ %
こちらの公開鍵が、仮想マシンのcoreユーザとrootユーザのauthorized_keyファイルに登録されているかを確認します。
VMのコンソール上で確認すると、起動時の出力でもIgnitionに従って公開鍵が登録されていることが表示されています。
実際にSSH公開鍵の中身を見てみるとrootユーザ、coreユーザとも両方とも登録されています。
ですので、SSH公開鍵の登録自体は問題ないことがわかります。
ログの確認(gvproxy.log)
次にネットワーク接続に関するログを見てみます。
先ほどのpodman machine startのdebugログのSSH接続のログを見ると、localhostのポート番号49354に接続しようとしています。
DEBU[0035] Executing: ssh [-i /Users/ayu/.local/share/containers/podman/machine/machine -p 49354 core@localhost -o IdentitiesOnly=yes -o StrictHostKeyChecking=no -o LogLevel=ERROR -o SetEnv=LC_ALL= true]
MACではMAC上ののpodman CLIから仮想マシンのpodman.sockに接続してコンテナの操作を行っているようです。
Mac: ~ % podman system connection list
Name                         URI                                                         Identity                                                   Default     ReadWrite
podman-machine-default       ssh://core@127.0.0.1:49354/run/user/501/podman/podman.sock  /Users/ayu/.local/share/containers/podman/machine/machine  true        true
podman-machine-default-root  ssh://root@127.0.0.1:49354/run/podman/podman.sock           /Users/ayu/.local/share/containers/podman/machine/machine  false       true
Mac: ~ %
ちゃんと理解していないので正しいかはわかりませんが、コンテナでポート公開を行うとpodman machineが自動でポートフォワードを行いますが、それをgvproxyというモジュールが担っているようです。
直接関係あるかはわかりませんが、ネットワーク関連ということでこちらのログも見てみたいと思います。
gvproxyのログの場所は、先ほどのpodman machine startのdebugの出力に書いていました。
DEBU[0000] gvproxy command-line: /opt/podman/bin/gvproxy -debug -mtu 1500 -ssh-port 49354 -listen-vfkit unixgram:///var/folders/z3/ggmm70591934m0b07r4rspkw0000gn/T/podman/podman-machine-default-gvproxy.sock -forward-sock /var/folders/z3/ggmm70591934m0b07r4rspkw0000gn/T/podman/podman-machine-default-api.sock -forward-dest /run/user/501/podman/podman.sock -forward-user core -forward-identity /Users/ayu/.local/share/containers/podman/machine/machine -pid-file /var/folders/z3/ggmm70591934m0b07r4rspkw0000gn/T/podman/gvproxy.pid -log-file /var/folders/z3/ggmm70591934m0b07r4rspkw0000gn/T/podman/gvproxy.log
gvproxyのログファイル/var/folders/z3/ggmm70591934m0b07r4rspkw0000gn/T/podman/gvproxy.logを見てみます。
Mac: ~ % cat /var/folders/z3/ggmm70591934m0b07r4rspkw0000gn/T/podman/gvproxy.log
time="2024-05-01T13:45:21+09:00" level=info msg="gvproxy version v0.7.3"
(略)

(略)
time="2024-05-01T13:49:14+09:00" level=info msg="PACKET: 42 bytes\n- Layer 1 (14 bytes) = Ethernet\t{Contents=[..14..] Payload=[..28..] SrcMAC=5a:94:ef:e4:0c:dd DstMAC=ff:ff:ff:ff:ff:ff EthernetType=ARP Length=0}\n- Layer 2 (28 bytes) = ARP\t{Contents=[..28..] Payload=[] AddrType=Ethernet Protocol=IPv4 HwAddressSize=6 ProtAddressSize=4 Operation=1 SourceHwAddress=[..6..] SourceProtAddress=[192, 168, 127, 1] DstHwAddress=[..6..] DstProtAddress=[192, 168, 127, 2]}\n"
time="2024-05-01T13:49:15+09:00" level=debug msg="Waiting for sshd (1s)"
time="2024-05-01T13:49:16+09:00" level=debug msg="597 kB sent to the VM, 11 kB received from the VM\n"
time="2024-05-01T13:49:16+09:00" level=error msg="cannot receive packets from /Users/ayu/Library/Application Support/vfkit/net-2737-875599647.sock, disconnecting: cannot read size from socket: read unixgram /var/folders/z3/ggmm70591934m0b07r4rspkw0000gn/T/podman/podman-machine-default-gvproxy.sock: use of closed network connection"
time="2024-05-01T13:49:16+09:00" level=error msg="gvproxy exiting: setupProxy failed: timeout: connect tcp 192.168.127.2:22: no route to host"
ログを見ると、gvproxyがProxyの設定をしている際に、192.168.127.2のポート22で接続しようとして失敗しています。
また、SourcePortAddressというところが192.168.127.1、DstPortAddressが192.168.127.2というようなログもありました。
podman machine start時に--log-level debugをつけて起動しているので、VMのコンソールが表示されているので、IPアドレスの設定を確認します。
IPアドレスを確認すると、IPアドレスが設定されていないようでした。
またconnectionも有効になっていないようでした。
ですので、connectionを有効にし、手動でIP Addressを192.168.127.2/24、Gatewayを192.168.127.1にしてみることにします。
手動でIPアドレスの設定
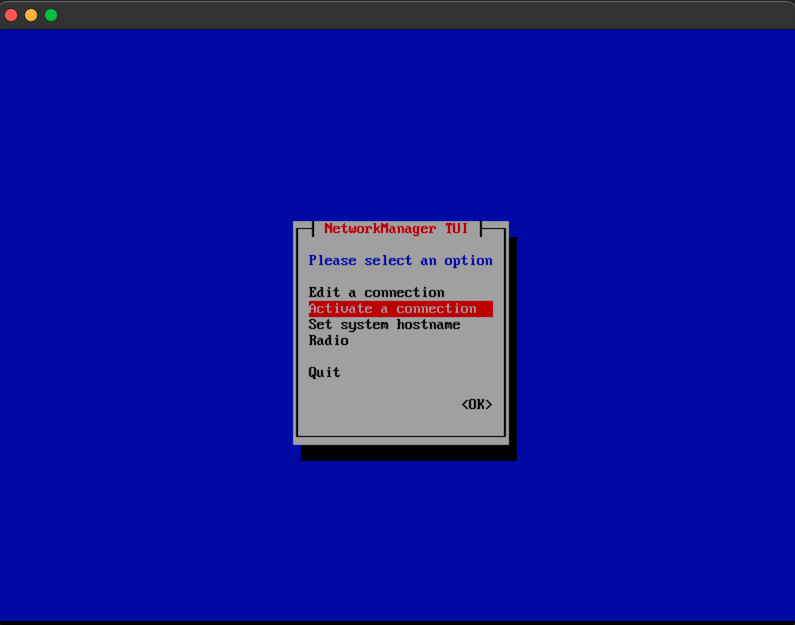
nmcliで見るとWired connection 1というconnectionがあるので、nmtuiで設定を見てみます。
(nmcliで設定を修正しても良かったのですがキーボードの設定が英語で大変だったのでnmtuiでやってしまいます。)
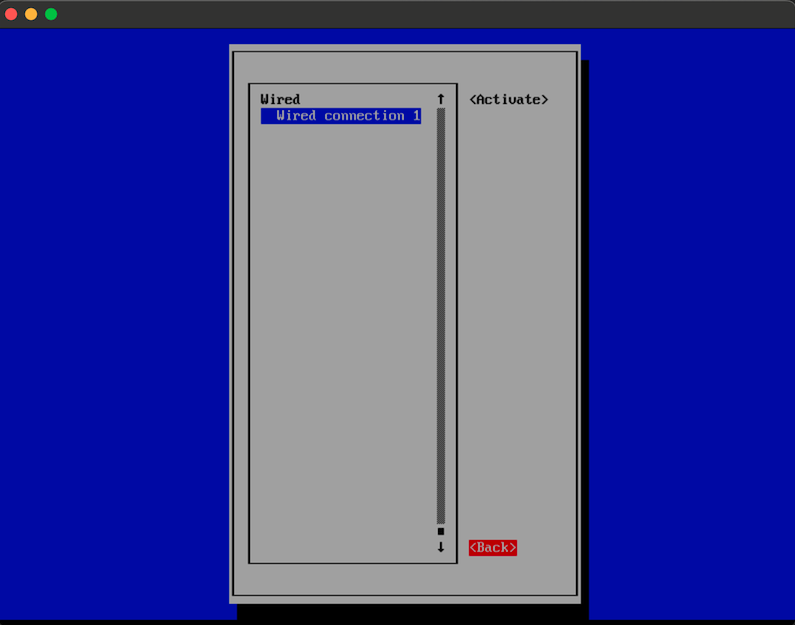
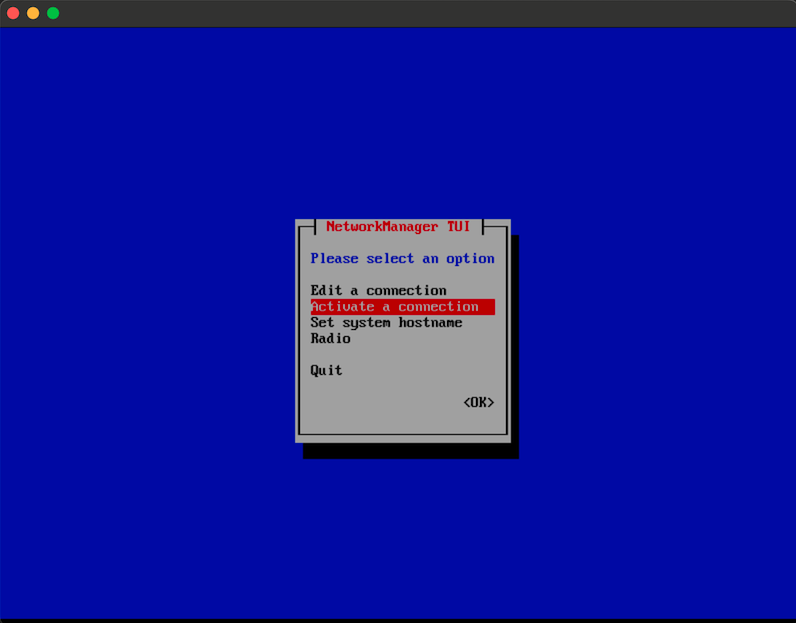
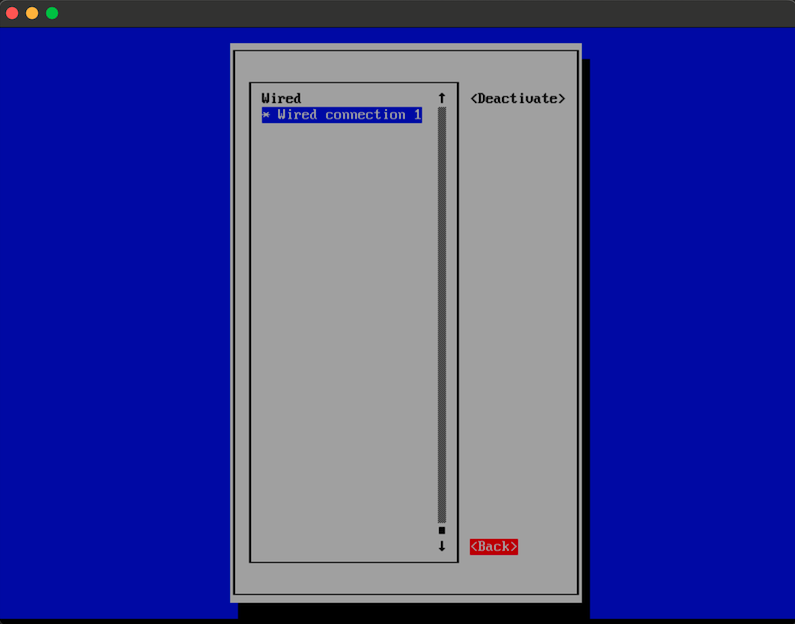
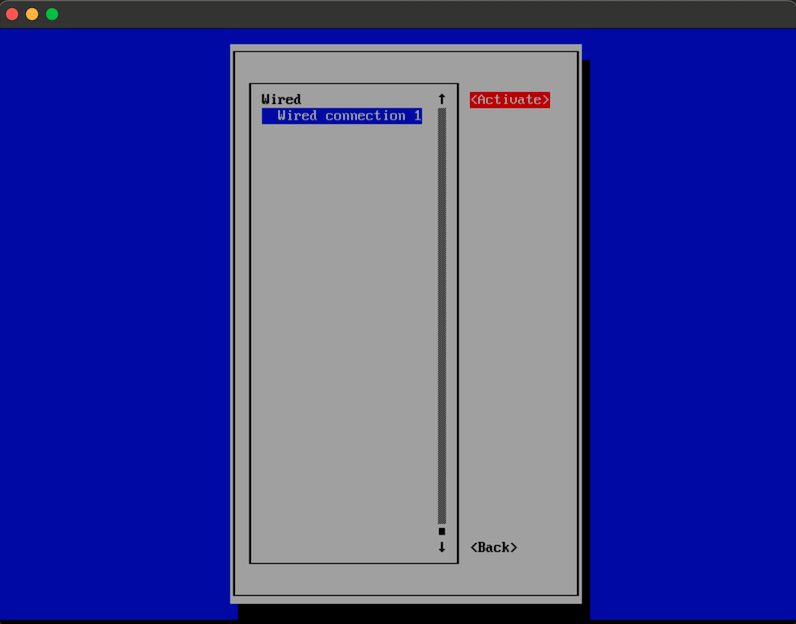
connectionが有効化されているかを見ます。「Activate a connection」を選択してEnterをクリックします。
Activateされていないようだったので、一度IPアドレスの設定などをした後にActivateしようと思雨ので、ここでは何もせず、Backを選択して最初の画面に戻ります。
最初の画面で「Edit a connection」を選択してEnterをクリックします。
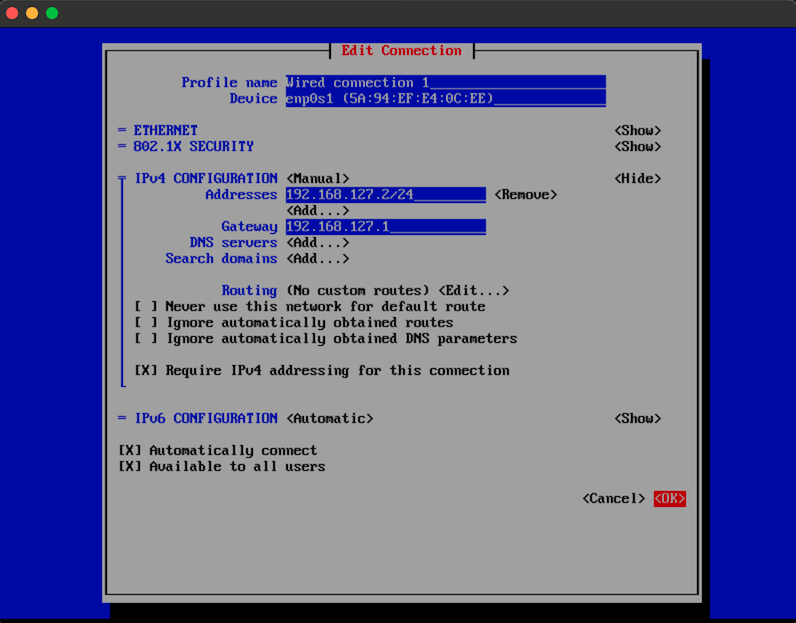
「Edit」を選択してEnterをクリックします。
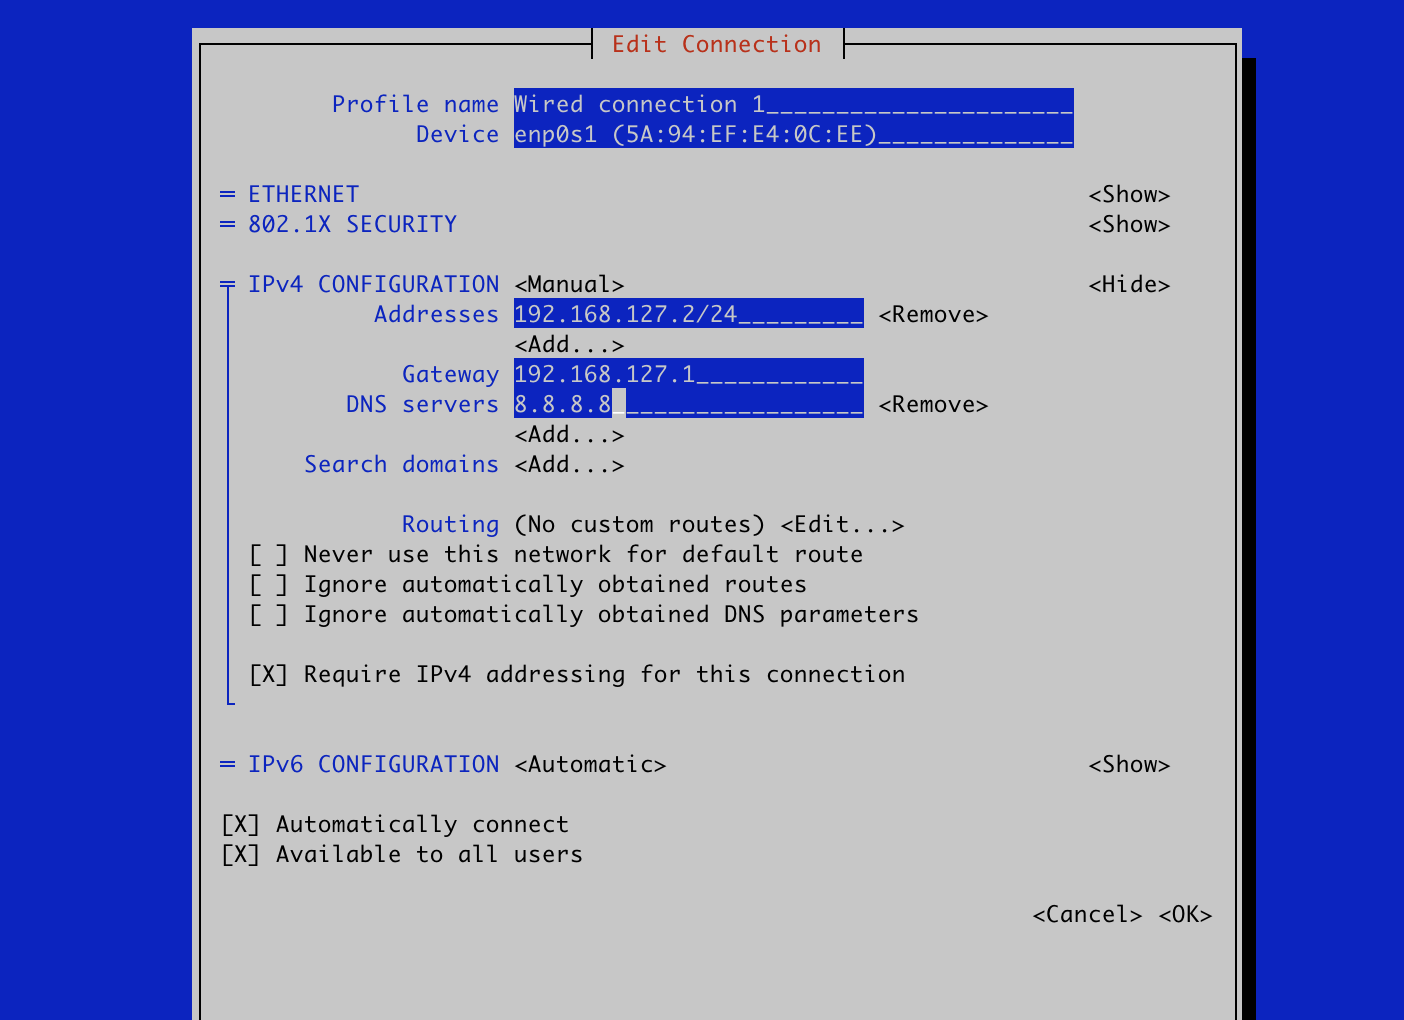
DHCPの設定になっているので本来IPアドレスは設定されると思うのですが、IPアドレスが取れていなかったので手動でIPアドレスを設定してみました。
IPv4 CONFIGURATIONをManualにし、Addressを、192.168.127.2/24、Gatewayを192.168.127.1にしてみました。
Require IPv4 addressing for this connectionにもチェックを入れてみました。
設定ができたら「OK」を選択してEnterをクリックします。
「Back」で最初の画面に戻ります。
「Activate a connection」を選択してEnterをクリックします。
connectionが有効化されていないので、「Activate」を選択してEnterをクリックします。
表示がDeactivateになり、有効化されたので、「Back」を選択してEnterをクリックし、元の画面に戻ります。
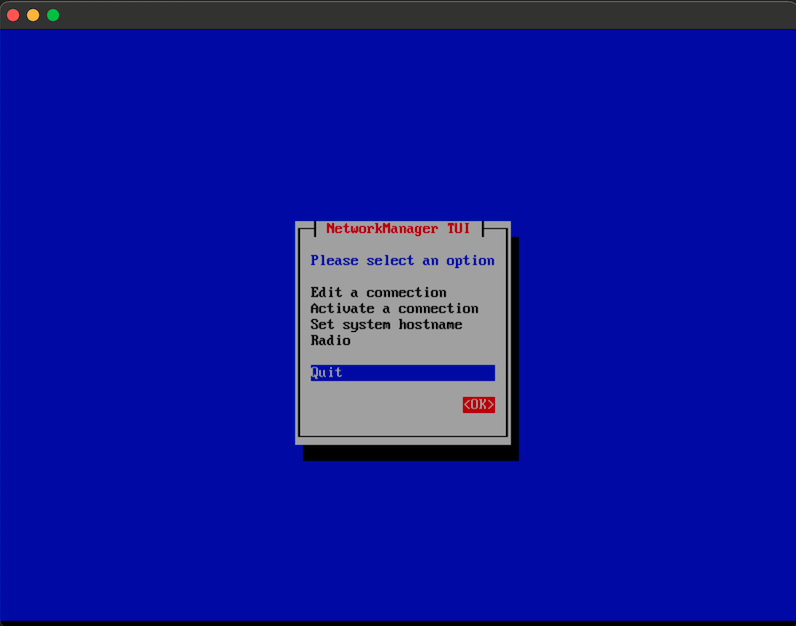
設定が終わったので、「OK」を選択してnmtuiを終了します。
今度は、connectionが有効になり、IPv4アドレスが設定されていることがわかります。
podman machineの起動(成功)
仮想マシンを再起動してpodman machine startがうまくいくかみてみます。
podman machineを停止します。
(CoreOSがシャットダウンしてVMのコンソールも閉じられます。)
Mac: ~ % podman machine stop
Machine "podman-machine-default" stopped successfully
Mac: ~ %
podman machineを再度起動します。
今度は起動に成功しました!!
Mac: ~ % podman machine start
Starting machine "podman-machine-default"

This machine is currently configured in rootless mode. If your containers
require root permissions (e.g. ports < 1024), or if you run into compatibility
issues with non-podman clients, you can switch using the following command:

	podman machine set --rootful

API forwarding listening on: /var/run/docker.sock
Docker API clients default to this address. You do not need to set DOCKER_HOST.

Machine "podman-machine-default" started successfully
Mac: ~ %
podman machineもCurrently runningになっています。
Mac: ~ % podman machine list
NAME                     VM TYPE     CREATED      LAST UP            CPUS        MEMORY      DISK SIZE
podman-machine-default*  applehv     2 hours ago  Currently running  4           2GiB        100GiB
Mac: ~ %
podman imagesコマンドなどが表示されているので、podmanコマンドは正常に動作できているようでした。
Mac: ~ % podman images
REPOSITORY  TAG         IMAGE ID    CREATED     SIZE
Mac: ~ %
podman infoも正常に表示されました。
Mac: ~ % podman info
host:
  arch: arm64
  buildahVersion: 1.35.3
  cgroupControllers:
  - cpu
  - io
  - memory
  - pids
  cgroupManager: systemd
  cgroupVersion: v2
  conmon:
    package: conmon-2.1.10-1.fc39.aarch64
    path: /usr/bin/conmon
    version: 'conmon version 2.1.10, commit: '
  cpuUtilization:
    idlePercent: 99.29
    systemPercent: 0.38
    userPercent: 0.33
  cpus: 4
  databaseBackend: sqlite
  distribution:
    distribution: fedora
    variant: coreos
    version: "39"
  eventLogger: journald
  freeLocks: 2048
  hostname: localhost.localdomain
  idMappings:
    gidmap:
    - container_id: 0
      host_id: 1000
      size: 1
    - container_id: 1
      host_id: 100000
      size: 1000000
    uidmap:
    - container_id: 0
      host_id: 501
      size: 1
    - container_id: 1
      host_id: 100000
      size: 1000000
  kernel: 6.8.4-200.fc39.aarch64
  linkmode: dynamic
  logDriver: journald
  memFree: 1661968384
  memTotal: 2047471616
  networkBackend: netavark
  networkBackendInfo:
    backend: netavark
    dns:
      package: aardvark-dns-1.10.0-1.fc39.aarch64
      path: /usr/libexec/podman/aardvark-dns
      version: aardvark-dns 1.10.0
    package: netavark-1.10.3-1.fc39.aarch64
    path: /usr/libexec/podman/netavark
    version: netavark 1.10.3
  ociRuntime:
    name: crun
    package: crun-1.14.4-1.fc39.aarch64
    path: /usr/bin/crun
    version: |-
      crun version 1.14.4
      commit: a220ca661ce078f2c37b38c92e66cf66c012d9c1
      rundir: /run/user/501/crun
      spec: 1.0.0
      +SYSTEMD +SELINUX +APPARMOR +CAP +SECCOMP +EBPF +CRIU +LIBKRUN +WASM:wasmedge +YAJL
  os: linux
  pasta:
    executable: /usr/bin/pasta
    package: passt-0^20240405.g954589b-1.fc39.aarch64
    version: |
      pasta 0^20240405.g954589b-1.fc39.aarch64-pasta
      Copyright Red Hat
      GNU General Public License, version 2 or later
        <https://www.gnu.org/licenses/old-licenses/gpl-2.0.html>
      This is free software: you are free to change and redistribute it.
      There is NO WARRANTY, to the extent permitted by law.
  remoteSocket:
    exists: true
    path: /run/user/501/podman/podman.sock
  security:
    apparmorEnabled: false
    capabilities: CAP_CHOWN,CAP_DAC_OVERRIDE,CAP_FOWNER,CAP_FSETID,CAP_KILL,CAP_NET_BIND_SERVICE,CAP_SETFCAP,CAP_SETGID,CAP_SETPCAP,CAP_SETUID,CAP_SYS_CHROOT
    rootless: true
    seccompEnabled: true
    seccompProfilePath: /usr/share/containers/seccomp.json
    selinuxEnabled: true
  serviceIsRemote: true
  slirp4netns:
    executable: /usr/bin/slirp4netns
    package: slirp4netns-1.2.2-1.fc39.aarch64
    version: |-
      slirp4netns version 1.2.2
      commit: 0ee2d87523e906518d34a6b423271e4826f71faf
      libslirp: 4.7.0
      SLIRP_CONFIG_VERSION_MAX: 4
      libseccomp: 2.5.3
  swapFree: 0
  swapTotal: 0
  uptime: 0h 3m 39.00s
  variant: v8
plugins:
  authorization: null
  log:
  - k8s-file
  - none
  - passthrough
  - journald
  network:
  - bridge
  - macvlan
  - ipvlan
  volume:
  - local
registries:
  search:
  - docker.io
store:
  configFile: /var/home/core/.config/containers/storage.conf
  containerStore:
    number: 0
    paused: 0
    running: 0
    stopped: 0
  graphDriverName: overlay
  graphOptions: {}
  graphRoot: /var/home/core/.local/share/containers/storage
  graphRootAllocated: 106769133568
  graphRootUsed: 3488686080
  graphStatus:
    Backing Filesystem: xfs
    Native Overlay Diff: "true"
    Supports d_type: "true"
    Supports shifting: "false"
    Supports volatile: "true"
    Using metacopy: "false"
  imageCopyTmpDir: /var/tmp
  imageStore:
    number: 0
  runRoot: /run/user/501/containers
  transientStore: false
  volumePath: /var/home/core/.local/share/containers/storage/volumes
version:
  APIVersion: 5.0.2
  Built: 1713312000
  BuiltTime: Wed Apr 17 09:00:00 2024
  GitCommit: ""
  GoVersion: go1.21.9
  Os: linux
  OsArch: linux/arm64
  Version: 5.0.2

Mac: ~ %
コンテナ起動確認(Hello World)(失敗)
実際にコンテナが起動できるかを確認します。
試しにHello Worldのコンテナを起動してみます。
GitHub / containers/podman / Podman Hello
残念ながらまたエラーで失敗しました。。
Mac: ~ % podman run --rm quay.io/podman/hello
Trying to pull quay.io/podman/hello:latest...
Error: initializing source docker://quay.io/podman/hello:latest: pinging container registry quay.io: Get "https://quay.io/v2/": dial tcp: lookup quay.io: Temporary failure in name resolution
Mac: ~ %
問題判別(その2)
ログの確認(コンテナ起動)
先ほどのpodman runのメッセージから、単純にquay.ioの名前解決ができていない模様です。
VM内から名前解決ができているか確認します。
podmanを再起動して--log-level debugオプションでVMのコンソールから確認でも良いのですが、今は、SSH接続ができるようになったので、podman machine sshでSSH接続して確認します。
Mac: ~ % podman machine ssh
Connecting to vm podman-machine-default. To close connection, use `~.` or `exit`
Fedora CoreOS 39.20240407.2.0
Tracker: https://github.com/coreos/fedora-coreos-tracker
Discuss: https://discussion.fedoraproject.org/tag/coreos

Last login: Wed May  1 06:34:31 2024 from 192.168.127.1
core@localhost:~$
VMにcoreユーザでログインできたので、quay.ioが名前解決されるかを確認すると、名前解決ができないことがわかります。
core@localhost:~$ nslookup quay.io
Server:		127.0.0.53
Address:	127.0.0.53#53

** server can't find quay.io: SERVFAIL

core@localhost:~$
手動でDNS設定(8.8.8.8)
DNSサーバとして8.8.8.8を設定してみます。
nmtuiで、先ほどのIPアドレスの設定に加えて「DNS Servers」に8.8.8.8を加えます。
podman machine sshだとcoreユーザでSSHログインしているので、設定を変更しようとすると権限が足りなくて設定できません。
(VMのコンソールでは、デフォルトではrootユーザでログインしているので気にする必要はありませんでしたが、今回はsudoが必要です。)
ですので、podman machine sshで接続後のnmtuiはsudoをつけるか、rootユーザに切り替えて実行します。
nmtuiで、先ほどのIPアドレスの設定に加えて「DNS Servers」に8.8.8.8を加えます。
設定が完了したら、再度podman machineを再起動します。
Mac: ~ % podman machine stop
Machine "podman-machine-default" stopped successfully
Mac: ~ %
Mac: ~ % podman machine start
Starting machine "podman-machine-default"

This machine is currently configured in rootless mode. If your containers
require root permissions (e.g. ports < 1024), or if you run into compatibility
issues with non-podman clients, you can switch using the following command:

	podman machine set --rootful

API forwarding listening on: /var/run/docker.sock
Docker API clients default to this address. You do not need to set DOCKER_HOST.

Machine "podman-machine-default" started successfully
Mac: ~ %
名前解決ができているか確認すると、出来ていることがわかります。
Mac: ~ % podman machine ssh
Connecting to vm podman-machine-default. To close connection, use `~.` or `exit`
Fedora CoreOS 39.20240407.2.0
Tracker: https://github.com/coreos/fedora-coreos-tracker
Discuss: https://discussion.fedoraproject.org/tag/coreos

Last login: Wed May  1 06:49:59 2024 from 192.168.127.1
core@localhost:~$
core@localhost:~$ nslookup quay.io
Server:		127.0.0.53
Address:	127.0.0.53#53

Non-authoritative answer:
Name:	quay.io
Address: 54.144.224.137
Name:	quay.io
Address: 3.225.247.3
Name:	quay.io
Address: 44.212.212.54
Name:	quay.io
Address: 54.236.73.49
Name:	quay.io
Address: 34.206.210.7
Name:	quay.io
Address: 3.228.243.121
Name:	quay.io
Address: 2600:1f18:483:cf00:2de7:dc8f:3e59:2cac
Name:	quay.io
Address: 2600:1f18:483:cf02:101c:ba62:1cd3:96f4
Name:	quay.io
Address: 2600:1f18:483:cf02:101e:d938:90b4:8f32
Name:	quay.io
Address: 2600:1f18:483:cf01:f5a7:c7a4:6620:dbc
Name:	quay.io
Address: 2600:1f18:483:cf00:e91a:d8cb:1b23:812b
Name:	quay.io
Address: 2600:1f18:483:cf01:fccc:f69:54b:1247

core@localhost:~$
core@localhost:~$ exit
logout
Mac: ~ %
コンテナ起動確認(Hello World)(成功)
再度Hello Worldを起動してみます。
今度は正常にquay.ioからコンテナイメージをpullして、コンテナを起動することができました!
Mac: ~ % podman run --rm quay.io/podman/hello
Trying to pull quay.io/podman/hello:latest...
Getting image source signatures
Copying blob sha256:5ea7ca68e6b64f513a82e9c9d619bd1a298cafb0ad21e07e5e776c826d112db5
Copying config sha256:78f4bb63a934181a0c721ba760726cf7c8b1c581cc62b1786043064e1f47f7df
Writing manifest to image destination
!... Hello Podman World ...!

         .--"--.
       / -     - \
      / (O)   (O) \
   ~~~| -=(,Y,)=- |
    .---. /`  \   |~~
 ~/  o  o \~~~~.----. ~~
  | =(X)= |~  / (O (O) \
   ~~~~~~~  ~| =(Y_)=-  |
  ~~~~    ~~~|   U      |~~

Project:   https://github.com/containers/podman
Website:   https://podman.io
Desktop:   https://podman-desktop.io
Documents: https://docs.podman.io
YouTube:   https://youtube.com/@Podman
X/Twitter: @Podman_io
Mastodon:  @Podman_io@fosstodon.org
Mac: ~ %
コンテナイメージもpull出来ていました。
Mac: ~ % podman images
REPOSITORY            TAG         IMAGE ID      CREATED     SIZE
quay.io/podman/hello  latest      78f4bb63a934  3 days ago  550 kB
Mac: ~ %
コンテナ起動確認(httpd)(失敗)
次に外部から接続するコンテナも起動してみます。
以下を参考にhttpdのコンテナを起動して、localhostの8080で接続できるかを確認します。
これがまたErrorで失敗します。。。
メッセージを見るとgateway.containers.internalの名前解決がされていないというメッセージのようでした。
Mac: ~ % podman run -dt -p 8080:80/tcp docker.io/library/httpd
Trying to pull docker.io/library/httpd:latest...
Getting image source signatures
Copying blob sha256:bae159c85a0b3662b8e9d58344f7da1b84836a7338c8ddf6b88360cea400929f
Copying blob sha256:22d97f6a5d13532e867231d23d92620a81874d51a456196be50154eeb32edc08
Copying blob sha256:4f4fb700ef54461cfa02571ae0db9a0dc1e0cdb5577484a6d75e68dc38e8acc1
Copying blob sha256:855b568ab02c3fee1362d51176f966517b1e03ca0c8efde55eddace90835f300
Copying blob sha256:c521cc2c4e8a439951003122cdab841fe1b1350db864e2cf9dea69298513f711
Copying blob sha256:98c8bced82bd1d3557a49d39ea03bb8090bf3abc8154ab65388d9f9728f3ce02
Copying config sha256:73acb239a8eb7a9ef5b6848a5b01bb26cc03d2262056705876bf7ac6ad781f02
Writing manifest to image destination
Error: Post "http://gateway.containers.internal/services/forwarder/expose": dial tcp: lookup gateway.containers.internal: no such host
Mac: ~ %
イメージ自体はpullできていますが、コンテナが起動していませんでした。
Mac: ~ % podman images
REPOSITORY               TAG         IMAGE ID      CREATED      SIZE
quay.io/podman/hello     latest      78f4bb63a934  3 days ago   550 kB
docker.io/library/httpd  latest      73acb239a8eb  3 weeks ago  181 MB
Mac: ~ %
Mac: ~ % podman ps
CONTAINER ID  IMAGE       COMMAND     CREATED     STATUS      PORTS       NAMES
Mac: ~ %
Mac: ~ % podman ps -a
CONTAINER ID  IMAGE                           COMMAND           CREATED        STATUS      PORTS                 NAMES
0c505c8d953d  docker.io/library/httpd:latest  httpd-foreground  3 minutes ago  Created     0.0.0.0:8080->80/tcp  epic_lumiere
Mac: ~ %
問題判別(その3)
gvproxyの設定確認
先ほども出てきたようにちゃんと理解していないので正しいかはわかりませんが、コンテナでポート公開を行うとpodman machineが自動でポートフォワードを行いますが、それをgvproxyというモジュールが担っているようです。
以下がそのソースのようでした。
- https://github.com/containers/gvisor-tap-vsock
- https://github.com/containers/gvisor-tap-vsock / cmd/gvproxy/main.go
まず、https://github.com/containers/gvisor-tap-vsockのDNS欄を見てみると、GatewayのアドレスでDNSの設定がされているようです。
それだけだとよくわからず、https://github.com/containers/gvisor-tap-vsock / cmd/gvproxy/main.goも見てみました。
以下が関連していそうな設定内容です。
main.go抜粋
const (
	gatewayIP   = "192.168.127.1"
	sshHostPort = "192.168.127.2:22"
	hostIP      = "192.168.127.254"
	host        = "host"
	gateway     = "gateway"
)
	config := types.Configuration{
		Debug:             debug,
		CaptureFile:       captureFile(),
		MTU:               mtu,
		Subnet:            "192.168.127.0/24",
		GatewayIP:         gatewayIP,
		GatewayMacAddress: "5a:94:ef:e4:0c:dd",
		DHCPStaticLeases: map[string]string{
			"192.168.127.2": "5a:94:ef:e4:0c:ee",
		},
		DNS: []types.Zone{
			{
				Name: "containers.internal.",
				Records: []types.Record{
					{
						Name: gateway,
						IP:   net.ParseIP(gatewayIP),
					},
					{
						Name: host,
						IP:   net.ParseIP(hostIP),
					},
				},
			},
			{
				Name: "docker.internal.",
				Records: []types.Record{
					{
						Name: gateway,
						IP:   net.ParseIP(gatewayIP),
					},
					{
						Name: host,
						IP:   net.ParseIP(hostIP),
					},
				},
			},
		},
		DNSSearchDomains: searchDomains(),
		Forwards: map[string]string{
			fmt.Sprintf("127.0.0.1:%d", sshPort): sshHostPort,
		},
		NAT: map[string]string{
			hostIP: "127.0.0.1",
		},
		GatewayVirtualIPs: []string{hostIP},
		VpnKitUUIDMacAddresses: map[string]string{
			"c3d68012-0208-11ea-9fd7-f2189899ab08": "5a:94:ef:e4:0c:ee",
		},
		Protocol: protocol,
	}
上述を見ると、まず、DHCPでMACアドレスに紐付けて192.168.127.2のIPアドレスがアサインされるようです。
ですので、先ほどのIPアドレスの設定は間違っていなさそうでした。
サブネットも24なのでこちらも間違っていないようでした。
また、DNSの設定では、二つのzoneが設定されており、以下の名前解決ができる必要があるようです。
これが先ほどのpodman runをした際のエラーメッセージで出ていたgateway.containers.internalのエントリも含まれています。
| hostname | IP Address |
|---|---|
| gateway.containers.internal | 192.168.127.1 |
| host.containers.internal | 192.168.127.254 |
| gateway.docker.internal | 192.168.127.1 |
| host.docker.internal | 192.168.127.254 |
実際はdnsmasq?が起動して/etc/resolv.confで参照して名前解決されるようですが、ここがうまくいっていなかったようですので、手動で/etc/hostsにこのエントリーを設定してみました。
(補足)dnsmasqを手動で起動してみたけどうまくいきませんでした。(systemctl unmaskとかしたらもしかしたら起動したかもしれませんが...。)
Mac: ~ % podman machine ssh
Connecting to vm podman-machine-default. To close connection, use `~.` or `exit`
Fedora CoreOS 39.20240407.2.0
Tracker: https://github.com/coreos/fedora-coreos-tracker
Discuss: https://discussion.fedoraproject.org/tag/coreos

Last login: Wed May  1 06:50:45 2024 from 192.168.127.1
core@localhost:~$
core@localhost:~$ sudo su -
root@localhost:~#
root@localhost:~# cat /etc/resolv.conf
# This is /run/systemd/resolve/stub-resolv.conf managed by man:systemd-resolved(8).
# Do not edit.
#
# This file might be symlinked as /etc/resolv.conf. If you're looking at
# /etc/resolv.conf and seeing this text, you have followed the symlink.
#
# This is a dynamic resolv.conf file for connecting local clients to the
# internal DNS stub resolver of systemd-resolved. This file lists all
# configured search domains.
#
# Run "resolvectl status" to see details about the uplink DNS servers
# currently in use.
#
# Third party programs should typically not access this file directly, but only
# through the symlink at /etc/resolv.conf. To manage man:resolv.conf(5) in a
# different way, replace this symlink by a static file or a different symlink.
#
# See man:systemd-resolved.service(8) for details about the supported modes of
# operation for /etc/resolv.conf.

nameserver 127.0.0.53
options edns0 trust-ad
search .
root@localhost:~#
root@localhost:~# systemctl status dnsmasq.service
Warning: The unit file, source configuration file or drop-ins of dnsmasq.service changed on disk. Ru>
○ dnsmasq.service
     Loaded: masked (Reason: Unit dnsmasq.service is masked.)
    Drop-In: /usr/lib/systemd/system/service.d
             └─10-timeout-abort.conf
     Active: inactive (dead)
root@localhost:~#
root@localhost:~# systemctl start dnsmasq.service
Failed to start dnsmasq.service: Unit dnsmasq.service is masked.
root@localhost:~#
root@localhost:~# exit
logout
core@localhost:~$ exit
logout
Mac: ~ %
手動でhosts設定
本来はちゃんと設定されると思うので、普通はやる必要がない & やっちゃいけないと思いますが、上述の4つのエントリを手動でhostsに登録してみました。
(/etc/hostsに以下を追記)
192.168.127.1     gateway.containers.internal gateway.docker.internal
192.168.127.254   host.containers.internal host.docker.internal
Mac: ~ % podman machine ssh
Connecting to vm podman-machine-default. To close connection, use `~.` or `exit`
Fedora CoreOS 39.20240407.2.0
Tracker: https://github.com/coreos/fedora-coreos-tracker
Discuss: https://discussion.fedoraproject.org/tag/coreos

Last login: Wed May  1 07:31:13 2024 from 192.168.127.1
core@localhost:~$
core@localhost:~$ cat /etc/hosts
# Loopback entries; do not change.
# For historical reasons, localhost precedes localhost.localdomain:
127.0.0.1   localhost localhost.localdomain localhost4 localhost4.localdomain4
::1         localhost localhost.localdomain localhost6 localhost6.localdomain6
# See hosts(5) for proper format and other examples:
# 192.168.1.10 foo.mydomain.org foo
# 192.168.1.13 bar.mydomain.org bar
core@localhost:~$
core@localhost:~$ sudo vi /etc/hosts
core@localhost:~$
core@localhost:~$ cat /etc/hosts
# Loopback entries; do not change.
# For historical reasons, localhost precedes localhost.localdomain:
127.0.0.1   localhost localhost.localdomain localhost4 localhost4.localdomain4
::1         localhost localhost.localdomain localhost6 localhost6.localdomain6
# See hosts(5) for proper format and other examples:
# 192.168.1.10 foo.mydomain.org foo
# 192.168.1.13 bar.mydomain.org bar

192.168.127.1     gateway.containers.internal gateway.docker.internal
192.168.127.254   host.containers.internal host.docker.internal
core@localhost:~$
core@localhost:~$ exit
logout
Mac: ~ %
設定が完了したら、再度podman machineを再起動します。
Mac: ~ % podman machine stop
Machine "podman-machine-default" stopped successfully
Mac: ~ %
Mac: ~ % podman machine start
Starting machine "podman-machine-default"

This machine is currently configured in rootless mode. If your containers
require root permissions (e.g. ports < 1024), or if you run into compatibility
issues with non-podman clients, you can switch using the following command:

	podman machine set --rootful

API forwarding listening on: /var/run/docker.sock
Docker API clients default to this address. You do not need to set DOCKER_HOST.

Machine "podman-machine-default" started successfully
Mac: ~ %
名前解決ができていることを確認します。
Mac: ~ % podman machine ssh
Connecting to vm podman-machine-default. To close connection, use `~.` or `exit`
Fedora CoreOS 39.20240407.2.0
Tracker: https://github.com/coreos/fedora-coreos-tracker
Discuss: https://discussion.fedoraproject.org/tag/coreos

Last login: Wed May  1 07:35:41 2024 from 192.168.127.1
core@localhost:~$
core@localhost:~$ nslookup gateway.containers.internal
Server:		127.0.0.53
Address:	127.0.0.53#53

Name:	gateway.containers.internal
Address: 192.168.127.1

core@localhost:~$
(以下同様)
コンテナ起動確認(httpd)(成功)
再度httpdのコンテナを起動してみます。
今度は正常に起動することができました!
Mac: ~ % podman run -dt -p 8080:80/tcp docker.io/library/httpd
e6babd61d12cb451526a97536495df4e844b8a95bcceef0b6e8ddd91fb6e5201
Mac: ~ %
Mac: ~ % podman ps
CONTAINER ID  IMAGE                           COMMAND           CREATED        STATUS        PORTS                 NAMES
e6babd61d12c  docker.io/library/httpd:latest  httpd-foreground  5 seconds ago  Up 5 seconds  0.0.0.0:8080->80/tcp  nifty_swanson
Mac: ~ %
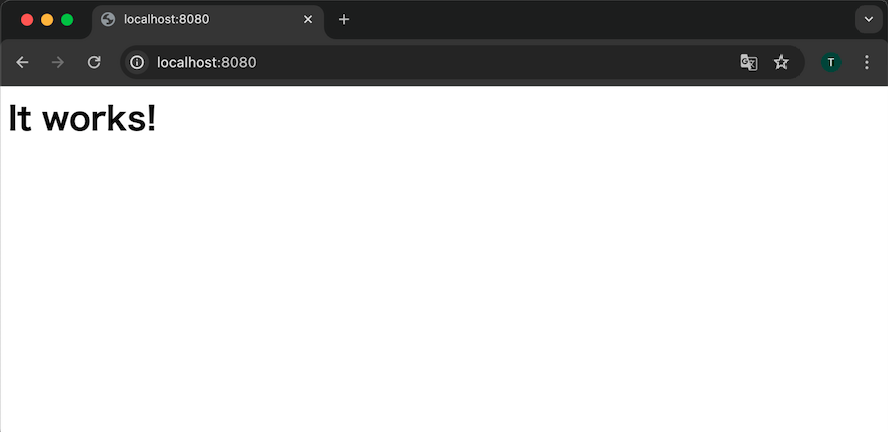
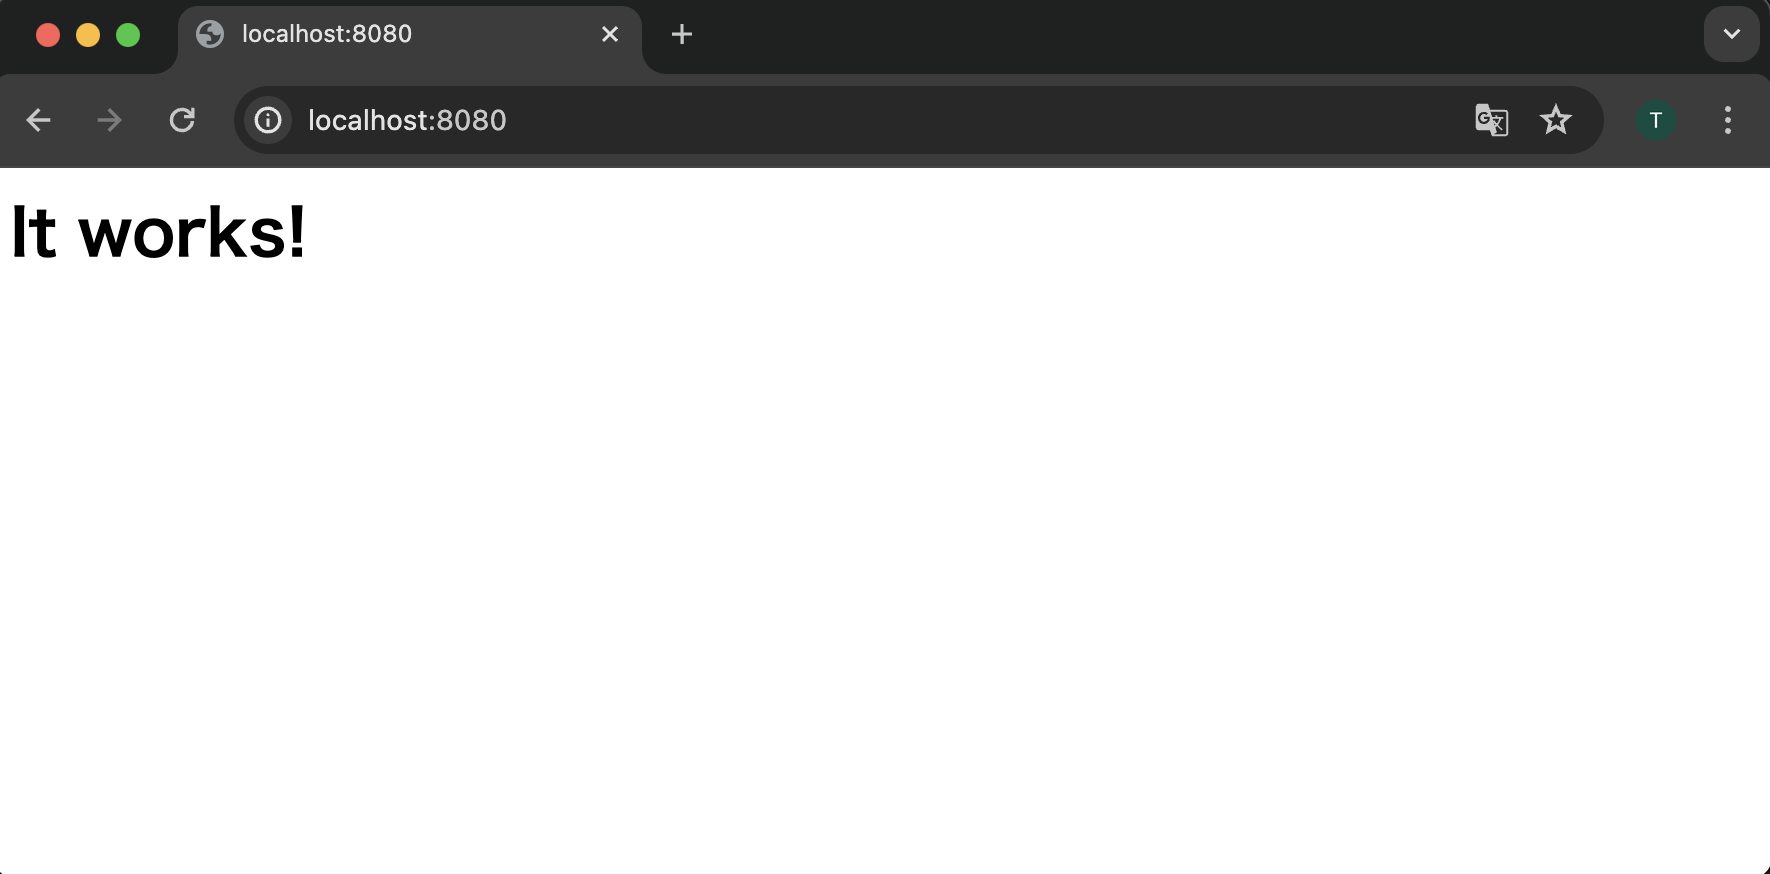
ブラウザからhttp://localhost:8080のURLで画面がちゃんと表示されました!
以上
全部を反映した手順
ここまで色々と試行錯誤しながらやってしまったので、結局何が必要だったのかが、わかりづらくなったので、必要な手順を整理してもう一度やってみました。
(補足)(一からやり直す前に一旦綺麗にアンインストール)
綺麗にアンインストールした状態から、再度やってみたかったので、一旦全部アンインストールしました。
Mac: ~ % podman machine stop
Machine "podman-machine-default" stopped successfully
Mac: ~ %
Mac: ~ % podman machine rm
The following files will be deleted:


/Users/ayu/.config/containers/podman/machine/applehv/podman-machine-default.json
/var/folders/z3/ggmm70591934m0b07r4rspkw0000gn/T/podman/podman-machine-default.sock
/var/folders/z3/ggmm70591934m0b07r4rspkw0000gn/T/podman/podman-machine-default-gvproxy.sock
/var/folders/z3/ggmm70591934m0b07r4rspkw0000gn/T/podman/podman-machine-default-api.sock
/var/folders/z3/ggmm70591934m0b07r4rspkw0000gn/T/podman/podman-machine-default.log
Are you sure you want to continue? [y/N] y
Mac: ~ %
Mac: ~ % ls -l .config/containers
total 8
drwxr-xr-x  3 ayu  staff  96  5  1 13:13 podman
-rw-r--r--  1 ayu  staff  28  5  1 16:45 podman-connections.json
-rw-r--r--  1 ayu  staff   0  5  1 13:17 podman-connections.json.lock
Mac: ~ %
Mac: ~ % rm -rf .config/containers
Mac: ~ %
Mac: ~ % ls -l .local/share/containers
total 0
drwx------  2 ayu  staff  64  5  1 13:13 cache
drwxr-xr-x  3 ayu  staff  96  5  1 13:13 podman
Mac: ~ %
Mac: ~ % rm -rf .local/share/containers
Mac: ~ %
Mac: ~ % which podman
/opt/podman/bin/podman
Mac: ~ %
Mac: ~ % ls -l /opt/podman/
total 0
drwxr-xr-x  6 root  wheel  192  3 20 02:29 bin
Mac: ~ %
Mac: ~ % ls -l /opt/podman/bin
total 302288
-rwxr-xr-x  1 root  wheel  23179008  3 20 02:29 gvproxy
-rwxr-xr-x  1 root  wheel  87072688  3 20 02:29 podman
-rwxr-xr-x  1 root  wheel  10658976  3 20 02:29 podman-mac-helper
-rwxr-xr-x  1 root  wheel  33854288  3 20 02:29 vfkit
Mac: ~ %
Mac: ~ % sudo rm -rf /opt/podman/
Password:
Mac: ~ %
podmanのインストール
インストールは最初のpodmanのインストールでやった手順と同じです。
podman machineの初期化
podman machineの初期化もpodman-machineの初期化でやった手順と同じです。
Mac: ~ % podman machine init
Looking up Podman Machine image at quay.io/podman/machine-os:5.0 to create VM
Getting image source signatures
Copying blob 0c74f573281e done   |
Copying config 44136fa355 done   |
Writing manifest to image destination
0c74f573281ebcefdded409a6384313afbbfd993bfc8e92d48b066b31ca941b0
Extracting compressed file: podman-machine-default-arm64.raw: done
Machine init complete
To start your machine run:

	podman machine start

Mac: ~ %
podman machineの起動(失敗)
podman machine startでpodman machineを起動します。
ここで何もエラーが出なければ、あとは特に何もする必要がありません。
もし以下のようなSSH接続のエラーが出たら次のステップのようなことをやってみます。
Mac: ~ % podman machine start
Starting machine "podman-machine-default"

This machine is currently configured in rootless mode. If your containers
require root permissions (e.g. ports < 1024), or if you run into compatibility
issues with non-podman clients, you can switch using the following command:

	podman machine set --rootful

Error: machine did not transition into running state: ssh error: exit status 255
Mac: ~ %
podman machineの起動(--log-level debugオプション)
--log-level debugオプションをつけてpodman machineを起動します。
SSHのエラーで失敗します。
Mac: ~ % podman machine start --log-level debug
INFO[0000] podman filtering at log level debug
DEBU[0000] Using Podman machine with `applehv` virtualization provider

(略)

DEBU[0038] SSH readiness check for machine failed: exit status 255
DEBU[0038] writing configuration file "/Users/ayu/.config/containers/podman/machine/applehv/podman-machine-default.json"
Error: machine did not transition into running state: ssh error: exit status 255
DEBU[0038] Shutting down engines
Mac: ~ %
IPアドレス、DNSサーバ、hostsの手動設定
表示されたvfkitのVMのコンソールでnmtuiでIPアドレスとDNSサーバの設定をします。
Activate a connectionのメニューで該当のconnectionをActivateします。
/etc/hostsはこのままVMのコンソールで設定しても良いのですが、podman machine sshできるようになってから修正したほうがコピペできるので簡単と思います。
そのため、一旦podman machineを再起動します。
Mac: ~ % podman stop
Error: you must provide at least one name or id
Mac: ~ % podman machine stop
Machine "podman-machine-default" stopped successfully
Mac: ~ %
Mac: ~ % podman machine start
Starting machine "podman-machine-default"

This machine is currently configured in rootless mode. If your containers
require root permissions (e.g. ports < 1024), or if you run into compatibility
issues with non-podman clients, you can switch using the following command:

	podman machine set --rootful

API forwarding listening on: /var/run/docker.sock
Docker API clients default to this address. You do not need to set DOCKER_HOST.

Machine "podman-machine-default" started successfully
Mac: ~ %
正常に起動したのでpodman machine ssh接続をして/etc/hostsを修正します。
Mac: ~ % podman machine ssh
Connecting to vm podman-machine-default. To close connection, use `~.` or `exit`
Fedora CoreOS 39.20240407.2.0
Tracker: https://github.com/coreos/fedora-coreos-tracker
Discuss: https://discussion.fedoraproject.org/tag/coreos

core@localhost:~$
core@localhost:~$ cat /etc/hosts
# Loopback entries; do not change.
# For historical reasons, localhost precedes localhost.localdomain:
127.0.0.1   localhost localhost.localdomain localhost4 localhost4.localdomain4
::1         localhost localhost.localdomain localhost6 localhost6.localdomain6
# See hosts(5) for proper format and other examples:
# 192.168.1.10 foo.mydomain.org foo
# 192.168.1.13 bar.mydomain.org bar
core@localhost:~$
core@localhost:~$ sudo vi /etc/hosts
core@localhost:~$ cat /etc/hosts
# Loopback entries; do not change.
# For historical reasons, localhost precedes localhost.localdomain:
127.0.0.1   localhost localhost.localdomain localhost4 localhost4.localdomain4
::1         localhost localhost.localdomain localhost6 localhost6.localdomain6
# See hosts(5) for proper format and other examples:
# 192.168.1.10 foo.mydomain.org foo
# 192.168.1.13 bar.mydomain.org bar

192.168.127.1     gateway.containers.internal gateway.docker.internal
192.168.127.254   host.containers.internal host.docker.internal
core@localhost:~$
core@localhost:~$ exit
logout
Mac: ~ %
podman machineを再起動します。
Mac: ~ % podman machine stop
Machine "podman-machine-default" stopped successfully
Mac: ~ %
Mac: ~ % podman machine start
Starting machine "podman-machine-default"

This machine is currently configured in rootless mode. If your containers
require root permissions (e.g. ports < 1024), or if you run into compatibility
issues with non-podman clients, you can switch using the following command:

	podman machine set --rootful

API forwarding listening on: /var/run/docker.sock
Docker API clients default to this address. You do not need to set DOCKER_HOST.

Machine "podman-machine-default" started successfully
Mac: ~ %
コンテナ起動確認(Hello World)
Hello Worldのコンテナが正常に起動しました。
Mac: ~ % podman run --rm quay.io/podman/hello
Trying to pull quay.io/podman/hello:latest...
Getting image source signatures
Copying blob sha256:5ea7ca68e6b64f513a82e9c9d619bd1a298cafb0ad21e07e5e776c826d112db5
Copying config sha256:78f4bb63a934181a0c721ba760726cf7c8b1c581cc62b1786043064e1f47f7df
Writing manifest to image destination
!... Hello Podman World ...!

         .--"--.
       / -     - \
      / (O)   (O) \
   ~~~| -=(,Y,)=- |
    .---. /`  \   |~~
 ~/  o  o \~~~~.----. ~~
  | =(X)= |~  / (O (O) \
   ~~~~~~~  ~| =(Y_)=-  |
  ~~~~    ~~~|   U      |~~

Project:   https://github.com/containers/podman
Website:   https://podman.io
Desktop:   https://podman-desktop.io
Documents: https://docs.podman.io
YouTube:   https://youtube.com/@Podman
X/Twitter: @Podman_io
Mastodon:  @Podman_io@fosstodon.org
Mac: ~ %
コンテナ起動確認(httpd)
httpdのコンテナも正常に起動しました。
Mac: ~ % podman run -dt -p 8080:80/tcp docker.io/library/httpd
Trying to pull docker.io/library/httpd:latest...
Getting image source signatures
Copying blob sha256:bae159c85a0b3662b8e9d58344f7da1b84836a7338c8ddf6b88360cea400929f
Copying blob sha256:855b568ab02c3fee1362d51176f966517b1e03ca0c8efde55eddace90835f300
Copying blob sha256:22d97f6a5d13532e867231d23d92620a81874d51a456196be50154eeb32edc08
Copying blob sha256:c521cc2c4e8a439951003122cdab841fe1b1350db864e2cf9dea69298513f711
Copying blob sha256:4f4fb700ef54461cfa02571ae0db9a0dc1e0cdb5577484a6d75e68dc38e8acc1
Copying blob sha256:98c8bced82bd1d3557a49d39ea03bb8090bf3abc8154ab65388d9f9728f3ce02
Copying config sha256:73acb239a8eb7a9ef5b6848a5b01bb26cc03d2262056705876bf7ac6ad781f02
Writing manifest to image destination
8c2159ec2a7402203c811cfc5f1fa33f8497d7a387cc1b08f1596cbfb0f4ab7f
Mac: ~ %
Mac: ~ % podman ps
CONTAINER ID  IMAGE                           COMMAND           CREATED         STATUS         PORTS                 NAMES
8c2159ec2a74  docker.io/library/httpd:latest  httpd-foreground  42 seconds ago  Up 43 seconds  0.0.0.0:8080->80/tcp  elated_shannon
Mac: ~ %
ブラウザから8080のポートでアクセスもできました。
まとめ
M1 MacBookで、podman v5.0.0が起動しなかったので、とりあえず自分の環境で起動させるまでの手順をメモで残してみました。
今回の環境は以下です。
- MacBook Air, M1 2020 (macOS Sonoma 14.4)
- podman v5.0.0
そもそも他のM1 Macの人は普通にpodmanは何もしなくても使えてると思いますし、自分の環境のせいかなとと思います。
また、今後新しいバージョンにアップデートして試すと、きっと直ってたりするのではと思います。
(2024/05/01の最新: podman v5.0.2、macOS 14.1.1)
とりあえず、今回の手順は絶対正しくないと思いますが、なんとなくMacでのpodman v5.0.0の仕組みが少しわかったような気がしたので、自分用のメモとして手順を残しておきました。
以上
