はじめに
本記事では、はるべえ氏(@ruyo_h)が公開しているVRM4Uプラグインを用いて、VRM形式のアバターをUE5.4へ読み込み、C++からアバターの関節を直接制御する際に自分がハマった注意点と解決策について共有します。
ポイントはローカル回転を実現するためにPoseableMeshComponentを継承した自作クラスを作成することです。
当方Unityは数年間触っているものの、UEは今回初めて触ったためもっと楽なやり方があるかもしれないです。
ご存じの方はコメント欄で教えていただければと思います。
実践
準備
Unreal Engineでゲーム→ブランクを選択し、C++を選んでプロジェクトを作成しておきます。
プロジェクトが立ち上がったら新規レベルをBasicで作成しておきます。

VRM4Uの導入
公式のセットアップページを見ながら進めれば特に問題はないはずです。
VRMモデルのダウンロードと追加
今回はVRoid HubからAvatarSample_Dをお借りします

⇒ Pixiv IDでログイン後ダウンロード
ダウンロードしてきたvrmファイルをUEのコンテンツブラウザ上にドラッグ&ドロップします。
ポップアップが表示されたらimportをクリック
※この時、ドロップしたフォルダに各種ファイルが展開されるため、あらかじめフォルダを分けておくことをお勧めします。
以下のようにスケルタルメッシュやスケルトンといったファイルが展開されていれば導入成功です

SK_○○の部分やSKEL_○○の部分などはファイル名がそのまま適用されるため、vroid.vrmやavatar.vrmなどわかりやすい名前にリネームしておくと良いです。
試しにプレイ画面上にSkeletalMeshを配置してみます。


右側はMToonAttachActorを適用した後のモデルです。輪郭線がはっきりとし、肌の色味も自然ですね。
実装
PoseableMeshComponentの場合
下記の記事のようにSkeletalMeshComponentにはボーンを取得してTransformを変更する関数が実装されていないため、C++から関節を動かしたい場合はPoseableMeshComponentを使用します。
まずはPoseableMeshComponentをRootObjectに持つようなアクターをC++で作成します。今回はコンストラクタでSK_vroidのSkeletalMeshをPoseableMeshComponentへコピーすることで生成します。
// Sets default values
APoseableMeshAvatar::APoseableMeshAvatar()
{
	// Set this actor to call Tick() every frame.  You can turn this off to improve performance if you don't need it.
	PrimaryActorTick.bCanEverTick = true;

	/* VRM4Uが生成したSkeletalMeshActorからSkeletalMeshをコピーする形で作成する */
	UPoseableMeshComponent *poseableAvatar = CreateDefaultSubobject<UPoseableMeshComponent>(TEXT("PoseableAvatar"));
	/* VRMファイルを読み込んだファイルパスを指定 */
	USkeletalMesh *skeletalMesh = LoadObject<USkeletalMesh>(nullptr, TEXT("/Game/StarterContent/Models/AvatarSample_D/SK_vroid.SK_vroid"));
	poseableAvatar->SetSkinnedAsset(skeletalMesh);
	RootComponent = poseableAvatar;
}
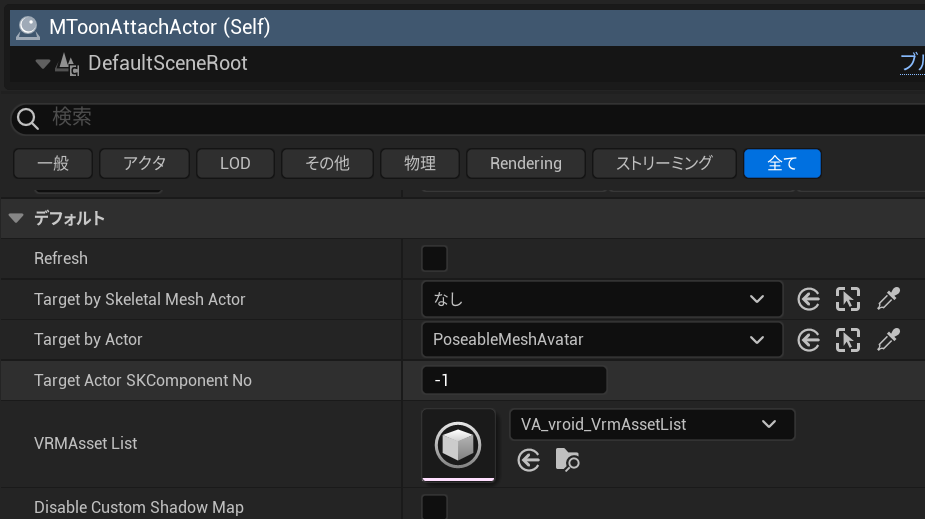
MToonAttachActorはTarget by Actorから生成したアクターを選択しておきます。

上記のオブジェクトを取得し、ボーンの名前と角度を指定して回転させるアクターを作成します。
// Called when the game starts or when spawned
void AAvatarRotationSample::BeginPlay()
{
	Super::BeginPlay();

	/* PoseableMeshComponentのロード */
	LoadPoseableMeshComponentFromObject();

	/* わかりやすさのために上腕を180度回転、前腕は無回転とする */
	UpdateBoneRotation(FName("J_Bip_R_UpperArm"), FRotator(0, 0, 180));
	UpdateBoneRotation(FName("J_Bip_R_LowerArm"), FRotator(0, 0, 0));
}

/* AvatarのPoseableMeshComponentをロード */
void AAvatarRotationSample::LoadPoseableMeshComponentFromObject()
{
	/* Avatarオブジェクトの読み込み */
	TArray<AActor *> worldActors;
	UGameplayStatics::GetAllActorsOfClass(GetWorld(), AActor::StaticClass(), worldActors);

	for (auto actor : worldActors)
	{
		if (actor->GetActorLabel() == FName("PoseableMeshAvatar"))
		{
			/* PoseableMeshComponentの取得 */
			UPoseableMeshComponent *meshComponent = actor->FindComponentByClass<UPoseableMeshComponent>();
			if (meshComponent)
			{
				_PoseableAvatar = meshComponent;
			}
		}
	}
}

/* ボーンの名前と角度を指定して回転 */
void AAvatarRotationSample::UpdateBoneRotation(FName BoneName, FRotator Rotation)
{
	if (_PoseableAvatar)
	{
		_PoseableAvatar->SetBoneRotationByName(BoneName, Rotation, EBoneSpaces::ComponentSpace);
	}
}
上記のAvatarRotationSampleアクターを配置してPlayすると以下の写真のように腕が回転すると思います。

前腕が親ボーンである上腕の回転を無視して絶対座標における無回転になっていることがわかります。
CustomPoseableMeshComponentの場合
次に以下のようにローカル回転のみを行うようなPoseableMeshComponentを拡張したCustomPoseableMeshComponentクラスを作成します。
基本的にはPoseableMeshComponentのコードを引用しています。
#pragma once

#include "CoreMinimal.h"
#include "BoneContainer.h"
#include "Kismet/KismetSystemLibrary.h"
#include "Components/SkeletalMeshComponent.h"
#include "Components/PoseableMeshComponent.h"

/* PoseableMeshComponentを継承 */
class VRM_TEST_API UCustomPoseableMeshComponent : public UPoseableMeshComponent
{
public:
	FTransform GetBoneTransformByName(FName BoneName);
	void SetBoneLocalRotationByName(FName BoneName, FRotator InRotation);
	void SetBoneLocalTransformByName(FName BoneName, const FTransform &InTransform);
};
#include "CustomPoseableMeshComponent.h"

template <class CompType>
FTransform GetBoneTransformByNameHelper(FName BoneName, FBoneContainer &RequiredBones, CompType *Component)
{
    int32 BoneIndex = Component->GetBoneIndex(BoneName);
    if (BoneIndex == INDEX_NONE)
    {
        FString Message = FString::Printf(TEXT("Invalid Bone Name '%s'"), *BoneName.ToString());
        FFrame::KismetExecutionMessage(*Message, ELogVerbosity::Warning);
        return FTransform();
    }
    return Component->BoneSpaceTransforms[BoneIndex];
}

FTransform UCustomPoseableMeshComponent::GetBoneTransformByName(FName BoneName)
{
    if (!GetSkinnedAsset() || !RequiredBones.IsValid())
    {
        return FTransform();
    }

    USkinnedMeshComponent *MPCPtr = LeaderPoseComponent.Get();
    if (MPCPtr)
    {
        if (USkeletalMeshComponent *SMC = Cast<USkeletalMeshComponent>(MPCPtr))
        {
            if (UAnimInstance *AnimInstance = SMC->GetAnimInstance())
            {
                return GetBoneTransformByNameHelper(BoneName, AnimInstance->GetRequiredBones(), SMC);
            }
            FString Message = FString::Printf(TEXT("Cannot return valid bone transform. Leader Pose Component has no anim instance"));
            FFrame::KismetExecutionMessage(*Message, ELogVerbosity::Warning);
            return FTransform();
        }
        FString Message = FString::Printf(TEXT("Cannot return valid bone transform. Leader Pose Component is not of type USkeletalMeshComponent"));
        FFrame::KismetExecutionMessage(*Message, ELogVerbosity::Warning);
        return FTransform();
    }
    return GetBoneTransformByNameHelper(BoneName, RequiredBones, this);
}

void UCustomPoseableMeshComponent::SetBoneLocalTransformByName(FName BoneName, const FTransform &InTransform)
{
    if (!GetSkinnedAsset() || !RequiredBones.IsValid())
    {
        return;
    }

    int32 BoneIndex = GetBoneIndex(BoneName);
    if (BoneIndex >= 0 && BoneIndex < BoneSpaceTransforms.Num())
    {
        BoneSpaceTransforms[BoneIndex] = InTransform;
        MarkRefreshTransformDirty();
    }
}

void UCustomPoseableMeshComponent::SetBoneLocalRotationByName(FName BoneName, FRotator InRotation)
{
    FTransform currentTransform = GetBoneTransformByName(BoneName);
    currentTransform.SetRotation(FQuat(InRotation));
    SetBoneLocalTransformByName(BoneName, currentTransform);
}
先ほどと同様にCustomPoseableMeshComponentをRootObjectに持つようなアクターをC++で作成し配置します。PoseableMeshAvatarとの変更点はposeableAvatarの型のみです。
以下のようにCustomPoseableMeshAvatarも回転させるようにAvatarRotationSampleを修正します。
/* AvatarのPoseableMeshComponentを取得 */
void AAvatarRotationSample::LoadPoseableMeshComponentFromObject()
{
	/* Avatarオブジェクトの読み込み */
	TArray<AActor *> worldActors;
	UGameplayStatics::GetAllActorsOfClass(GetWorld(), AActor::StaticClass(), worldActors);

	for (auto actor : worldActors)
	{
		if (actor->GetActorLabel() == FName("PoseableMeshAvatar"))
		{
			/* PoseableMeshComponentの取得 */
			UPoseableMeshComponent *meshComponent = actor->FindComponentByClass<UPoseableMeshComponent>();
			if (meshComponent)
			{
				_PoseableAvatar = meshComponent;
			}
		}
		/* 追加 */
		else if (actor->GetActorLabel() == FName("CustomPoseableMeshAvatar"))
		{
			/* CustomPoseableMeshComponentの取得 */
			UCustomPoseableMeshComponent *meshComponent = actor->FindComponentByClass<UCustomPoseableMeshComponent>();
			if (meshComponent)
			{
				_CustomPoseableAvatar = meshComponent;
			}
		}
	}
}

/* ボーンの名前と角度を指定して回転 */
void AAvatarRotationSample::UpdateBoneRotation(FName BoneName, FRotator Rotation)
{
	if (_PoseableAvatar)
	{
		_PoseableAvatar->SetBoneRotationByName(BoneName, Rotation, EBoneSpaces::ComponentSpace);
		/* 追加 */
		_CustomPoseableAvatar->SetBoneLocalRotationByName(BoneName, Rotation);
	}
}
実行すると以下のように手のひらが上を向いた形になると思います。

前腕が親ボーンの回転の影響を受けて相対座標における無回転になっていることが分かります。
先ほどのPoseableMeshAvatarと並べると以下のように手のひらの向きが真逆になっていることが分かります。

左のアバターがCustomPoseableMeshAvatar、右のアバターがPoseableMeshAvatarです。
比較
既存のPoseableMeshAvatarは指定した回転を、親ボーンの回転の影響を無視して適用しています。
一方で、作成したCustomPoseableMeshAvatarは指定した回転を、親ボーンの回転の影響を受けた状態で適用しています。
一応PoseableMeshComponent単体でも親ボーンの回転を取得し、合成した状態で回転を適用することでCustomPoseableMeshComponentと同様の回転を実現できるはずです。(未検証)
一概にどちらが優れているということではないため、以下のように用途に応じて使い分けるのが良いかなと思います。
- 空間全体から見て指定したい角度を確実に適用したい場合は
PoseableMeshComponentを使用する - 指定したポーズを取らせるためにFK的に角度を適用したい場合は
CustomPoseableMeshComponentを使用する
今回の自分の使用用途は後者の指定したポーズを取らせたいパターンだったため、上記のようなローカル回転が必要でした。
まとめ
アバターの関節の角度を直接指定して動かしたい場合は、親ボーンの回転の影響を受けて欲しい回転なのか、受けないで欲しい回転なのか、を判断することが大事。
-
受けて欲しい回転なら
PoseableMeshComponentを使うだけでOK -
受けないで欲しい回転なら
CustomPoseableMeshComponentのようにローカル回転を実現するための拡張クラスを実装することで実現できる
ちなみに、余談ですがEBoneSpacesの定義を見てみるとLocalSpaceがコメントアウトされてしまっていることがわかります。

実装する必要がなかったため消されてしまったのでしょうか・・・
個人的にはアバターのような人型の場合、親のボーンの影響を受けた状態で指定する方が楽なのでローカル回転を使いたいです。