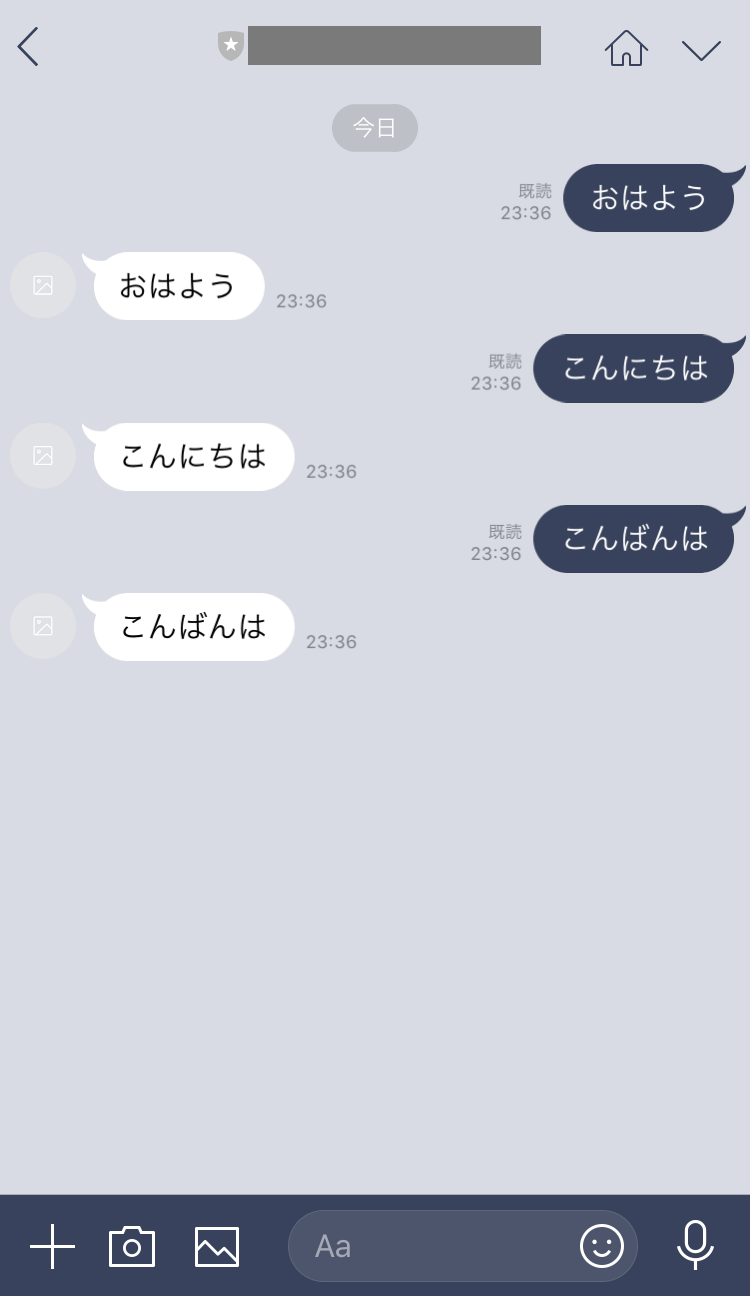
VPS環境でNginx + SpringBootの、オウム返しするLineBotを作成しました。
環境構成
・VPS:Conoha(https://www.conoha.jp/)
・OS:CentOS7
・SSL証明書:Let’s Encrypt
・Nginx 1.12.2
・SpringBoot 2.1.6
https化
LineBotのWebhookは、httpsのURLのみ有効です。
VPSはConohaで、独自ドメインは別ドメインサイトで取得しました。
ここでは独自ドメインの取得方法や設定方法は割愛します。
SSL証明書は以下を参考に取得しました。
また以下の記事の中でNginxをインストールしました。
Let’s EncryptのSSL証明書で、安全なウェブサイトを公開
https://knowledge.sakura.ad.jp/5573/
Line Developersの設定と確認
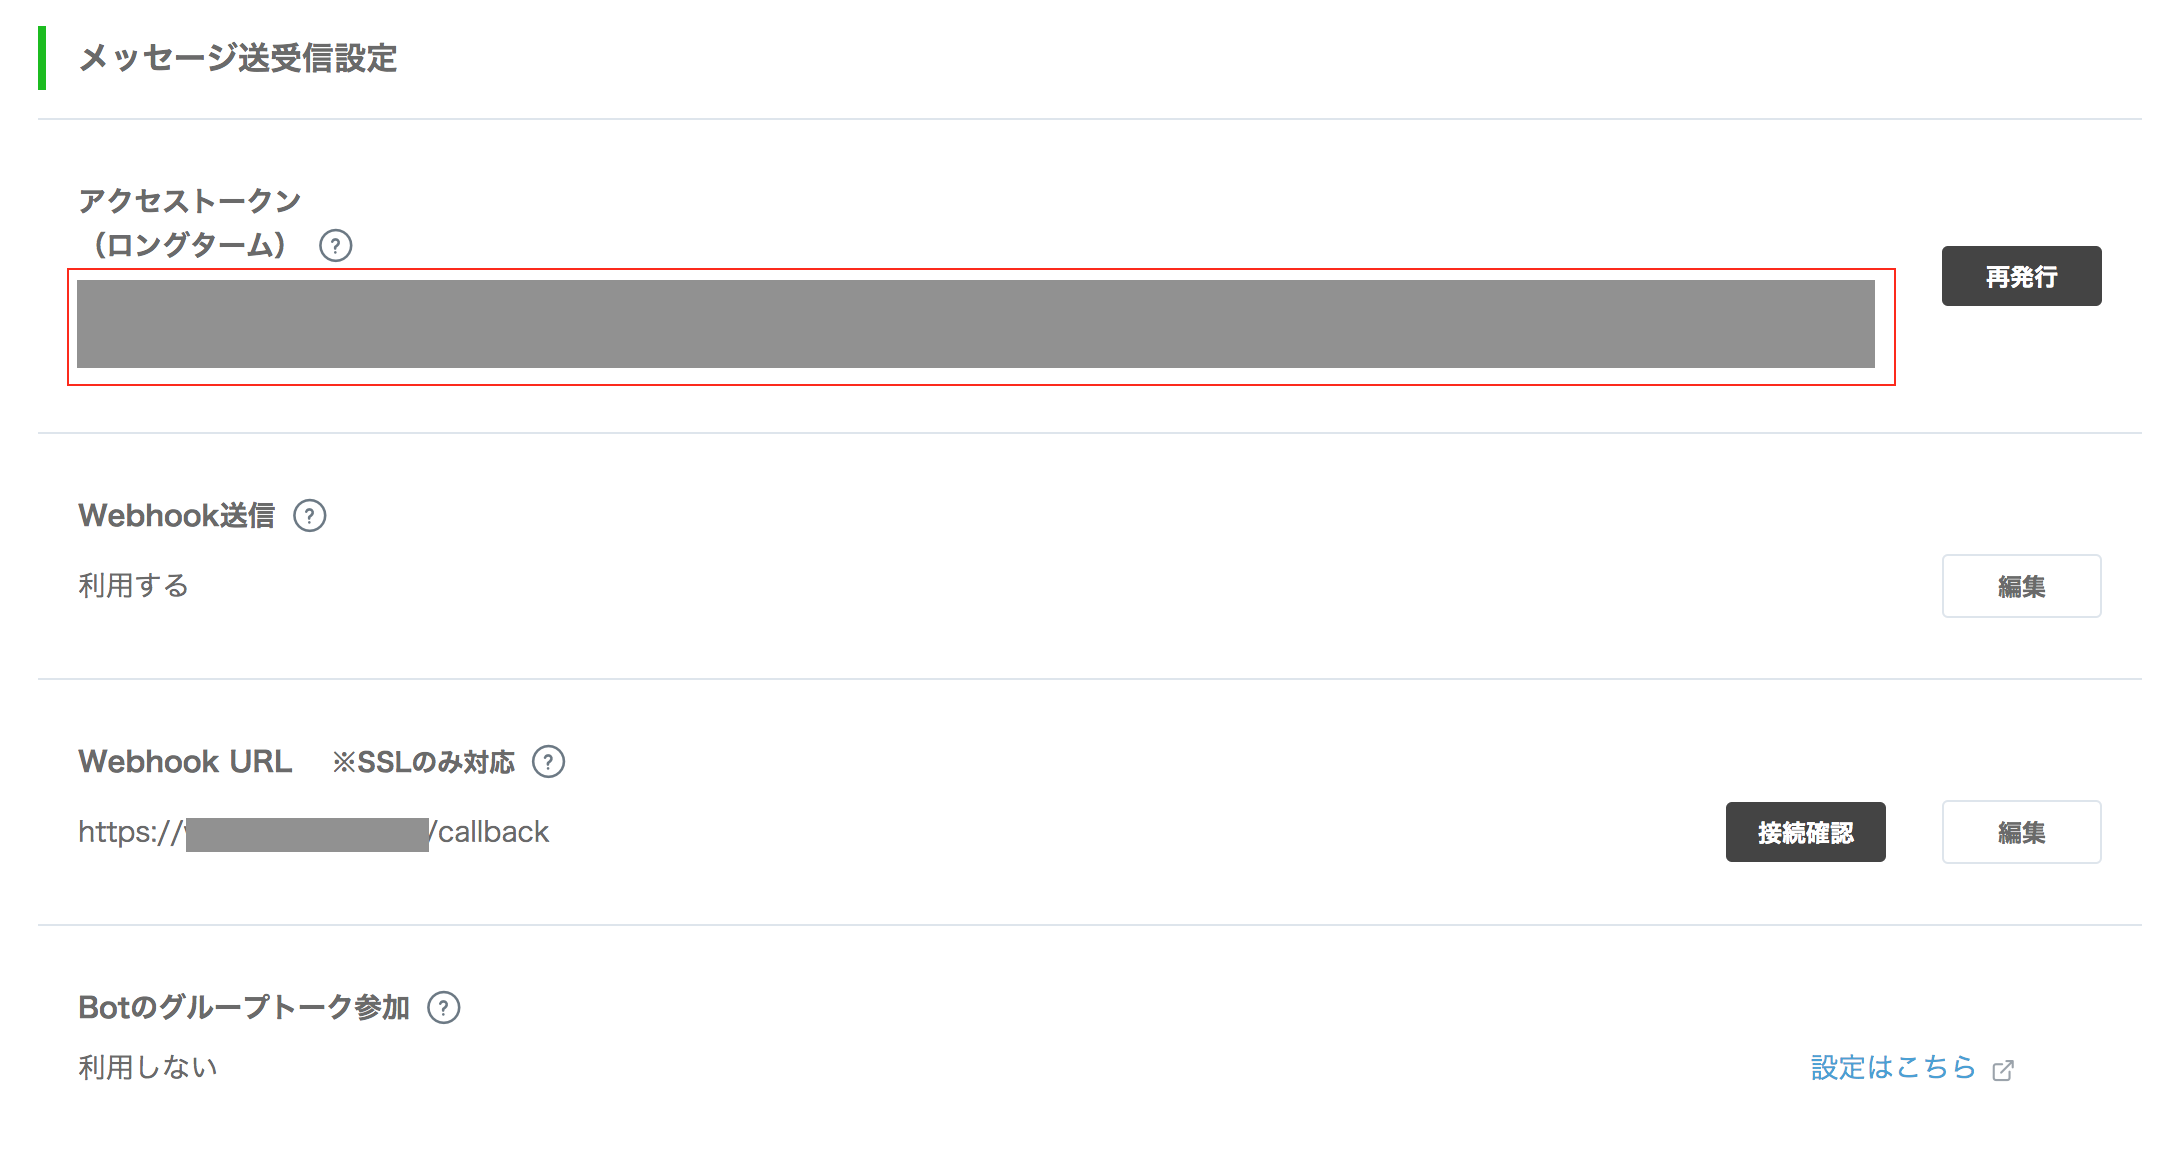
Line Developersでチャンネル基本設定を開き、WebHookなどの設定を行います。
ChannnelSecretは後の手順で使用するので、メモを控えておいてください。

アクセストークンは再発行をしておき、表示されたアクセストークンは、後の手順で使用するためメモに控えておいてください。
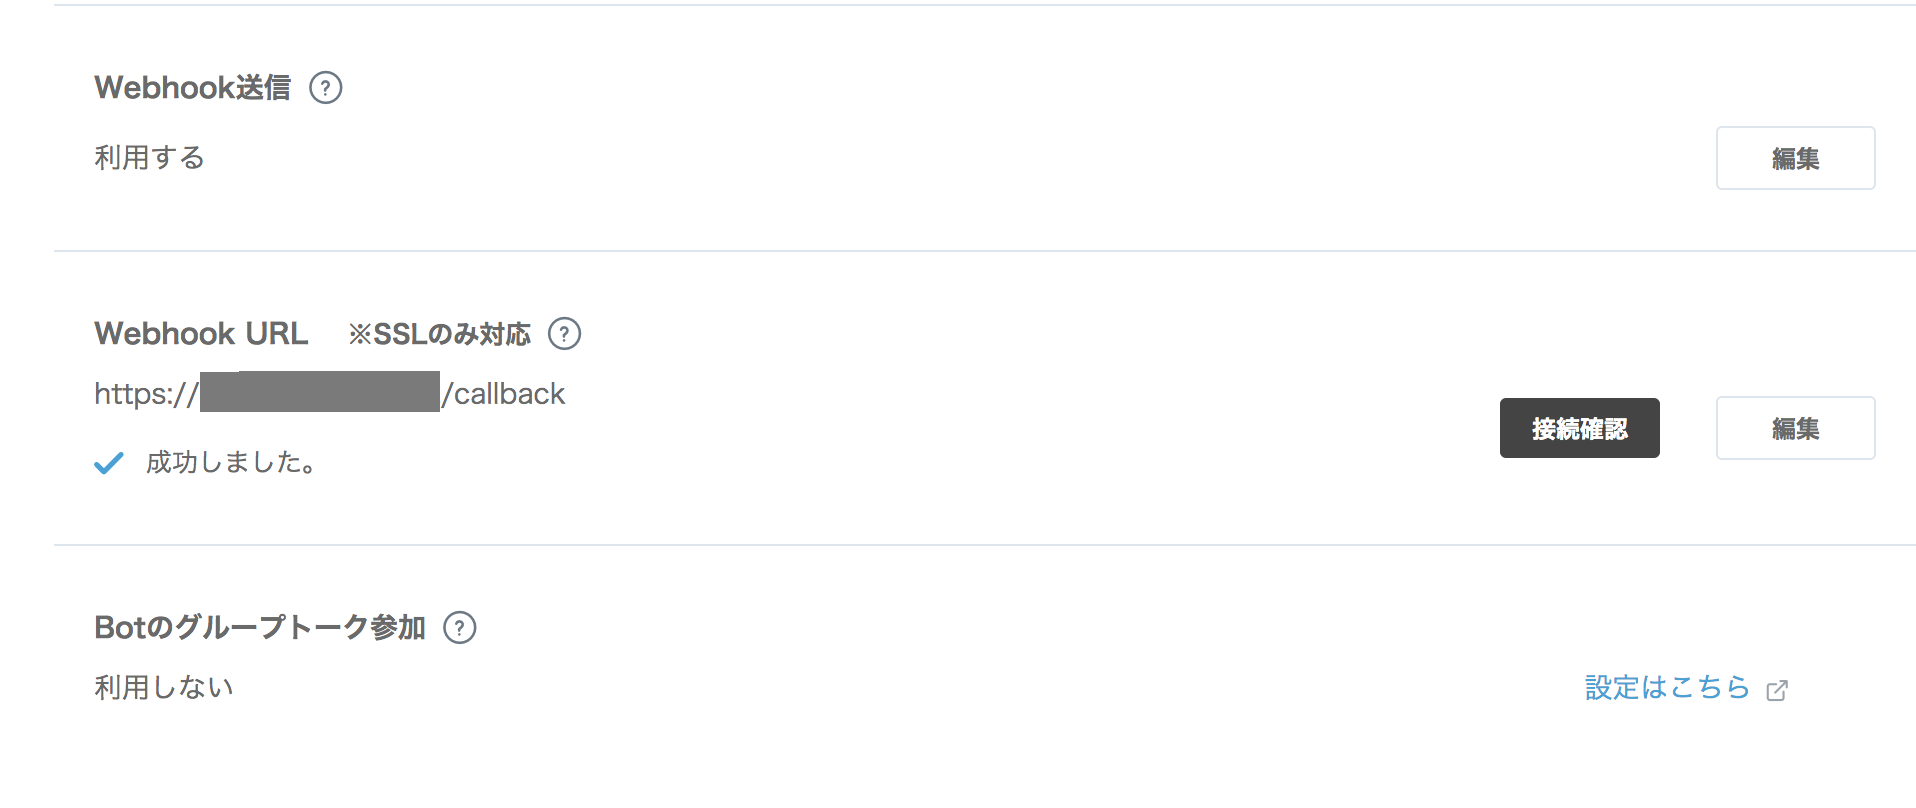
Webhook送信は「利用する」に変更
Webhook URLのグレーで隠れている部分は取得したドメイン名を指定してください。
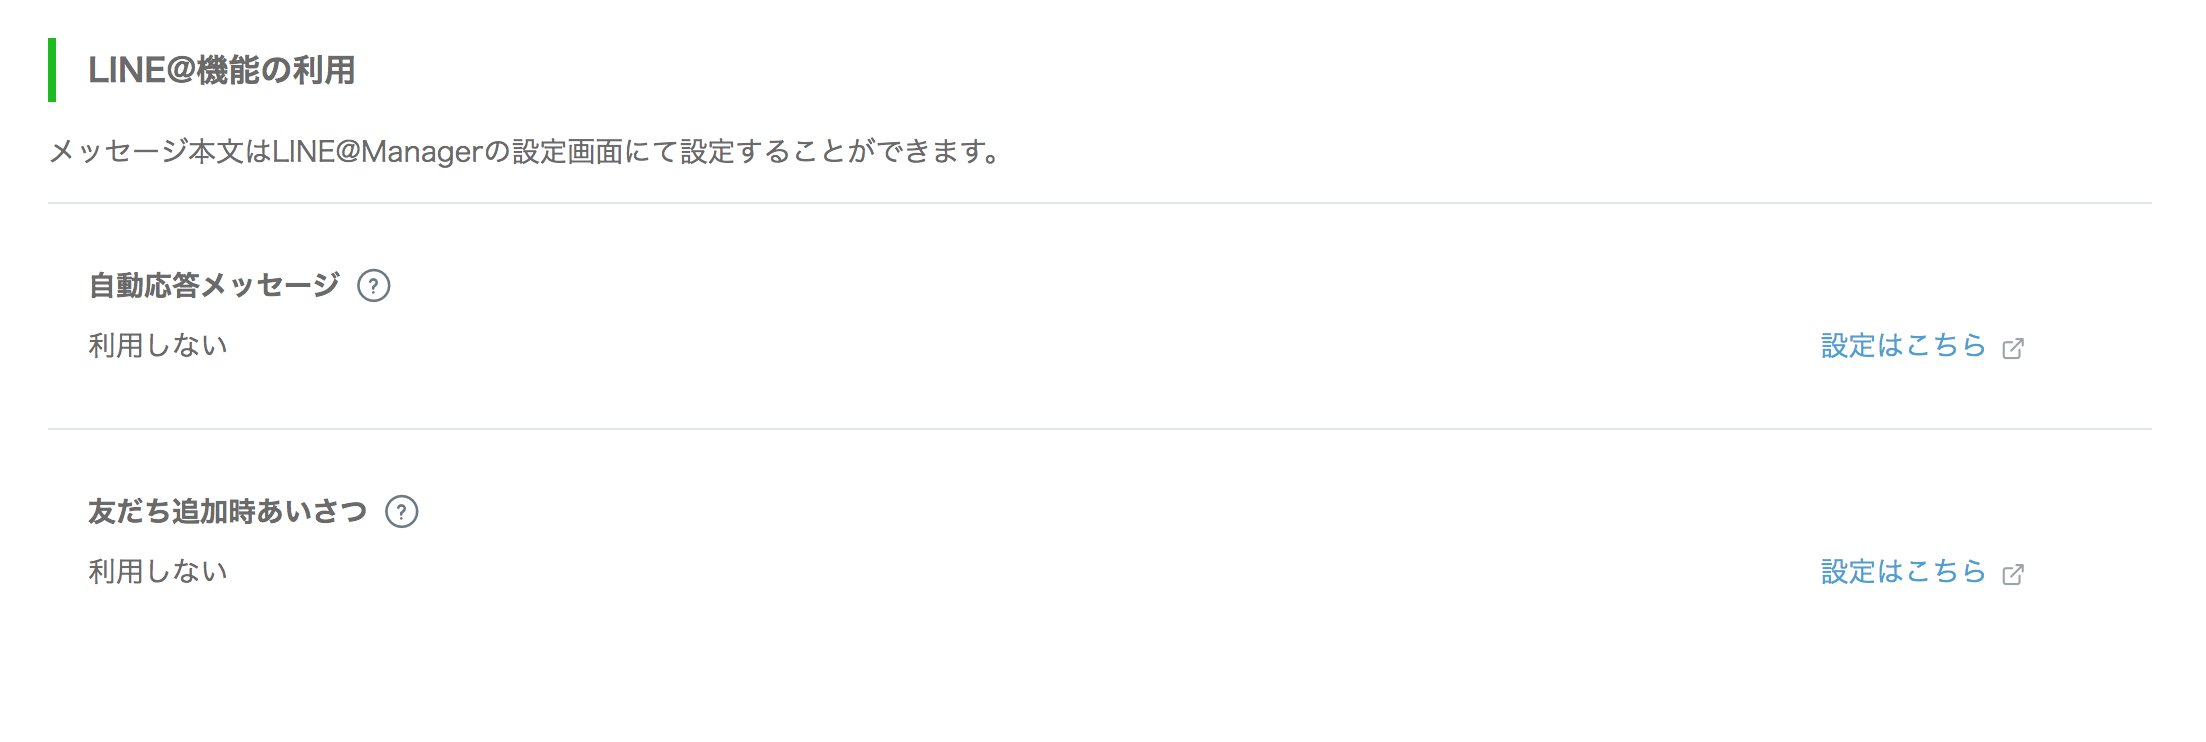
自動応答メッセージは「利用しない」を選択し、
友だち追加時のあいさつは「利用しない」を選択してください。
SpringBootプロジェクト作成
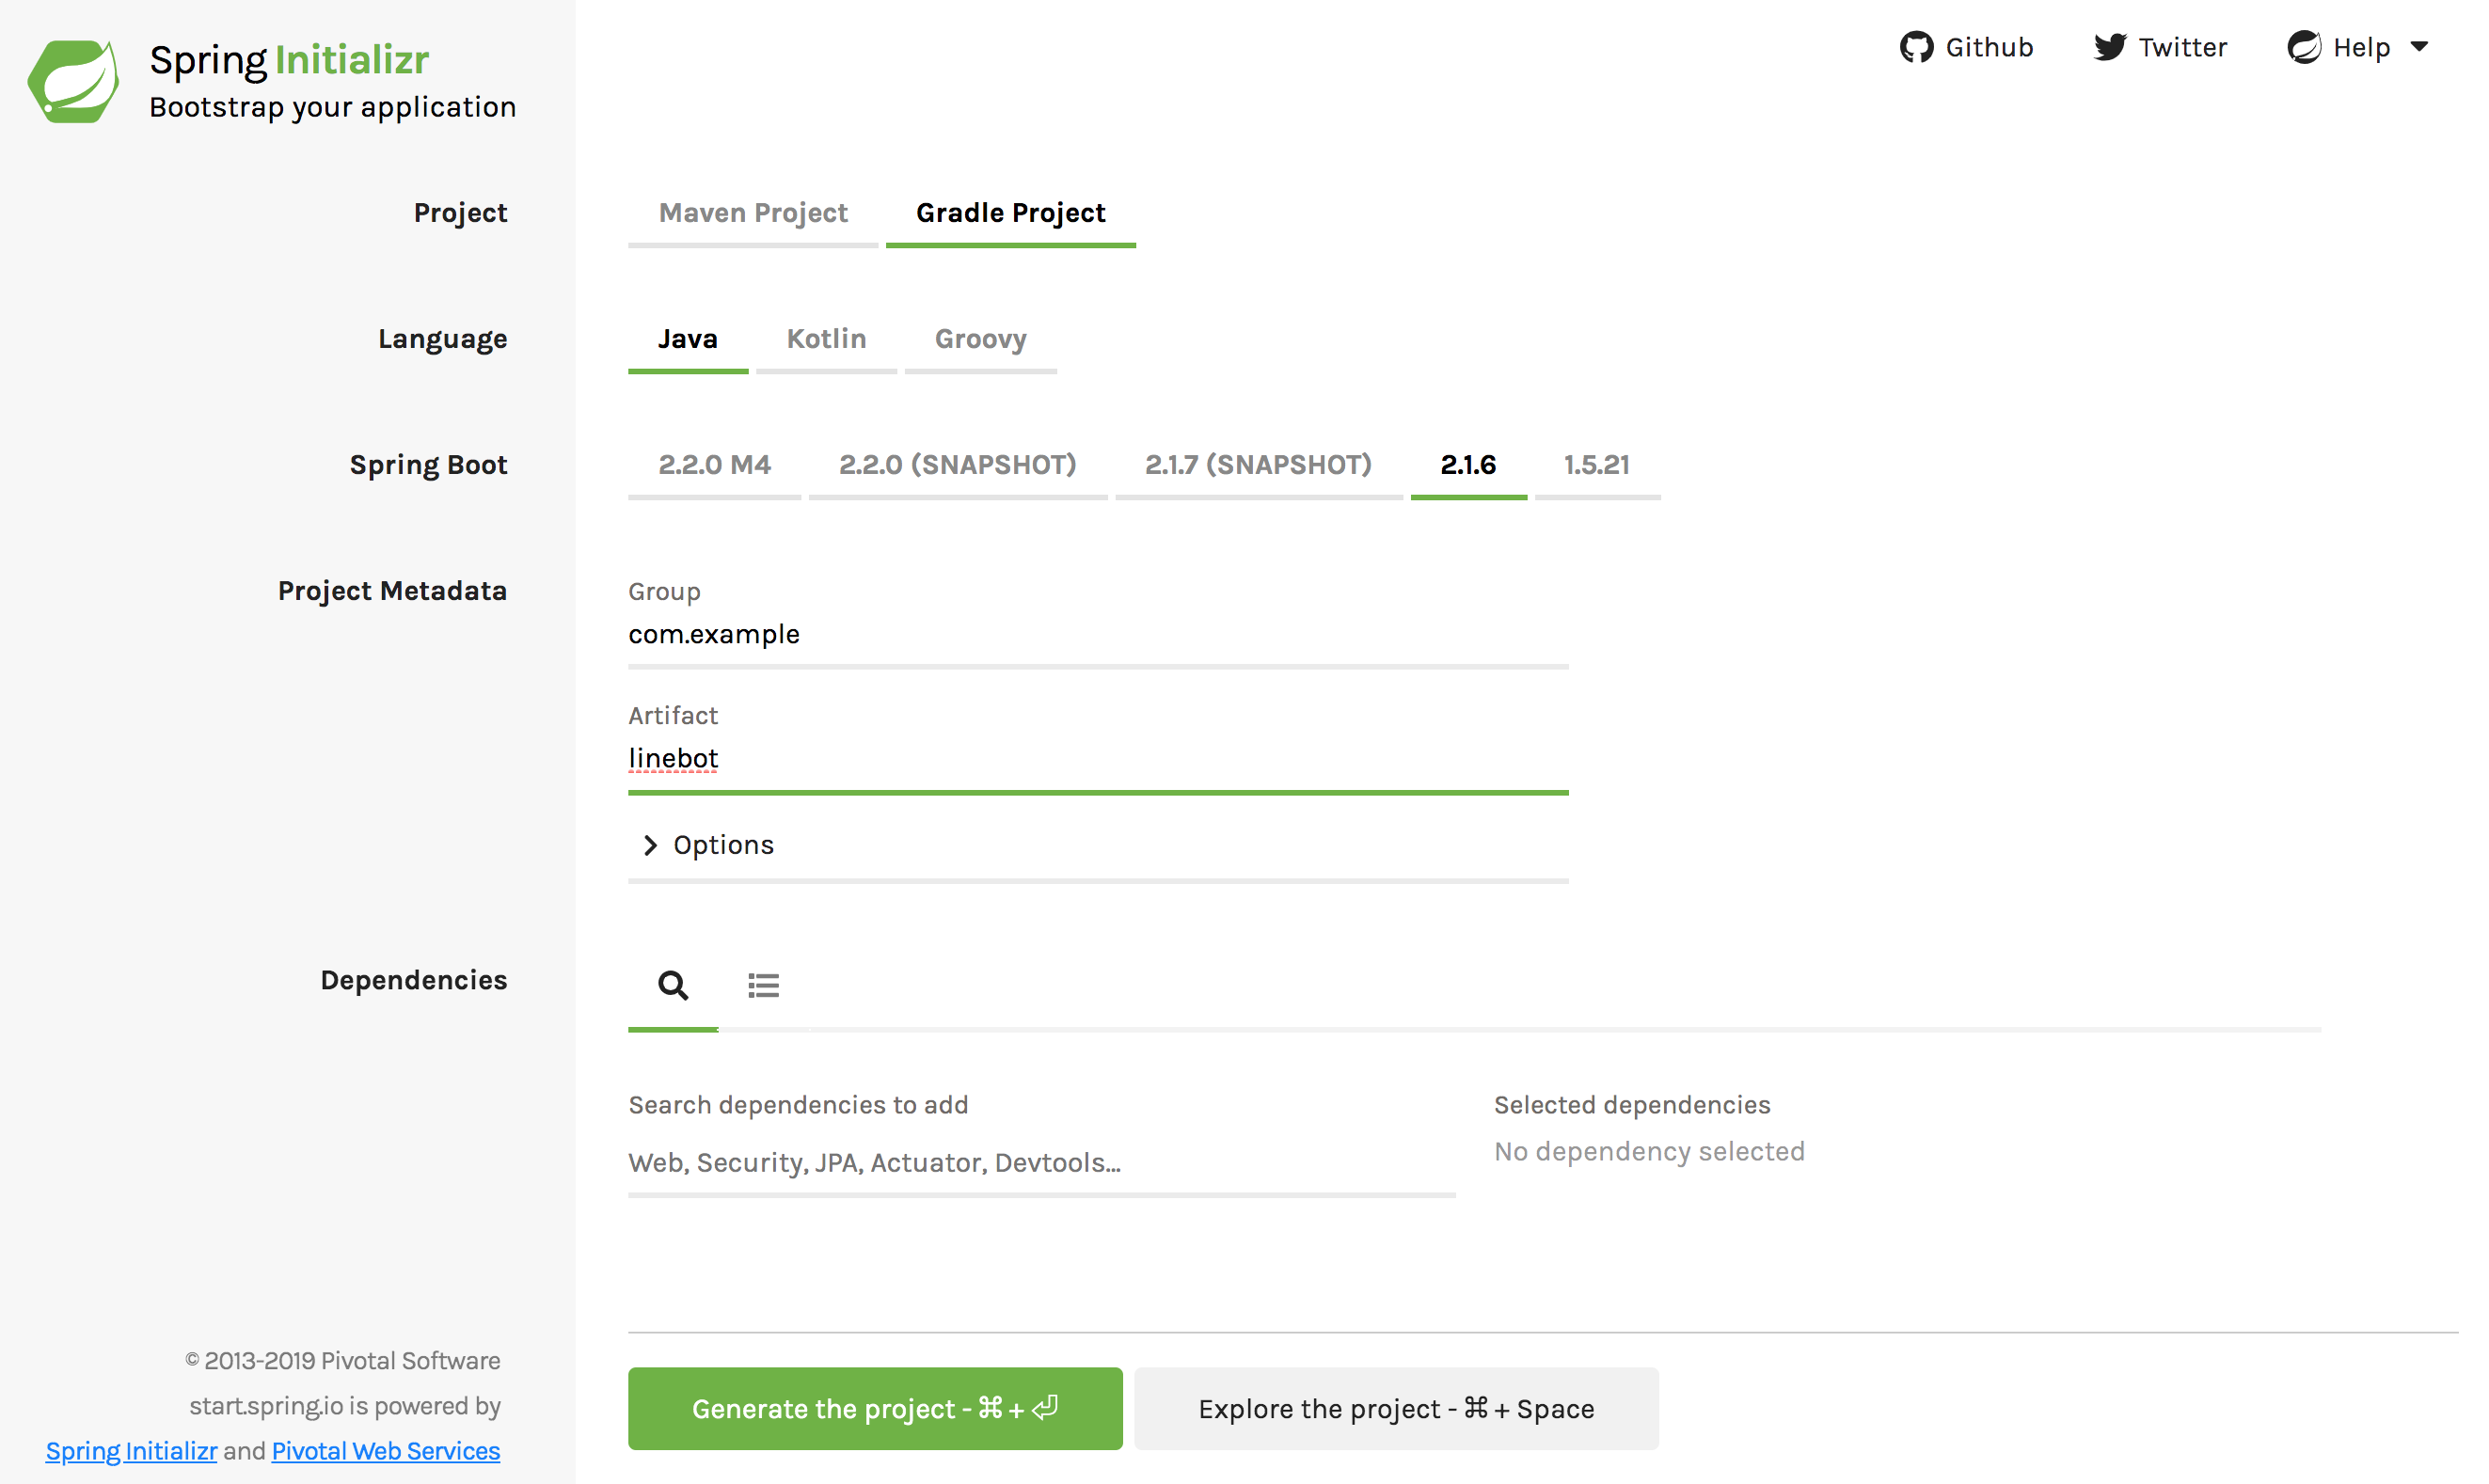
1.Spring Initializrにてプロジェクトを作成
https://start.spring.io/
・Project:Gradle Poject
・Language:Java
・Spring Boot:2.1.6
・Project Metadata
・Group:com.example
・Artifact:linebot
2.STSにて、作成したプロジェクトをインポートし、line-bot-javaのサンプル(echo)をLinebotApplication.javaにコピペします。
この時点で、linebotのライブラリが入っていないため、コンパイルエラーが発生しますが、あとの手順で解消します。
@SpringBootApplication
@LineMessageHandler
public class LinebotApplication {

	public static void main(String[] args) {
		SpringApplication.run(LinebotApplication.class, args);
	}

    @EventMapping
    public Message handleTextMessageEvent(MessageEvent<TextMessageContent> event) {
        System.out.println("event: " + event);
        final String originalMessageText = event.getMessage().getText();
        return new TextMessage(originalMessageText);
    }

    @EventMapping
    public void handleDefaultMessageEvent(Event event) {
        System.out.println("event: " + event);
    }
}
3.build.gradleを編集。初期の状態から下記に変更し、Jarにビルドするようにしています。
plugins {
	id 'org.springframework.boot' version '2.1.6.RELEASE'
	id 'java'
}

apply plugin: 'io.spring.dependency-management'
apply plugin: 'java'

group = 'com.example'
version = '0.0.1-SNAPSHOT'
sourceCompatibility = '1.8'

repositories {
	mavenCentral()
}

dependencies {
	implementation 'org.springframework.boot:spring-boot-starter'
	testImplementation 'org.springframework.boot:spring-boot-starter-test'
	compile 'com.linecorp.bot:line-bot-spring-boot:2.7.0'
}

jar {
    manifest {
        attributes 'Main-Class': 'LinebotApplication'
    }
}
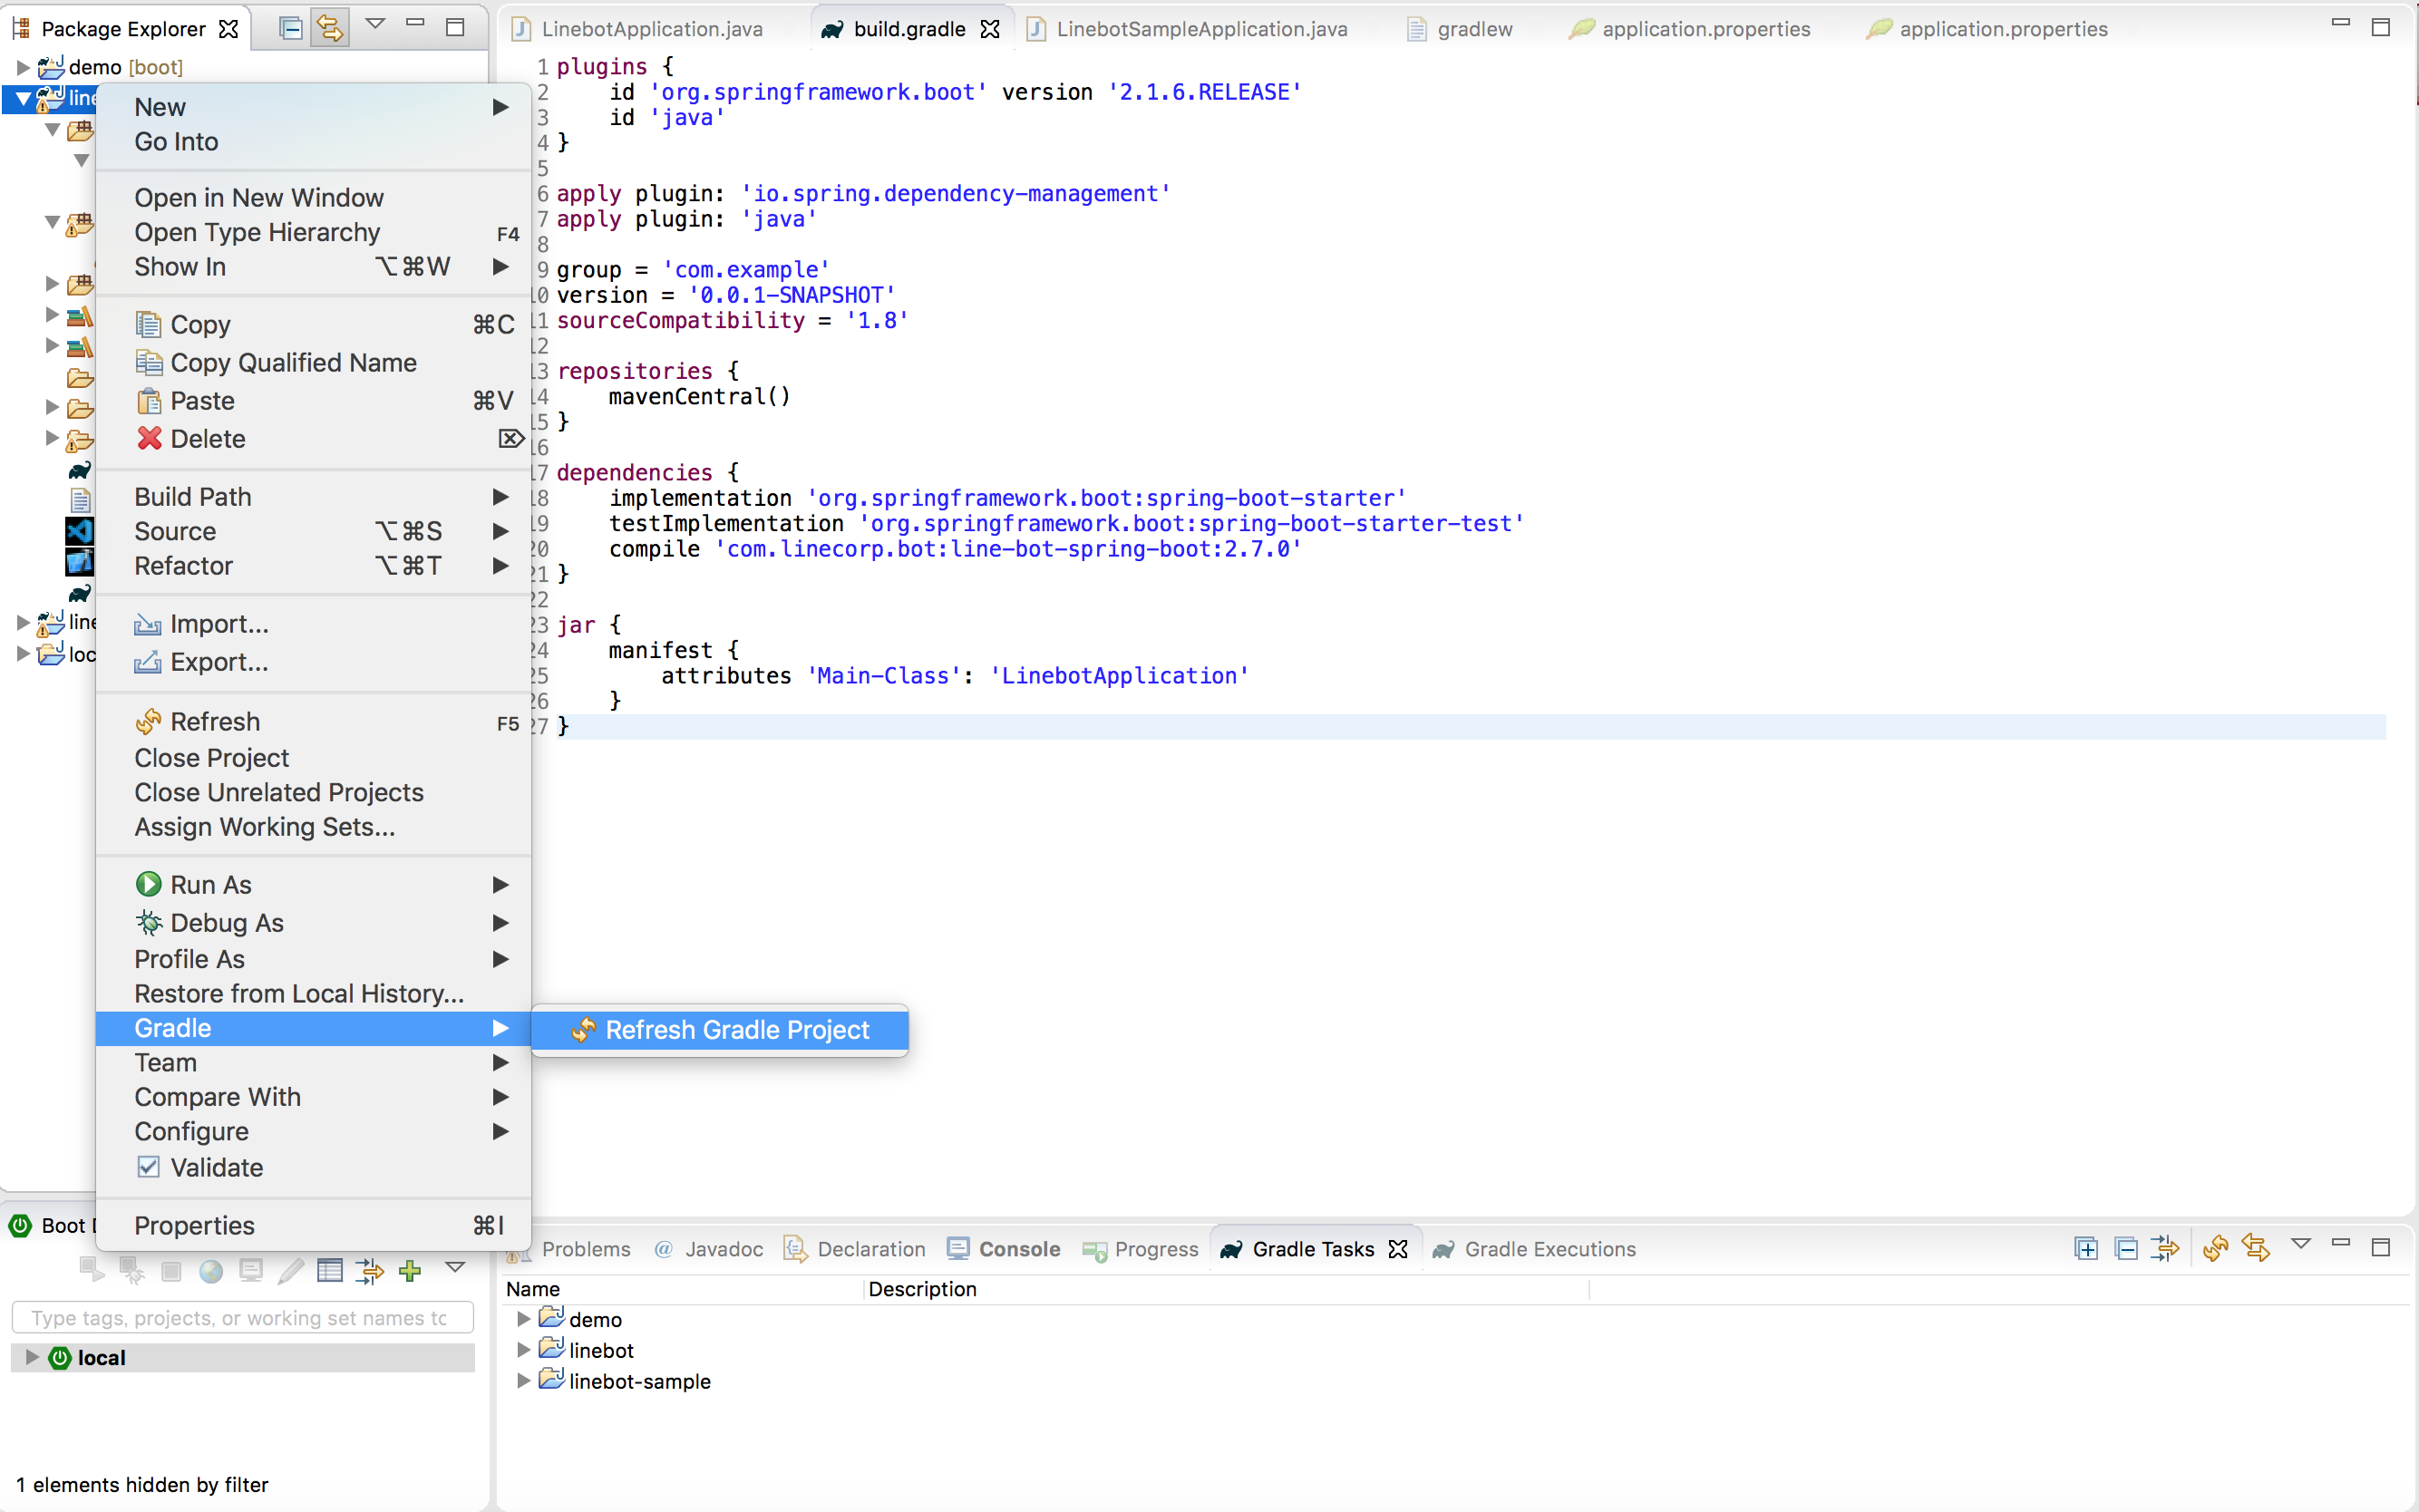
4.Gradle Projectをリフレッシュ
前手順で、「line-bot-spring-boot:2.7.0」をGradleに追加したので、GradleProjectをリフレッシュして、Jarを取り込みます。(これでJavaのコンパイルエラーがなくなります。)
プロジェクトを右クリック -> Gradle -> Refresh Gradle Projectをクリック
5.Spring Bootのapplication.propertiesに下記3行を追加
※channelSecretとchannelTokenはシングルクォーテーションで囲まないこと
line.bot.channelSecret = XXX(Line DevelopersのChannnelSecret)
line.bot.channelToken = XXX(Line Developersのアクセストークン)
line.bot.handler.path = /callback
次の手順「NginxとSpringBootの連携」でもapplication.propertiesを編集するため、まだビルドは行いません
NginxとSpringBootの連携
NginxとSpringBootと連携します。
連携方法は以下を参考しました。
Spring bootでSSL(HTTPS)を有効にするならnginxを使え
https://qiita.com/keigohtr/items/5b2b423fe0e9da027db6
1.記事内のssl.confは下記のように変更しました。
※example.comは独自ドメインに変更してください。
server {
    listen       80;
    listen       [::]:80;
    return       301 https://$host$request_uri;
}

upstream spring-boot {
    server 127.0.0.1:8443;
}

server {
    listen      443 ssl;
    listen      [::]:443 ssl;

    ssl_certificate /etc/letsencrypt/live/example.com/fullchain.pem;
    ssl_certificate_key /etc/letsencrypt/live/example.com/privkey.pem;

    ssl         on;
    ssl_prefer_server_ciphers on;
    ssl_dhparam /etc/nginx/ssl/dhparam.pem;
    ssl_protocols TLSv1 TLSv1.1 TLSv1.2;
    ssl_ciphers ECDHE+RSAGCM:ECDH+AESGCM:DH+AESGCM:ECDH+AES256:DH+AES256:ECDH+AES128:DH+AES:!aNULL:!eNULL:!EXPORT:!DES:!3DES:!MD5:!DSS;

    ssl_stapling on;
    ssl_stapling_verify on;
    ssl_trusted_certificate /etc/letsencrypt/live/example.com/fullchain.pem;
    resolver     8.8.8.8;
    add_header   Strict-Transport-Security 'max-age=31536000; includeSubDomains;';

    server_name  example.com;
    location / {
        proxy_pass    http://spring-boot;
    }
}
2.上記記事内のapplication.propertiesの内容を追記しています。
最終的にapplication.propertiesは以下となります。
line.bot.channelSecret = XXX
line.bot.channelToken = XXX
line.bot.handler.path = /callback

server.port=8443
# server.ssl.key-store=keystore.p12
# server.ssl.key-store-password=mypassword
# server.ssl.keyStoreType=PKCS12
# server.ssl.keyAlias=tomcat
endpoints.enabled=false
management.add-application-context-header=false
SpringBootをGradleでJarにビルド
プロジェクトを右クリック -> Run As -> Gradle Buildを行えなかったため、以下の方法でSTSからJarへのビルドを行いました
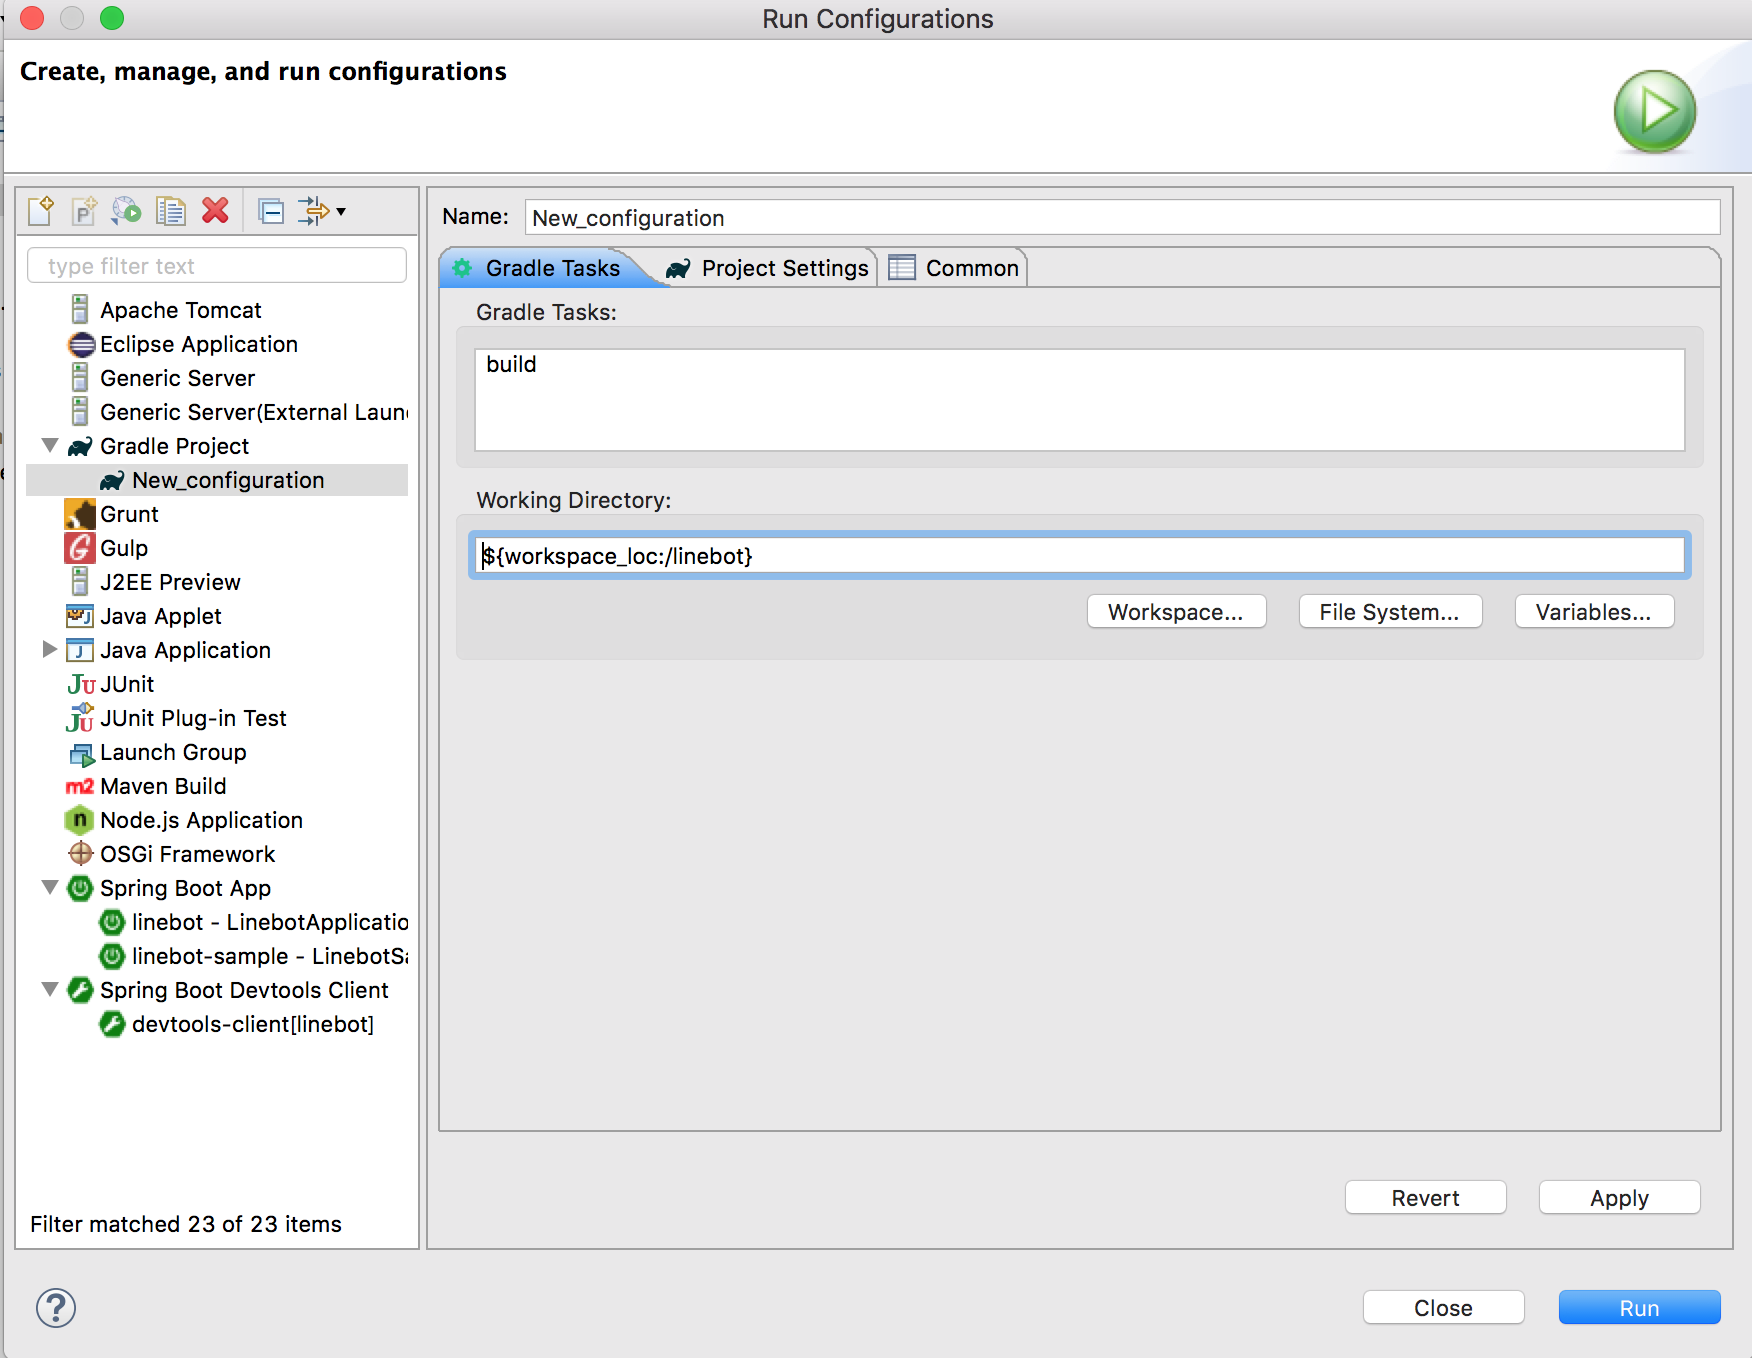
1プロジェクトを右クリック -> Run As -> Run Configuration...をクリック
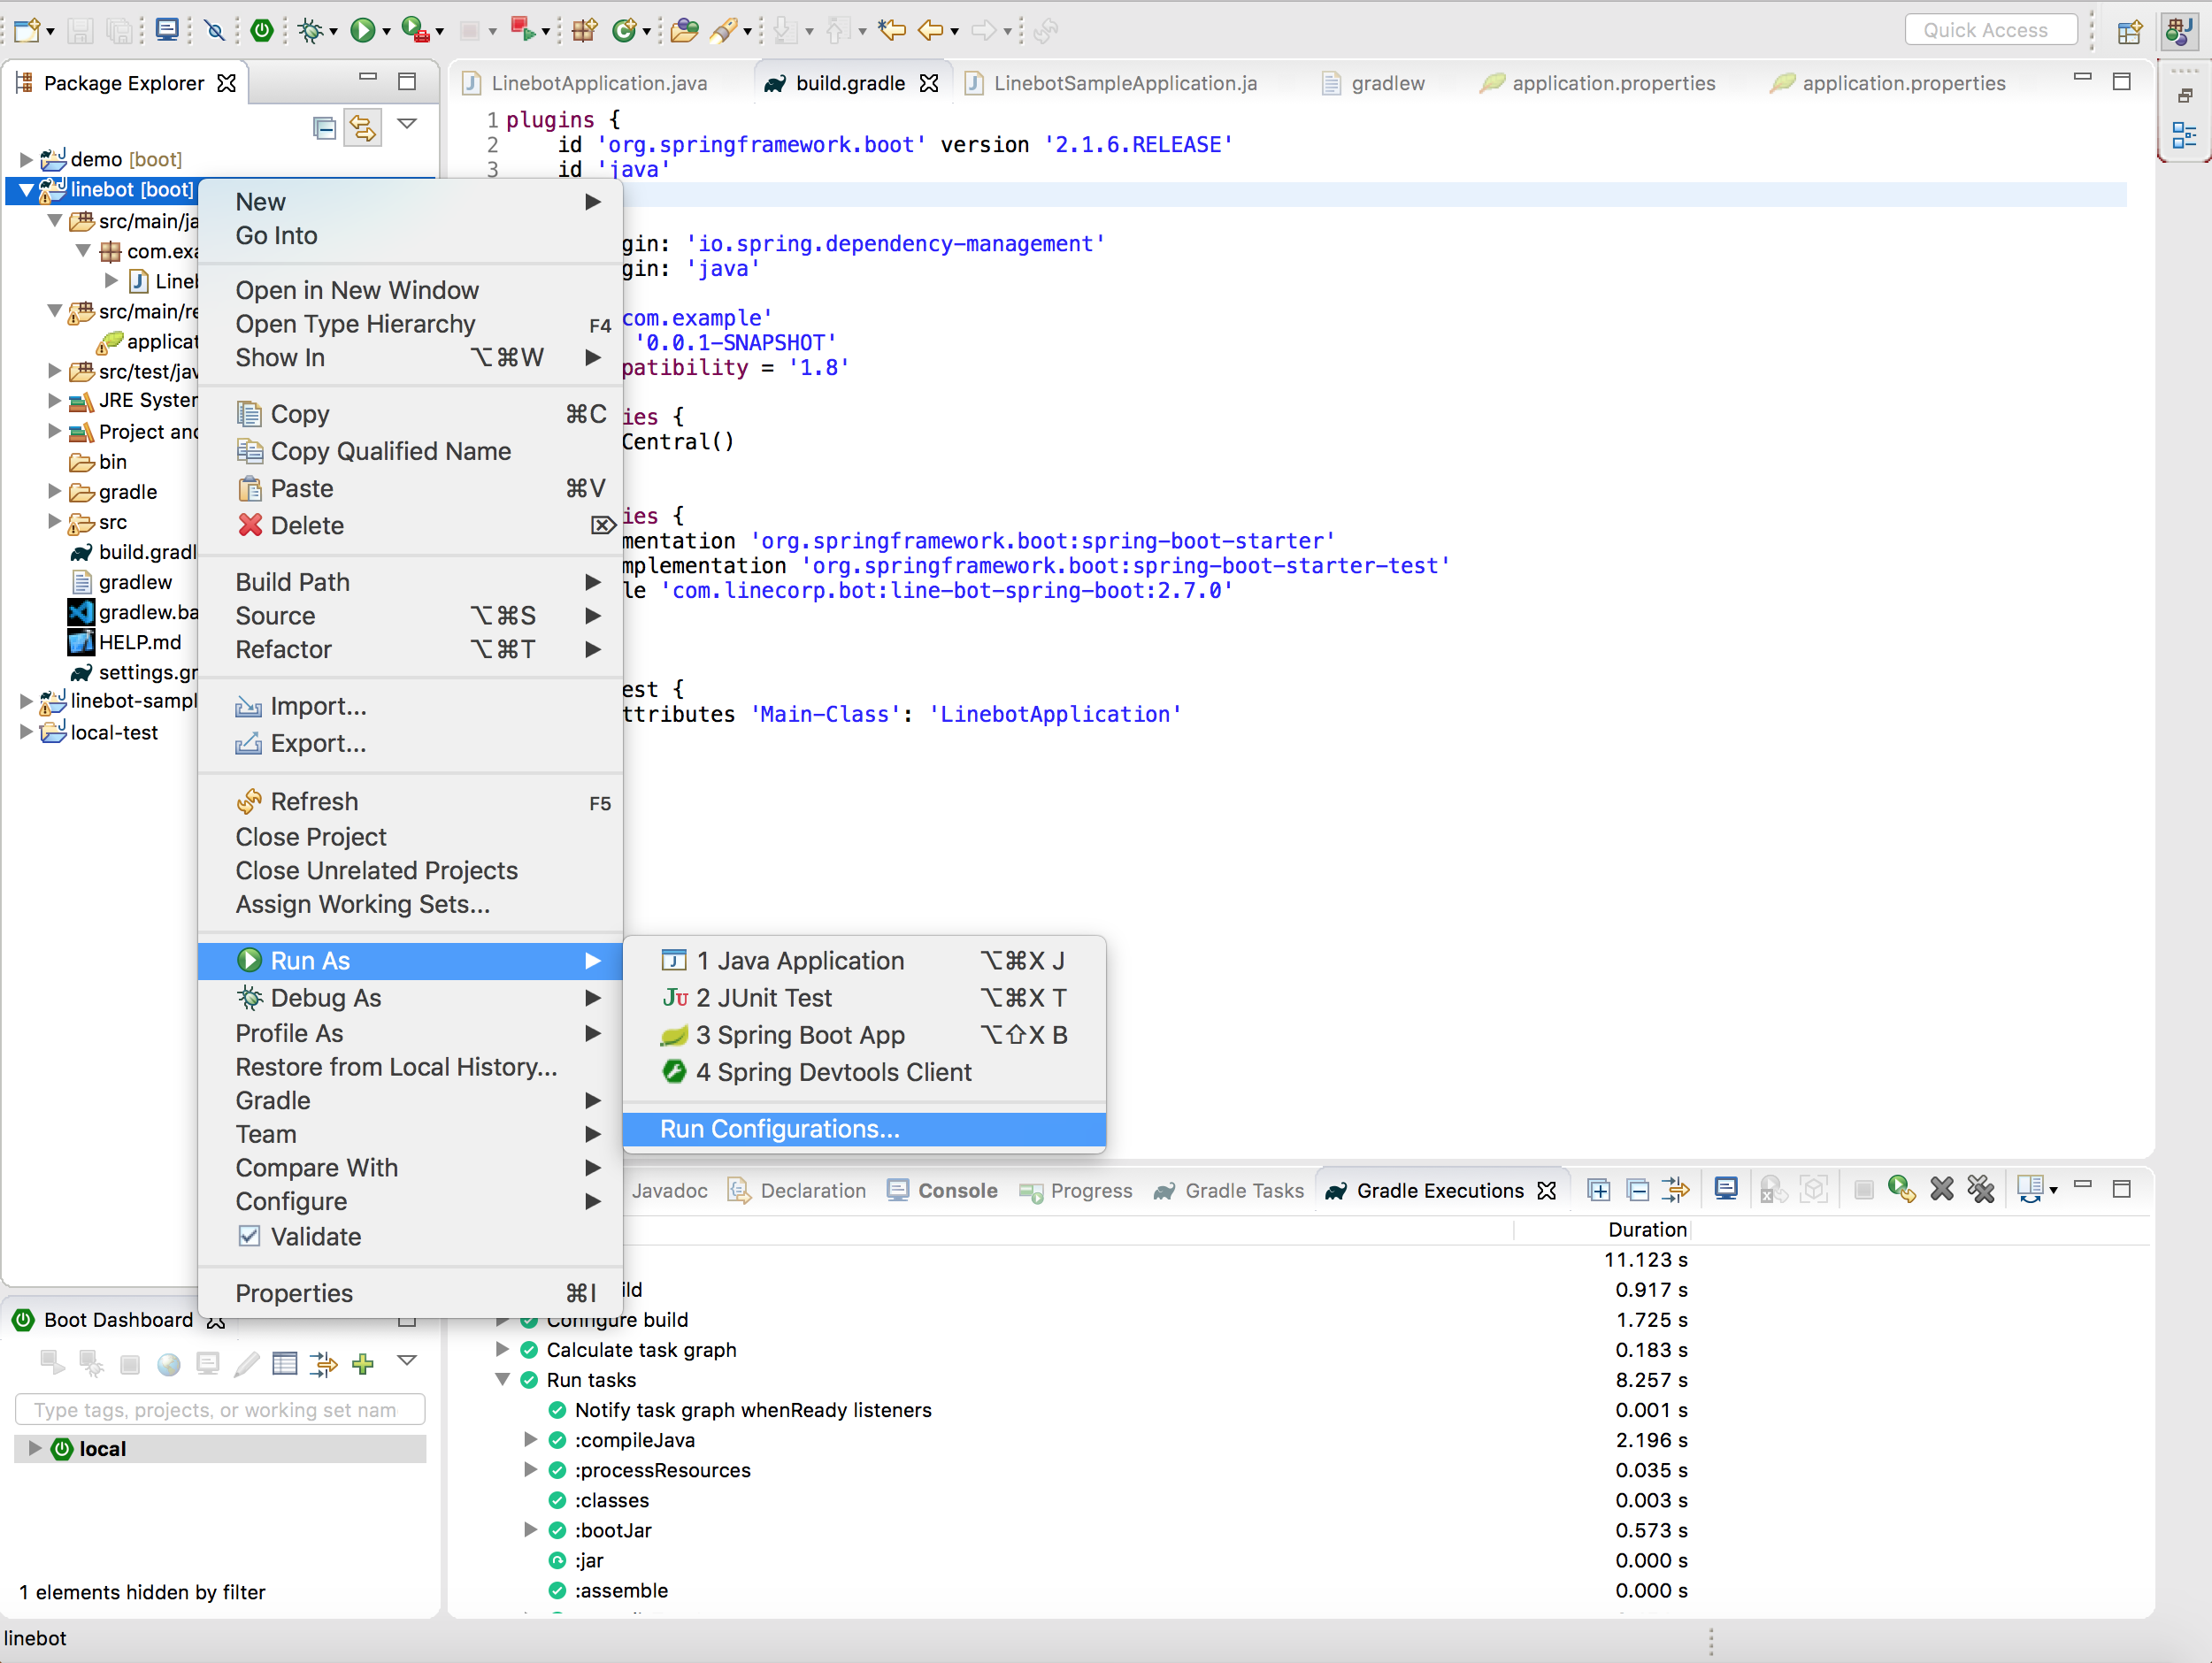
2.Gradle Projectをダブルクリック -> New_configrationを選択し、Gradle Tasks:に「build」を入力、Workspalce...をクリック
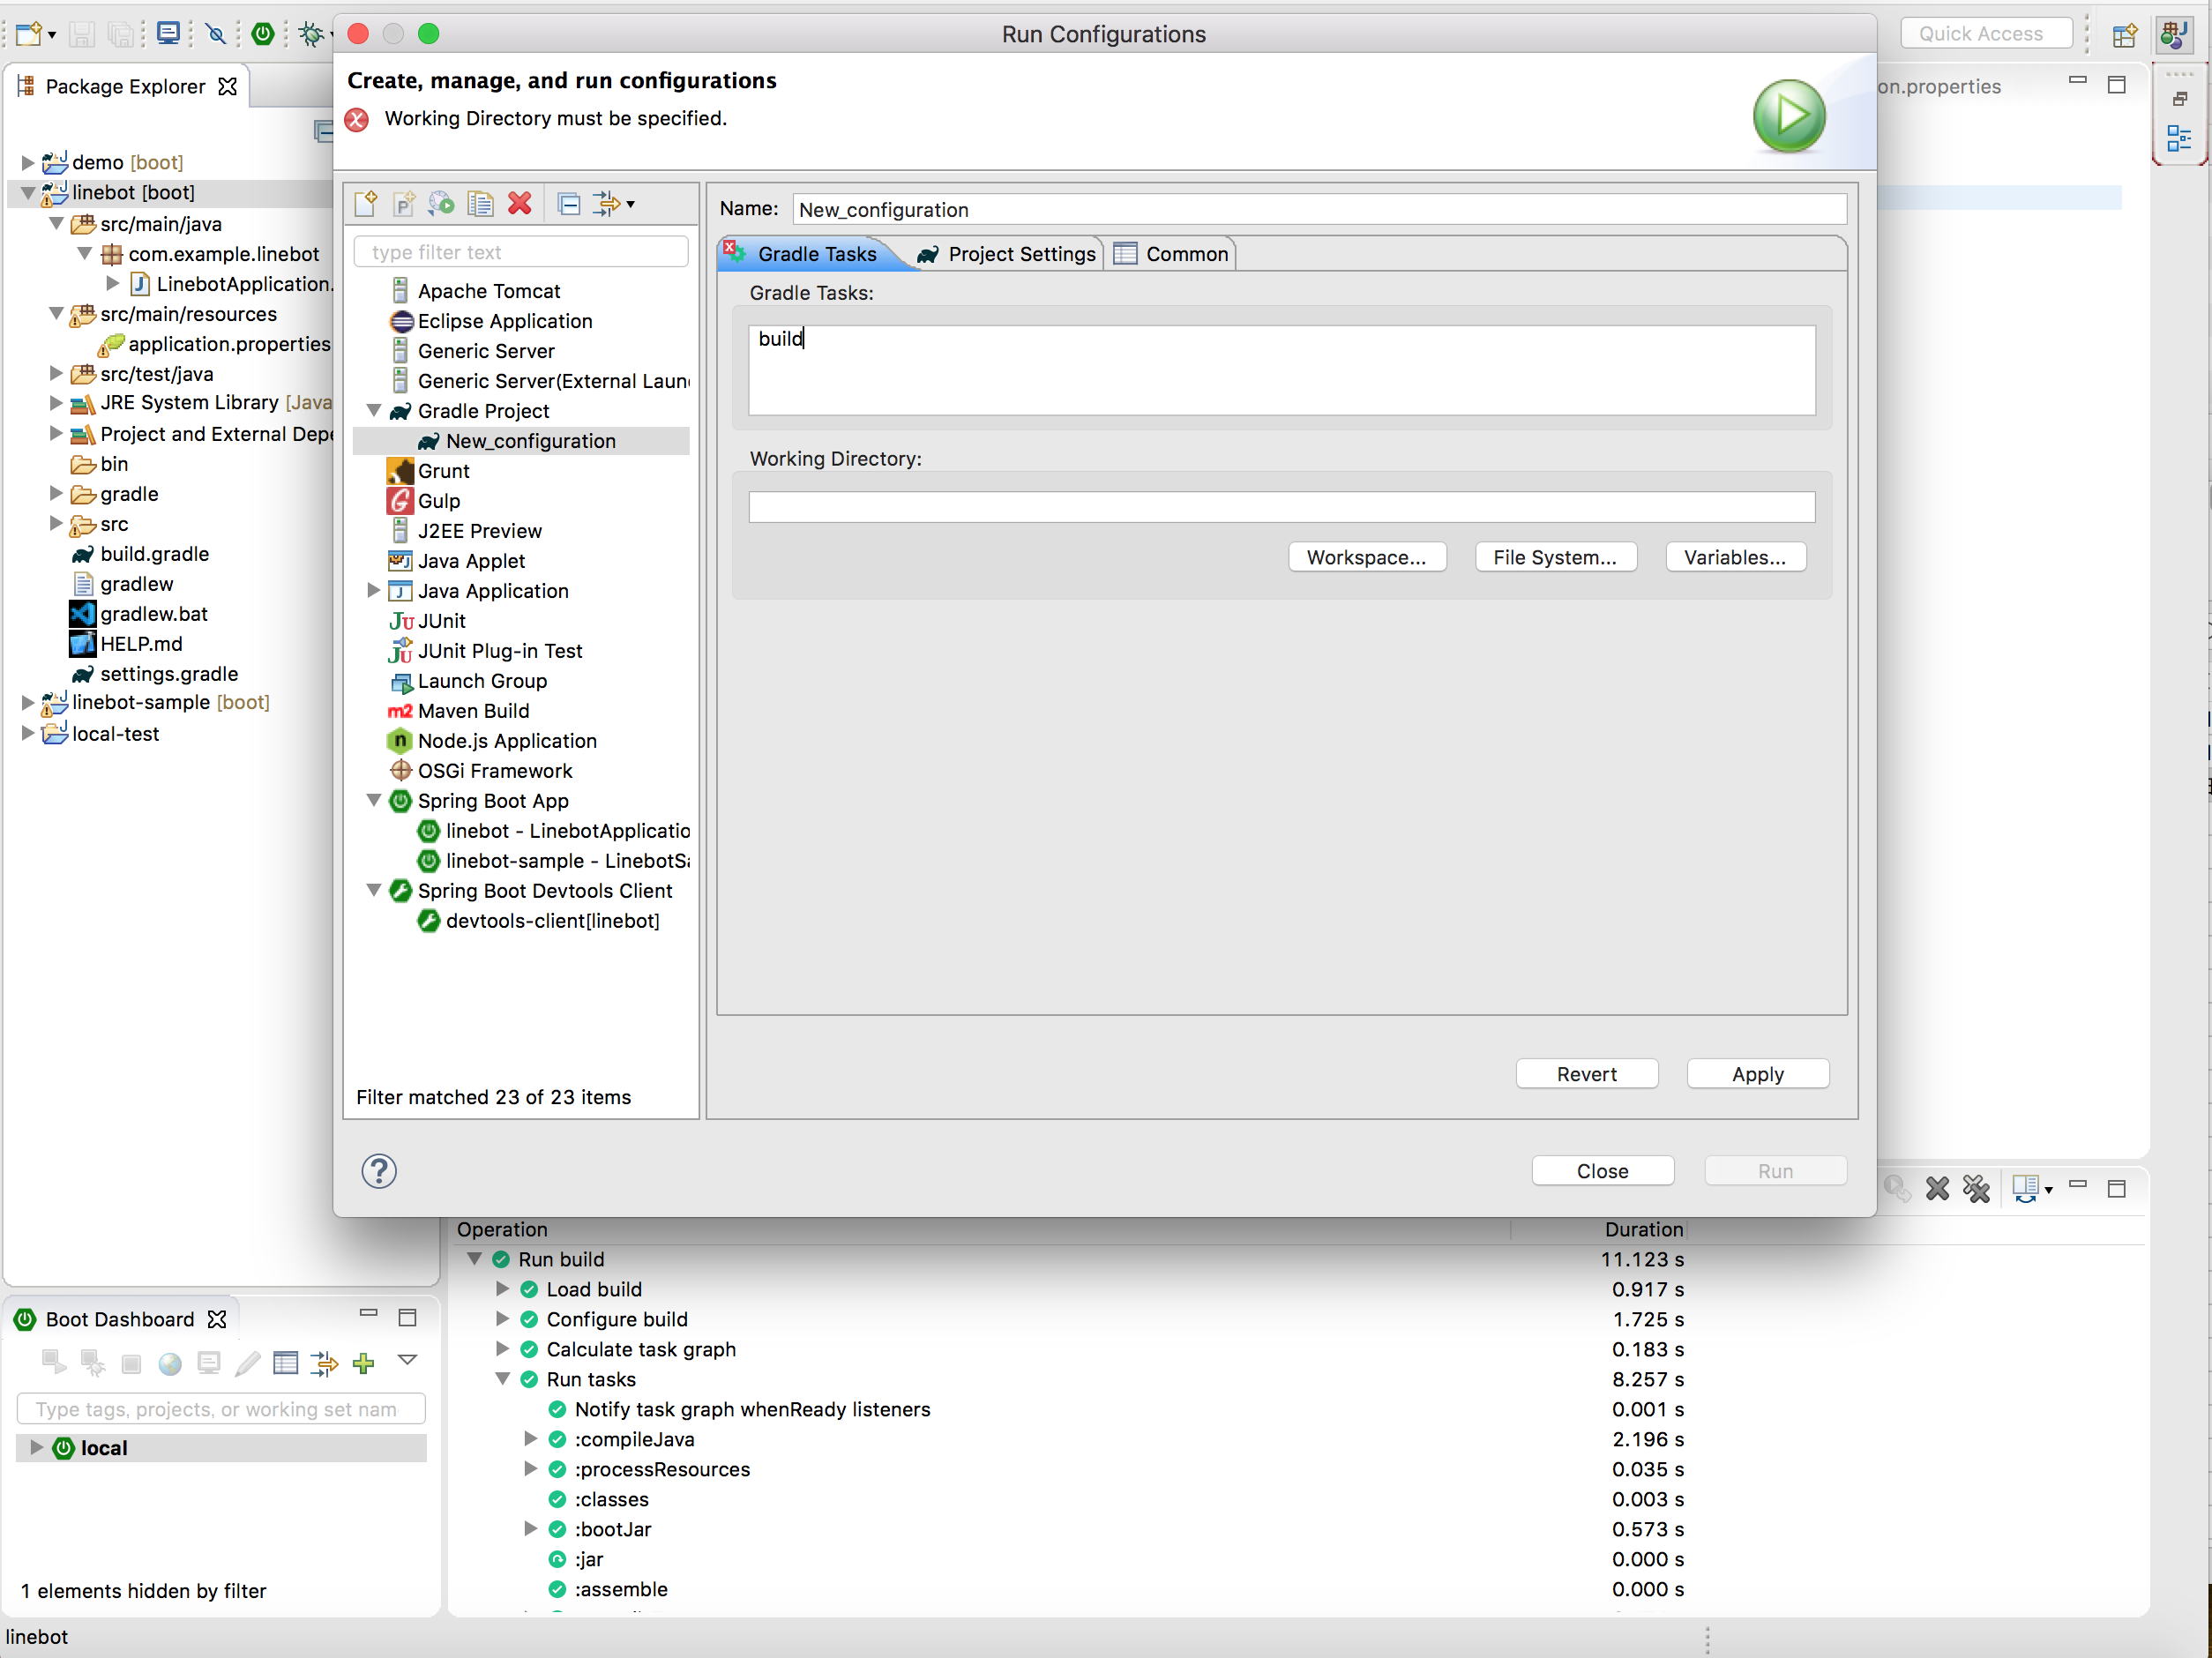
3.Select Projectでビルド対象プロジェクトを選択
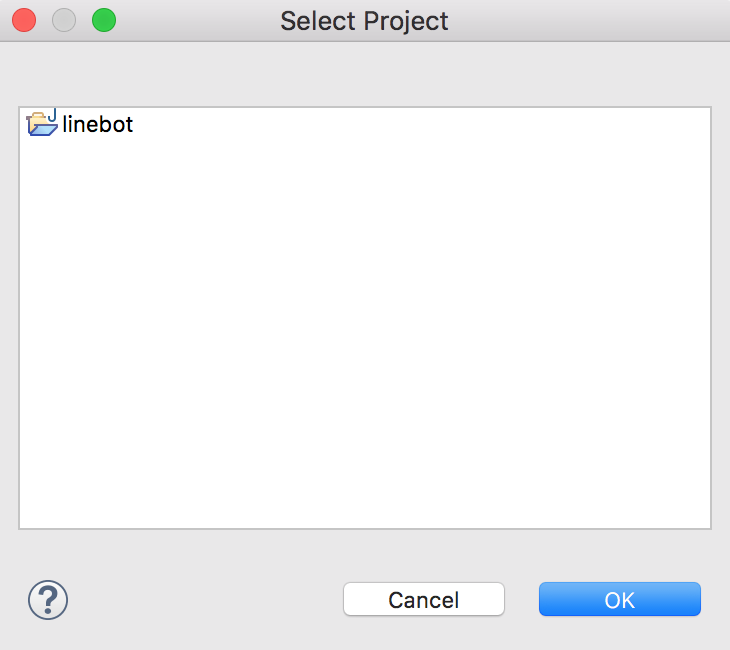
4.Working Directoryにパスを設定されたらRunをクリック
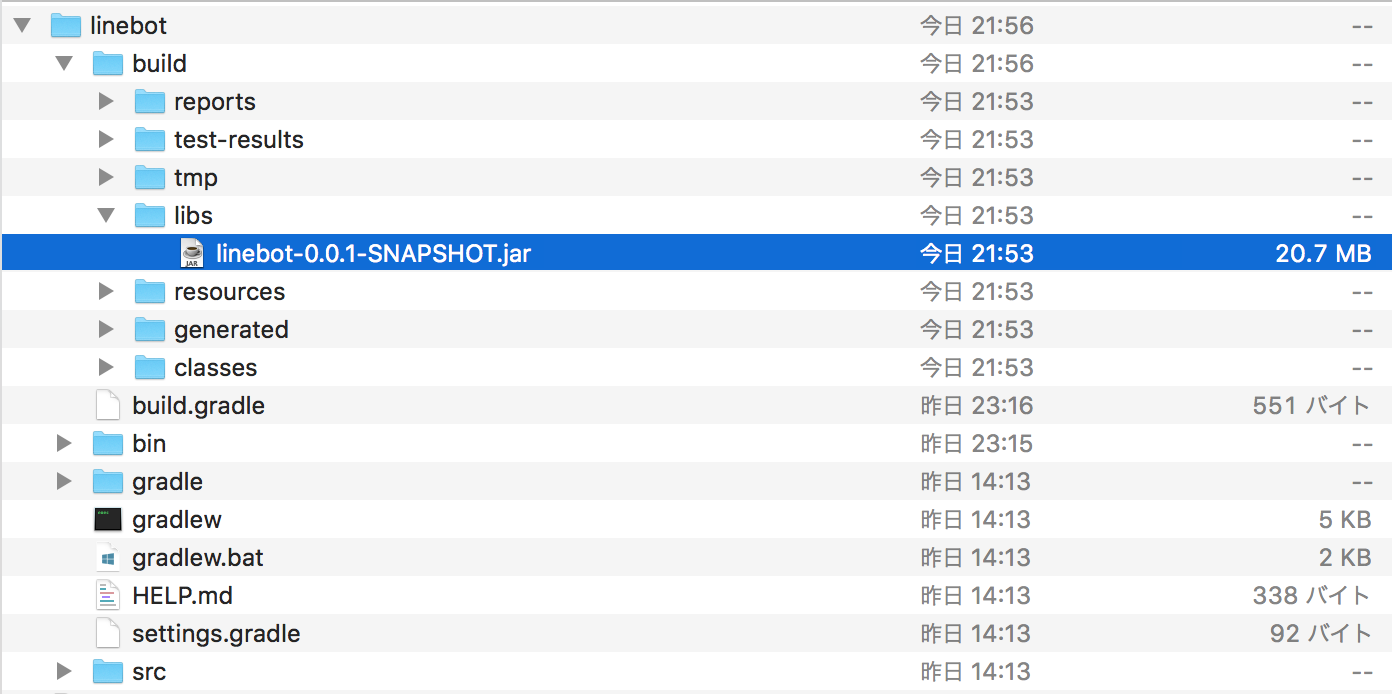
5.ビルドが成功したら、build/libsにjarが生成されます。
SpringBootをVPS上で起動
作成したjarをサーバの場所はユーザディレクトリ(/home/[user名])にアップロードして、下記コマンドを実行し、Spring Bootを立ち上げします
sudo java -jar linebot-0.0.1-SNAPSHOT.jar
接続確認
Line Developersにて、設定したWebhook URLの接続確認を行います。
「成功しました。」と表示されれば、これまでの設定が正しく行われて、LineBotからVPSへの接続が確立されています。
Lineアプリで確認
Lineアプリから作成したチャンネルあてにメッセージを送信すると、送信したメッセージと同じメッセージが返ってきます。
これでオウム返しbotができました。
