想定読者
- 高度な3D表現を盛り込みながら、多量の情報をUIにダイナミックにリスト表示するようなアプリを作成したい人
- UaaLを使った実用的なアプリ開発を行いたい人
TL;DR
- flutter_unity_widgetを使うことで、Flutterの良いところ(複雑なUI・ナビゲーションの迅速な構築)とUnityの良いところ(リッチな3D表現・立体音響)を組み合わせることができる。認証や決済、ファイルアクセスなどUnityで実装するのが難しい機能をFlutter側に移行することで解決しやすくなる
- FlutterとUnityを組み合わせた実用的なアプリを作成するには、FlutterのUIとUnityの3Dシーンの状態を共有・同期する仕組みが必要。UnityとFlutterの通信データをProtocolBufferで定義しつつReduxのアイデアを借用することで、dartとC#の両方で静的型付を用いる状態管理の仕組みが現実的な開発工数で実現できる
なぜflutter_unity_widget?
Flutter unity 3D widget for embedding unity in flutter. Now you can make awesome gamified features of your app in Unity and get it rendered in a Flutter app both in fullscreen and embeddable mode. Works great on Android, iPad OS, iOS, Web.
flutter_unity_widgetはpub.devおよびGitHubで公開されているflutter向けライブラリです。Unity 2019.3から提供されているUaaL(Unity as a Library)機能を利用してFlutter製ネイティブアプリにUnityアプリを埋め込むことができます。
私の所属する株式会社GATARIでは音響xRプラットフォームサービス「Auris」の開発と提供を行っており、アプリ開発にUaaLを活用しています。
株式会社GATARI
他にもUaaLを利用したサービス・アプリの実績はいくつか挙げることができます。
Mirrativ×Unity as a Library 活用事例と開発テクニック - Mirrativ Tech Blog
Unityを組み込んだiOSアプリにおける、UXも考慮した開発 - ZOZO TECH BLOG
ネイティブアプリとUnityを組み合わせることで、
- ネイティブアプリの、宣言型UIフレームワークによる一貫性のあるUIの迅速な構築
- UnityによるAR/VR機能へのアクセス、高度な3D・音響表現
の二つの異なる利点を組み合わせたアプリケーションを開発することが可能です。
UaaLの課題 状態管理
Unity as a Libraryでは、Unityとネイティブアプリのアプリ間通信を行うためのAPIが提供されています。
UaaLが提供するAPIは非常にシンプルです。
- ネイテブアプリからUnityへのメッセージは、「ゲームオブジェクト名」「関数名」「一つのString引数」のシグネチャのRPC
- Unityからネイティブアプリへのメッセージも一つのString引数のみのメッセージを送信
公式で提供されているサンプルに倣い、シーンのゲームオブジェクトのメソッドをflutterから直接呼び出す方法を取る場合、flutter側の実装とUnity側の実装が密結合し、かつ大規模になる程ロジックが分散してメンテナンスが困難になることが容易に想像できます。
また、Unity側で発生したイベント(物理エンジンの挙動やUnity UIからのイベント)や状態変化をリアルタイムに正しく伝達するためには、Unityから送られてるメッセージを構造化して、複雑な状態を表現できるようにする必要もあるでしょう。
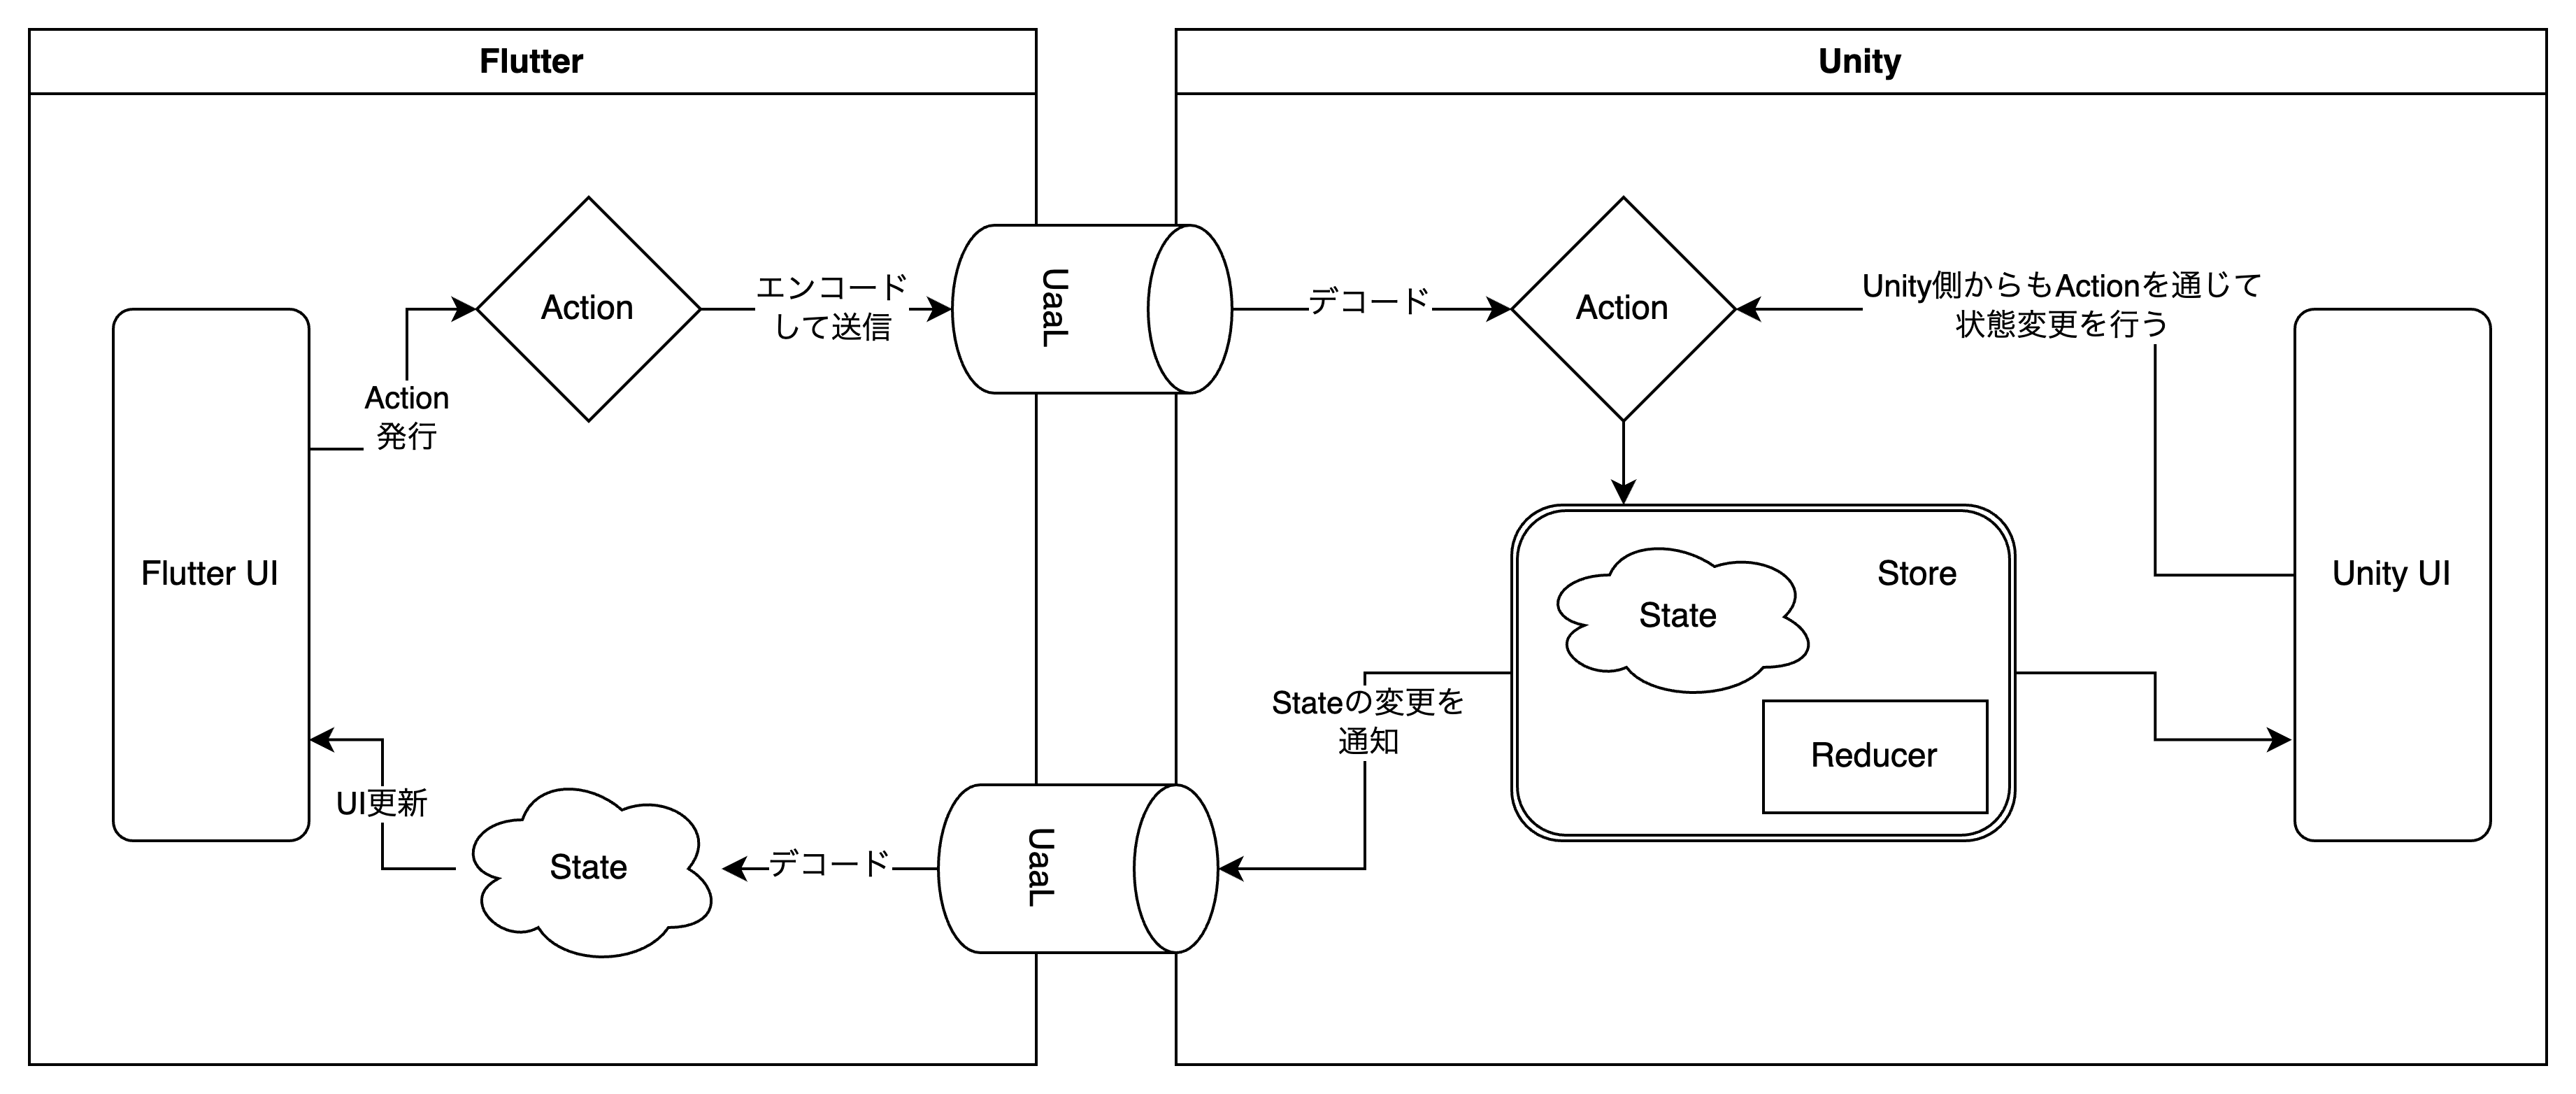
Redux風アプリ間状態同期の導入

https://redux.js.org/tutorials/essentials/part-1-overview-concepts#redux-application-data-flow
Reduxは状態管理のためのライブラリです。ReduxではStoreとActionを定義し、Reducerを通じてStateにActionを作用させることでのみ状態を更新するようにします。
ActionとStateをシリアライズしてネイティブアプリとUnityの間で受け渡しすることで、両方のアプリで一貫した状態を保持できるはずです。
シリアライズに利用するデータ記述言語には複数の候補がありますが、ここではProtobufを利用してメッセージを定義します。ProtobufはGoogleが提供するデータ記述言語で、FlutterとUnityの言語であるDartとC#両方のシリアライザ・デシリアライザのコードを一つのスキーマ記述ファイルから生成できます。
これにより、異なる言語間で静的型付けによる型安全性を保ったまま、アプリ間で一貫した状態管理を行うことができます。
サンプルアプリの作成
ここからは実際に簡単なアプリケーションをモデルケースとして作ってみます。
完成品のサンプルコードはこちらに公開しています。
仕様
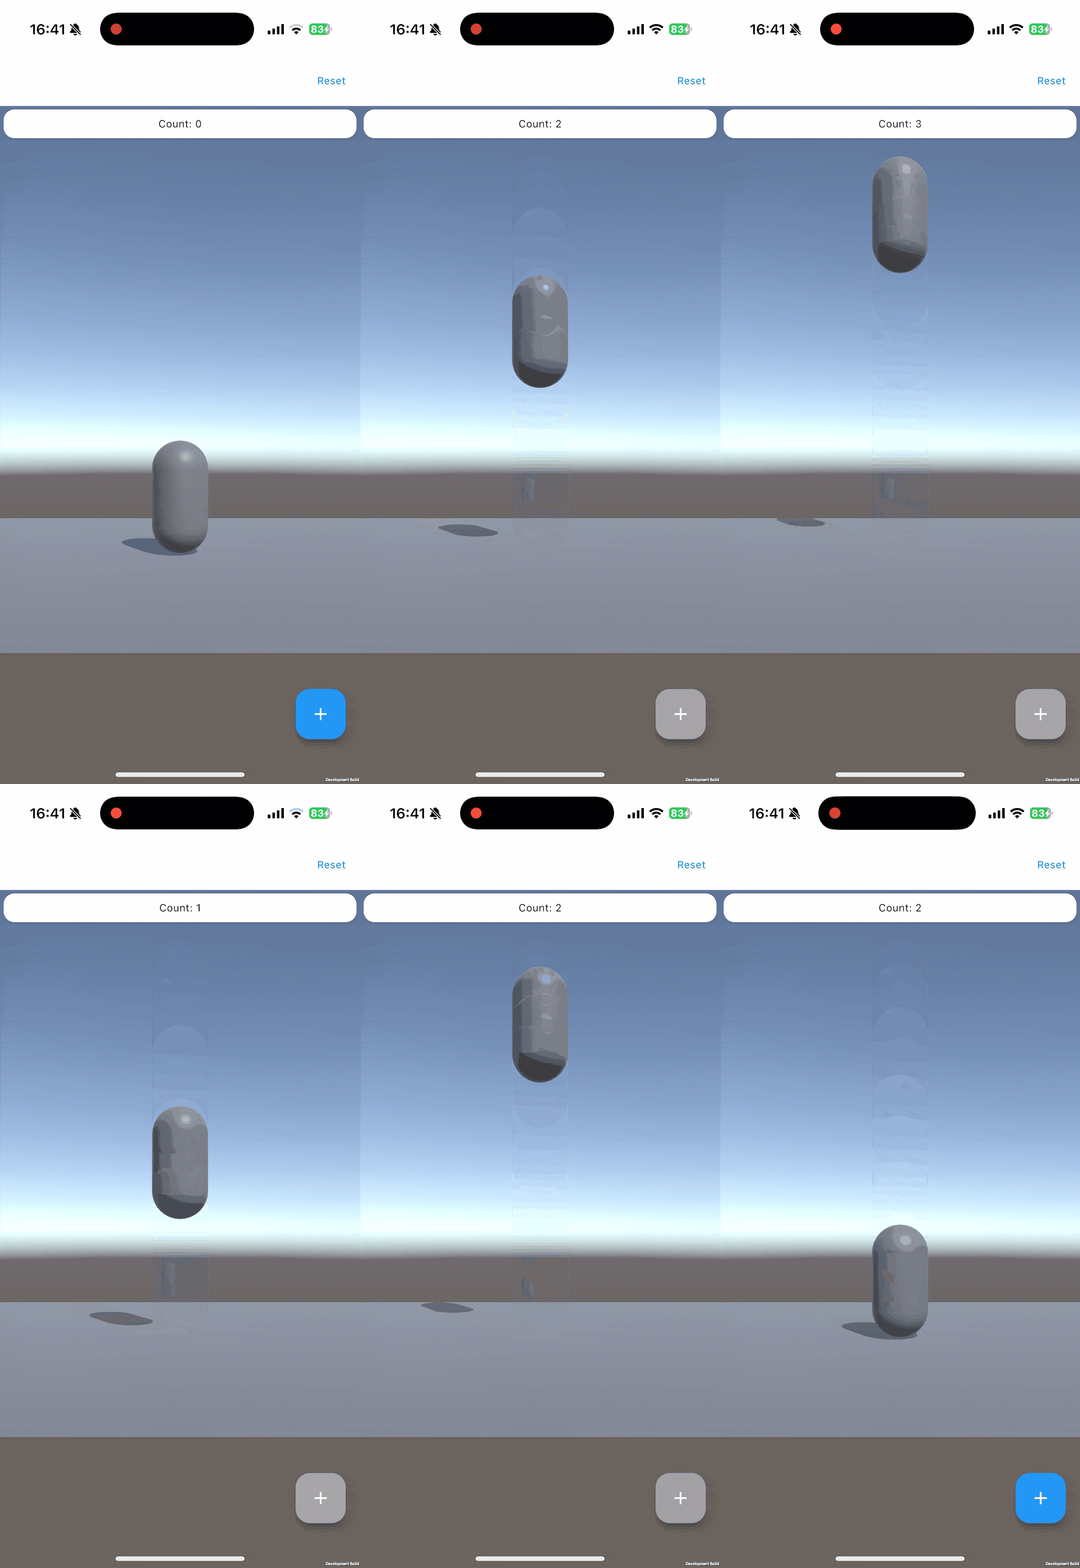
Unityの物理エンジンを絡めたリアルタイムの状態共有をデモンストレーションを行うことを鑑みて、以下のように仕様を定めます。
- ファーストビューでUnity画面+オーバーレイされたFlutter UIを表示
- Flutter UIでジャンプボタンをタップすると3Dキャラクターが床を蹴ってジャンプする
- 滞空中はジャンプ不可
- ジャンプした回数を保持し、UIに表示
- リセットボタンでジャンプ回数を0に戻す
実装工程
flutter_unity_widgetのプロジェクトセットアップについては割愛し、状態管理の実装に絞って解説をします。
- protobufでStateとActionを定義
- protogenでdartとc#のコードを生成
- Unity側でStore/Reducer/Middleware/Presenterを実装
- Flutter側でUnityViewからState変化を受け取り、UIに反映する
ProtobufによるState/Action定義
要件に則り、以下のようにProtobufファイルを記述しました。
syntax = "proto3";

package flutter_unity_widget_sample;

import 'google/protobuf/empty.proto';
import 'google/protobuf/timestamp.proto';

message PAppState {
  int32 count = 1;
  bool can_jump = 2;
}

message PAppAction {
  message Jump {

  }

  message SetCanJump {
    bool can_jump = 1;
  }

  message Reset {

  }

  oneof action {
    Jump jump = 1;
    SetCanJump set_can_jump = 2;
    Reset reset = 3;
  }
}
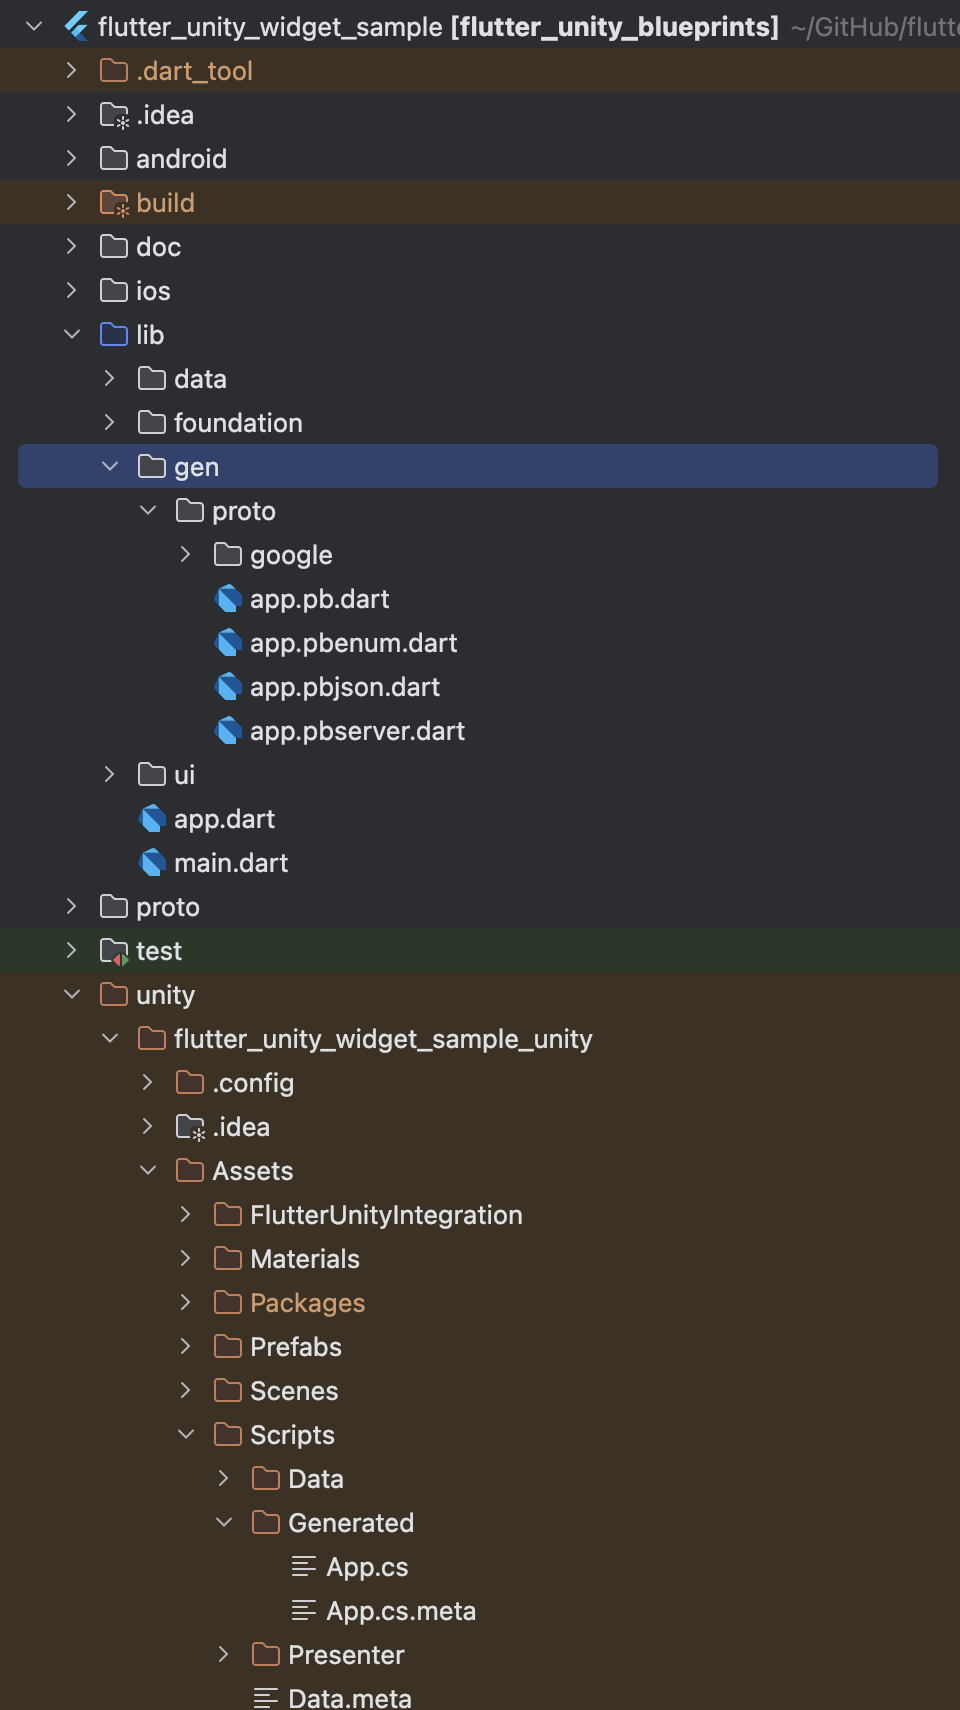
記述したprotobufをコンパイルし、dartとc#のコードを生成します。サンプルアプリではMakefileに一括コード生成のためのダミーターゲットを作成しています。
codegen:
	rm -rf unity/$(UNITY_APP_NAME)/Assets/Scripts/Generated
	rm -rf lib/gen/proto
	mkdir -p unity/$(UNITY_APP_NAME)/Assets/Scripts/Generated
	mkdir -p lib/gen/proto
	protoc -I=proto \
		--csharp_out=unity/$(UNITY_APP_NAME)/Assets/Scripts/Generated \
		./proto/**/*.proto
	protoc -I=proto \
		--dart_out=lib/gen/proto \
 		./proto/**/*.proto \
 		google/protobuf/empty.proto \
 		google/protobuf/timestamp.proto
UnityでStore/Reducer/Middlewareを実装する
先に生成したStateとActionのクラスを利用して、Reduxのコンポーネントを実装します。Reduxの概念をC#で実装するために、以下のインターフェースを継承するクラスを実装していきます。
using System.Collections.Generic;
using UniRx;

namespace FlutterUnityWidgetSample.Data.Domain.Interface
{
    public interface IStore<TState, TAction>
    {
        IReadOnlyReactiveProperty<TState> State { get; }
        public List<IMiddleware<IStore<TState, TAction>, TAction>> Middlewares { get; }
        IReducer<TState, TAction> Reducer { get; }
        void Dispatch(TAction action);
    }
}
namespace FlutterUnityWidgetSample.Data.Domain.Interface
{
    public interface IReducer<TState, in TAction>
    {
        TState Reduce(TState state, TAction action);
    }
}
using System;

namespace FlutterUnityWidgetSample.Data.Domain.Interface
{
    public interface IMiddleware<in TStore, TAction>
    {
        void Invoke(TStore store, TAction action, Action<TAction> next);
    }
}
-
DefaultStore
StateをUniRx.ReativePropertyとして公開することで、ネイティブアプリに対して状態変更を通知できるようにします。
using System.Collections.Generic; using FlutterUnityWidgetSample.Data.Domain.Interface; using UniRx; namespace FlutterUnityWidgetSample.Data.Domain { public class DefaultStore : IStore<PAppState, PAppAction> { public IReadOnlyReactiveProperty<PAppState> State { get; } public List<IMiddleware<IStore<PAppState, PAppAction>, PAppAction>> Middlewares { get; } = new(); public IReducer<PAppState, PAppAction> Reducer { get; } private readonly ReactiveProperty<PAppState> _state; public DefaultStore(PAppState initialState, IReducer<PAppState, PAppAction> reducer) { Reducer = reducer; _state = new ReactiveProperty<PAppState>(initialState); State = _state; } public void Dispatch(PAppAction action) { ExecuteMiddlewares(action, 0); } private void ExecuteMiddlewares(PAppAction action, int currentIndex) { if (currentIndex < Middlewares.Count) { var nextMiddleware = Middlewares[currentIndex]; nextMiddleware.Invoke(this, action, (next) => ExecuteMiddlewares(next, currentIndex + 1)); } else { // 全てのミドルウェアを通過したら、最終的にReducerを呼び出す _state.SetValueAndForceNotify(Reducer.Reduce(_state.Value, action)); } } } } -
DefaultReducer
ActionによってどのようにSteteが変化するかを定義します。
using System; using FlutterUnityWidgetSample.Data.Domain.Interface; namespace FlutterUnityWidgetSample.Data.Domain { public class DefaultReducer : IReducer<PAppState, PAppAction> { public PAppState Reduce(PAppState state, PAppAction action) { switch (action.ActionCase) { case PAppAction.ActionOneofCase.None: { return state; } case PAppAction.ActionOneofCase.Reset: { var clone = state.Clone(); clone.Count = 0; return clone; } case PAppAction.ActionOneofCase.Jump: { var clone = state.Clone(); clone.Count++; return clone; } case PAppAction.ActionOneofCase.SetCanJump: { var clone = state.Clone(); clone.CanJump = action.SetCanJump.CanJump; return clone; } default: throw new ArgumentOutOfRangeException(); } } } } -
DefaultMiddleware
Middlewareでは現在のStateとActionを参照して、Actionに変更を加える、Actionを握りつぶす、副作用のある処理(今回はキャラクターのジャンプ)を行います。
using System;
using FlutterUnityWidgetSample.Data.Domain.Interface;

namespace FlutterUnityWidgetSample.Presenter
{
    // ReSharper disable once ClassNeverInstantiated.Global
    public class DefaultMiddleware : IMiddleware<IStore<PAppState, PAppAction>, PAppAction>
    {
        private readonly CharacterView _characterView;

        public DefaultMiddleware(CharacterView characterView)
        {
            _characterView = characterView;
        }

        public void Invoke(IStore<PAppState, PAppAction> store, PAppAction action, Action<PAppAction> next)
        {
            switch (action.ActionCase)
            {
                case PAppAction.ActionOneofCase.None:
                case PAppAction.ActionOneofCase.SetCanJump:
                case PAppAction.ActionOneofCase.Reset:
                {
                    break;
                }
                case PAppAction.ActionOneofCase.Jump:
                {
                    if (!store.State.Value.CanJump) return;
                    _characterView.Jump();

                    break;
                }
                default:
                    throw new ArgumentOutOfRangeException();
            }

            next(action);
        }
    }
}
PresenterでStoreとネイティブアプリを接続する
using System;
using FlutterUnityWidgetSample.Data.Domain;
using MessagePipe;
using UniRx;
using VContainer.Unity;

// ReSharper disable once ClassNeverInstantiated.Global

namespace FlutterUnityWidgetSample.Presenter
{
    // ReSharper disable once ClassNeverInstantiated.Global
    public class AppPresenter : IStartable, IDisposable
    {
        private readonly ISubscriber<PAppAction> _actionSubscriber;
        private readonly CompositeDisposable _compositeDisposable = new();
        private readonly DefaultStore _defaultStore;
        private readonly DefaultMiddleware _defaultMiddleware;
        private readonly CharacterView _characterView;

        public AppPresenter(ISubscriber<PAppAction> actionSubscriber,
            DefaultStore defaultStore, DefaultMiddleware defaultMiddleware, CharacterView characterView)
        {
            _actionSubscriber = actionSubscriber;
            _defaultStore = defaultStore;
            _defaultMiddleware = defaultMiddleware;
            _characterView = characterView;
        }

        public void Start()
        {
            // middlewareを登録
            _defaultStore.Middlewares.Add(_defaultMiddleware);

            // flutterやPresenter層・Middlewareから発行されたActionをStoreにDispatchする
            _actionSubscriber
                .Subscribe(action => { _defaultStore.Dispatch(action); })
                .AddTo(_compositeDisposable);

            // Stateの変化を監視し、flutter側に通知する
            _defaultStore.State.Subscribe(FlutterUnityConnector.SendAppState)
                .AddTo(_compositeDisposable);

            // キャラクターの設置状況の変化を監視してアクションを発行
            _characterView.isGrounded.Subscribe(b =>
            {
                _defaultStore.Dispatch(new PAppAction
                {
                    SetCanJump = new PAppAction.Types.SetCanJump()
                    {
                        CanJump = b
                    }
                });
            }).AddTo(_compositeDisposable);
        }

        public void Dispose()
        {
            _compositeDisposable?.Dispose();
        }
    }
}
シーン開始時に以下の処理を行うことで、シーン上のゲームオブジェクトとRedux Store、Flutterを連携させます。
- 依存注入されたStoreにMiddlewareを登録
- 発行されたアクションをStoreにDispatchする
- StoreのStateに変化があった場合はFlutter側に通知する
- ゲームオブジェクトの状態変化を購読し、Actionを発行する
Flutter側でのUnityのレンダリング、状態管理、UI構築
Unity側から送られてくる状態の管理やAction発行を担うControllerと、UnityWidgetとネイティブUIを表示するPageクラスを実装すれば完了です!
import 'package:app/data/provider/unity_controller_provider.dart';
import 'package:app/foundation/unity_widget_controller_ex.dart';
import 'package:app/gen/proto/app.pb.dart';
import 'package:riverpod_annotation/riverpod_annotation.dart';

part 'home_controller.g.dart';

@riverpod
class HomeController extends _$HomeController {
  @override
  PAppState build() {
    return PAppState(
      count: 0,
      canJump: false,
    );
  }

  void syncState(PAppState value) {
    state = value;
  }

  void jump() {
    ref.read(unityWidgetControllerProvider)?.sendAction(PAppAction(
          jump: PAppAction_Jump(),
        ));
  }

  void reset() {
    ref.read(unityWidgetControllerProvider)?.sendAction(PAppAction(
          reset: PAppAction_Reset(),
        ));
  }
}
import 'dart:convert';

import 'package:app/data/provider/unity_controller_provider.dart';
import 'package:app/gen/proto/app.pb.dart';
import 'package:app/ui/home_controller.dart';
import 'package:auto_route/auto_route.dart';
import 'package:flutter/material.dart';
import 'package:flutter_unity_widget/flutter_unity_widget.dart';
import 'package:hooks_riverpod/hooks_riverpod.dart';

@RoutePage()
class CounterPage extends HookConsumerWidget {
  const CounterPage({super.key});

  @override
  Widget build(BuildContext context, WidgetRef ref) {
    final count =
        ref.watch(homeControllerProvider.select((value) => value.count));
    final canJump =
        ref.watch(homeControllerProvider.select((value) => value.canJump));

    ref.watch(unityWidgetControllerProvider);

    return Scaffold(
      appBar: AppBar(
        actions: [
          TextButton(
            onPressed: () {
              ref.read(homeControllerProvider.notifier).reset();
            },
            child: const Text('Reset'),
          ),
        ],
      ),
      body: Stack(
        children: [
          Stack(
            children: [
              UnityWidget(
                onUnityCreated: (controller) async {
                  ref.read(unityWidgetControllerProvider.notifier).state =
                      controller;
                  controller.resume();
                },
                onUnityMessage: (message) {
                  var state = PAppState.fromBuffer(base64.decode(message));
                  ref.read(homeControllerProvider.notifier).syncState(state);
                },
              ),
              Column(
                crossAxisAlignment: CrossAxisAlignment.stretch,
                children: [
                  Card(
                    child: Padding(
                      padding: const EdgeInsets.all(8.0),
                      child: Center(
                        child: Text('Count: $count'),
                      ),
                    ),
                  ),
                ],
              ),
            ],
          ),
        ],
      ),
      floatingActionButton: FloatingActionButton(
        backgroundColor: canJump ? Colors.blue : Colors.grey,
        onPressed: canJump
            ? () {
                ref.read(homeControllerProvider.notifier).jump();
              }
            : null,
        child: const Icon(Icons.add),
      ),
    );
  }
}


