この記事でわかること
①AWS amplifyを使用してreactアプリを作る方法がわかる
②公式資料だけでは不十分なので、どの部分を修正すれば完成させられるかわかる
開発環境
MacOS Sonoma バージョン14.2.1
Amplify version 12.10.1
今回行ったチュートリアルはこちら
資料:フルスタック React アプリケーションを構築する
私は最初この資料に従ってチュートリアルを進めていったのですが、初心者にとっては少し説明足らずな部分があったり、わかりにくい部分があってつまずきました。そしてつまずいた最大の原因は、この資料が最新のバージョンの書き方に沿っていなかったことです。なので、この資料通りに書いてもチュートリアルを最後まで終わらせることはできません。
なのでその解決方法を今から紹介いたします。また、この記事だけでもチュートリアルを完成させることもできます。
手順1
① VSCodeで新しいウィンドウを開く
② 新しいターミナルからターミナルを立ち上げ、 以下のコマンドを打ち込む。これによってreactアプリが作成されます
npx create-react-app amplifyapp
cd amplifyapp
npm start
③ AWSのアカウントを作成し、ルートユーザーとしてログインしておく
④ VSCodeの「フォルダを開く」からamplifyappフォルダを選択し、そこでもターミナルを開く
⑤ 確認のため、新しく開いたVSCodeのウィンドウでもターミナルに npm start と打ち込み、ブラウザが自動で立ち上がるか確認する。立ち上がればアプリ作成ができています。以下のようになるはずです

⑥ AWSマネジメントコンソールを開き、検索欄にaws-amplifyと打ち込む。選択肢からaws-amplifyを選択し、開く。右にある「新しいアプリケーション」の「アプリケーションをホスト」を選択する。そしてgithubを選択し、「続行」ボタンを押せば「認証に成功しました。」と出てきます。(このタブは以降使用するので閉じないでください)
⑦ githubを開き、以下の写真のように新しいレポジトリを作成する。

⑧以下の写真の「…or create a new repository on the command line」の部分をコピーし、ターミナルに貼り付け、実行する。

⑨aws-amplifyコンソールに戻り一度リロードをして、「最近更新されたリポジトリ」で作成したレポジトリを選択し、ブランチを main にして「次へ」ボタンを押す。その後のビルドの設定と確認は何も変更せずに「保存してデプロイ」ボタンを押す。
⑩プロビジョン、構築、デプロイという3つの段階がありますが、デプロイまで進んだ状態でそれらの表示の左隣にあるリンクを押すと以下のような画面が出てきます。これが表示されればデプロイは完了です。

最後にコードの変更を自動的にデプロイできるように、src/App.jsファイルを変更します。以下のコードを貼り付けてください。
import React from 'react';
import logo from './logo.svg';
import './App.css';

function App() {
  return (
    <div className="App">
      <header className="App-header">
        <img src={logo} className="App-logo" alt="logo" />
        <h1>Hello from V2</h1>
      </header>
    </div>
  );
}

export default App;
貼り付けた後にターミナルで以下のコードを打ち込むことで自動デプロイができるようになります。
git add .
git commit -m “auto-deploy”
git push origin main
amplifyコンソールを開き、デプロイまで進んでいることを確認してリンクを開くと以下の写真ようになっているはずです。これで手順1は完了です。

手順2
① 以下のコードを打ち込み、Amplify CLIをインストールします。
npm install -g @aws-amplify/cli
② その後、ターミナルで amplify configure と打ち込むことによって、地域の選択を迫られます。Specify the AWS Regionと表示されると思いますので、日本に住んでいる方はap-northeast-1を選択しましょう。また、ユーザーの作成という画面が以下の写真のようにブラウザに表示されるかと思います。
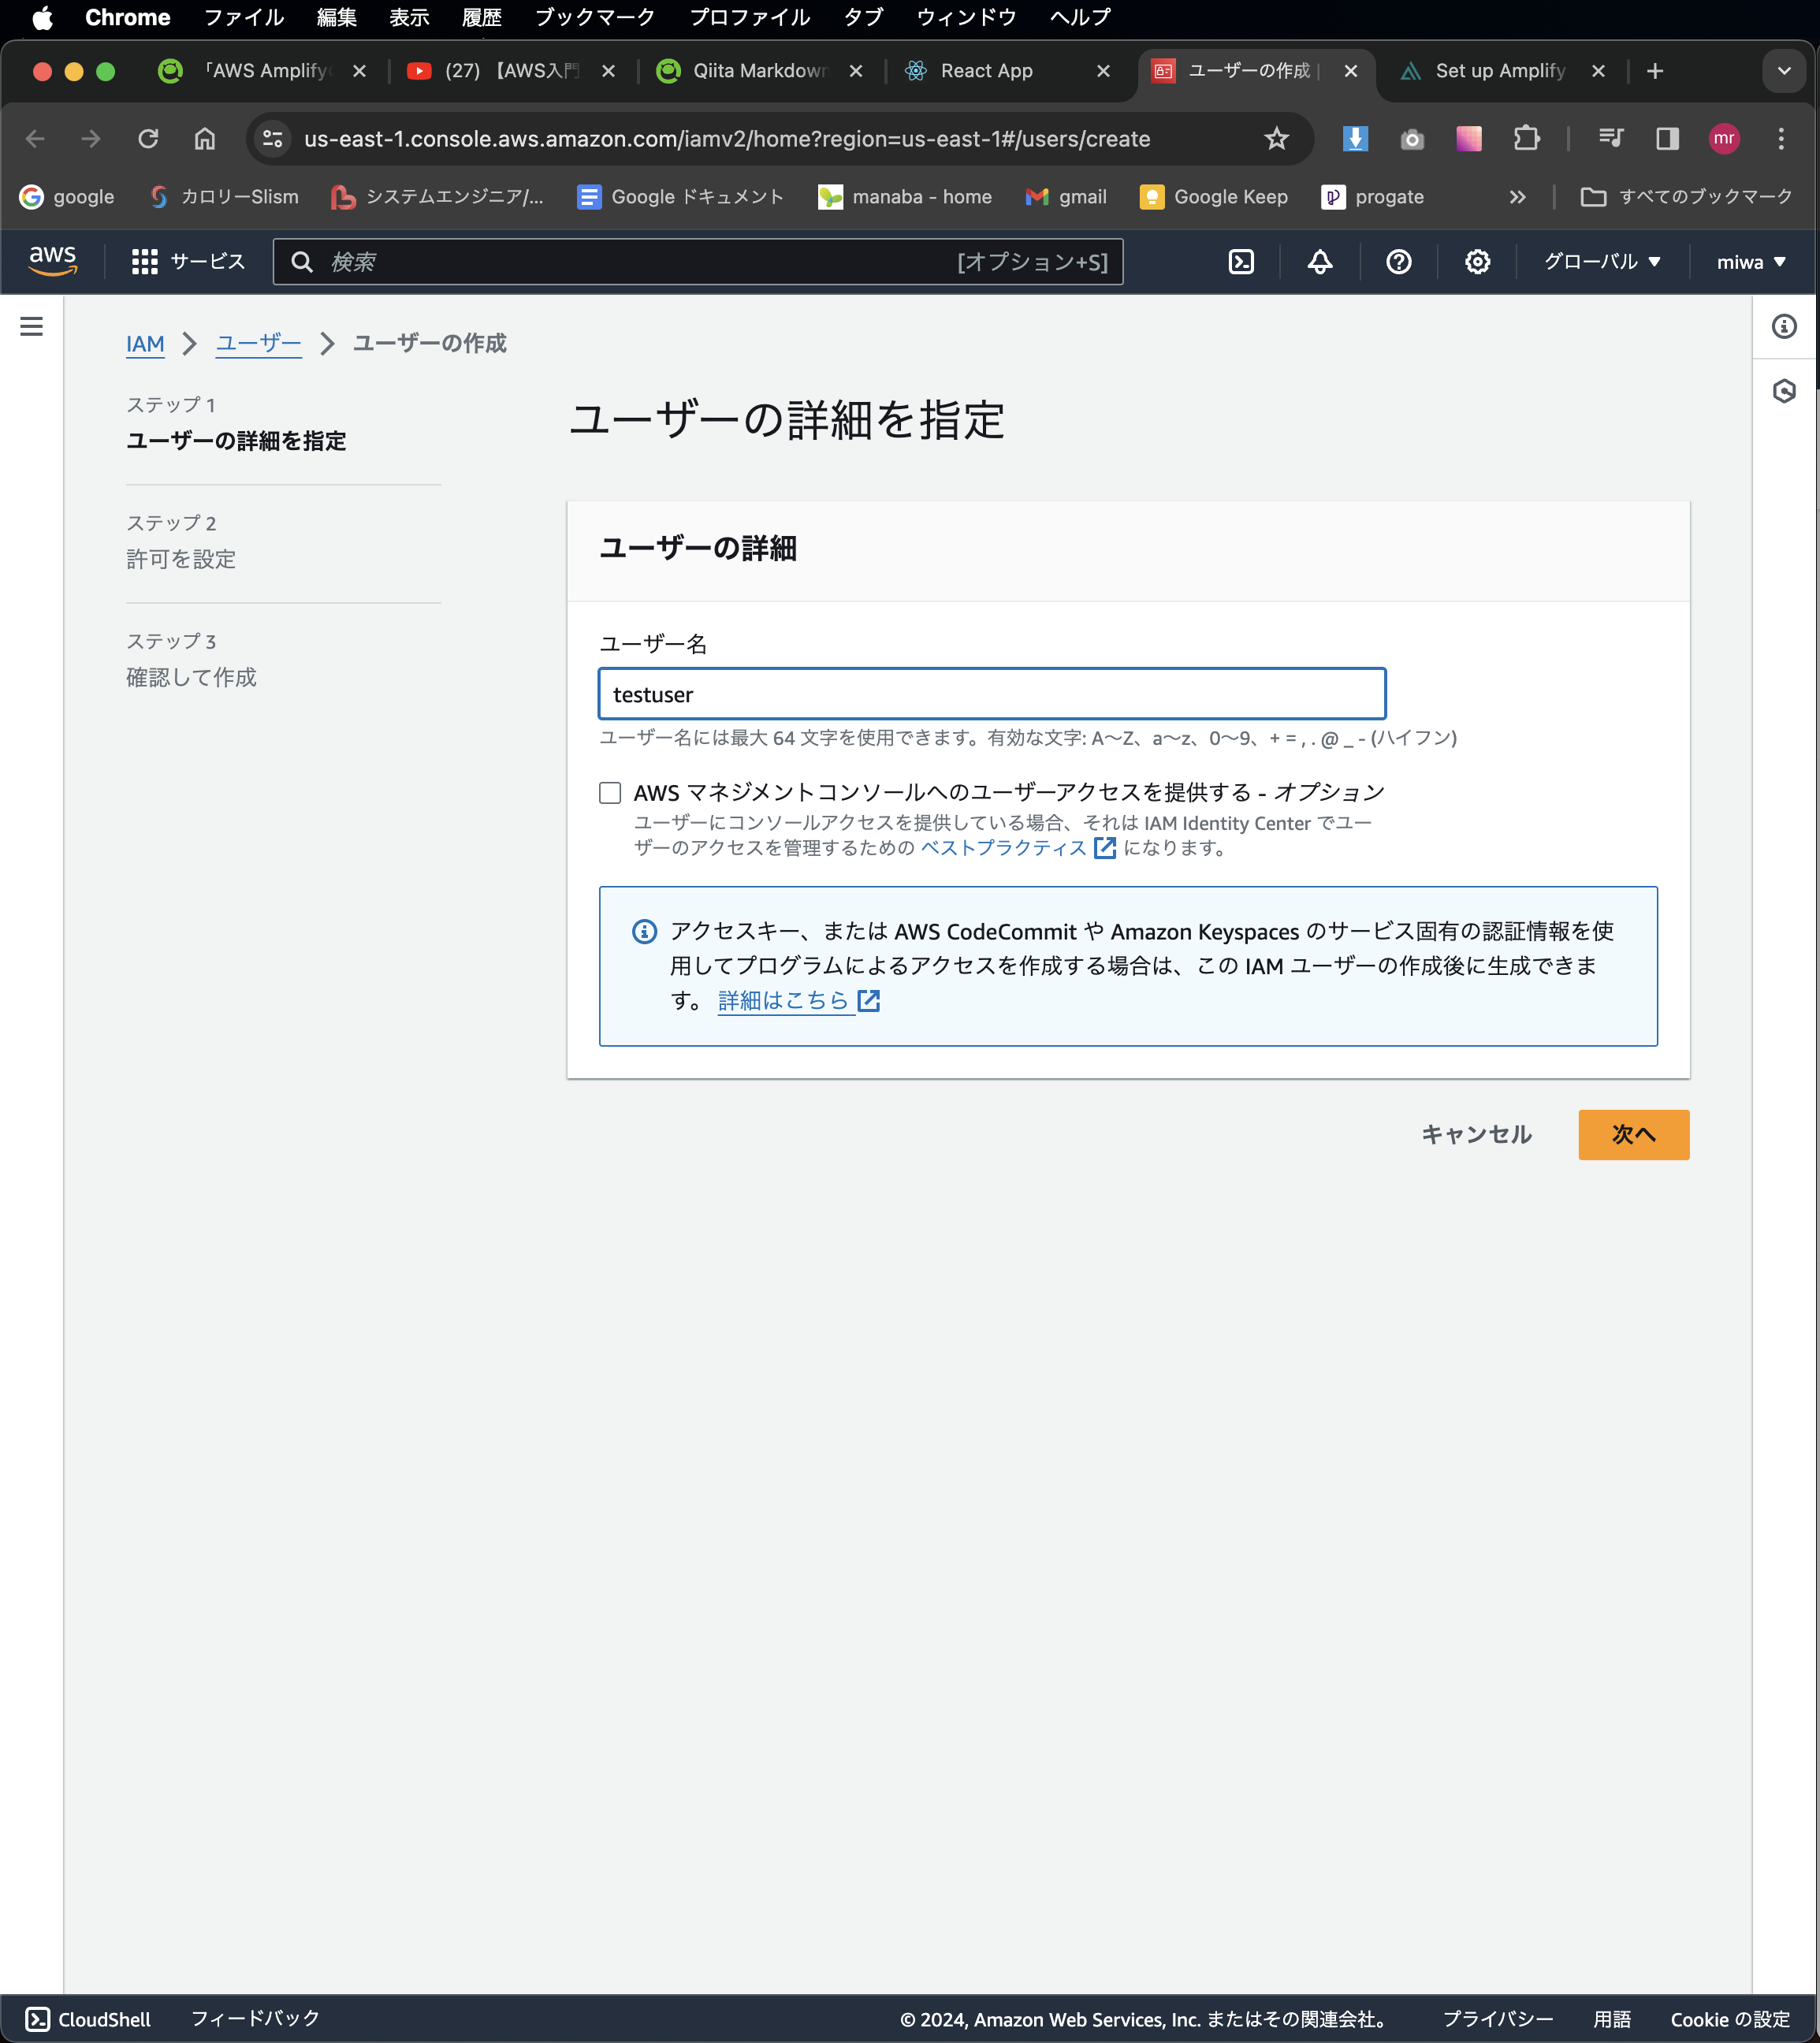
ユーザー名を記入し、「次へ」を押しましょう。その次に以下の写真のように選択をし、「次へ」ボタンを押します。

最後に「確認して作成」というページに移りますので、何も変更せず「ユーザーを作成」ボタンを押します。
すると「ユーザー」という画面に遷移し、先ほど作成したユーザーが青線が引かれた状態で表示されているはずです。これをクリックしてください。その後は「アクセスキーを作成」と言うボタンがありますので、それをクリックしてください。以下の写真のように選択をし、「次へ」ボタンを押してください。

次のページで任意の説明文を入力し、「キーを作成」ボタンを押すとアクセスキーとシークレットキーが表示されます。これは一度しか表示されませんので、必ずどこかへメモしてください。そしてそのキーをターミナルで入力されるよう求められるのでそれぞれ入力してください。profile nameをどうするか聞かれますので、キーの名前を入力してください。これでCLIの設定は完了です。
③ 次にバックエンド環境をローカルで初期化します。amplifyコンソールを開き、backend enviromentsを選択して「Get Started」ボタンを押してください。完了したら前の画面に戻り、「スタジオを起動する」ボタンを押してまた元の画面に戻っておいてください。その後「ローカル設定手順」ボタンを押してコマンドをコピーし、ターミナルで実行します。選択肢が現れますので以下のコードのように選択していってください。
? Choose your default editor: Visual Studio Code
? Choose the type of app that you're building javascript
? What javascript framework are you using react
? Source Directory Path:  src
? Distribution Directory Path: build
? Build Command:  npm run-script build
? Start Command: npm run-script start
? Do you plan on modifying this backend? Y
ここまでで手順2は完了です。
手順3
ここからは認証サービスを追加していくために以下の方法で進めていきます。
①まず、以下のコマンドを打ち込み、ライブラリをインストールします。
npm install aws-amplify @aws-amplify/ui-react
つぎに以下のコマンドを打ち込みます。
amplify add auth
そして選択肢が出てくるので以下のように選択します。
? Do you want to use the default authentication and security configuration? Default configuration
? How do you want users to be able to sign in? Username
? Do you want to configure advanced settings? No, I am done.
追加した認証サービスをデプロイするために、以下のコマンドを打ち込みます。
amplify push --y
② 次に以下のコードをsrc/index.jsファイルの最後のインポートの下に追加してください。
import { Amplify } from 'aws-amplify';
import config from './aws-exports';
Amplify.configure(config);
そしてsrc/app.jsファイルもコードを更新します。以下のコードをコピペしてください。
import logo from "./logo.svg";
import "@aws-amplify/ui-react/styles.css";
import {
  withAuthenticator,
  Button,
  Heading,
  Image,
  View,
  Card,
} from "@aws-amplify/ui-react";

function App({ signOut }) {
  return (
    <View className="App">
      <Card>
        <Image src={logo} className="App-logo" alt="logo" />
        <Heading level={1}>We now have Auth!</Heading>
      </Card>
      <Button onClick={signOut}>Sign Out</Button>
    </View>
  );
}

export default withAuthenticator(App);
最後に npm start とターミナルに打ち込むことでローカルにて実行できることを確認できます。以下の写真のような画面が表示されるはずです。

③次にamplifyコンソールを開いてください。左側のメニューバーから「ビルドの設定」を選択します。amplify.ymlを以下のコードに変更してください。「編集」ボタンから変更できます。
version: 1
backend:
  phases:
    build:
      commands:
        - '# Execute Amplify CLI with the helper script'
        - amplifyPush --simple
frontend:
  phases:
    preBuild:
      commands:
        - yarn install
    build:
      commands:
        - yarn run build
  artifacts:
    baseDirectory: build
    files:
      - '**/*'
  cache:
    paths:
      - node_modules/**/*
変更できたら、そのページの一番下までスクロールし、build image settingsを変更します。「edit」ボタンを押し、パッケージをamplify CLIに変更してください。以下の写真のようになれば大丈夫なので保存を押してください。

それではhosting enviromentsに戻り、mainと書いてあるところの近くにある「編集」ボタンを押してください。そしてバックエンド環境をstagingに変更します。この時、以下の写真の「詳細はこちら」ボタンを押してサービスロールを作成します。

すると英語のサイトが出てきますが、焦らずStep1の「open the IAM console」ボタンを押してください。飛んだ先のサイトで「ロールを作成」ボタンを押して以下の写真のように選択してください。
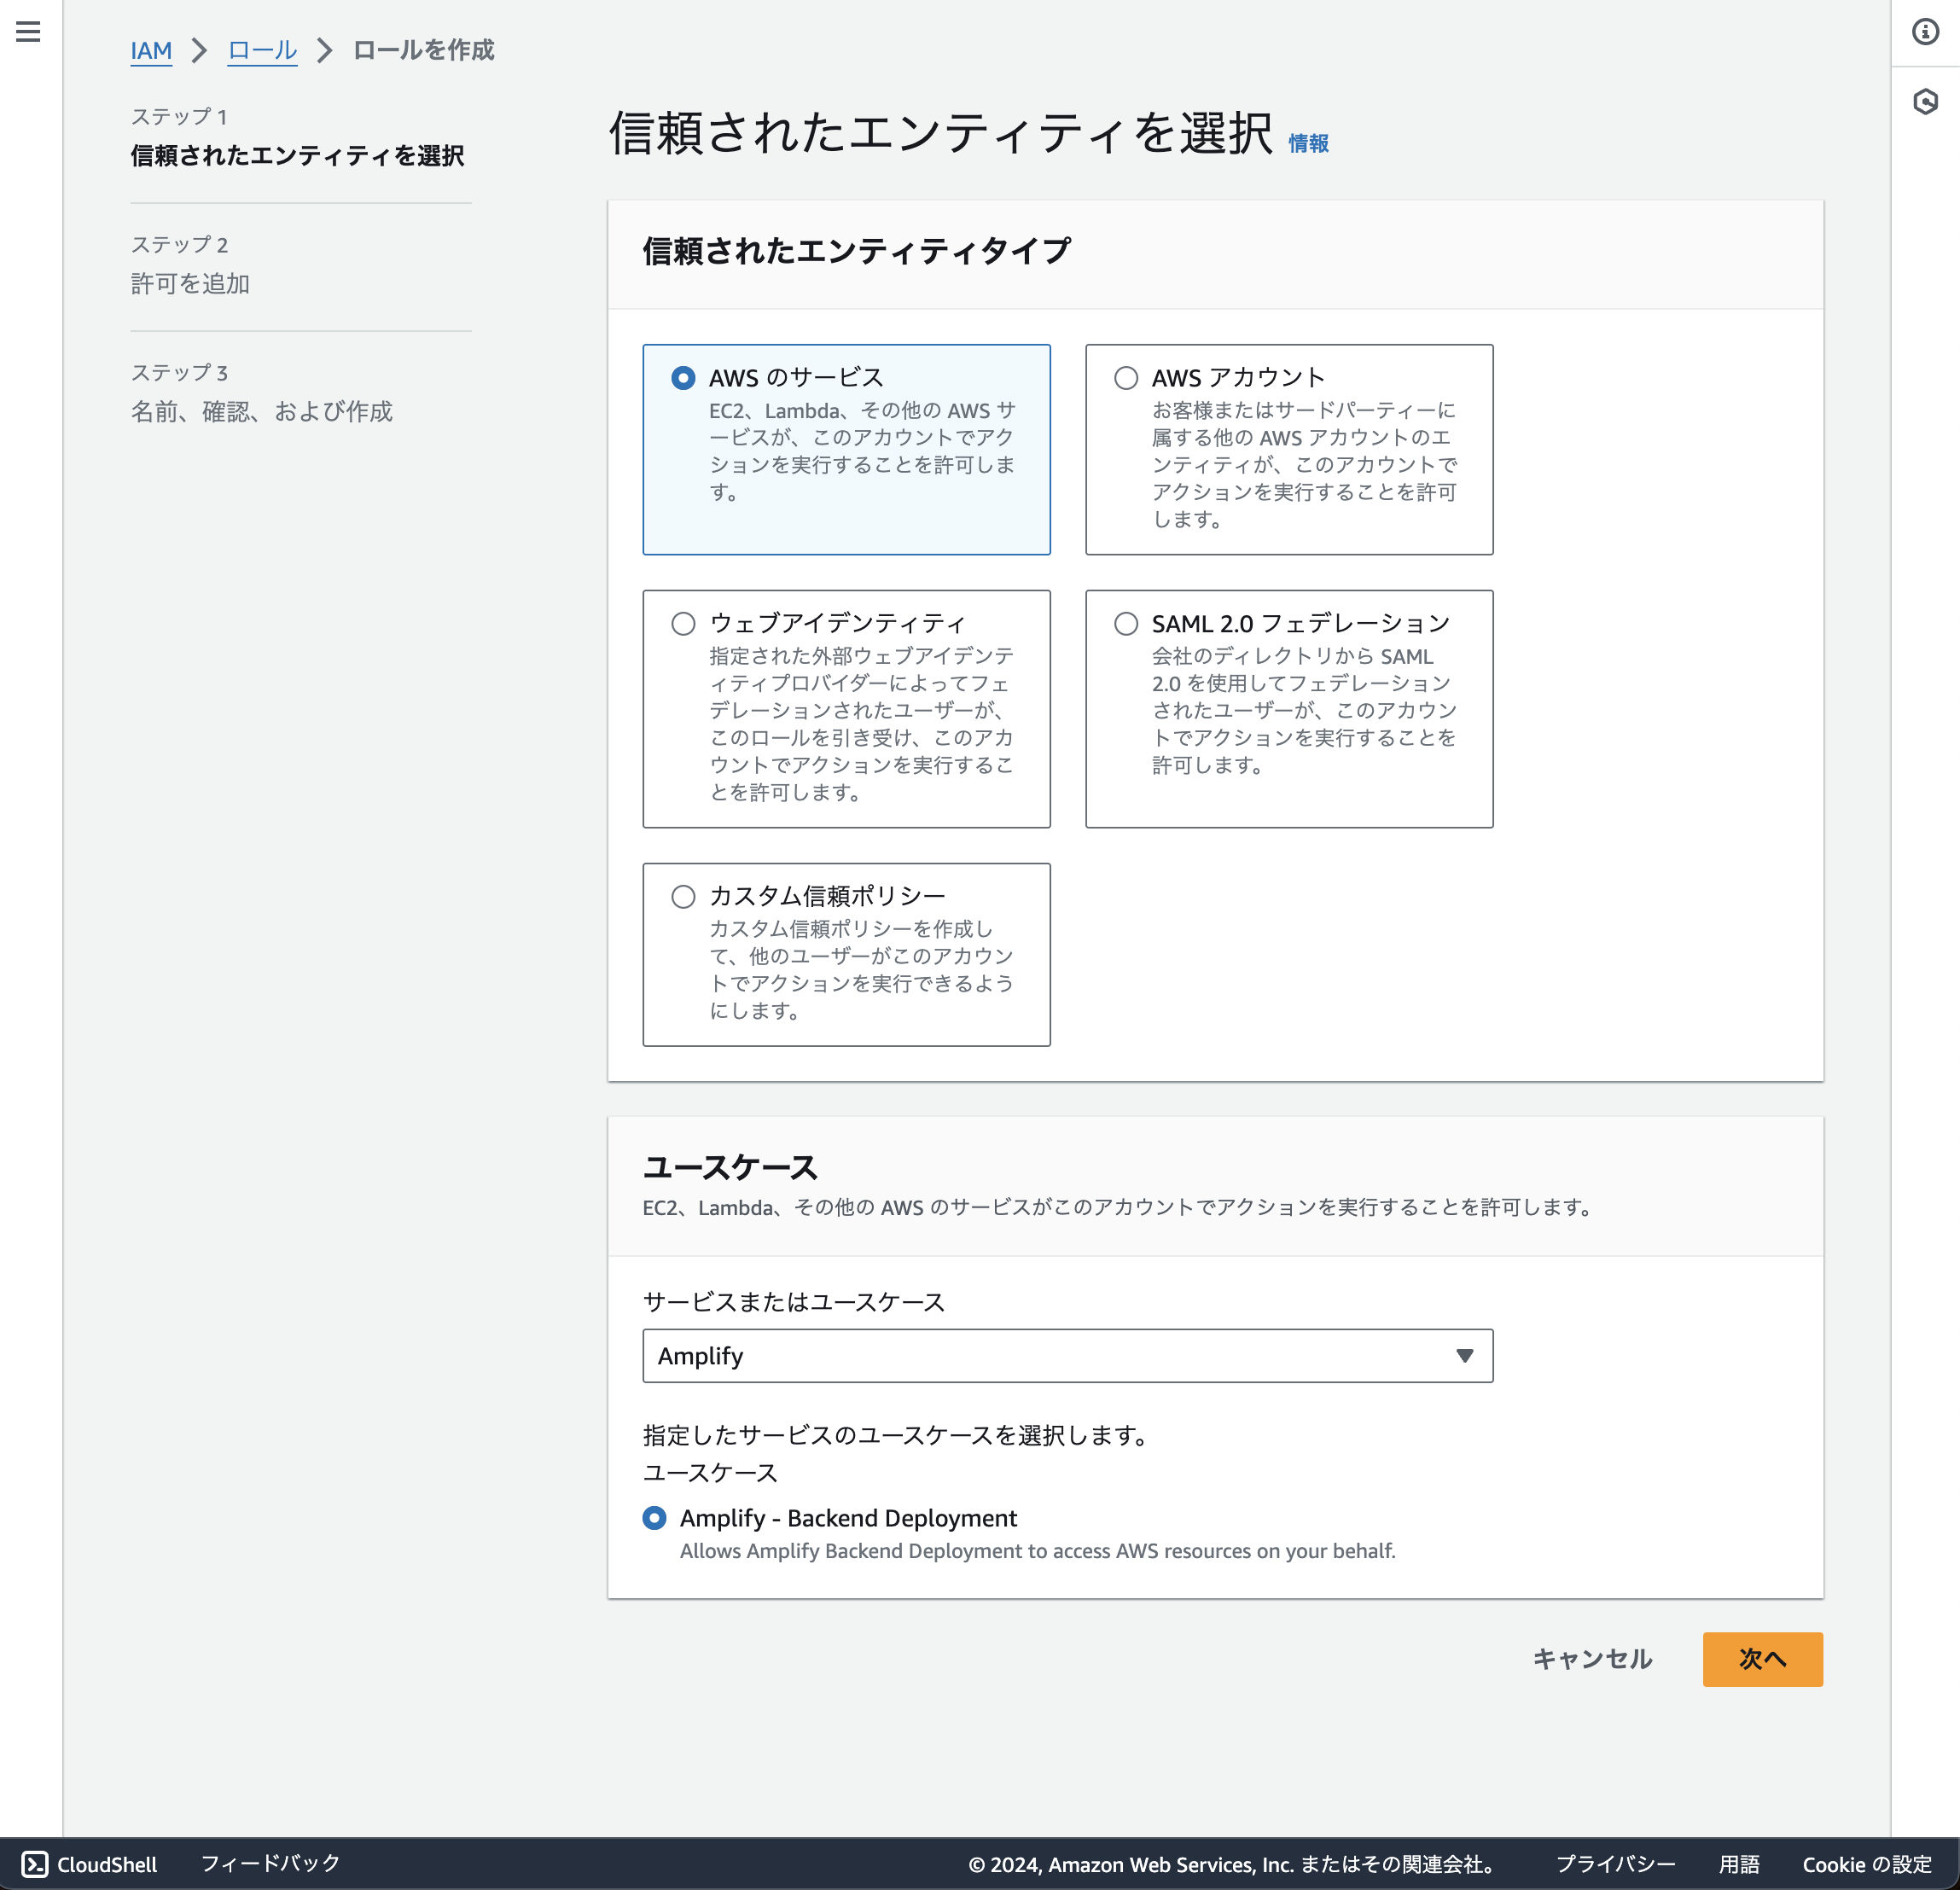
あとはデフォルトのままステップ3まで進み、「ロールを作成」ボタンを押してください。
amplifyコンソールに戻り、左のメニューバーから「全般」ボタンを選択し、「編集」ボタンを押してください。サービスロールを先ほど作成したロールに変更し、hosting enviromentsのページに戻ってください。
④ ターミナルで以下のコマンドを実行し、ライブ環境にデプロイします。
git add .
git commit -m "added auth"
git push origin main
これで手順3は終了です。
手順4
ここからが公式のチュートリアル通りに行うと問題が起こる場面です。ですが、基本はコードを変更すれば問題ないです。
①まずはAPIをアプリケーションに追加します。以下のコマンドを打ち込みます。
amplify add api
そして以下のように選択します。
? Select from one of the below mentioned services: GraphQL
? Here is the GraphQL API that we will create. Select a setting to edit or continue: Continue
? Choose a schema template: Single object with fields (e.g., "Todo" with ID, name, description)
? Do you want to edit the schema now? (Y/n) yes
②すると/amplify/backend/api//schema.graphqlのファイルが開かれると思います。ですので以下のコードに変更してください。
type Note @model @auth(rules: [ { allow: public } ] ){
  id: ID!
  name: String!
  description: String
}
以下のコマンドをターミナルに打ち込んでデプロイします。
amplify push --y
③ここが問題のところになります。公式の資料で進めていった方は必ずここでつまずくと思います。その原因は先ほども述べたように最新バージョンに沿ったものでないからです。**具体的には公式の資料ではversion5にそった書き方なのですが、今はversion6なのでエラーが出てしまうということです。**なので以下のコードでsrc/app.jsファイルを更新します。
// Put your code below this line.

import React, { useState, useEffect } from "react";
import "./App.css";
import "@aws-amplify/ui-react/styles.css";
import {
  Button,
  Flex,
  Heading,
  Text,
  TextField,
  View,
  withAuthenticator,
} from "@aws-amplify/ui-react";
import { listNotes } from "./graphql/queries";
import {
  createNote as createNoteMutation,
  deleteNote as deleteNoteMutation,
} from "./graphql/mutations";
import { generateClient } from 'aws-amplify/api';

const client = generateClient();

const App = ({ signOut }) => {
  const [notes, setNotes] = useState([]);

  useEffect(() => {
    fetchNotes();
  }, []);

  async function fetchNotes() {
    const apiData = await client.graphql({ query: listNotes });
    const notesFromAPI = apiData.data.listNotes.items;
    setNotes(notesFromAPI);
  }

  async function createNote(event) {
    event.preventDefault();
    const form = new FormData(event.target);
    const data = {
      name: form.get("name"),
      description: form.get("description"),
    };
    await client.graphql({
      query: createNoteMutation,
      variables: { input: data },
    });
    fetchNotes();
    event.target.reset();
  }

  async function deleteNote({ id }) {
    const newNotes = notes.filter((note) => note.id !== id);
    setNotes(newNotes);
    await client.graphql({
      query: deleteNoteMutation,
      variables: { input: { id } },
    });
  }

  return (
    <View className="App">
      <Heading level={1}>My Notes App</Heading>
      <View as="form" margin="3rem 0" onSubmit={createNote}>
        <Flex direction="row" justifyContent="center">
          <TextField
            name="name"
            placeholder="Note Name"
            label="Note Name"
            labelHidden
            variation="quiet"
            required
          />
          <TextField
            name="description"
            placeholder="Note Description"
            label="Note Description"
            labelHidden
            variation="quiet"
            required
          />
          <Button type="submit" variation="primary">
            Create Note
          </Button>
        </Flex>
      </View>
      <Heading level={2}>Current Notes</Heading>
      <View margin="3rem 0">
        {notes.map((note) => (
          <Flex
            key={note.id || note.name}
            direction="row"
            justifyContent="center"
            alignItems="center"
          >
            <Text as="strong" fontWeight={700}>
              {note.name}
            </Text>
            <Text as="span">{note.description}</Text>
            <Button variation="link" onClick={() => deleteNote(note)}>
              Delete note
            </Button>
          </Flex>
        ))}
      </View>
      <Button onClick={signOut}>Sign Out</Button>
    </View>
  );
};

export default withAuthenticator(App);
更新できたら npm start で実装されているか確認します。ログインし、以下の写真のようになっていれば成功です。

手順5
次に画像ストレージ機能を追加するために、ストレージをアプリケーションに追加します。
①以下のコマンドを打ち込んでください。
amplify add storage
そして以下のように選択してください。注意: ? What kind of access do you want for Authenticated users?の部分はctl+aで全て選択してください。
? Select from one of the below mentioned services: Content (Images, audio, video, etc.)
? Provide a friendly name for your resource that will be used to label this category in the project: imagestorage
? Provide bucket name: <your-unique-bucket-name>
? Who should have access: Auth users only
? What kind of access do you want for Authenticated users? create/update, read, delete
? Do you want to add a Lambda Trigger for your S3 Bucket? (y/N) no
②先ほどのスキーマファイル(/amplify/backend/api//schema.graphql)を開き、以下のコードで更新します。
type Note @model @auth(rules: [ { allow: public } ] ){
  id: ID!
  name: String!
  description: String
  image: String
}
これをデプロイするので以下のコマンドを打ち込んでください。
amplify push --y
③ここも問題が起こる部分なのでv6の記法に沿ってコードを更新しましょう。以下のコードでsrc/app.jsファイルを更新してください。
import React, { useState, useEffect } from "react";
import "./App.css";
import "@aws-amplify/ui-react/styles.css";
import {
  Button,
  Flex,
  Heading,
  Text,
  TextField,
  Image,
  View,
  withAuthenticator,
} from "@aws-amplify/ui-react";
import { listNotes } from "./graphql/queries";
import {
  createNote as createNoteMutation,
  deleteNote as deleteNoteMutation,
} from "./graphql/mutations";
import { generateClient } from 'aws-amplify/api';
import { uploadData, getUrl, remove } from 'aws-amplify/storage';

const client = generateClient();

const App = ({ signOut }) => {
  const [notes, setNotes] = useState([]);

  useEffect(() => {
    fetchNotes();
  }, []);

  async function fetchNotes() {
    const apiData = await client.graphql({ query: listNotes });
    const notesFromAPI = apiData.data.listNotes.items;
    await Promise.all(
      notesFromAPI.map(async (note) => {
        if (note.image) {
          const url = await getUrl({ key: note.name });
          note.image = url.url;
        }
        return note;
      })
    );
    setNotes(notesFromAPI);
  }

  async function createNote(event) {
    event.preventDefault();
    const form = new FormData(event.target);
    const image = form.get("image");
    const data = {
      name: form.get("name"),
      description: form.get("description"),
      image: image.name,
    };
    if (!!data.image) await uploadData({
      key: data.name,
      data: image
    });
    await client.graphql({
      query: createNoteMutation,
      variables: { input: data },
    });
    fetchNotes();
    event.target.reset();
  }

  async function deleteNote({ id, name }) {
    const newNotes = notes.filter((note) => note.id !== id);
    setNotes(newNotes);
    await remove({ key: name });
    await client.graphql({
      query: deleteNoteMutation,
      variables: { input: { id } },
    });
  }

  return (
    <View className="App">
      <Heading level={1}>My Notes App</Heading>
      <View as="form" margin="3rem 0" onSubmit={createNote}>
        <Flex direction="row" justifyContent="center">
          <TextField
            name="name"
            placeholder="Note Name"
            label="Note Name"
            labelHidden
            variation="quiet"
            required
          />
          <TextField
            name="description"
            placeholder="Note Description"
            label="Note Description"
            labelHidden
            variation="quiet"
            required
          />
          <View
            name="image"
            as="input"
            type="file"
            style={{ alignSelf: "end" }}
          />
          <Button type="submit" variation="primary">
            Create Note
          </Button>
        </Flex>
      </View>
      <Heading level={2}>Current Notes</Heading>
      <View margin="3rem 0">
        {notes.map((note) => (
          <Flex
            key={note.id || note.name}
            direction="row"
            justifyContent="center"
            alignItems="center"
          >
            <Text as="strong" fontWeight={700}>
              {note.name}
            </Text>
            <Text as="span">{note.description}</Text>
            {note.image && (
              <Image
                src={note.image}
                alt={`visual aid for ${notes.name}`}
                style={{ width: 400 }}
              />
            )}
            <Button variation="link" onClick={() => deleteNote(note)}>
              Delete note
            </Button>
          </Flex>
        ))}
      </View>
      <Button onClick={signOut}>Sign Out</Button>
    </View>
  );
};

export default withAuthenticator(App);
これをgithubにpushします。以下のコマンドを打ち込んでください。
git add .
git commit -m "Added graphql and storage"
git push origin main
デプロイされていることを確認してから npm start をターミナルに打ち込んでください。以下の写真のようになっていて、ノートの追加や画像の追加ができていれば全ての手順が終わりこのチュートリアルは完了です。お疲れ様でした!!

手順4、5で発生するエラーの解決に使用したwebサイト
エラーの解決に使用したサイトを載せています。また、それぞれのバージョンによる記法の違いなども載せておきますので、よければ参考にしてください。コピペするだけでなく、それぞれの違いを見つめながらすすめていくと理解が深まると思います。
version5の記法
import { API, graphqlOperation } from 'aws-amplify';
import { createTodo } from './graphql/mutations';

const todo = {
  name: 'My first todo',
  description: 'Hello world!'
};

/* create a todo */
const newTodo = await API.graphql(
  graphqlOperation(createTodo, {
    input: todo
  })
);
version6の記法
import { generateClient } from 'aws-amplify/api';
import { createTodo } from './graphql/mutations';

const client = generateClient();

const todo = {
  name: 'My first todo',
  description: 'Hello world!'
};

/* create a todo */
const newTodo = await client.graphql({
  query: createTodo,
  variables: { input: todo }
});
version5の記法、つまり公式資料通りに行うと「export 'API' (imported as 'API') was not found in 'aws-amplify' (possible exports: Amplify)」のようなエラーがでるかと思います。以下のサイトを参照し、コードを変更すればエラーがなくなリました。
Migrate from Amplify JavaScript v5 to v6
export 'API' (imported as 'API') was not found in 'aws-amplify' (possible exports: Amplify)のエラーの解決方法
API and graphqlOperation aren't found in @aws-amplify/apiのエラーの解決方法
まとめ
いかがでしたでしょうか?今回のチュートリアルをしたことでバージョンの確認をすることとエラーメッセージをしっかりと理解することがいかに大事かを思い知らされました。また、公式DOCもイマイチ使い方がわかっていなかったのですが、今回のようなケースではかなり役に立つことがわかりました。プログラミング学習者、特に私のような初学者の人は思わぬところでつまずくことが多いかとは思いますが、めげずに勉強を続けていきましょう!