これは何
Kindleの蔵書一覧を全文検索サービスのAlgoliaで検索可能にするスクリプトです。
こちらの記事を参考に、蔵書一覧をCSV出力する代わりに Algolia でインデックスし、検索可能にしてみます。
InstantSearch.jsでフロントエンドを作ると簡単なWebアプリケーションにもなります(サンプル)。
前提条件
あらかじめAlgoliaアカウントを作成し、API Keyを取得する必要があります。
アカウントの取得についてはこちらを参考に。
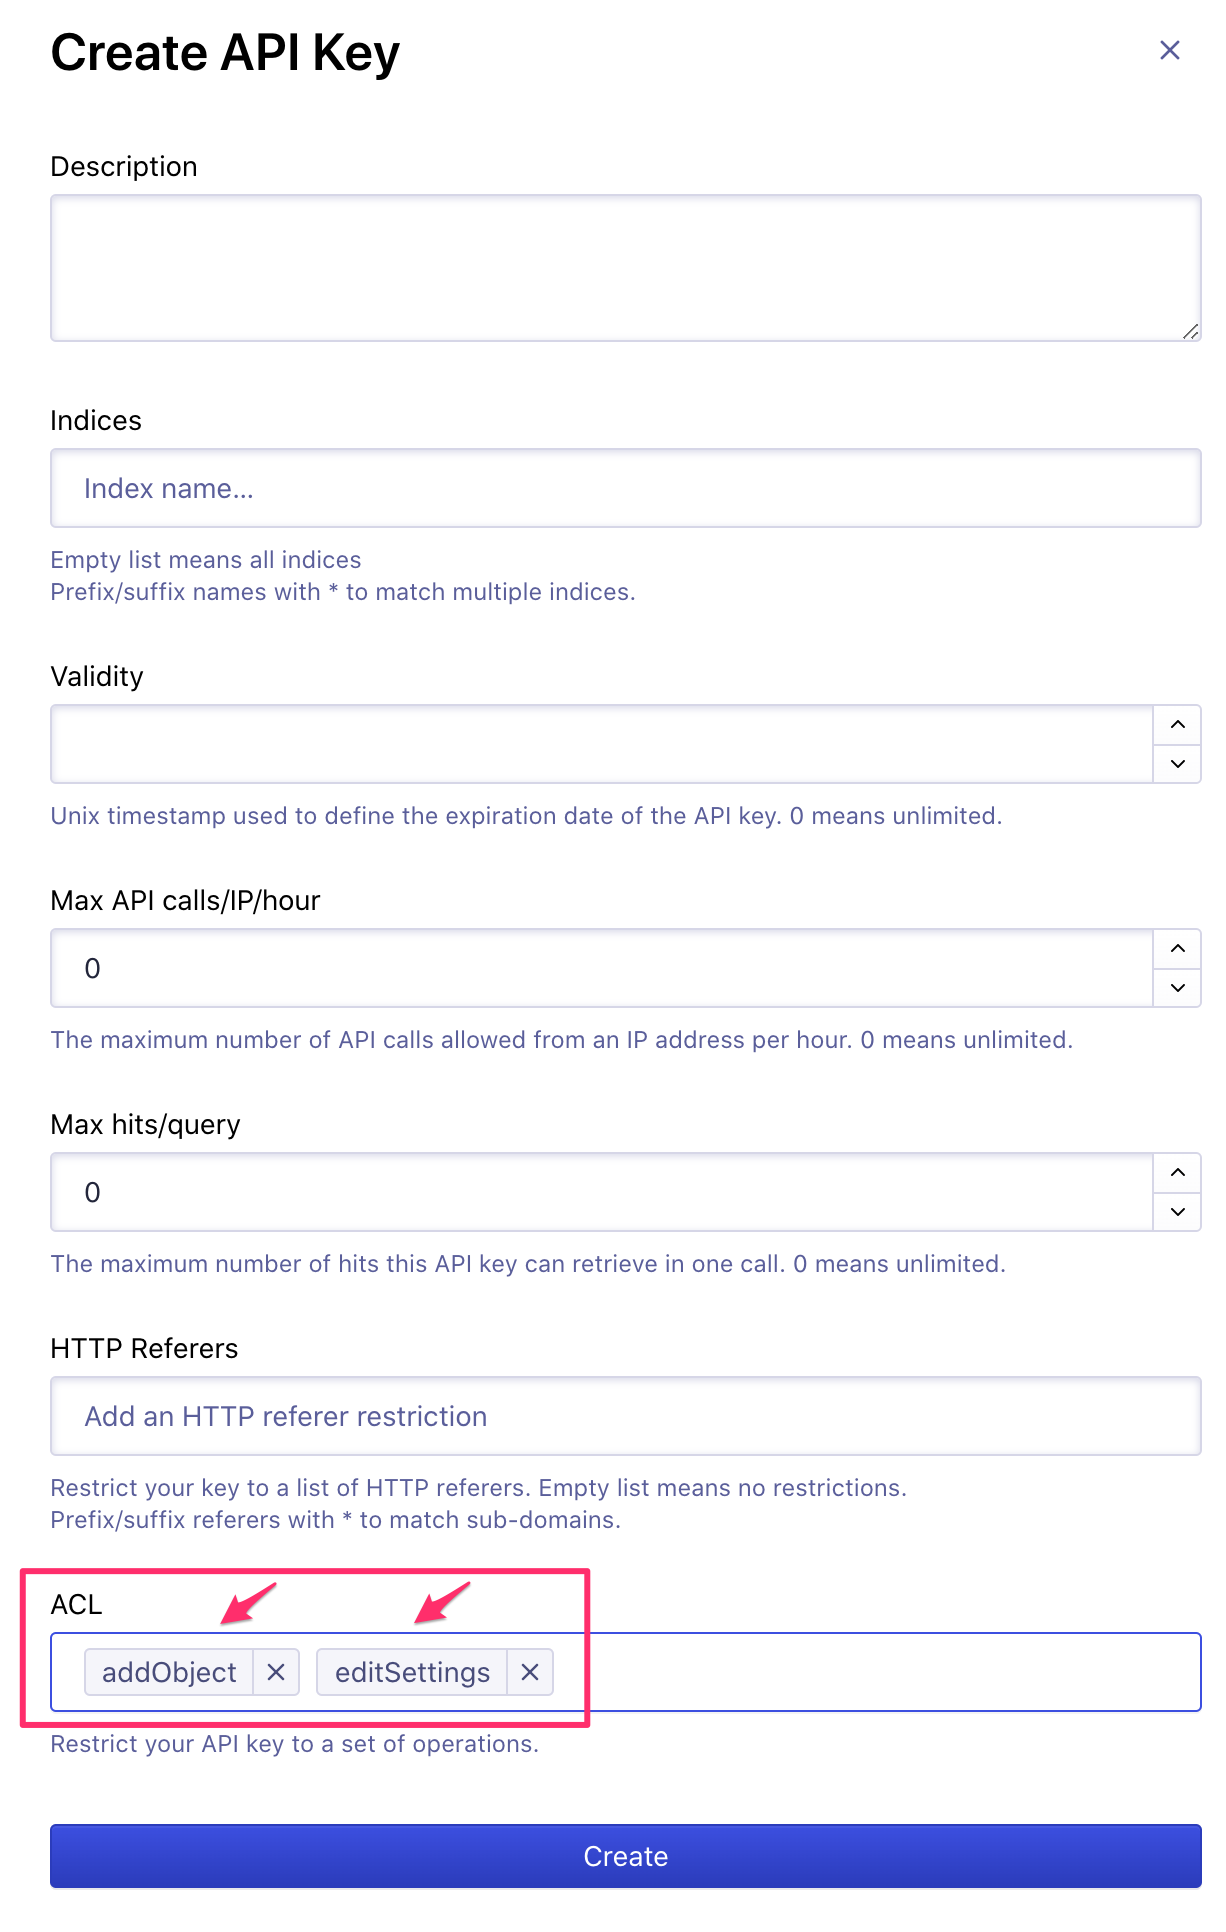
今回必要なのはインデックスを作成する権限及びレコードを追加する権限となるのため、editSettings と addObject 権限に絞った API キーをあらかじめ発行しておくと良いです。
Algolia Dashboard からの操作だと以下のように新規 API キー作成時に ACL を指定することができます。ACL など API キーに関する詳細はこちらの記事にまとまっています。
なお、Algoliaのフリープランでは10000レコード・10000検索リクエストまで無料なので、個人使用の範囲であればほぼ問題ないかと思います(ライブラリが10000冊を超える方ってどのくらいいるんだろう・・・)。
やり方
-
Kindle Cloud Readerにアクセス。本が大量にあると読み込みが終わるまで時間がかかるためしばらく待つ
-
F12を押して、デベロッパーツールを立ち上げる
-
Consoleタブに移動して、以下のコードの各変数を環境に合わせて変更し実行する。appIdとapiKeyはAlgoliaアカウント情報から取得したものを、indexNameは任意のものを指定する
let appId = 'YOUR_ALGOLIA_APP_ID'
let apiKey = 'YOUR_ALGOLIA_API_KEY_WITH_WRITE_PERMISSION'
let indexName = 'kindleLibrary'
- 以下のコードを実行しインデックスを作成する
createAlgoliaIndex = function (appId, apiKey, indexName) {
    const url = `https://${appId}-dsn.algolia.net/1/indexes/${indexName}/settings`
    const headers = {
        'X-Algolia-API-Key': apiKey,
        'X-Algolia-Application-Id': appId
    }

    let req = new Request(url, {
        method: 'PUT',
        body: JSON.stringify({
            searchableAttributes: ["title", "authors", "purchaseDate"],
            customRanking: ["desc(purchaseDate)"],
            attributesForFaceting: ["searchable(authors)"]
        }),
        headers: headers
    })

    fetch(req)
        .then(response => {
            if (response.status === 200) {
                console.log(response.json());
            } else {
                throw new Error('Something went wrong on api server!' + response.json());
            }
        })
        .then(response => {
            console.debug(response);
        }).catch(error => {
            console.error(error);
        });
}

createAlgoliaIndex(appId, apiKey, indexName)
- 以下のコードを実行しkindle libraryのデータをAlogliaに登録する
sendKindleToAlgolia = function (appId, apiKey, indexName) {
    let db = openDatabase('K4W', '3', 'thedatabase', 1024 * 1024);

    const url = `https://${appId}-dsn.algolia.net/1/indexes/${indexName}/batch`
    const headers = {
        'X-Algolia-API-Key': apiKey,
        'X-Algolia-Application-Id': appId
    }

    db.transaction(function (tx) {
        tx.executeSql('SELECT * FROM bookdata order by title;', [], function (tx, results) {
            const len = results.rows.length;
            let batch = []

            for (i = 0; i < len; i++) {
                let result = results.rows.item(i);
                let asin = result.asin;
                let title = result.title;
                let authors = JSON.parse(result.authors);
                let purchaseDate = new Date(result.purchaseDate);
                let productUrl = `https://www.amazon.co.jp/dp/${asin}`
                let productImageUrl = `https://images-na.ssl-images-amazon.com/images/P/${asin}.09.MZZZZZZZ.jpg`

                // Remove double quotes and CRLF from title
                title = title.replace(/"/g, '');
                title = title.replace(/\n|\r\n|\r/g, '');

                // Add record to batch
                let record = {
                    asin: asin,
                    title: title,
                    authors: authors,
                    purchaseDate: purchaseDate,
                    productUrl: productUrl,
                    productImageUrl: productImageUrl
                }
                batch.push({
                    action: 'addObject',
                    body: record
                })
            }
            let req = new Request(url, {
                method: 'POST',
                body: JSON.stringify({
                    requests: batch
                }),
                headers: headers
            })

            fetch(req)
                .then(response => {
                    if (response.status === 200) {
                        console.log(response.json());
                    } else {
                        throw new Error('Something went wrong on api server!' + response.json());
                    }
                })
                .then(response => {
                    console.debug(response);
                }).catch(error => {
                    console.error(error);
                });

        });
    });
};

sendKindleToAlgolia(appId, apiKey, indexName);
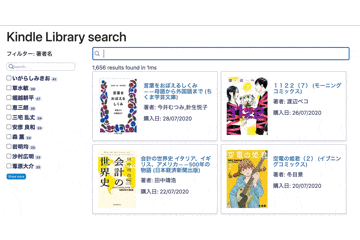
- Algolia dashboard 画面に移動しデータがインデックスされていることを確認する。メニューから 'indices' をクリックし、indexName で指定したインデックスを選択。検索欄にクエリを入力すると検索結果が表示される

その他
Aloglia Dashboardにログインするのがめんどくさい場合はWeb UIライブラリのInstantSearch.jsで比較的簡単にWebアプリにしてしまうこともできます -> 試しに作ってみました。ソースをコピペして AppId, APIキー、インデックス名を書き換えれば動くはずです。
参考:
Getting Started | Building Search UI | Guide | Algolia Documentation
Vue InstantSearchを使って検索機能を実現する | shinodogg.com
Vue InstantSearch (Algolia) を使った検索機能の実装 | by Kazuki Yonemoto | Medium