経緯
PCを自動起動させたかったが、ubuntuインストール時にデータパーティションをLUKSを使い暗号化してしまったため、毎回立ち上げる際にパスワード入力を求められていた。
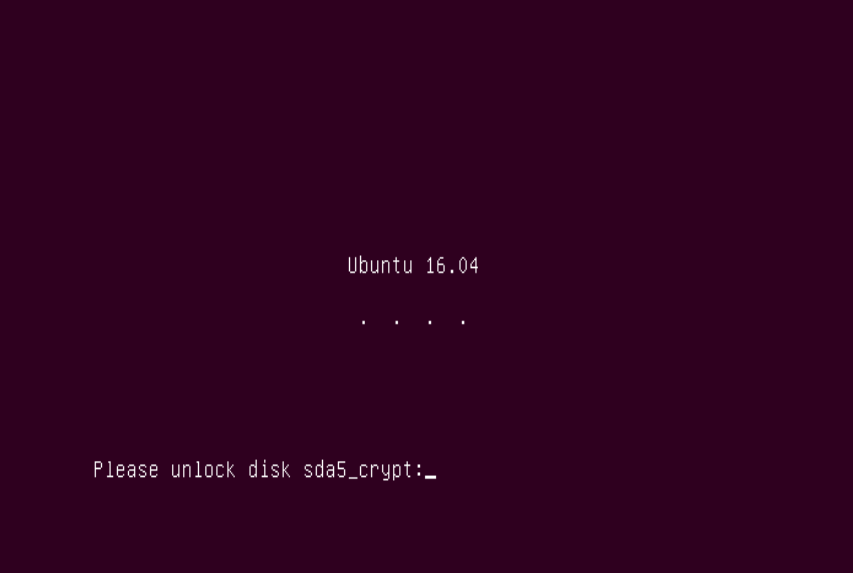
↓のような感じで毎回パスワード入力を求められていた。(厳密には違うけど)
似たようなことに関する情報は crypt unlock luksで出てくる。(日本語での情報はあまりない?)
流れの概要
前提として、
- sda1→UEFI(BIOS) (/boot/efi)
- sda2→ブートローダー (/boot)
- sda3→データパーティション(LUKSにより暗号化されているパーティション)
としている。(cat /dev/disk/by-uuid/ で各々の環境で確認できる)
ubuntuが起動する際の大まかな流れは、ブートローダーがまず読み込まれ、その後データパーティションへと移る。(この辺のパソコンの仕組みはまだ勉強中です)
その際に2枚めの画像のようにパスワード入力が求められるが、passphraseをブートローダーのパーティションに置き、それを自動で入力してくれるようにする。
実際やってみる
パスワードを生成し、それをluksのpassphraseとして登録
- パスワード生成
$ sudo dd if=/dev/urandom of=/boot/keyfile bs=1024 count=4
このkeyfileがpassphrase(パスワード)として使われるよう,設定していく。(luksでパスワードを求められるときはpassphraseと出てくるのでそれに倣っている)
- LUKSのパスワードとして登録
# set permissions
$ sudo chmod 0400 /boot/keyfile

# set /boot/keyfile as luks passphrase
$ sudo cryptsetup -v luksAddKey /dev/sda3 /boot/keyfile
とすると
Enter your old/existing passphrase here. Expected output:
言われるので現在すでに使用しているものを入力。
Key slot 0 unlocked.
Command successful.
と出れば完了。
確認
$ cryptsetup luksDump /dev/sda3
でSLOT1が追加され、ENABLEDになっていればOK。
0は元からあるやつ。
keyfileをログイン時に自動で入力するようにする
/etc/crypttabを編集。
sda3_crypt UUID=ae6501ed-38da-43ad-b6fd-199e529120e8 none luks
となっているところの
第三フレーズnoneと第4フレーズluks
を
none → /dev/disk/by-uuid/{uuid of boot partition}:/keyfile
luks → luks,keyscript=/lib/cryptsetup/scripts/passdev
に編集。
uuid of boot partitionの確認方法は
$ ll /dev/disk/by-uuid/
drwxr-xr-x 2 root root 180  6月 15 10:00 ./
drwxr-xr-x 8 root root 160  6月 15 10:00 ../
lrwxrwxrwx 1 root root  10  6月 15 01:00 0915-2B24 -> ../../sda5
lrwxrwxrwx 1 root root  10  6月 15 01:00 87b53f55-f29a-4366-a40d-d33ce4c86a4e -> ../../sda7
lrwxrwxrwx 1 root root  10  6月 15 01:00 8882-67EC -> ../../sda1
lrwxrwxrwx 1 root root  10  6月 15 01:00 90751d1f-c7b3-415a-bb16-0474e5e1fe04 -> ../../sda2
lrwxrwxrwx 1 root root  10  6月 15 01:00 E02E880F2E87DD42 -> ../../sda6
lrwxrwxrwx 1 root root  10  6月 15 01:00 F6E08764E0872A47 -> ../../sda3
lrwxrwxrwx 1 root root  10  6月 15 01:00 FE126FF0126FAC79 -> ../../sda4
結果を見ると
90751d1f-c7b3-415a-bb16-0474e5e1fe04がsda2へのシンボリックリンク?であるようだ。
これを/etc/crypttabの内容に書き加える。
また、どのパーティションがブートローダーで、UEFI(BIOS)であるかは、
$ cat /etc/fstab
or
$ lsblk
でわかる。
そして編集し終えたら、
$ sudo update-initramfs -u
を実行し、エラーが出なければ再起動し確認。
I: The initramfs will attempt to resume from /dev/dm-2
I: (/dev/mapper/ubuntu--vg-swap_1)
I: set the RESUME variable to override this
と出るかと思うので、
echo "RESUME=UUID={uuid of dm-2}" | sudo tee /etc/initramfs-tools/conf.d/resume
でRESUME変数を設定すれば完了。
この作業の意味はよく分からない。
dm-2のUUIDではなく、sda1のUUIDやsda3(LUKS暗号化パーティション)のものでもいけた(他のPCではだめだった)。
sda2ではログインできていない?かもしれない。
注意点
最後の
$ sudo update-initramfs -u
でallを加えてしまわないように。
一発でうまく行けばいいが、うまく行かないときは、何度もrecovery modeで作業することになる。
上でallを付けてしまうとrecovery modeですら作業できなくなってしまう可能性あり。
recovery modeの入り方。
立ち上げている途中にF11を押してブートローダのパーティションを選択すると以下の画面になる。
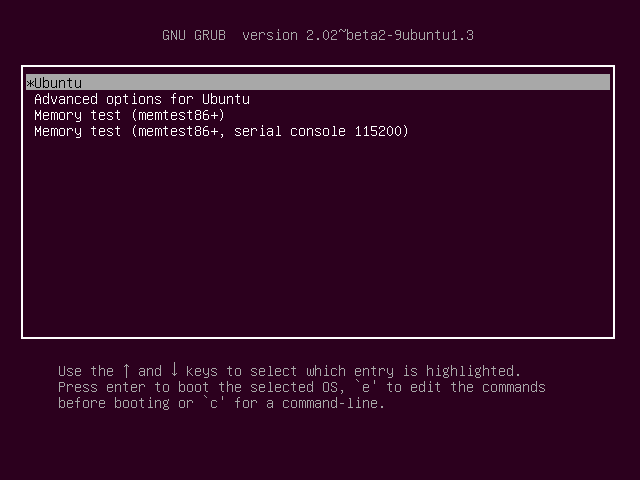
そこでAdvanced options for ubuntuを選択肢、数字の小さい方?のrecovery modeを選択する。
上でallを付けていなければ、この記事の作業をする前のままのもので作業できるはず。(黒い画面で操作することになると思うが)
recovery modeでrootでの作業をする際、sda3はマウントされているものの、rootでの作業にも関わらず読み込みのみとなっているので以下のコマンドでマウントし直す必要あり。
mount -o remount,rw /
参考
https://dradisframework.com/support/guides/customization/auto-unlock-luks-encrypted-drive.html
https://askubuntu.com/questions/1116778/how-to-set-the-resume-variable-to-override-these-issues
https://ubuntuforums.org/showthread.php?t=837416
https://askubuntu.com/questions/1132833/how-do-i-automatically-mount-luks-drives-upon-login
https://askubuntu.com/questions/996155/how-do-i-automatically-decrypt-an-encrypted-filesystem-on-the-next-reboot
https://askubuntu.com/questions/1116778/how-to-set-the-resume-variable-to-override-these-issues