3
4

Delete article

Deleted articles cannot be recovered.

Draft of this article would be also deleted.

Are you sure you want to delete this article?

More than 5 years have passed since last update.

raspberrypiでLチカをやってみる

Last updated at Posted at 2016-10-02

必要なもの

  • LED(発光ダイオード)
  • 抵抗(1kΩ)
  • ジャンパー線(オス―メス)
  • ブレッドボード
  • raspberrypi 3 一式

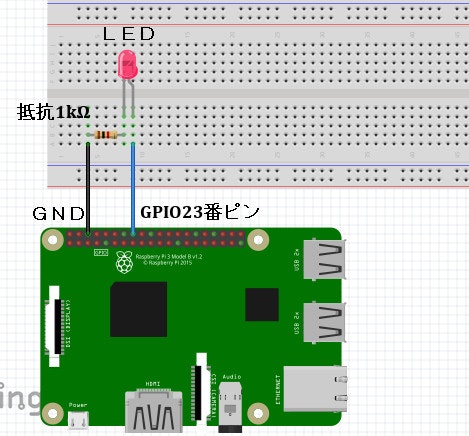
配線する

GPIOのピン番号についてはこちらを参照

  • raspberrypi3のGPIO23番ピン → LEDのアノード(足が長い方)
  • LEDのカソード(足の短い方) → 抵抗
  • 抵抗 → GND

Lチカ.jpg

Pythonでプログラムを組む

  • wiringpiをインストールする。
pip install wiringpi
  • 下記プログラムを作成し実行する。
led_test.py
import wiringpi
import time

out_pin = 23

wiringpi.wiringPiSetupGpio()
wiringpi.pinMode(out_pin, wiringpi.OUTPUT)

for i in range(0, 5):
    wiringpi.digitalWrite(out_pin, 1)
    time.sleep(1)
    wiringpi.digitalWrite(out_pin, 0)
    time.sleep(1)
  • 10秒間LEDが点滅すれば成功です。

#参考
raspberrypi3 のGPIO HEADER
WiringPi 関数メモ

3
4
0

Register as a new user and use Qiita more conveniently

  1. You get articles that match your needs
  2. You can efficiently read back useful information
  3. You can use dark theme
What you can do with signing up
3
4

Delete article

Deleted articles cannot be recovered.

Draft of this article would be also deleted.

Are you sure you want to delete this article?