はじめに
以前以下のような記事を書きました。その時に作成したスプレッドシートの情報をGoogle Apps Script(以降GAS)で地図上に可視化してみたいと思います。
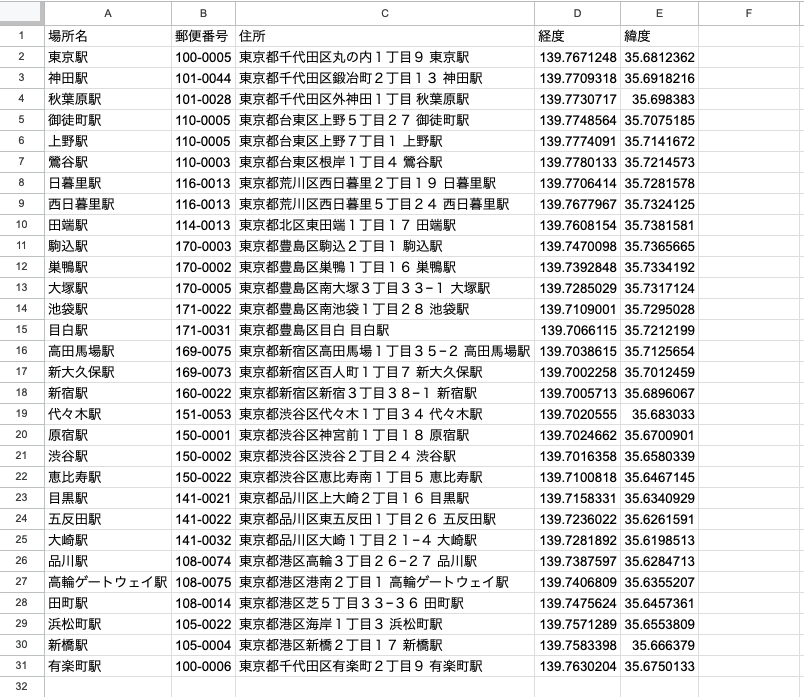
以下のようなスプレッドシートから、
以下のような画面を作成してみます。

事前準備
API Keyの準備
地図上に可視化するため、今回はGoogle MapsのMaps JavaScript APIを使用します。
以下の公式ドキュメントを参考にAPI Keyを作成・取得してください。
実装内容
作成するファイル
以下4ファイルを作成します。こちらのベストプラクティスに書かれていることを参考に、JavaScriptとCSSのファイルを分離しています。
- main.gs
- index.html
- JavaScript.html
- Stylesheet.html

それぞれのコードを記載し、簡単に解説します。
main.gs
スプレッドシートからデータを取得し、index.htmlにデータを渡しています。doGet関数はWebアプリとしてデプロイされたGASがGETリクエストされた時に動く関数です。
include関数は後述するindex.html内で使用しています。
function doGet(e) {
  let indexHtml = HtmlService.createTemplateFromFile('index');

  // スプレッドシートからデータを取得
  const res = Sheets.Spreadsheets.Values.batchGet(
    SpreadsheetApp.getActive().getId(), // スプレッドシートID
    { ranges: ['シート1!A2:E'] } // 取得したい範囲
  );

  const valueRanges = res.valueRanges || [];
  const places = valueRanges[0].values;

  let addrs = [];
  places.forEach((place) => {
    const placeName = place[0];
    const postalCode = place[1];
    const addr = place[2];
    const lng = parseFloat(place[3]);
    const lat = parseFloat(place[4]);
    addrs.push({ placeName, postalCode, addr, lng, lat });
  });

  // HTMLテンプレートにデータを渡す
  indexHtml.data = { addresses: JSON.stringify(addrs) };

  return indexHtml.evaluate().setTitle('mapSample');
}

function include(filename) {
  return HtmlService.createHtmlOutputFromFile(filename)
      .getContent();
}
index.html
<!DOCTYPE html>
<html>
  <head>
    <base target="_top">
    <?!= include('Stylesheet'); ?>
  </head>
  <body>
    <div id="map"></div>

    <script>
      // サーバーサイドから渡されたデータを取得
      const addresses = JSON.parse(<?= data.addresses ?>);
    </script>

    <script async
        src="https://maps.googleapis.com/maps/api/js?key={ API KEY }&callback=initMap">
    </script>

    <?!= include('JavaScript'); ?>

  </body>
</html>
{ API KEY }と記載している箇所に事前準備で取得したAPI Keyを記述してください。
    <script async
        src="https://maps.googleapis.com/maps/api/js?key={ API KEY }&callback=initMap">
    </script>
main.gsのdoGet関数内で作成したデータを受け取っています。
    <script>
      // サーバーサイドから渡されたデータを取得
      const addresses = JSON.parse(<?= data.addresses ?>);
    </script>
以下の2行はmain.gsで作成したinclude関数を呼び出していて、JavaScript.htmlとStylesheet.htmlを読み込んでいます。
<?!= include('Stylesheet'); ?>
<?!= include('JavaScript'); ?>
なお、Maps JavaScript APIの読み込み方はこちらに記載の方法があるのですが、今回は以前のスクリプト読み込みタグを使用するの方法を採用しています。Dynamic Library Importの方で初めは実施しようと思ったのですが、どうしてもGASではうまく読み込めなかったので断念しました。やり方わかる方いらっしゃれば教えてください。
JavaScript.html
<script>
  let map;

  function initMap() {
    map = new google.maps.Map(document.getElementById("map"), {
      center: { lat: 35.681236, lng: 139.767125 },
      zoom: 13,
    });

    // addresses変数を利用してマーカーを追加
    addresses.forEach((address) => {
      if (address.lng && address.lat) {
        const marker = new google.maps.Marker({
          position: { lat: address.lat, lng: address.lng },
          map: map,
          title: address.addr
        });

        const infoWindow = new google.maps.InfoWindow({
          content: `<div>
                      <p><strong>${address.placeName}</strong></p>
                      <p><strong>住所:</strong> ${address.addr}</p>
                      <p><strong>郵便番号:</strong> ${address.postalCode}</p>
                      <p><strong>緯度:</strong> ${address.lat}</p>
                      <p><strong>経度:</strong> ${address.lng}</p>
                    </div>`
        });

        marker.addListener('click', () => {
          infoWindow.open(map, marker);
        });
      }
    });
  }
</script>
以下でindex.htmlのid=mapのdivタグに対してGoogle Mapを設定しています。
    map = new google.maps.Map(document.getElementById("map"), {
      center: { lat: 35.681236, lng: 139.767125 },
      zoom: 13,
    });
以下の部分でマーカーの追加と、マーカーをクリックした時のポップアップ表示を設定しています。今回はポップアップ表示としてスプレッドシートで読み込んだ情報を表示するようにしてみました。
    // addresses変数を利用してマーカーを追加
    addresses.forEach((address) => {
      if (address.lng && address.lat) {
        const marker = new google.maps.Marker({
          position: { lat: address.lat, lng: address.lng },
          map: map,
          title: address.addr
        });

        const infoWindow = new google.maps.InfoWindow({
          content: `<div>
                      <p><strong>${address.placeName}</strong></p>
                      <p><strong>住所:</strong> ${address.addr}</p>
                      <p><strong>郵便番号:</strong> ${address.postalCode}</p>
                      <p><strong>緯度:</strong> ${address.lat}</p>
                      <p><strong>経度:</strong> ${address.lng}</p>
                    </div>`
        });

        marker.addListener('click', () => {
          infoWindow.open(map, marker);
        });
      }
    });
Stylesheet.html
CSS部分です。こちらをコピペしただけです。
<style>
  #map {
    height: 100%;
  }

  /*
  * Optional: Makes the sample page fill the window.
  */
  html,
  body {
    height: 100%;
    margin: 0;
    padding: 0;
  }
</style>
デプロイ
これらのファイルを作成した上でWebアプリとしてデプロイすると、「はじめに」でお見せした以下のような画面が確認できるかと思います。デプロイの手順はこちらをご確認ください。
まとめ
スプレッドシートとGASだけで、地図上に情報を載せることができました。
位置情報を持つデータについては地図上に可視化することで新たな発見が得られることもあると思いますので、興味のある方は試してみてください。