前置き
-
時々しかいじらない設定や操作って、いざ使いたい時に忘れてるので、ここに記述しておきます。
-
eclipse oxygen(4.7.3a) , eclipse 2019-03 で確認してますが、他のバージョンでも大きく変わらないはず。
編集操作
- プロジェクト内での一括名前変更
- 対象文字を選択 -> [Refactor] -> [Rename]
- 対象文字を選択 -> Shift + Alt + R
画面や文字の色
-
画面のテーマ
- [window]->[Preferences]->[General]->[Appearance]
-
テキストエディタのフォントとサイズ
-
[window]->[Preferences]->[General]->[Appearance]->[Color ans Fonts]
-
テキストエディタ C++構文の 色
-
[window]->[Preferences]->[C/C++]->[Editor]->[Syntax Coloring]
-
テキストエディタ背景色
-
[window]->[Preferences]->[General]->[Editors]->[Text Editor]
-
コンソールの背景色
-
[window]->[Preferences]->[C/C++]->[Build]->[Console]
-
Makefileの文字色
-
[window]->[Preferences]->[C/C++]->[Build]->[Makefile Editor] の Syntaxタブ defaultのColor
-
ShelScriptの文字色
-
[window]->[Preferences]->[Shell Script]->[Editor] の Syntaxタブ defaultのColor
-
Darkest Dark 内のテーマ選択
-
[window]->[Preferences]->[DevStyle]->[Color Themes]
Perspective
- インストール直後だと デバッガ画面 や Git画面への 切り替えボタンがでてない。→ 変更ボタンを出したい。
-
画面右上の
 ボタンを押下。
 -
↑で開いた画面から [Debug] と [Git] を選択。
-
画面右上に
 と反映される。
-
Perspective の Sub Window 構成のリセット
- 画面構成のリセット
- [window]->[Perspective]->[Reset Perspective]
- タブやビューを不用意に消した場合には、一旦、デフォルトの画面構成に戻した方が速そう。
RemoteSystemsTempFiles を生成させない
- Window - > Preferences - > General - > Startup and Shutdown 画面 "RSE UI"のチェックを外す。
- RemoteSystemsTempFiles は削除。
- .metadata を削除し、projectを読み直す。
理由
- autotools で configure で生成する MakeFile ファイルを eclipse で読み込む際、RemoteSystemsTempFiles ディレクトリが存在すると、Build時に MakeFileが意図しないワーニングメッセージを出力し、eclipse のコンソールに表示され、Buildの成否の出力が隠れ、Buildが失敗したように見える。
Makefile から読み込んだ projectで、std::unique_ptr が 赤波線でエラー(undefined reference)扱いとなる状況への対処方法
- Build は 通るので、eclipse CDT の Index 周りの設定が不足している。
解消方法
読み込み済み project のための 対処方法
- [Project Explorer]で該project を選択し右クリック→ Properties → C/C++ General → Preprocessor Include Paths, Marcos etc. → Providers [tab]
- CDT GCC Build-in Compiler Settings を有効化。
- Command to get compiler specs: に
-std=c++11を追加。
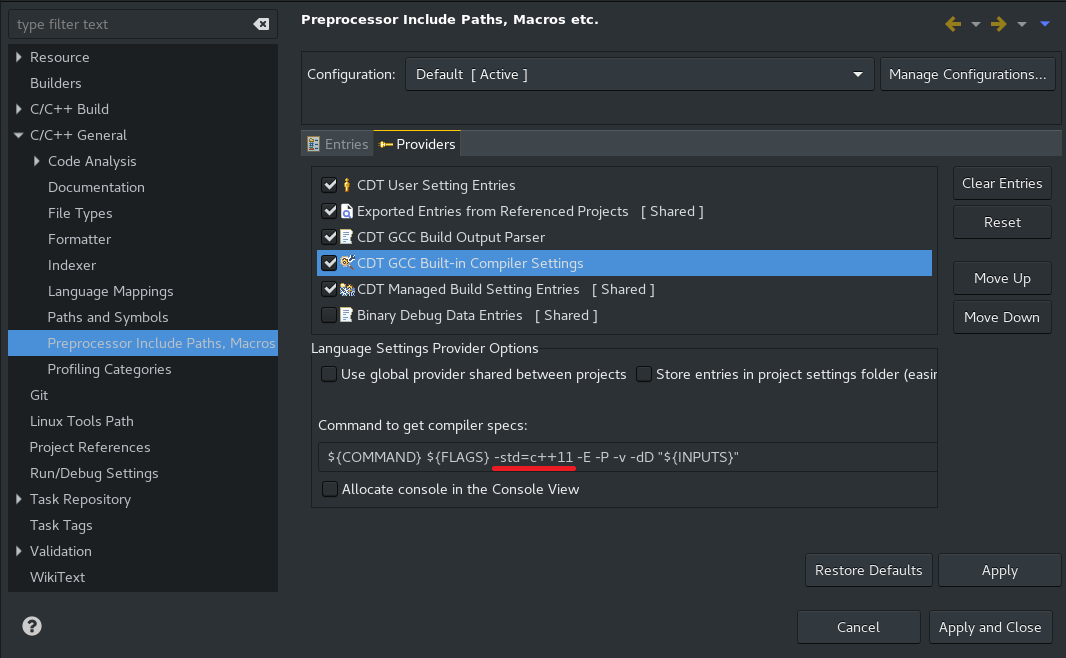
- Apply and close ボタンを押下
- [Project Explorer]で該project を選択し右クリック→ Clean Project
- [Project Explorer]で該project を選択し右クリック→ Build Project
- [Project Explorer]で該project を選択し右クリック→ Index → Freshen All Files.
今後 読み込む project のための 設定変更
- Window → Preferences → C/C++ → Build → Settings → Discovery → CDT GCC Build-in Compiler Settings
- CDT GCC Build-in Compiler Settings を有効化。
- Command to get compiler specs: に
-std=c++11を追加。

- Apply and close ボタンを押下
他のプロジェクト の ファイル参照
- [Project Explorer]で該project を選択し右クリック→ Properties → Project References
Eclipse-CDT の Formatter の profile に GoogleのC++コード規約のスタイルを適用する。
XMLファイル
-
https://github.com/google/styleguide/blob/gh-pages/eclipse-cpp-google-style.xml
- ↑の内容を、~/eclipse/あたりに、eclipse-cpp-google-style.xml の名で保存する。
取り込み方
- eclipse から
Window→Preferences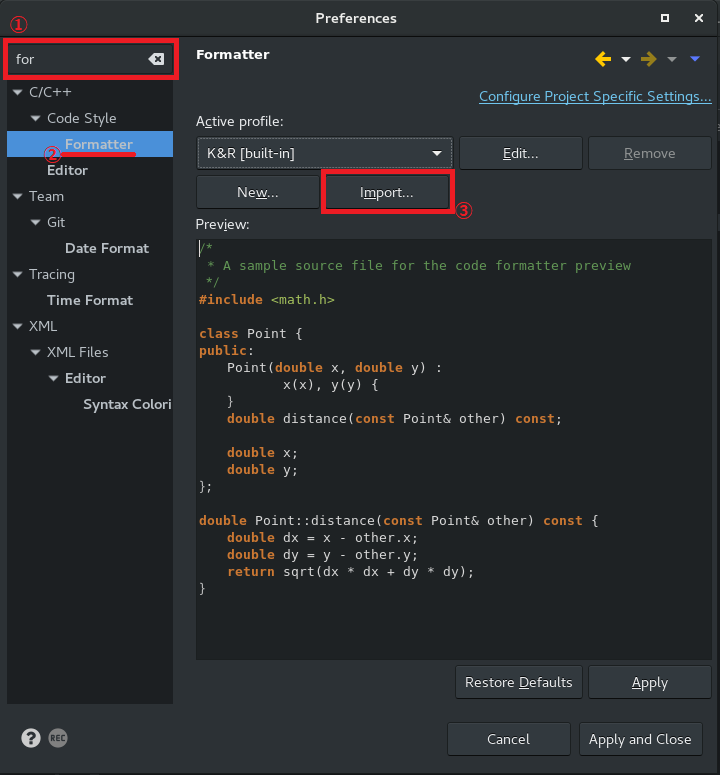
- ① の 検索欄で formatter で検索 (for あたりで目的の項目が出現する)
- ② の
C/C++/Code下のFormatterを選択する。 - ③ の
Importボタンを押下し、先程保存した eclipse-cpp-google-style.xml を選択する。
ソースコードへの スタイルの適応方法
- 該当ソースファイルを eclipse の editer で開く。
- スタイル変更のコマンドは、1ファイル毎。(プロジェクト単位の一括変更は行えない)
-
CTRL+SHIFT+Fキーを押下。 -
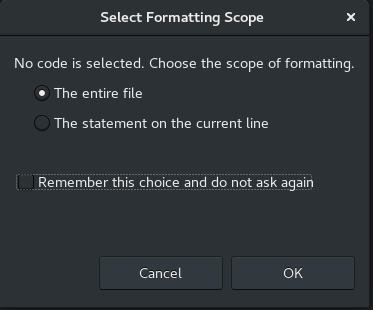
- この画面にて
OKボタンを押下。- スタイル変更が行われる。