1. はじめに
前回の記事では、AWS マネジメントコンソールと、AWS CLIによる費用確認方法を紹介しました。今回は、プログラミングによるREST API操作と、Lambdaへのデプロイについて解説します。
- AWS費用監視ツール(前編:AWS マネジメントコンソール&AWS CLI)
- AWS費用監視ツール(後編:Lambda活用) ← 本記事
本編は、次の2つの章立てになっています:
- 2章「プログラム(Python)による確認」
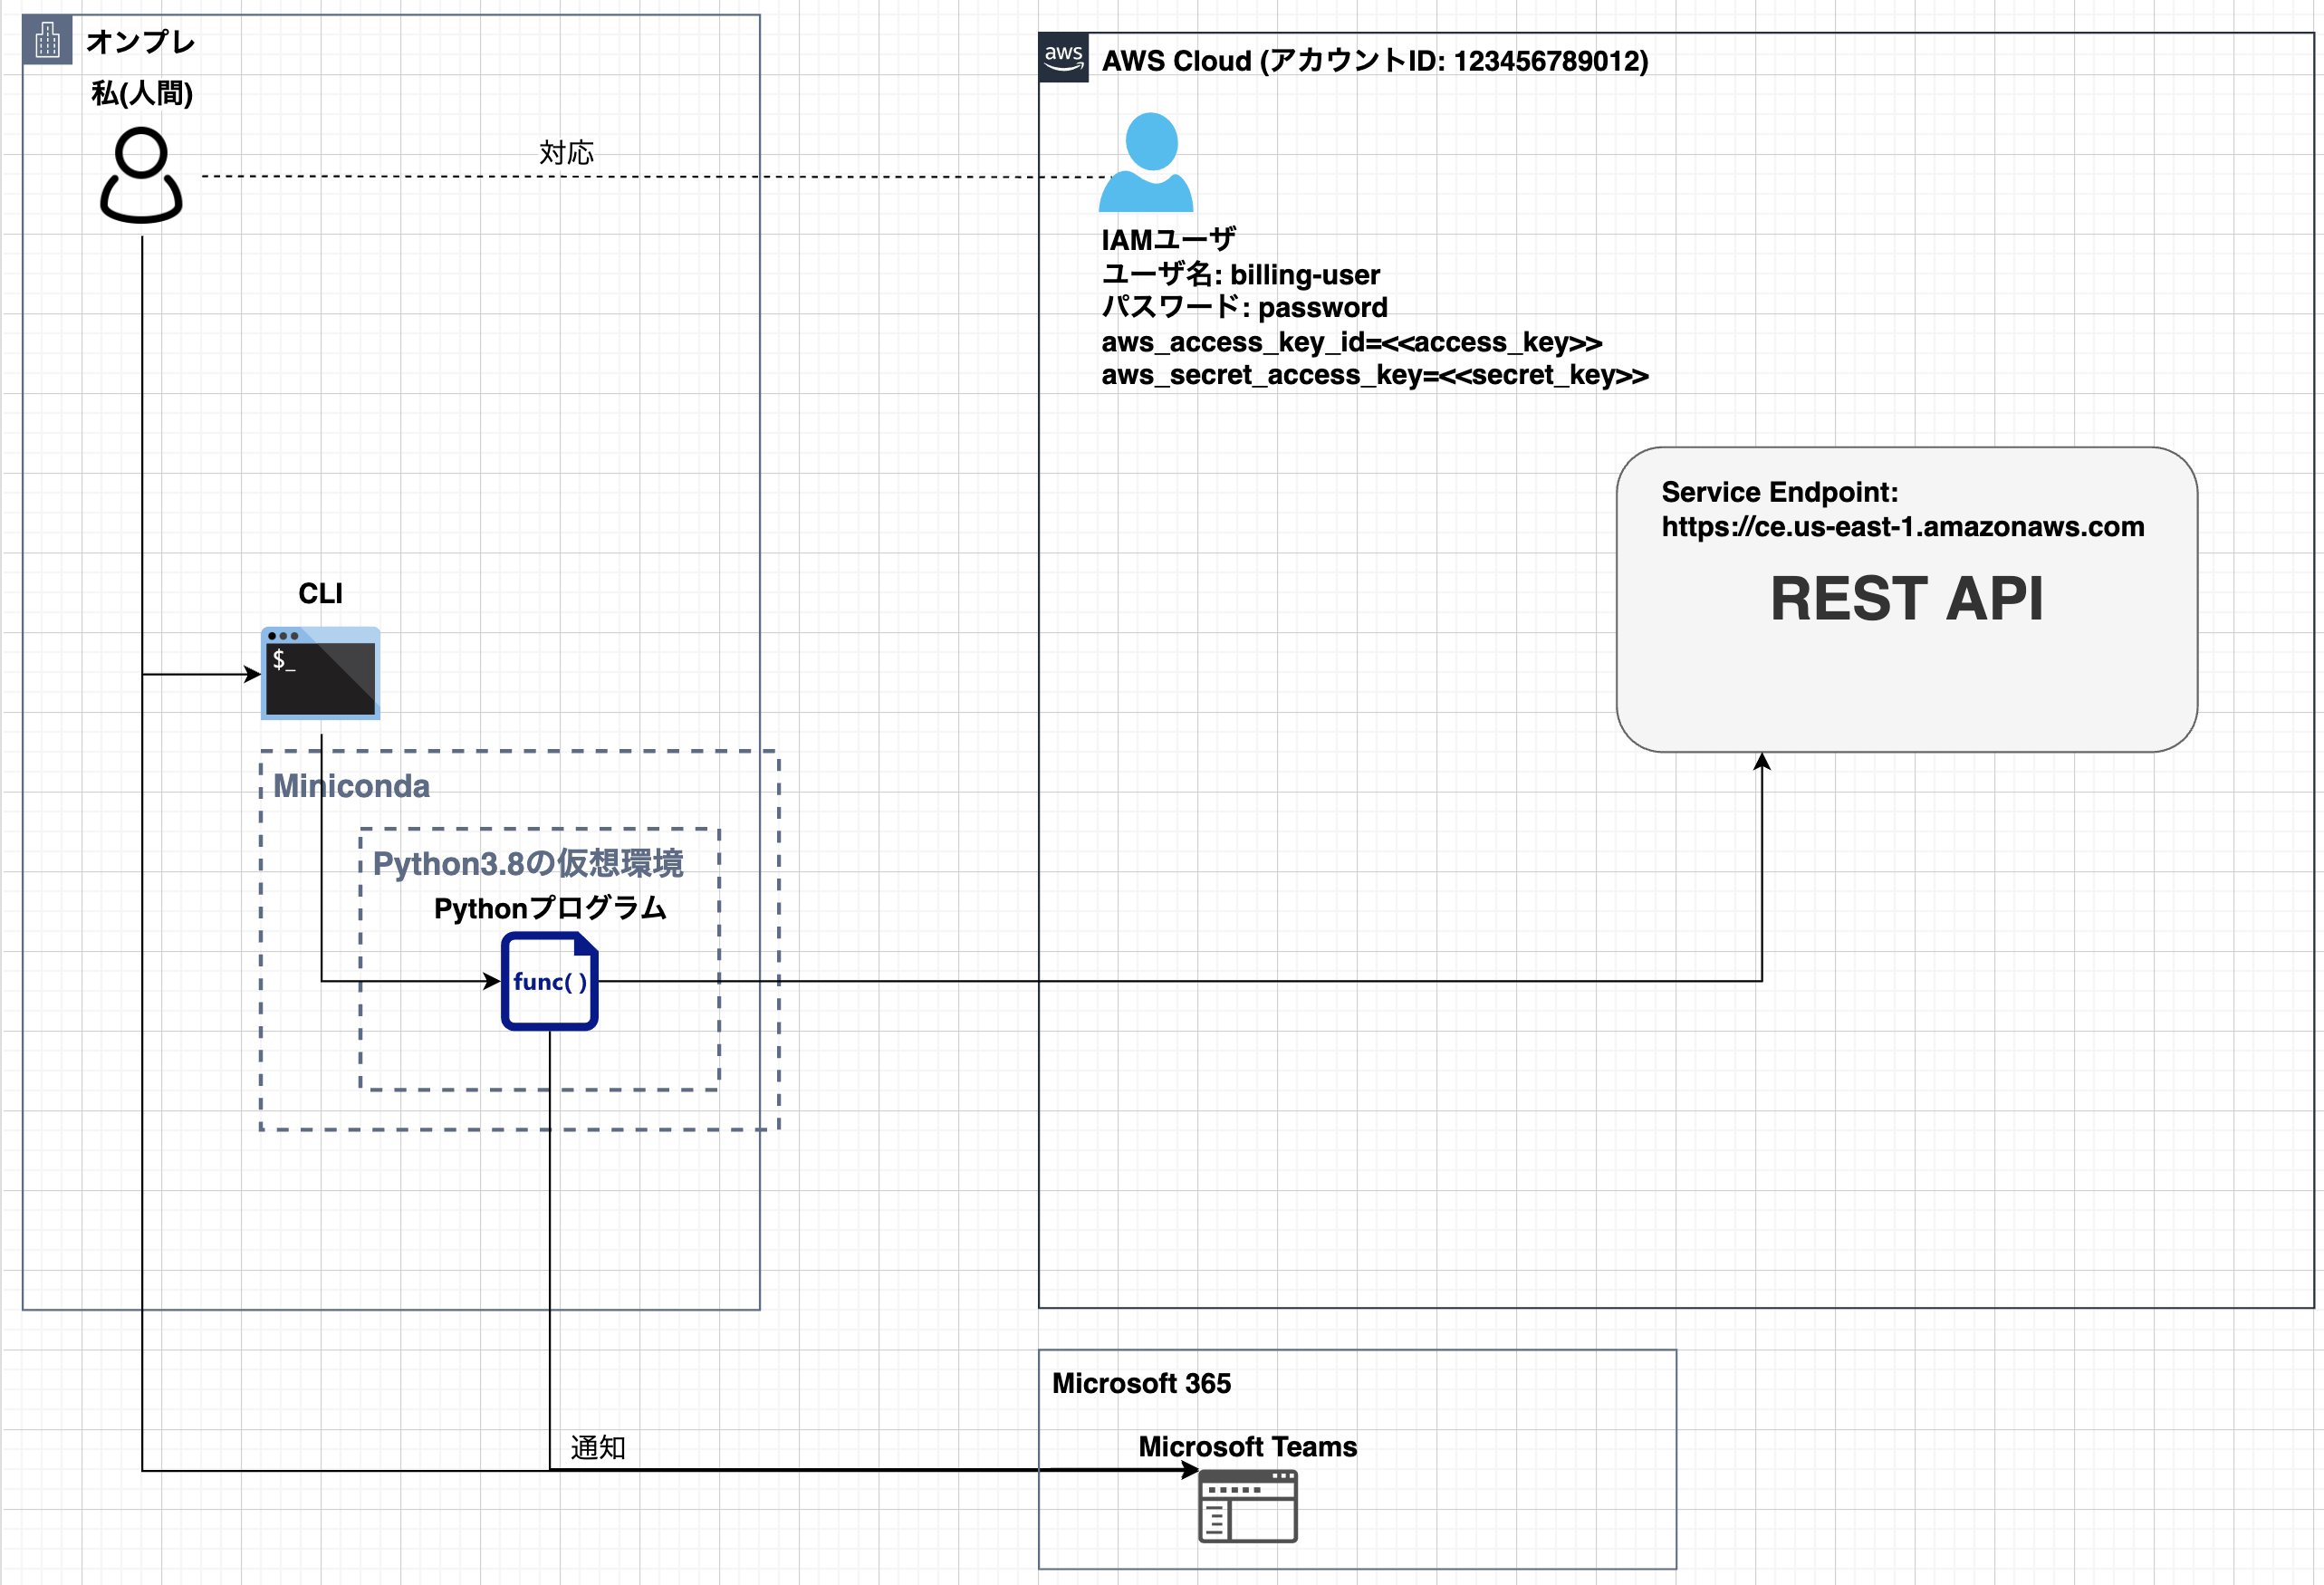
- AWS CLIに代わってプログラムからREST APIを操作します。ここではプログラミング言語としてPythonを使いましたが、(SDKがサポートされている)好きなプログラミング言語を使用できます(下記参照)。
- 3章「Lambdaへのデプロイ (AWS SAMフレームワーク)」
- 2章で作成したPythonのロジックをベースにLambdaに移植します。この章では、サーバレスフレームワークのAWS SAMを使います。「ステップ・バイ・ステップ」という観点では「(1)AWS マネジメントコンソールを使ってLambdaなどリソースを手動構築する」「(2)CloudFormationを利用することで構築操作を自動化(テンプレート化)する」「(3)AWS SAMを使う」と説明手順を分解することも可能ですが、今回は1〜2を省略、いきなり3の解説になります^^;。ご了承下さいm(_ _)m
2. プログラム(Python)による確認
2-1. Python実行環境
Pythonが使える環境を準備します。やり方はネット上に沢山解説がありますので、それらを参照して下さい。私はMiniconda(Pythonのディストリビューションの一つ)を使いました。詳細は「付録: Python実行環境の準備(Miniconda)」を参考にしてください。
2-2. Pythonコード
次に、コードを記載していきます。AWSのREST APIを利用するために「AWS SDK for Python (Boto3)」というSDKを使います(SDKは、プログラミング毎に準備されるツールです)。
Pythonでは、「boto3」と呼ばれるモジュールを使います。boto3の使い方については、APIリファレンスを活用します。
また、今回Microsoft Teamsへ結果をプッシュ配信するため、「requests」と呼ばれるPythonのモジュールも利用します。以上、「boto3」と「requests」を、お使いのPython実行環境に合せインストールしてください。
付録のMinicondaを使っている場合は、(pipコマンドでなく)condaコマンドでライブラリをインストールします。
(billing-3.8) % conda install boto3 requests
AWS費用出力スクリプトを準備しましょう。
import os
import json
import boto3
import requests
from datetime import datetime, timedelta, date
from typing import Union

USE_TEAMS_POST="no"
# USE_TEAMS_POST="yes"

if USE_TEAMS_POST == "yes":
#    TEAMS_WEBHOOK_URL =  "https://<YOUR DOMAIN>>.webhook.office.com/webhookb2/XXXXXXXXX"
    TEAMS_WEBHOOK_URL = os.environ['TEAMS_WEBHOOK_URL']

# 集計期間自動設定(今月初め〜本日)
def get_date_range() -> Union[str,str]:
    start_date = date.today().replace(day=1).isoformat()
    end_date = date.today().isoformat()
    if start_date == end_date:
        end_of_month = datetime.strptime(start_date, '%Y-%m-%d') + timedelta(days=-1)
        begin_of_month = end_of_month.replace(day=1)
        return begin_of_month.date().isoformat(), end_date
    return start_date, end_date
(start_date, end_date) = get_date_range()

# 集計期間手動設定(不要ならコメントアウト)
(start_date, end_date) = ("2021-11-01", "2021-12-01")

# REST API(get_cost_and_usage)のパラメータ設定
MY_PERIOD={
    'Start': start_date,
    'End': end_date
}

MY_GRANULARITY='MONTHLY'

MY_FILTER={
    'Not': {
        'Dimensions': {
            'Key': "RECORD_TYPE",
            'Values': ["Credit"]
        }
    }
}

MY_METRIC='AmortizedCost'

MY_GROUP_BY= {
    'Type': 'DIMENSION',
    'Key': 'SERVICE'
}

def get_total_cost(inCredit:bool, client) -> str:
    if inCredit:
        response = client.get_cost_and_usage(
            TimePeriod=MY_PERIOD,
            Granularity=MY_GRANULARITY,
            Metrics=[MY_METRIC]
        )
    else:
        response = client.get_cost_and_usage(
            TimePeriod=MY_PERIOD,
            Granularity=MY_GRANULARITY,
            Filter=MY_FILTER,
            Metrics=[MY_METRIC]
        )

    return response['ResultsByTime'][0]['Total'][MY_METRIC]['Amount']

def get_service_costs(inCredit:bool, client) -> list:
    if inCredit:
        response = client.get_cost_and_usage(
            TimePeriod=MY_PERIOD,
            Granularity=MY_GRANULARITY,
            Metrics=[MY_METRIC],
            GroupBy=[MY_GROUP_BY]
        )
    else:
        response = client.get_cost_and_usage(
            TimePeriod=MY_PERIOD,
            Granularity=MY_GRANULARITY,
            Filter=MY_FILTER,
            Metrics=[MY_METRIC],
            GroupBy=[MY_GROUP_BY]
        )

    billings = []

    for item in response['ResultsByTime'][0]['Groups']:
        billings.append({
            'service_name': item['Keys'][0],
            'billing': item['Metrics'][MY_METRIC]['Amount']
        })
    return billings

def get_services_msg(service_billings: list) -> dict:
    servicess = []
    for item in service_billings:
        service_name = item['service_name']
        billing = round(float(item['billing']), 2)
        if billing == 0.0: continue
        servicess.append(f'- {service_name}: {billing:.2f}')
    return servicess

def post_teams_webhook(title: str, services: str) -> None:
    payload = {
        "title": title,
        "text": services
    }

    try:
        response = requests.post(TEAMS_WEBHOOK_URL, data=json.dumps(payload))
    except requests.exceptions.RequestException as e:
        print(e)
    else:
        print("Teams Webhook Response(Status Code): " + str(response.status_code))

if __name__ == '__main__':
    client = boto3.client('ce', region_name='us-east-1')

    start_day = (datetime.strptime(start_date, '%Y-%m-%d')).strftime('%m/%d')
    end_yesterday = (datetime.strptime(end_date, '%Y-%m-%d') - timedelta(days=1)).strftime('%m/%d')

    # クレジット適用後費用
    print("------------------------------------------------------")
    total_cost_after_credit = round(float(get_total_cost(True, client)), 2)
    title = f'{start_day} - {end_yesterday}のクレジット適用後費用は{total_cost_after_credit:.2f}(USD)です.'
    print(title)
    services_cost_after_credit = get_services_msg(get_service_costs(True, client))
    print('\n'.join(services_cost_after_credit))
    if USE_TEAMS_POST == "yes":
        post_teams_webhook(title, '\n\n'.join(services_cost_after_credit))

    # クレジット適用前費用
    print("------------------------------------------------------")
    total_cost_before_credit = round(float(get_total_cost(False, client)), 2)
    title = f'{start_day} - {end_yesterday}のクレジット適用前費用は{total_cost_before_credit:.2f}(USD)です.'
    print(title)
    services_cost_before_credit = get_services_msg(get_service_costs(False, client))
    print('\n'.join(services_cost_before_credit))
    print("------------------------------------------------------")
    if USE_TEAMS_POST == "yes":
        post_teams_webhook(title, '\n\n'.join(services_cost_before_credit))
2-3. 実行&結果確認
では、実際に試してみます。
# AWSプロファイルを設定
export AWS_PROFILE=billing-user

# 実行
% python app_shell.py
------------------------------------------------------
11/01~11/30のクレジット適用後費用は、209.13 (USD)です。
- AWS Config: 31.23
- AWS Cost Explorer: 2.42
(中略)
- Tax: 19.02
------------------------------------------------------
11/01~11/30のクレジット適用前費用は、440.21 (USD)です。
- AWS Config: 31.23
- AWS Cost Explorer: 5.41
(中略)
- Tax: 19.02
------------------------------------------------------
如何でしょうか?うまく表示できましたか?プログラム(Python)による確認は以上になります。
3. Lambdaへのデプロイ (AWS SAMフレームワーク)
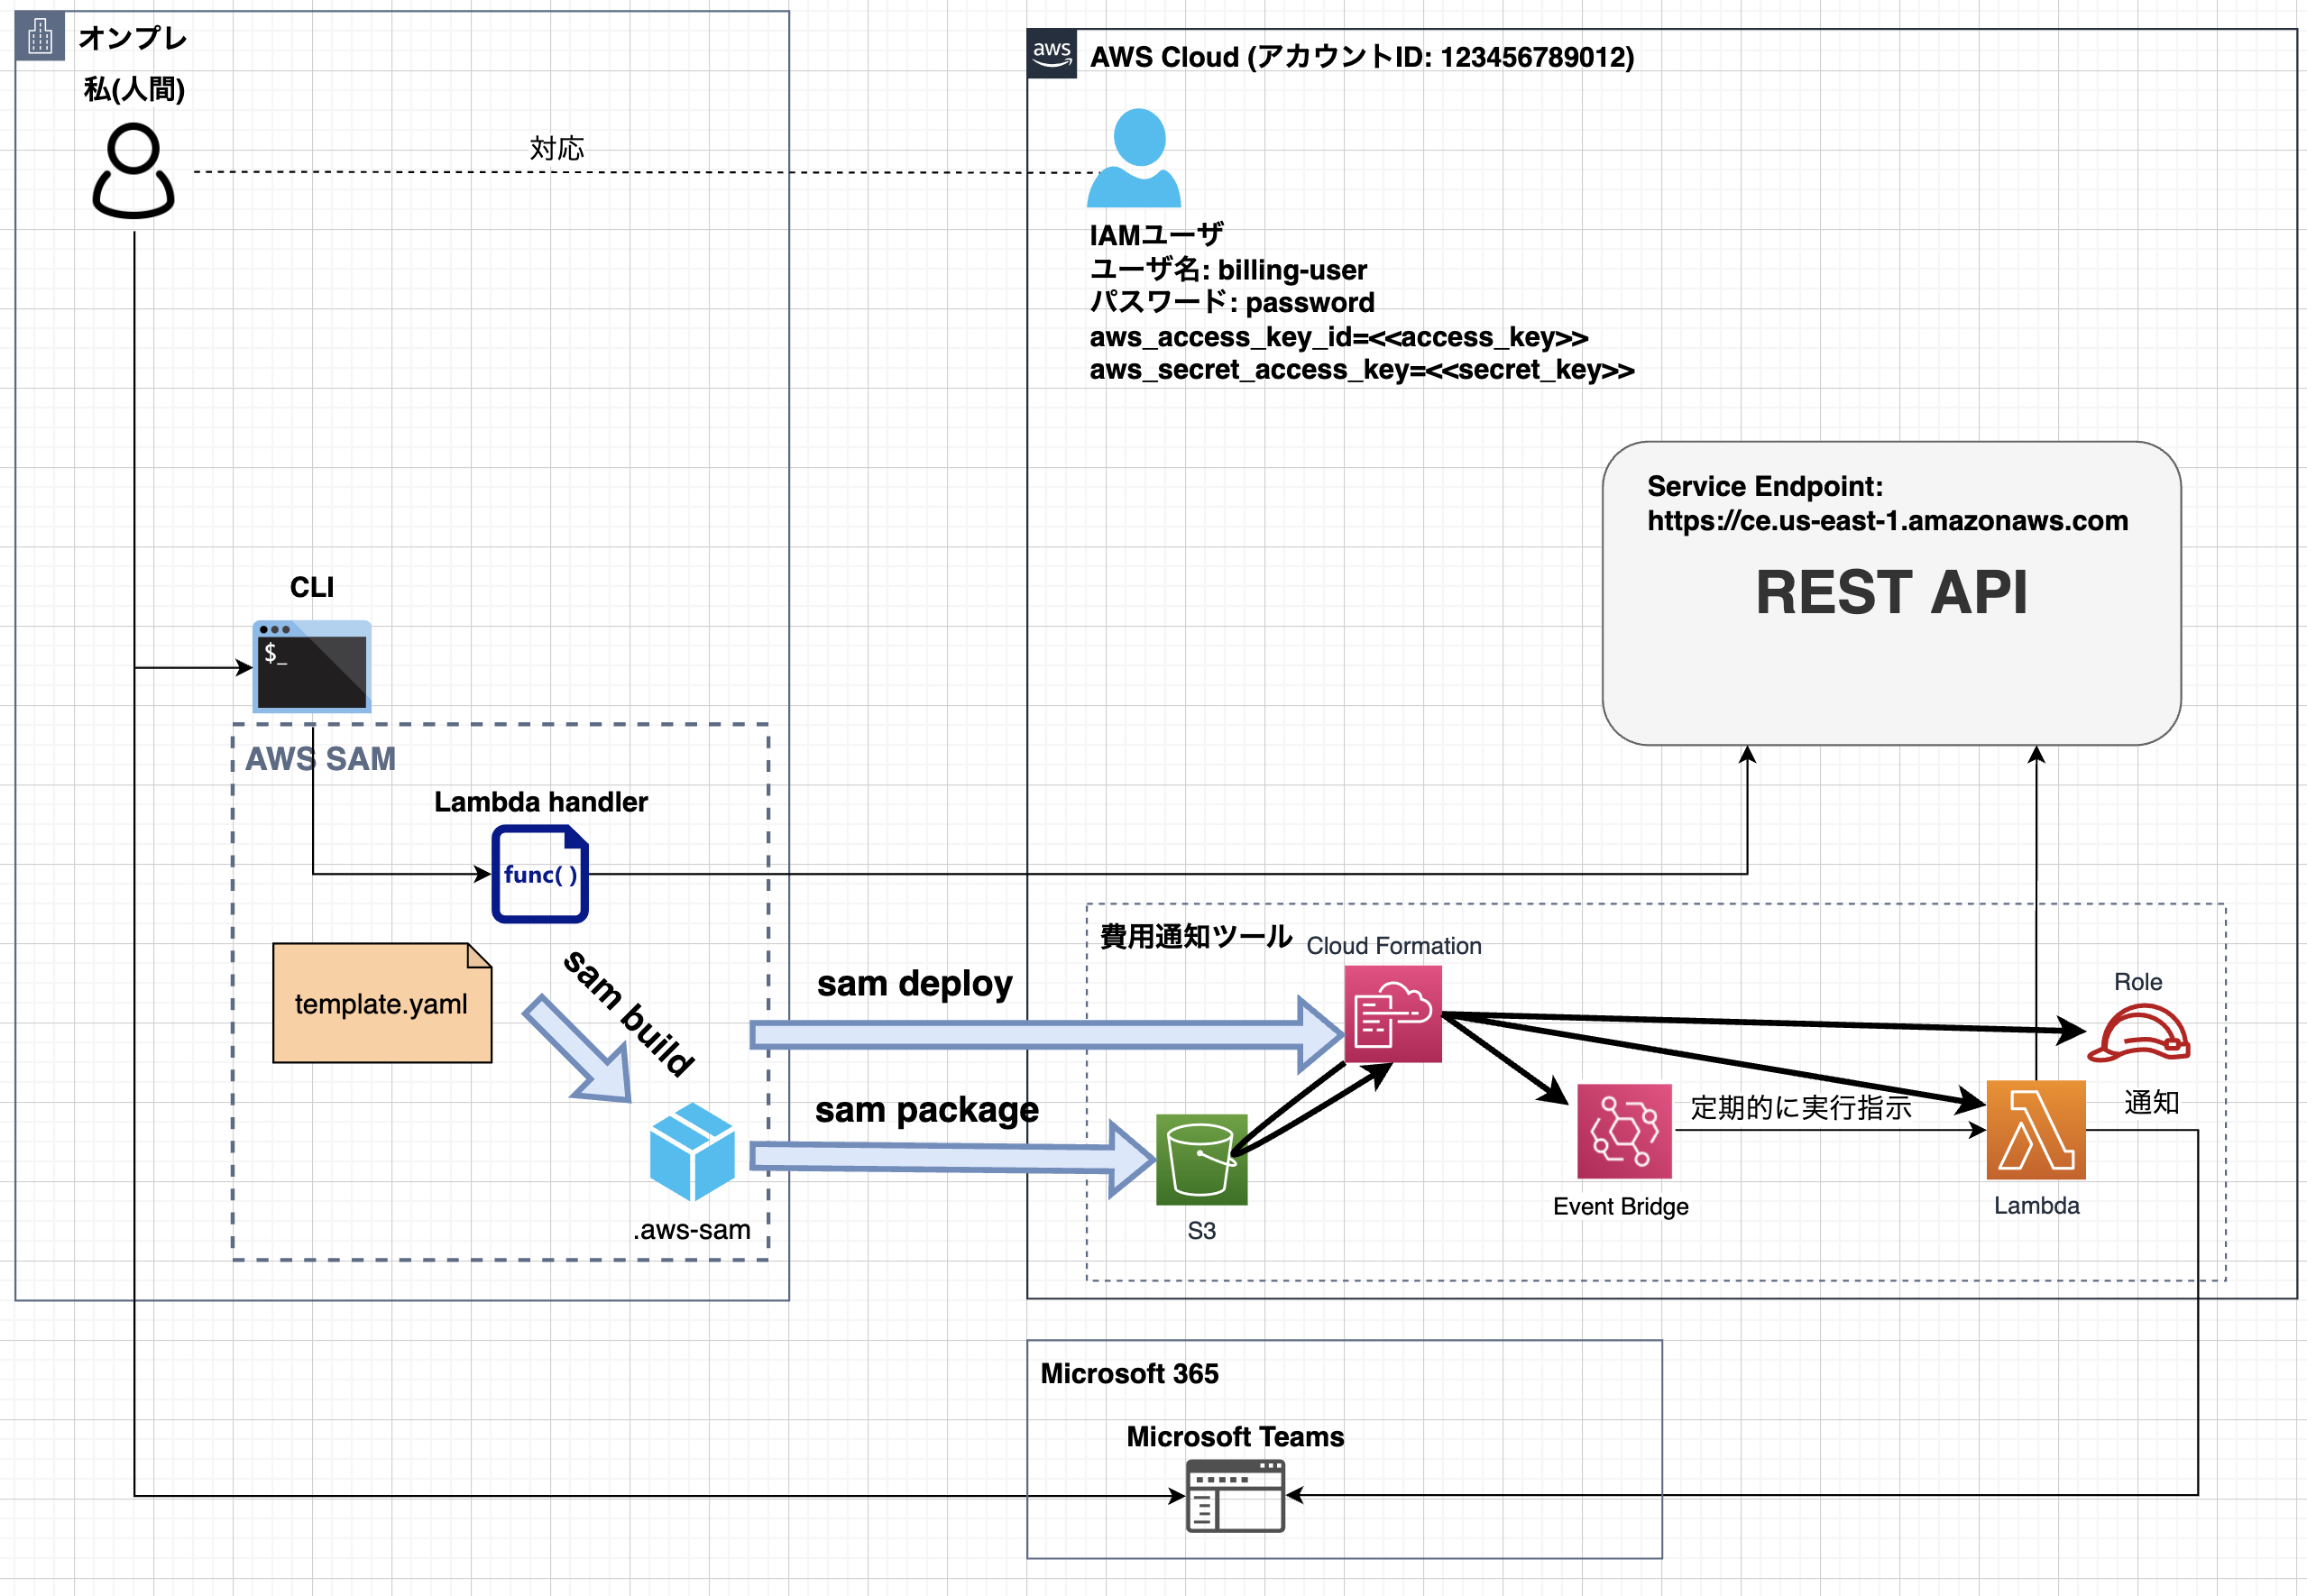
それでは最後に、AWS SAMを使った「LambdaからMicrosoft Teamsへ費用の通知システム」を構築します。AWS SAM(Serverless Application Model)は、AWSでのサーバレスアプリケーション開発を効率的にするためのフレームワークです。CloudFormationに比べて、より簡略化した定義(テンプレート)が使えますし、(今回は手を出してませんが)CI/CDへの組込みも容易になります。詳細は、下記ドキュメントを参照して下さい。
3-1. AWS SAMプロジェクト
SAMのプロジェクトを作って、カスタマイズしていきます。
sam init --runtime python3.8 --name <<好きなプロジェクト名>>
.
├── README.md
├── __init__.py
├── aws_billing_app
│   ├── __init__.py
│   ├── app.py
│   ├── model
         |-(省略)
│   └── requirements.txt
├── buildAnddeploy.sh       <=== ビルド&デプロイスクリプト
├── conftest.py
├── events
│   └── event.json
├── packaged.yaml
├── template.yaml
└── tests
     |-(省略)
3-2. SAMテンプレート
AWSTemplateFormatVersion: '2010-09-09'
Transform: AWS::Serverless-2016-10-31
- Description:
-   sample
-   Sample SAM Template for sample
+ Description: Notify AWS billing

Globals:
  Function:
-    Timeout: 3
+    Timeout: 30

+ Parameters:
+   TeamsWebhookUrl:
+     Type: String
+     Default: default-value

Resources:
+   BillingIamRole:
+       Type: AWS::IAM::Role
+       Properties:
+         AssumeRolePolicyDocument:
+           Version: "2012-10-17"
+           Statement:
+             - Effect: Allow
+               Principal:
+                 Service: lambda.amazonaws.com
+               Action: "sts:AssumeRole"
+         Policies:
+           - PolicyName: "BillingNotificationToTeamsLambdaPolicy"
+             PolicyDocument:
+               Version: "2012-10-17"
+               Statement:
+                 - Effect: Allow
+                   Action:
+                     - "logs:CreateLogGroup"
+                     - "logs:CreateLogStream"
+                     - "logs:PutLogEvents"
+                     - "ce:GetCostAndUsage"
+                     - "sns:*"
+                   Resource: "*"

-   HelloWorldFunction:
+   BillingNotificationFunction:
      Type: AWS::Serverless::Function
      Properties:
-       CodeUri: hello_world_function
-       Handler: hello_world/app.lambda_handler
+       CodeUri: aws_billing_app/
+       Handler: app.lambda_handler
        Runtime: python3.8
        Architectures:
          - x86_64
+       Environment:
+         Variables:
+           TEAMS_WEBHOOK_URL: !Ref TeamsWebhookUrl
+       Role: !GetAtt BillingIamRole.Arn
        Events:
-         HelloWorld:
-           Type: CloudWatchEvent # More info about CloudWatchEvent Event Source: https://github.com/awslabs/serverless-application-model/blob/master/versions/2016-10-31.md#cloudwatchevent
+         NotifyTeams:
+           Type: Schedule
            Properties:
-             Pattern:
-               source:
-                 - aws.ec2
-               detail-type:
-                 - EC2 Instance State-change Notification
+             Schedule: cron(0 0 * * ? *)

Outputs:
- HelloWorldFunction:
-   Description: "Hello World Lambda Function ARN"
-   Value: !GetAtt HelloWorldFunction.Arn
- HelloWorldFunctionIamRole:
-   Description: "Implicit IAM Role created for Hello World function"
-   Value: !GetAtt HelloWorldFunctionRole.Arn
+ BillingNotificationFunction:
+   Description: "Billing Notification Lambda Function ARN"
+   Value: !GetAtt BillingNotificationFunction.Arn
+ BillingNotificationFunctionIamRole:
+   Description: "Implicit IAM Role created for Billing Notification function"
+   Value: !GetAtt BillingIamRole.Arn
3-3. プログラム(Lambdaハンドラー)
2-2節にある「app_shell.py」を修正します。下記のように「if __name__ == '__main__':」のコードブロックを削除し、代わりに「def lambda_handler(event, context) -> None:」のコードブロック(関数)を追加すればok!
(中略)
if __name__ == '__main__':
    client = boto3.client('ce', region_name='us-east-1')
    ・
    ・
    ・
(中略)
↑を削除、↓を追加。
(中略)
def lambda_handler(event, context) -> None:
    client = boto3.client('ce', region_name='us-east-1')

    start_day = (datetime.strptime(start_date, '%Y-%m-%d')).strftime('%m/%d')
    end_yesterday = (datetime.strptime(end_date, '%Y-%m-%d') - timedelta(days=1)).strftime('%m/%d')

    # クレジット適用後費用
    total_cost_after_credit = round(float(get_total_cost(True, client)), 2)
    title = f'{start_day} - {end_yesterday}のクレジット適用後費用は{total_cost_after_credit:.2f}(USD)です.'
    services_cost_after_credit = get_services_msg(get_service_costs(True, client))
    post_teams_webhook(title, '\n\n'.join(services_cost_after_credit))

    # クレジット適用前費用
    total_cost_before_credit = round(float(get_total_cost(False, client)), 2)
    title = f'{start_day} - {end_yesterday}のクレジット適用前費用は{total_cost_before_credit:.2f}(USD)です.'
    services_cost_before_credit = get_services_msg(get_service_costs(False, client))
    post_teams_webhook(title, '\n\n'.join(services_cost_before_credit))
(中略)
細かいですが、Lambdaの方は(app_shell.pyにある)下記も不要です。
- USE_TEAMS_POST="no"
- #USE_TEAMS_POST="yes"
-
- if USE_TEAMS_POST == "yes":
- #    TEAMS_WEBHOOK_URL =  "https://<YOUR DOMAIN>>.webhook.office.com/webhookb2/XXXXXXXXX"

- #特定の期間に上書きする場合
- start_date = "2021-11-01"
- end_date = "2021-11-30"
3-4. デプロイ
AWS SAMを用いたデプロイ用にスクリプとを準備します。通知先となるMicrosoft TeamsのURLは、下記を参考に取得して下さい。
# !/bin/sh
set -eu

# aws-root
AWS_PROFILE=billing-user
S3_BACKET=<your backet name>
TEAMS_WEBHOOK_URL=<Teams Webhook URL>

echo "Start sam build command."
sam build

echo "Start sam package command."
sam package \
    --output-template-file packaged.yaml \
    --s3-bucket $S3_BACKET

echo "Start sam deploy command."
sam deploy \
    --template-file packaged.yaml \
    --stack-name NotifyBillingToTeams \
    --capabilities CAPABILITY_IAM \
    --parameter-overrides TeamsWebhookUrl=$TEAMS_WEBHOOK_URL
スクリプトを実行します。
(billing-3.8) % ./buildAnddeploy.sh
Start sam build command.
(中略)
Build Succeeded
Built Artifacts  : .aws-sam/build
Built Template   : .aws-sam/build/template.yaml
・
(中略)
・
Successfully created/updated stack - NotifyBillingToTeams in None
以上でビルド成果物がS3へアップロードされ、CloudFormation経由でLambdaなどリソースが作成されました。
3-5. 実行&結果
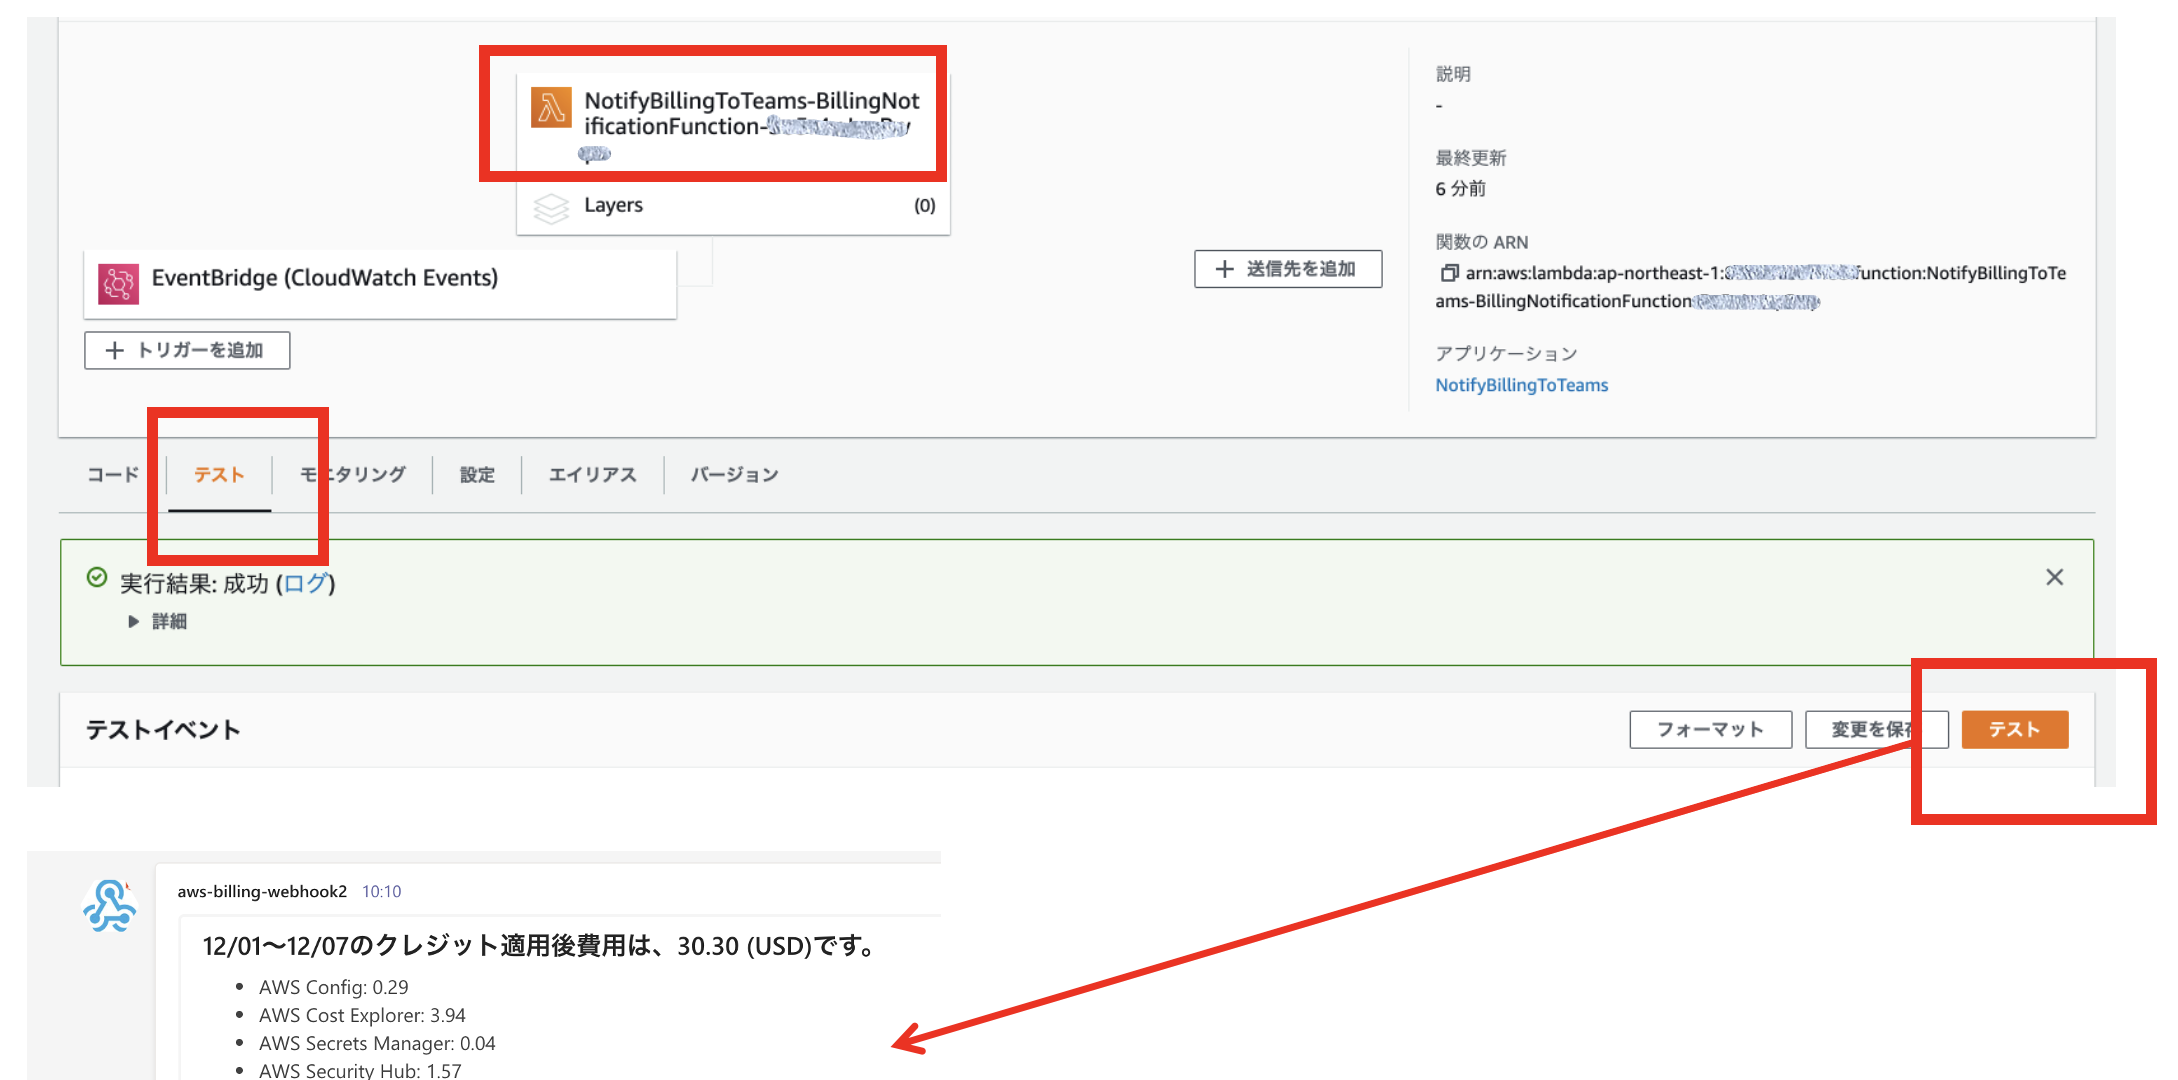
最後に、Lambdaの[テスト]で、Teamsへ通知されるか確認します。
無事、Microsoft Teamsへ通知されたでしょうか?以上で検証は完了です。
3-6. 削除
削除は、下記コマンドで行います。以前はdeleteがサポートされておらず、CloudFormationのスタックを手動で削除していましたが、このdeleteオプションのサポートにより、sam packageでアップロードしたS3の成果物の消し忘れなどが無くなりました。
(billing-3.8) % sam delete --stack-name NotifyBillingToTeams
    Are you sure you want to delete the stack NotifyBillingToTeams in the region ap-northeast-1 ? [y/N]: y
	Do you want to delete the template file XXXXXXXXXXXXXXX.template in S3? [y/N]: y
(中略)
Deleted successfully
CloudFormationのスタック、及びS3にアップロードされた成果物が削除されていることを確認します。
4. まとめ
以上、AWS費用の可視化を中心に、管理ポータル、AWS CLI、Lambdaを使った通知ツール作成(サーバレスアプリケーション構築)を説明しました。AWSクラウドを操作するUIは複数ありますが、最終的には全てのクラウドリソースがREST APIを通して操作されているという感触が掴めたでしょうか?
最後に筆者の経験上、クラウドのGUI(管理ポータル)は変化・成長が激しく、1年前に準備した手順書(スクリーンショット)がガラッと代わっていて、メンテナンスが大変といった事がありました。AWS CLIやREST APIは、GUIと比較すると変更は緩やかです。そういう観点では、操作手順書は極力CLIベースにするといったチャレンジも、今後必要かなと感じております。その時、本記事が、GUI、CLI、REST APIの関係理解のお役に立てると幸いです。
- Amazon Web Services、および、その他のAWS 商標は、米国およびその他の諸国におけるAmazon.com, Inc.またはその関連会社の商標です。
- Microsoft 365、Microsoft Teamsは、米国Microsoft Corporationおよびその関連会社の米国およびその他の国における登録商標または商標です。
- その他、本資料に記述してある会社名、製品名は、各社の登録商品または商標です。
付録: Python実行環境の準備(Miniconda)
Pythonの実行環境準備ですが、今回は(私が使い慣れている)Anaconda(正確にはGUIなどを抜いているMiniconda)を活用しました。Miniconda環境のインストールは、下記をご覧下さい。
無事Minicondaが使えるようになったら、検証用の仮想環境を作成します。
# minicondaインストール初期状態。仮想環境の確認。baseのみ。
(base) % conda info -e
# conda environments:
#
base                  *  /Users/<user-name>/opt/anaconda3
(中略)

# 仮想環境として、名前「billing-3.8」で作成。pythonのバージョンは(後述AWS SAMと合せ)3.8とする。
(base) % conda create -n billing-3.8 python=3.8
Collecting package metadata (current_repodata.json): done
Solving environment: done
(中略)

# 新規に「billing-3.8」が作成されていることを確認。
(base) % conda info -e
# conda environments:
#
base                  *  /Users/<user-name>/opt/anaconda3
billing-3.8              /Users/<user-name>/opt/anaconda3/envs/billing-3.8
(中略)

# 仮想環境「billing-3.8」をアクティベート
(base) % conda activate billing-3.8

# プロンプトが「base」から「billing-3.8」に変更されている事がわかる。
# 初期状態で、この仮想環境にインストールされているライブラリ表示。
(billing-3.8) % conda list
# packages in environment at /Users/<user-name>/opt/anaconda3/envs/billing-3.8:
#
# Name                    Version                   Build  Channel
ca-certificates           2021.10.26           hecd8cb5_2
certifi                   2021.10.8        py38hecd8cb5_0
libcxx                    12.0.0               h2f01273_0
libffi                    3.3                  hb1e8313_2
ncurses                   6.3                  hca72f7f_2
openssl                   1.1.1l               h9ed2024_0
pip                       21.2.4           py38hecd8cb5_0
python                    3.8.12               h88f2d9e_0
readline                  8.1                  h9ed2024_0
setuptools                58.0.4           py38hecd8cb5_0
sqlite                    3.36.0               hce871da_0
tk                        8.6.11               h7bc2e8c_0
wheel                     0.37.0             pyhd3eb1b0_1
xz                        5.2.5                h1de35cc_0
zlib                      1.2.11               h1de35cc_3

# pythonバージョン確認
(billing-3.8) % python -V
Python 3.8.12


