この記事はNextremer Advent Calendar 2019の24日目の記事です(遅刻ですが)。
あらまし
Blenderは3Dグラフィクス用のモデルデータを作成したりするためのソフトウェアです。ソースコードは公開されておりGPL-v3.0でライセンスされた自由なソフトウェアです。Blenderにはスクリプト言語としてPythonが組み込まれており、UIの操作等を自動化できるようです。
プログラムから操作できるということは、Processingでジェネラティブアートをやるように、オブジェクトをたくさん作って配置したりして遊ぶことができるのではないかしら? そう思って調べると以下のような記事がでてきます。ありがたいですね。
ところで、オブジェクトの追加方法としては、BlenderのScriptingタブのコンソールで以下のようにやる方法が紹介されているようです。
# ファイルでやる場合は`import bpy`が必要
>>> bpy.ops.mesh.primitive_cube_add()
{'FINISHED'}
>>>
戻り値が{"FINISHED"}。ちなみにこれを起動直後のBlenderで行うと、Scene Collection>Collection以下にCube.001というオブジェクトが追加されます(すでにCubeというオブジェクトが置かれているため)。このCube.001の情報をprimitive_cube_add()の後に変更しようとしたらどうするかというと、こうします。
# Scene Collection内のCollectionの子要素から"Cube.001"という名前で引いてくる
>>> bpy.data.collections.data.objects['Cube.001']
bpy.data.objects['Cube.001']
ちなみにCube.001という名前は、もしCube.001が存在する状況でprimitive_cube_add()をやった後だとCube.002になります。つまり、UIの状態によって名前が異なる。ううむ、なんというか、通常のPythonプログラミング的には、作ったオブジェクトの名前をprimitive_cube_add()で返してほしい。
ちなみに調べるとどうもbpy.obsモジュールはUIの操作を関数として提供したモジュールのようです。
であるならば。
きっとUIの操作の中で呼ばれている、もっと低レベルなオブジェクトたちの生成・操作APIがあるに違いないです。
この記事では、そんなBlenderの低レベルなオブジェクト操作APIで遊んでみます。
動作環境
この記事の内容はBlenderの公式サイトで配布されているGNU/Linux版のBlender 2.81バイナリを利用しています。
$ blender -v
Blender 2.81 (sub 16)
        build date: 2019-12-04
        build time: 13:48:07
        build commit date: 2019-12-04
        build commit time: 11:32
        build hash: f1aa4d18d49d
        build platform: Linux
        build type: Release
        build c flags:  -Wall -Wcast-align -Werror=implicit-function-declaration -Werror=return-type -Werror=vla -Wstrict-prototypes -Wmissing-prototypes -Wno-char-subscripts -Wno-unknown-pragmas -Wpointer-arith -Wunused-parameter -Wwrite-strings -Wlogical-op -Wundef -Winit-self -Wmissing-include-dirs -Wno-div-by-zero -Wtype-limits -Wformat-signedness -Wnonnull -Wuninitialized -Wredundant-decls -Wshadow -Wno-error=unused-but-set-variable  -fuse-ld=gold -std=gnu11   -msse -pipe -fPIC -funsigned-char -fno-strict-aliasing -msse2 -D_GLIBCXX_USE_CXX11_ABI=0
        build c++ flags:  -Wredundant-decls -Wall -Wno-invalid-offsetof -Wno-sign-compare -Wlogical-op -Winit-self -Wmissing-include-dirs -Wno-div-by-zero -Wtype-limits -Werror=return-type -Wno-char-subscripts -Wno-unknown-pragmas -Wpointer-arith -Wunused-parameter -Wwrite-strings -Wundef -Wformat-signedness -Wuninitialized -Wundef -Wmissing-declarations  -fuse-ld=gold -std=c++11   -msse -pipe -fPIC -funsigned-char -fno-strict-aliasing -msse2 -D_GLIBCXX_USE_CXX11_ABI=0
        build link flags:  -Wl,--version-script='/home/sources/buildbot-x86_64-slave/linux_glibc217_x86_64_cmake/blender.git/source/creator/blender.map'
        build system: CMake
オブジェクトを生成する
というわけでまずはBlenderのあの猿のSuzanneを低レベルAPIによって召喚しましょう。コンソールでこうやります。
# blenderの生メッシュ情報を操作するモジュールをインポートしてBMeshオブジェクトを作成
>>> import bmesh
>>> bm = bmesh.new()

# Suzanneのメッシュデータをbmにセット
>>> bmesh.ops.create_monkey(bm)
... # なんか名前頂点データがぶわーって出る

# bmに設定された実際のBMeshオブジェクト
>>> bm
<BMesh(0x7f40f970ba08), totvert=507, totedge=1005, totface=500, totloop=1968>

# 表示用のメッシュオブジェクトをつくり、BMeshをmeshに変換して設定する
>>> mesh = bpy.data.meshes.new('suzanne')
>>> bm.to_mesh(mesh)
>>> bm.free()  # いっぱい作るなら解放したほうがいいっぽい

# 表示用の*オブジェクト*オブジェクトをmeshを指定して作成する
>>> obj = bpy.data.objects.new('suzanne', mesh)

# 現在のコンテキストのコレクションのオブジェクトリストにリンク(登録)する(と表示される)
>>> bpy.context.collection.objects.link(obj)
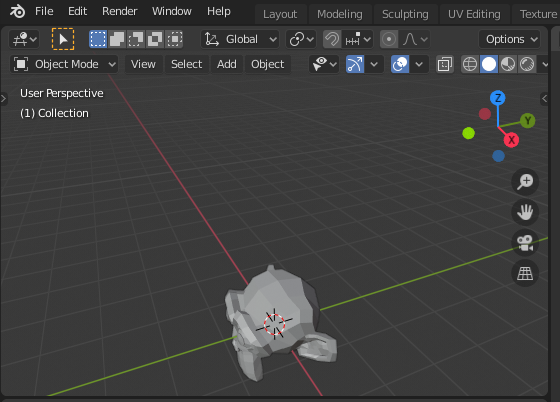
結果、こうなります(デフォルトで置かれていた箱は削除の上)。
ちなみにUIの操作としてのSuzanne召喚はbpy.ops.mesh.primitive_monkey_add()でできます(API docより)。
内部のことを若干想像
以上の操作とPython APIドキュメント( https://docs.blender.org/api/current/bpy.types.html や https://docs.blender.org/api/current/bmesh.html )などから、なんとなくBlenderのデータモデルっぽいものが推測できます。
- 頂点データ等を直接編集できるオブジェクト(BMesh)と、実際にBlenderで利用するオブジェクト(MeshやText)は分かれている
- BMeshオブジェクトはBlender自身のメッシュ編集ツールが使うC APIに従う感じらしい…?
- オブジェクトは
bpy.data.objectsやbpy.data.lightsなど、bpy.data(BlendDataのフィールド)にlink(obj)されるとBlenderから見えるようになる - Blenderのアプリケーションの内部状態は
bpy.contextに保持されている - Blenderのオブジェクトプールは
bpy.dataの各フィールド。種類別に入っている - Blenderのオブジェクトのベースクラスは
bpy_struct - なんかたまに
bpy_struct以外にIDクラスを継承したクラスがある- このクラスのインスタンスは
bpy.data.objects.new(name, object_data)の第2引数に渡すことができる - たとえば
TextCurvehttps://docs.blender.org/api/current/bpy.types.TextCurve.html - たとえば
Texthttps://docs.blender.org/api/current/bpy.types.Text.html - しかしそのままインスタンスつくろうとしてもなんかエラーになる
- 推測: Blenderの内部はEntity Component Systemアーキテクチャでつくられており、
IDはEntityとコンポーネントに対応するのでは…?
- このクラスのインスタンスは
どのようにつくられているのかソースコードを読んでみると、楽しいかもしれません。
文字を色をつけて表示する
# フォントをロードする
font = bpy.data.fonts.load('/home/grey/.fonts/en/Nobile/Nobile-Regular.ttf')

# コレクションをつくる
col = bpy.data.collections.new('nils')
bpy.context.scene.collection.children.link(col)

# オブジェクトに設定するマテリアル(色=黒)を用意
mat = bpy.data.materials.new(name="black")
mat.diffuse_color = (0, 0, 0, 1.0)

# FontCurveオブジェクトを作成
text_curve = bpy.data.curves.new(type='FONT', name='fontcurve')
nil = bpy.data.objects.new('nil', text_curve)

# 文字列本体やフォントやマテリアルを設定
nil.data.body = 'nil'
nil.data.font = font
nil.data.materials.append(mat)

# 角度や場所を指定して文字を置く関数
def put_nil(x, y, z):
    obj = nil.copy()
    obj.location = (x, y, z)
    obj.rotation_euler = (0, 0, PI/2)
    col.objects.link(obj)

# 実際に文字を置く
put_nil(0, 0, 0)
その結果はこちら。
たくさん() (空リスト)を置く
# たくさんnilを並べるだけの関数
def nils(xr, yr, zr):
    for x in xr:
        for y in yr:
            for z in zr:
                put_nil(x, y, z)

# それはもうたくさん並べる空リスト
nils(
    [x/1.1 for x in range(-6, 6)],
    [y/1.8 for y in range(-5, 7)],
    [z/15 for z in range(-5, 5)]
)
put_nil()関数を呼ぶ部分をこのようにすると、ぼくが技術書典8用につくったサークルカット用画像ができあがります。
