jExcel Spreadsheetを試したので投稿します。
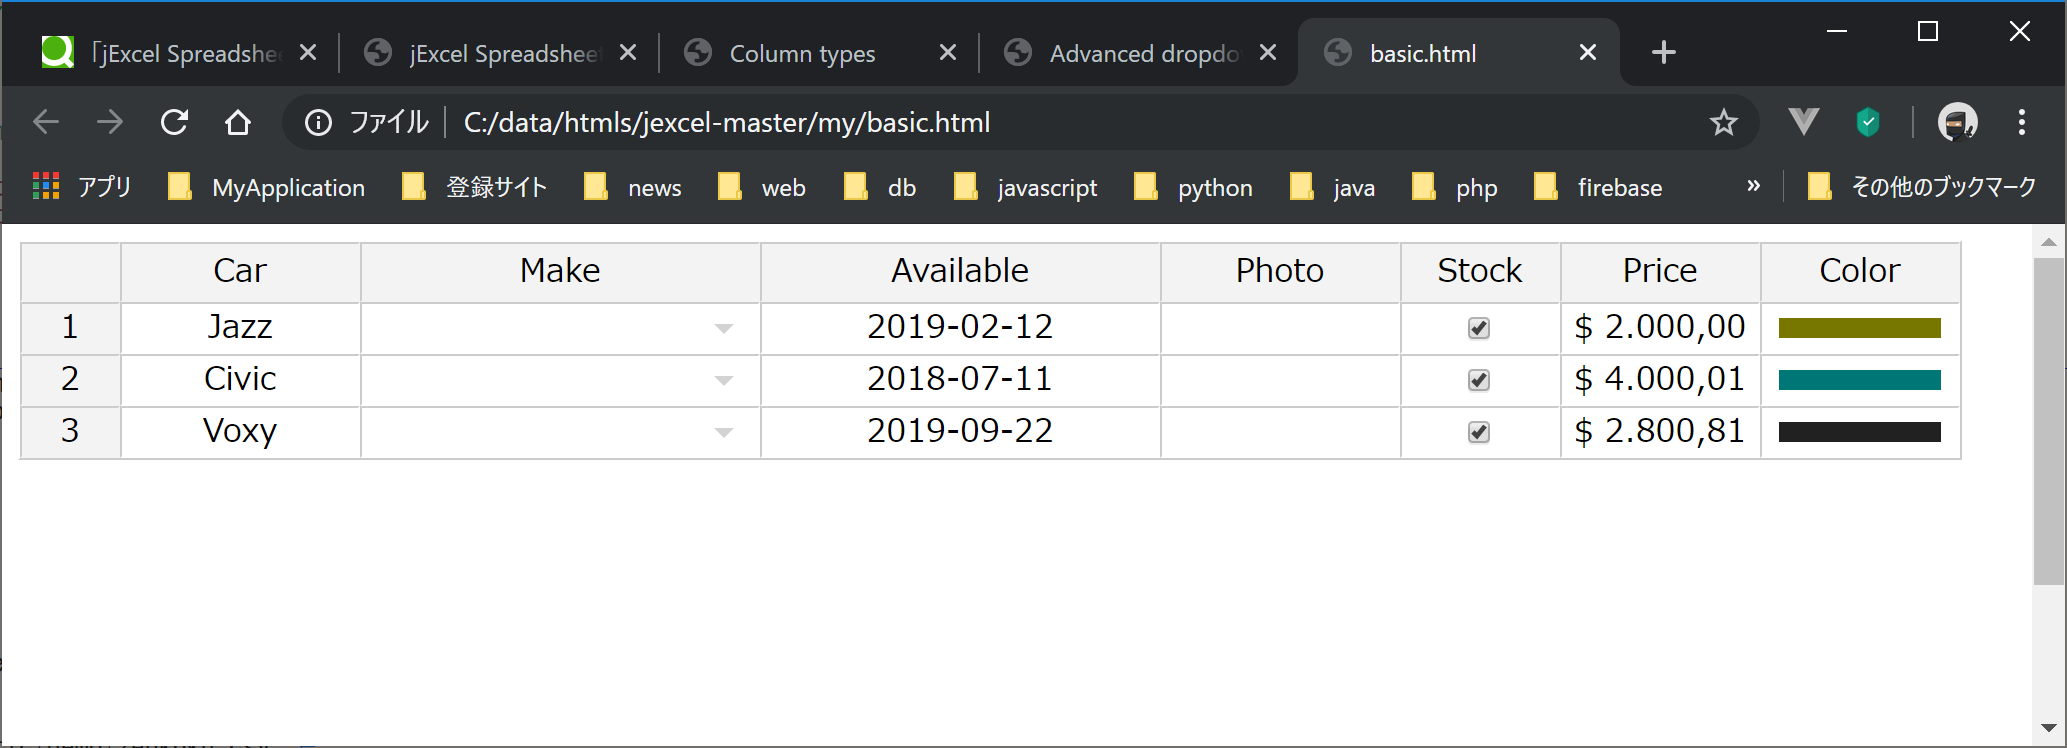
jexcelはData Gridのライブラリでhtml上でExcel風編集ができます。
1. 利用方法
(1). ダウンロード
Git HUBからファイルをダウンロードして適切な場所に配置します。
※jexcelを使うには、jsuitesが必要です。ダウンロードはこちら。
(2). 配置例
任意ですが、私は以下のような感じで配置します。
static
  css
    jsuites.css
    jexcel.css
  js
    jsuites.js
    jexcel.js
index.html
(3). HTMLからの参照例。
  <link rel="stylesheet" href="./static/css/jsuites.css" type="text/css" />
  <link rel="stylesheet" href="./static/css/jexcel.css" type="text/css"  media="all"/>
  <script src="./static/js/jexcel.js"></script>
  <script src="./static/css/jsuites.js"></script>
(4). 操作
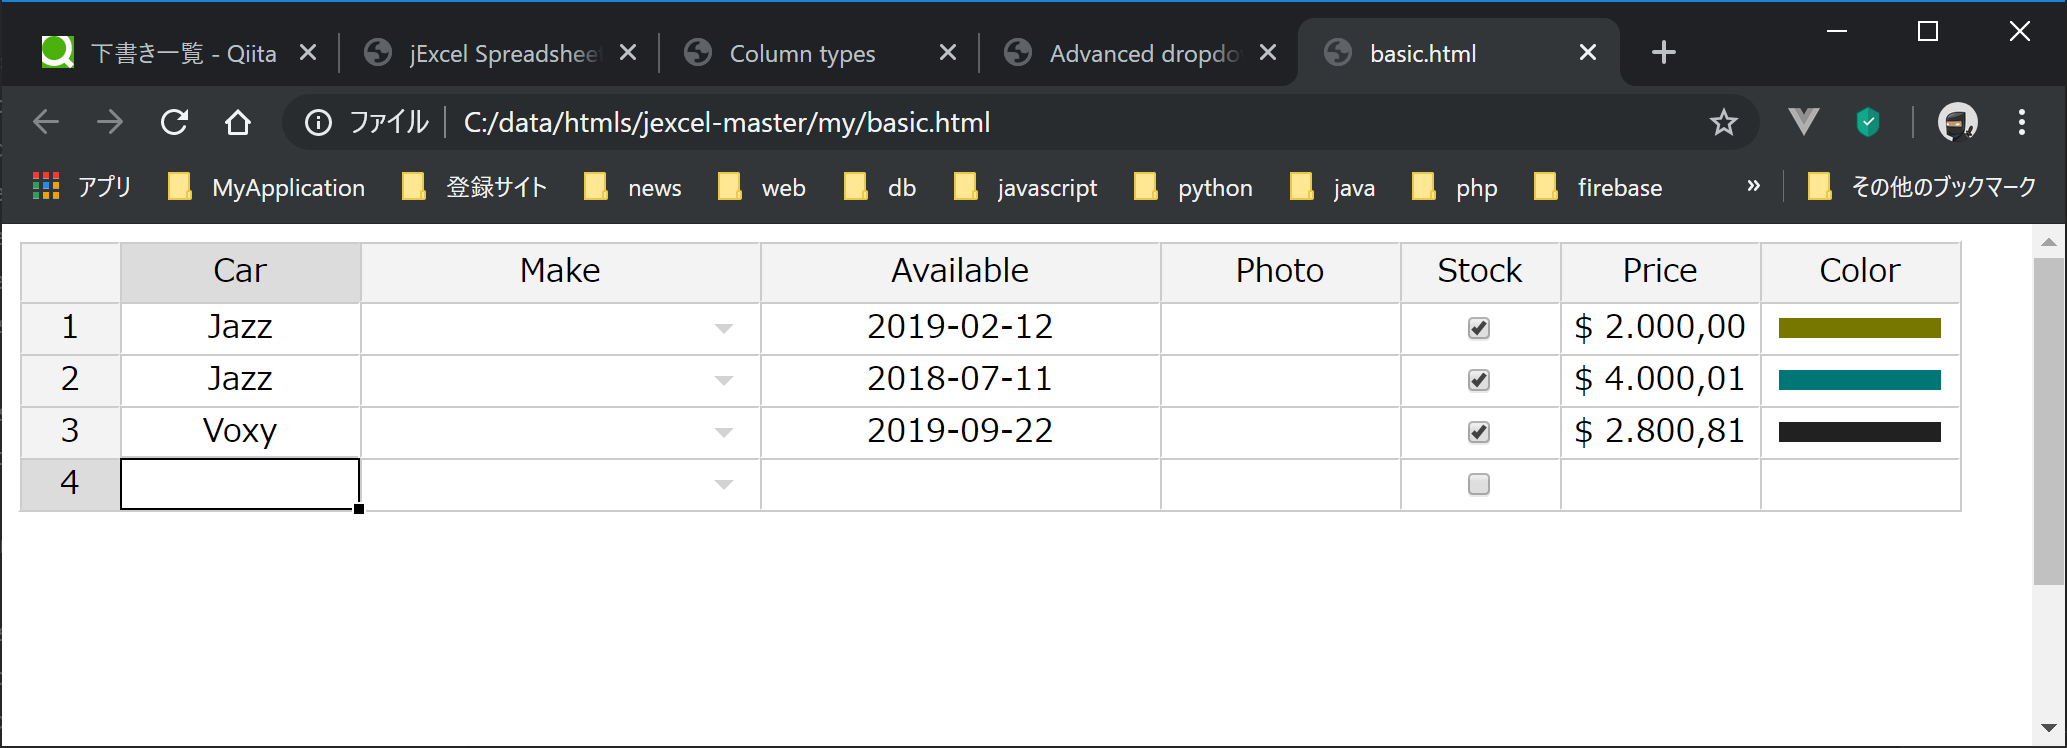
・行追加
最終行のセル上で「Enter」を入力すると、新規行が追加されます。わざわざ「新規行」などのボタンを実装する必要がなくていいです。
・cellのコピー
cell右下の黒点をマウスでつまんで、下にスライドすると、値がコピーされます。Excelと同じ動きをします。

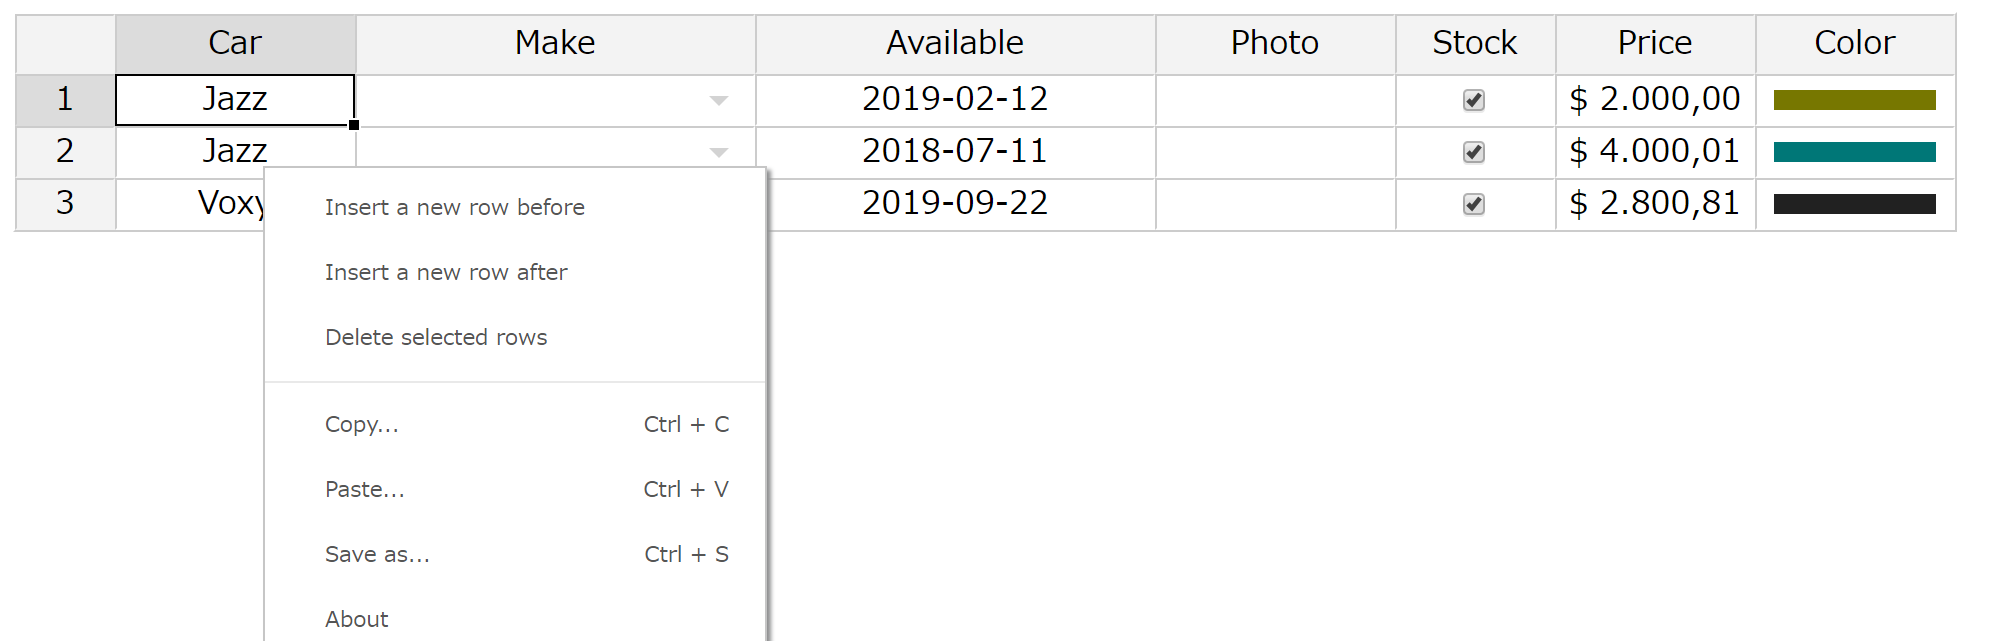
・コンテキストメニュー
セルを右クリックするとコンテキストメニューが表示されます。「行挿入」「行削除」「コピー」「貼付」「保存」などの機能があります。
2. Getting started
では、Getting startedから使いそうなものを見てみます。
(1). Loading from a javascript array
他のGridライブラリと同様。簡単に使えます。Javascriptの配列をロードする場合。data変数はJSONデータでもOK。
<div id='my-spreadsheet'></div>

<script>
data = [
    ['Mazda', 2001, 2000],
    ['Pegeout', 2010, 5000],
    ['Honda Fit', 2009, 3000],
    ['Honda CRV', 2010, 6000],
];
jexcel(document.getElementById('my-spreadsheet'), {
    data:data,
    columns:[
        { title:'Model', width:300 },
        { title:'Price', width:80 },
        { title:'Model', width:100 }
    ]
});
</script>
(2). Loading from a JSON file
サーバサイドのJSONファイルをロードする場合は、urlパラメータにファイルのパスをセットします。
<div id='my-spreadsheet'></div>
<script>
jexcel(document.getElementById('my-spreadsheet'), {
    url:'data.json',
    columns:[
        { title:'Model', width:300 },
        { title:'Price', width:80 },
        { title:'Model', width:100 }
    ]
});
</script>
(3). Loading from a CSV file
csvパラメータにファイルのパスをセットします。ヘッダレコードがあれば、「csvHeaders:true」とします。
<div id='my-spreadsheet'></div>

<script>
jexcel(document.getElementById('my-spreadsheet'), {
    csv:'demo.csv',
    csvHeaders:true,
    columns:[
        { width:300 },
        { width:80 },
        { width:100 }
    ]
});
</script>
(4). Nested headers
よく使うヘッダグループの機能もあります。
<script>
jexcel(document.getElementById('spreadsheet'), {
    data:data,
    columns: [
        { type: 'autocomplete', title:'Country', width:'300', url:'/jexcel/countries' },
        { type: 'dropdown', title:'Food', width:'150', source:['Apples','Bananas','Carrots','Oranges','Cheese'] },
        { type: 'checkbox', title:'Stock', width:'100' },
    ],
    nestedHeaders:[
        [
            { title:'Supermarket information', colspan:'3' },
        ],
        [
            { title:'Location', colspan:'1' },
            { title:' Other Information', colspan:'2' }
        ],
    ],
});
(5). Column types
列の型も必要なものは一通りそろってます。
jexcel(document.getElementById('myTable'), {
    data:data,
    columns: [
        { title:'Model', width:300, type:'text'; },
        { title:'Price', width:80, type:'numeric' },
        { title:'Date', width:100, type:'calendar', options: { format:'DD/MM/YYYY' } },
        { title:'Photo', width:150, type:'image' },
        { title:'Condition', width:150, type:'dropdown', source:['New','Used'] },
        { title:'Color', width:80, type:'color' },
        { title:'Available', width:80, type:'checkbox' },
    ]
});
(6). Calendar type
列の型が「calendar」の場合は、optionsパラメータをセットします。
options : {
    // Date format
    format:'DD/MM/YYYY',
    // Allow keyboard date entry
    readonly:0,
    // Today is default
    today:0,
    // Show timepicker
    time:0,
    // Show the reset button
    resetButton:true,
    // Placeholder
    placeholder:'',
    // Translations can be done here
    months:['Jan', 'Feb', 'Mar', 'Apr', 'May', 'Jun', 'Jul', 'Aug', 'Sep', 'Oct', 'Nov', 'Dec'],
    weekdays:['Sunday','Monday','Tuesday','Wednesday','Thursday','Friday','Saturday'],
    weekdays_short:['S', 'M', 'T', 'W', 'T', 'F', 'S'],
    // Value
    value:null,
    // Events
    onclose:null,
    onchange:null,
    // Fullscreen (this is automatic set for screensize < 800)
    fullscreen:false,
};
(7). Dropdown and autocomplete type
Dropdown and autocompleteにも対応しています。
data = [
    ['Honda', 1, 'Civic', '4'],
    ['Peugeot', 3,'1007', '2'],
    ['Smart', 3,'Cabrio', '4;5'],
];

$('#my').jexcel({
jexcel(document.getElementById('spreadsheet'), {
    data:data,
    columns: [
        {
            type:'dropdown',
            title:'Region',
            source:['South East','South West','North','London'],
            width:'200',
        },
        {
            type:'dropdown',
            title:'Available in',
            multiple:true,
            source:[{id:1, name:'Red'},{id:2, name:'Yellow'},{id:3,name:'Blue'}],
            width:'200',
        },
        {
            type:'autocomplete',
            title:'Region',
            url:'values.json',
            width:'200',
        },
    ]
});
(8). 右寄せ、左寄せ、MASK( 2019.12.14 追記)
右寄せ、左寄せは「align」数値のフォーマットは「mask」で指定します。
columns: [
 //左寄せ。文字列
 { type: 'text', width:200 , align: 'left'},
 //右寄せ。mask(少数第2位までの数値)
 { type: 'numeric', width:100, align: 'right' ,mask:'#,##.00' },
]
3. Examples
Exampleも少し見てみます。
(1). Implementation
React, VUE, Jqueryからの利用方法もあります。
(2). download
gridのデータをcsv形式でダウンロードできます。
<div id="spreadsheet1"></div>

<p><button id='download'>Export my spreadsheet as CSV</button></p>

<script>
mySpreadsheet = jexcel(document.getElementById('spreadsheet1'), {
    csv:'/jexcel/arts.csv',
    csvHeaders:true,
    tableOverflow:true,
    columns: [
        { type:'text', width:300 },
        { type:'text', width:80 },
        { type:'dropdown', width:120, source:['England','Wales','Northern Ireland','Scotland'] },
        { type:'text', width:120 },
        { type:'text', width:120 },
     ]
});

document.getElementById('download').onclick = function () {
    mySpreadsheet.download();
}
(3) Readonly columns
columnsのreadonlyをtrueにセットするだけです。
割愛しますが特定のcellだけをreadOnlyにすることもできます。
jexcel(document.getElementById('spreadsheet'), {
    data: data,
    columns: [
        {
            type: 'text',
            title:'Description',
            width:'200px',
            readOnly:true,
        },
        {
            type: 'text',
            title:'Year',
            width:'200px'
        },
        {
            type: 'text',
            title:'Price',
            width:'100px',
            mask:'#.##',
        },
        {
            type: 'checkbox',
            title:'Automatic',
            width:'100px'
        },
    ],
    updateTable: function(el, cell, x, y, source, value, id) {
        if (x == 2 && y == 2) {
            cell.classList.add('readonly');
        }
    }
});
(4). Lazy loading
データ量が多いCSVやJSONデータなどは、lazyLoading:true, loadingSpin:trueとしておけば100行スクロールする毎に次のページをレンダリングしている感じになっている。
<div id="spreadsheet"></div>

<script>
jexcel(document.getElementById('spreadsheet'), {
    csv:'https://bossanova.uk/jexcel/demo1.csv',
    csvHeaders:false,
    tableOverflow:true,
    lazyLoading:true,
    loadingSpin:true,
    columns: [
        {
            type:'text',
            width:200,
            title:'Name'
        },
        {
            type:'dropdown',
            width:100,
            title:'Age',
            source:[
            {
                id:1,name:'Male'
            },
            {
                id:2,
                name:'Female'
            }]
        },
        {
            type:'text',
            width:200,
            title:'City'
        },
     ]
});
</script>
(5). Advanced dropdown
ページの「2 CONDITIONAL DROPDOWN」
条件付きDrop Downの機能もある。実装も分かりやすくてよい。
var data2 = [
    [3, 'Cheese', true],
    [1, 'Apples', true],
    [2, 'Carrots', true],
    [1, 'Oranges', false],
];

dropdownFilter = function(instance, cell, c, r, source) {
    var value = instance.jexcel.getValueFromCoords(c - 1, r);
    if (value == 1) {
        return ['Apples','Bananas','Oranges'];
    } else if (value == 2) {
        return ['Carrots'];
    } else {
        return source;
    }
}

jexcel(document.getElementById('spreadsheet2'), {
    data:data2,
    columns: [
        { type:'dropdown', title:'Category', width:'300', source:[ {'id':'1', 'name':'Fruits'}, {'id':'2', 'name':'Legumes'}, {'id':'3', 'name':'General Food'} ] },
        { type:'dropdown', title:'Food', width:'200', source:['Apples','Bananas','Carrots','Oranges','Cheese'], filter:dropdownFilter },
        { type: 'checkbox', title:'Buy', width:'100' },
    ],
    onchange:function(instance, cell, c, r, value) {
        if (c == 0) {
            var columnName = jexcel.getColumnNameFromId([c + 1, r]);
            instance.jexcel.setValue(columnName, '');
        }
    }
});
(6). Clock Picker
時間エディタなどデフォルトのエディタにないものはカスタムエディタを実装することで実現するようです。Clock Pickerはjquery-clockpickerを利用します。
<html>
<script src="https://bossanova.uk/jexcel/v3/jexcel.js"></script>
<script src="https://bossanova.uk/jsuites/v2/jsuites.js"></script>
<link rel="stylesheet" href="https://bossanova.uk/jexcel/v3/jexcel.css" type="text/css" />
<link rel="stylesheet" href="https://bossanova.uk/jsuites/v2/jsuites.css" type="text/css" />

<link rel="stylesheet" type="text/css" href="http://weareoutman.github.io/clockpicker/dist/jquery-clockpicker.min.css" />
<script src="https://cdnjs.cloudflare.com/ajax/libs/jquery/3.4.1/jquery.min.js"></script>
<script src="http://weareoutman.github.io/clockpicker/dist/jquery-clockpicker.min.js"></script>

<div id="custom"></div>

<script>
var data2 = [
    ['PHP', '14:00'],
    ['Javascript', '16:30'],
];

var customColumn = {
    // Methods
    closeEditor : function(cell, save) {
        var value = cell.children[0].value;
        cell.innerHTML = value;
        return value;
    },
    openEditor : function(cell) {
        // Create input
        var element = document.createElement('input');
        element.value = cell.innerHTML;
        // Update cell
        cell.classList.add('editor');
        cell.innerHTML = '';
        cell.appendChild(element);
        $(element).clockpicker({
            afterHide:function() {
                setTimeout(function() {
                    // To avoid double call
                    if (cell.children[0]) {
                        myTable.closeEditor(cell, true);
                    }
                });
            }
        });
        // Focus on the element
        element.focus();
    },
    getValue : function(cell) {
        return cell.innerHTML;
    },
    setValue : function(cell, value) {
        cell.innerHTML = value;
    }
}

myTable = jexcel(document.getElementById('custom'), {
    data:data2,
    columns: [
        { type: 'text', title:'Course Title', width:300 },
        { type: 'text', title:'Time', width:100, editor:customColumn },
     ]
});
</script>
</html>
(7). 作成したhtml(2019.12.14 追記)
jexcelを使うと旅費をinlineで入力する画面を作成しても簡単です。
<!DOCTYPE html>
<html>
<head>
    <meta http-equiv="X-UA-Compatible" content="IE=edge">
    <meta charset="utf-8">
    <title>travel expense with jexcel spreadsheet</title>
    <meta name="description" content="">
    <meta name="author" content="">
    <meta name="viewport" content="width=device-width, initial-scale=1">
    <link rel="shortcut icon" href="">
    <link rel="stylesheet" href="./jexcel/dist/jexcel.css" type="text/css" />
    <script src="./jexcel/dist/jexcel.js"></script>
    <link rel="stylesheet" href="./jexcel/dist/css/jsuites.css" type="text/css" />
    <script src="./jexcel/dist/js/jsuites.js"></script>
</head>
<body>
<h1>旅費明細</h1>
<div id="spreadsheet" style="height: 200px;"></div>
<script>

    var addresslist=[
        {"id": "534000000", "name": "大阪市都島区"},
        {"id": "553000000", "name": "大阪市福島区"},
        {"id": "554000000", "name": "大阪市此花区"},
        {"id": "550000000", "name": "大阪市西区"},
        {"id": "552000000", "name": "大阪市港区"},
        {"id": "999999999", "name": "帰社"}]
    var spreadsheetdata = [
      {"direction": "往路","targetdate": "2019-12-08",  "destination": "534000000", "distance": 13.1, "transportation": "公共交通", "stayarea": "大阪", "fare": 16000, "dailyallowance": 3000, "stayallowance": 20000, "adjustmentamount": 1000,"total":"=G1+H1+I1+J1", "remarks": "直行"},
      {"direction": "復路","targetdate": "2019-12-09",  "destination": "999999999", "distance": 13.1, "transportation": "公共交通", "fare": 16000, "dailyallowance": 3000, "stayallowance": 0, "adjustmentamount": 0,"total":"=G2+H2+I2+J2", "remarks": ""}]

    var stayarealist = ['東京','大阪','その他'];
    var transportations = ['公共交通', '自家用車','社用車'];
    var directions = [ '往路' ,'復路' ,];


    var trexplist = jexcel(document.getElementById('spreadsheet'), {
        data: spreadsheetdata,
        minSpareRows: 3,
        columns: [
            { type: 'dropdown', title:'方向', width:74, source:directions },
            { type: 'calendar', title:'日付', width:120, options: { format:'YYYY-MM-DD' } },
            { type: 'autocomplete', title:'訪問先', width:200 , align: 'left', source: addresslist, multiple:false },
            { type: 'numeric', title:'距離', width:100, align: 'right' ,mask:'#,##.0' },
            { type: 'dropdown', title:'移動手段', width:120, align: 'left', source:transportations },
            { type: 'dropdown', title:'宿泊地', width:120, align: 'left', source:stayarealist },
            { type: 'numeric', title:'運賃', width:80 , align: 'right' ,mask:'#,##'},
            { type: 'numeric', title:'日当', width:80 , align: 'right' ,mask:'#,##'},
            { type: 'numeric', title:'宿泊費', width:80 , align: 'right' ,mask:'#,##'},
            { type: 'numeric', title:'その他', width:80 , align: 'right' ,mask:'#,##'},
            { type: 'text', title:'合計', width:100 , align: 'right' ,mask:'#,##'},
            { type: 'text', title:'備考', width:200, align: 'left' },
        ]
    });
</script>
</body>
</html>

4. まとめ
一覧での編集機能が一通りそろっていて、実装もかなりわかりやすく、気に入りました。大量データの場合はSlickGridのほうが軽いと感じましたが、SlickGridはちょっと実装が難しいので、ニーズに合わせて使っていきたいと思いました。