FastAPIを使ってCRUD APIを作成するの続編で、今回はファイルのアップロード機能を作成してみたいと思います。
0.前提条件
-
Windows10(WSL2)にUbuntu 20.04がインストールされているものとします。
-
Python, pipはインストール済であるものとします。
-
環境は以下のとおり
| category | value |
|---|---|
| CPU | core i5 10210U 160GHz |
| MEMORY | 8GB |
| OS | Ubuntu 20.04.1 LTS(WSL2, Windows 10 home 1909) |
| Python | 3.8.5 |
1. アプリの概要
以下の4つの機能を、WEBアプリケーションで開発します。
- ファイルをサーバにアップロードし、サーバに保存する
- アップロードされたファイルは画面からダウンロードできる
- アップロードしたファイルは削除できるようにする
- 同一のファイル名をアップロードした場合は上書きして保存する
2. 画面レイアウト
下図の画面を作成します。
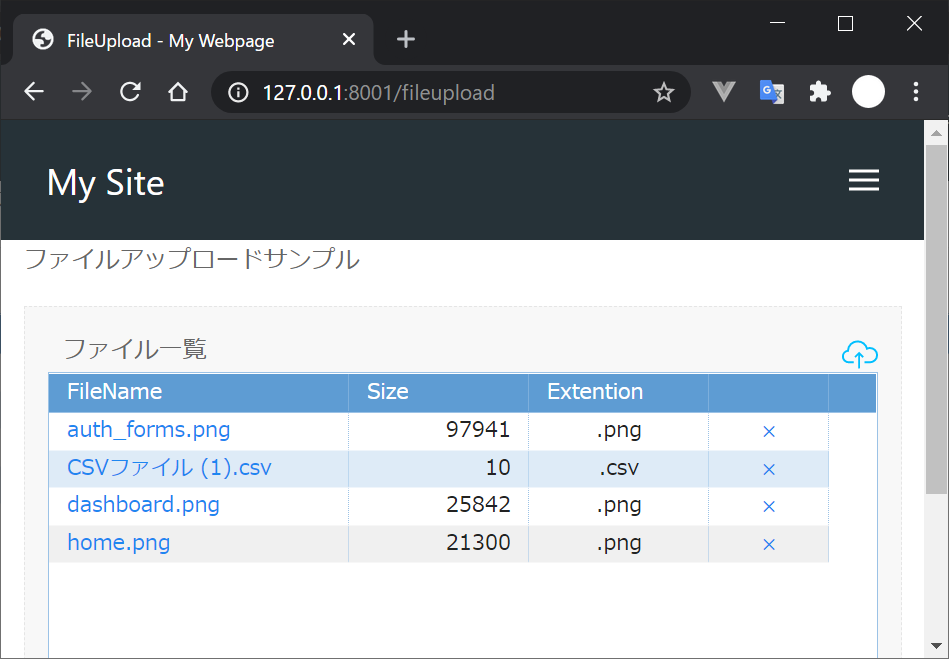
3. イベント定義
| 項目名 | comment |
|---|---|
| ファイル一覧 | このエリアにファイルをDragDropするとアップロードする |
| アップロード(icon) | クリックするとファイル選択ダイアログからファイルを選択してアップロードする |
| ファイル名(link) | クリックするとファイルをダウンロードする |
| ×ボタン(icon) | クリックするとファイルを削除する |
4. 言語、フレームワーク
サーバには、Pythonがインストールされ、必要なフレームワークもインストール済みであることを前提とします。
- Backend
| category | value | Version |
|---|---|---|
| language | Python | 3.8.5 |
| package | FastAPI | 0.61.1 |
| Jinja2 | 2.11.2 | |
| orjson | 3.3.1 |
- Frontend
javascriptフレームワークもサーバに配置します。必要なフレームワークはダウンロードしてください。
| category | value | Version |
|---|---|---|
| browser | google chrome | 87.0.4280.66 |
| language | html, javascript | - |
| framework | UIKit | 3.5.9 |
| ag-grid-community | 23.2.1 |
5. ディレクトリ/ファイル
以下のような感じで作っていきます。staticフォルダは、css, jsなどの静的ファイル、templatesフォルダは、htmlを格納します。また、uploadsフォルダにアップロードするファイルを格納するものとします。
.
├── static  ・・・参照するcss, javacscriptのファイルを配置する
│   ├── css
│   │   ├── ag-grid.min.css
│   │   ├── ag-theme-blue.min.css
│   │   ├── uikit-rtl.min.css
│   │   └── uikit.min.css
│   └── js
│       ├── ag-grid-community.min.js
│       ├── uikit-icons.min.js
│       └── uikit.min.js
├── templates  ・・・ htmlテンプレートを配置する
│   ├── base.html
│   ├── base_menu.html
│   └── fileupload.html
├── uploads  ・・・ アップロードしたファイルを保存するフォルダ
│
└── main.py  ・・・ applicationファイル
6. Backend
main.pyを作成します。まず、ルーティングを決めて、それに対応する処理を書いていきます。
| URL | method | comment |
|---|---|---|
| /fileupload | get | 初期表示 |
| /fileupload | post | アップロードされたファイルをサーバに保存 |
| /fileupload/getlist | get | アップロードされたファイルの一覧を取得 |
| /fileupload/deletefile | post | アップロードされたファイルをサーバから削除 |
ソースは下記のようになる。エラー処理を書いていないが、80行程度で実装できます。
import os
from fastapi import FastAPI, Request
from fastapi.responses import HTMLResponse, ORJSONResponse, RedirectResponse, FileResponse
from fastapi.staticfiles import StaticFiles
from fastapi.templating import Jinja2Templates
from starlette.status import HTTP_302_FOUND
import ast

app = FastAPI()

app.mount("/static", StaticFiles(directory="static"), name="static")

templates = Jinja2Templates(directory="templates")

@app.get("/fileupload", response_class=HTMLResponse)
async def fileupload(request: Request):
    '''docstring
    ファイルアップロード(初期表示)
    '''
    return templates.TemplateResponse("fileupload.html", {"request": request})

@app.get("/fileupload/filelist", response_class=ORJSONResponse)
async def get_filelist(request: Request):
    '''docstring
    アップロードされたファイルの一覧を取得する
    '''

    def get_extention(filePath):
        '''docstring
        ファイルパスから拡張子を取得する
        '''
        ex = os.path.splitext(filePath)
        return ex[len(ex)-1]

    uploadedpath = "./uploads"
    files = os.listdir(uploadedpath)
    filelist = [{
        "filename":f,
        "filesize": os.path.getsize(os.path.join(uploadedpath, f)),
        "extention": get_extention(f),
    } for f in files if os.path.isfile(os.path.join(uploadedpath, f))]
    return filelist

@app.get("/filedownload/{filename}")
async def get_filelist(filename):
    '''docstring
    ファイルを取得する
    '''
    uploadedpath = f"{os.getcwd()}/uploads/{filename}"
    return FileResponse(uploadedpath)

@app.post("/fileupload")
async def fileupload_post(request: Request):
    '''docstring
    アップロードされたファイルを保存する
    '''
    form = await request.form()
    uploadedpath = "./uploads"
    files = os.listdir(uploadedpath)
    for formdata in form:
        uploadfile = form[formdata]
        path = os.path.join("./uploads", uploadfile.filename)
        fout = open(path, 'wb')
        while 1:
            chunk = await uploadfile.read(100000)
            if not chunk: break
            fout.write (chunk)
        fout.close()
    return {"status":"OK"}

@app.post("/fileupload/deletefile")
async def deletefile_post(request: Request):
    '''docstring
    ファイルを削除する
    '''
    form = await request.form()
    for formdata in form:
        formparams = form[formdata]
        dictparams = ast.literal_eval(formparams)
        os.remove(os.path.join("./uploads", dictparams.get('filename')))
    response = RedirectResponse(url='/fileupload2', status_code=HTTP_302_FOUND)
    return response
7. Frontend
FastAPIでは、テンプレートエンジンは、Jinja2を使います。
また、Frontendを開発するときには、フレームワークを利用を検討することで開発効率が上がります。今回は、CSS Frameworkには、UIKit、grid(一覧表示)には、ag-gridを選択しました。
UIKitを選択した理由は、ファイルアップロードのjavascriptが用意されていること、その他にもnavigation、formの機能があり、さらにiconも同梱されていて使い勝手がよいからです。
また、ag-gridは、テーブルを高速に表示してくれるし、themeもいくつか用意してくれていて、モダンなテーブルを簡単に表示できます。また、列の定義や表示するdataはjson形式であり、apiと相性が良いです。
(1) base.html
base.htmlに、すべてのページで共通のナビゲーションやレイアウトを定義しておきます。このようにすることで、個別のページには、コンテンツの中だけを書けばいいようになります。
UIKitの部分は多少難しい感じに受け取られるかもしれませんが、ドキュメントのソースを少しカスタマイズしているだけです。
<!DOCTYPE html>
<html lang="ja">
<head>
    <meta http-equiv="X-UA-Compatible" content="IE=edge">
    <meta charset="utf-8">
    <meta name="description" content="uikit example">
    <meta name="author" content="myname">
    <meta name="viewport" content="width=device-width, initial-scale=1">
    <link href="{{ url_for('static', path='/css/uikit.min.css') }}" rel="stylesheet">
    <script type=text/javascript src="{{ url_for('static', path='/js/uikit.min.js') }}"></script>
    <script type=text/javascript src="{{ url_for('static', path='/js/uikit-icons.min.js') }}"></script>
    <link rel="shortcut icon" href="#">
    {% block head %}
    <title>{% block title %}{% endblock %} - My Webpage</title>
    {% endblock %}
    <style>
        .uk-navbar{
            background-color: #263238 !important;
        }
        .uk-navbar *{
            color: white !important;
        }
    </style>
</head>
<body class="text-center">
  <header>
    <nav class="uk-container uk-navbar">
      <div class="uk-navbar-left">
        <a class="uk-navbar-item uk-logo" href="/">My Site</a>
        <ul class="uk-navbar-nav uk-visible@s">
        </ul>
      </div>
      <div class="uk-navbar-right">
        <ul class="uk-navbar-nav uk-visible@s">
          <!-- navigation menu -->
          {% include 'base_menu.html' %}
        </ul>
        <a href="#" class="uk-navbar-toggle uk-hidden@s" uk-navbar-toggle-icon uk-toggle="target: #sidenav"></a>
      </div>
    </nav>
    <div id="sidenav" uk-offcanvas="flip: true" class="uk-offcanvas">
      <div class="uk-offcanvas-bar">
        <ul class="uk-nav">
          <!-- navigation menu -->
          {% include 'base_menu.html' %}
        </ul>
      </div>
    </div>
  </header>
  <!-- main content -->
  <main>
    <div class="uk-container uk-height-max-large uk-overflow-auto uk-width-expand">
        {% block content %}
        <!-- コンテンツ部分 -->
        {% endblock %}
    </div>
  </main>
  <script>
    //ファイルのdrag&dropを禁止します。
    window.addEventListener('dragover', function(e){
        e.preventDefault();
    }, false);
    window.addEventListener('drop', function(e){
        e.preventDefault();
        e.stopPropagation();
    }, false);
  </script>
</body>
</html>
UIKitやag-gridの使い方は、公式サイトを見ればわかるので、ここでは説明しません。
(2) ナビゲーションメニュー
ナビゲーションメニューは別で定義して、base.htmlでincludeして使うようにすることで拡張しやすくなります。機能を追加する場合は、
~をコピーしてhrefとラベルを変更すれば追加していけます。<li><a class="uk-text-large" href="/fileupload">Fileupload</a></li>
(3) fileupload.html
base.htmlでレイアウトを定義しているので、コンテンツ部分だけを書くだけです。
{% extends "base.html" %}
{% block title %}FileUpload{% endblock %}
{% block head %}
{{ super() }}
{% endblock %}
{% block content %}
<script src="{{ url_for('static', path='/js/ag-grid-community.min.js') }}"></script>
<link rel="stylesheet" href="{{ url_for('static', path='/css/ag-grid.min.css') }}">
<link rel="stylesheet" href="{{ url_for('static', path='/css/ag-theme-blue.css') }}">
<style>
.uk-form-custom{
color:deepskyblue;
}
</style>
<div class="uk-container">
<p>ファイルアップロードサンプル</p>
<div class="js-upload uk-placeholder uk-text-center uk-background-muted uk-padding-small">
<div class="uk-child-width-1-2" uk-grid>
<div>
<div class="uk-child-width-1-2" uk-grid>
<div>
<span>ファイル一覧</span>
</div>
<div></div>
</div>
</div>
<div class="uk-text-right">
<div uk-form-custom>
<input id="file5" type="file" multiple uk-tooltip="クリックしてファイルを選択するか、ファイルをDrag&Dropします"/>
<span class="upload-icon"><span uk-icon='icon: cloud-upload; ratio: 1.2'></span></span>
</div>
</div>
</div>
<!-- ag-gridを表示する要素 -->
<div id="myGrid" style="height:300px;width:100%; " class="ag-theme-blue"></div>
</div>
<!-- progressbar -->
<progress id="js-progressbar" class="uk-progress" value="0" max="100" hidden></progress>
<script>
/*************************************
ag-gridを再描画する
**************************************/
function refresh_grid(){
//ファイル一覧を取得する
agGrid.simpleHttpRequest({url: '/fileupload/filelist'}).then(function(data) {
//取得したファイル一覧をgridにセットする
gridOptions.api.setRowData(data);
});
}
/*************************************
ag-gridの列定義
**************************************/
var columnDefs = [
{headerName: "FileName", field: "filename", minWidth: 200, cellStyle: {"text-align": "left"},
cellRenderer : function(params){
filename=params.data.filename;
html="<a target='_blank' href='/filedownload/"+filename+"'>"+
params.data.filename+
"</a>"+
""
return html
}
},
{headerName: "Size", field: "filesize", width: 120, cellStyle: {"text-align": "right"}},
{headerName: "Extention", field: "extention", width: 120},
{headerName: '', width: 80,
cellRenderer : function(params){
html="<form action='/fileupload/deletefile' method='post'>"+
"<input type='hidden' name='params' value='"+JSON.stringify(params.data)+"'/>"+
"<button class='uk-button uk-button-link'>×</button>"+
"</form>"+
""
return html
}
}
];
/*************************************
ag-gridのオプション
**************************************/
var gridOptions = {
columnDefs: columnDefs,
};
/*************************************
ag-gridを表示するdiv要素を取得して生成
**************************************/
var eGridDiv = document.querySelector('#myGrid');
new agGrid.Grid(eGridDiv, gridOptions);
refresh_grid();
/*************************************
UIkit-Upload
**************************************/
var bar = document.getElementById('js-progressbar');
UIkit.upload('.js-upload', {
url: '/fileupload',
method: 'post',
multiple: true,
error: function () {
console.log('error', arguments);
},
loadStart: function (e) {
bar.removeAttribute('hidden');
bar.max = e.total;
bar.value = e.loaded;
},
progress: function (e) {
bar.max = e.total;
bar.value = e.loaded;
},
loadEnd: function (e) {
bar.max = e.total;
bar.value = e.loaded;
refresh_grid();
},
completeAll: function () {
setTimeout(function () {
bar.setAttribute('hidden', 'hidden');
}, 1000);
}
});
</script>
</div>
{% endblock %}
以上