経緯
レイアウトを設定していると
Compression Registance PriorityとContent Hugging Priorityはよく使いますが、
どっちがどっちだろうと混同することが多く、
優先順に関しても理解があいまいであったため
メモとして記録します。
Compression Registance Priority
・コンテンツのつぶれにくさ
・文字列がコントローラの幅よりも長いとき末尾を「...」とならないように値を増加する
・デフォルトの優先度の値は750
Content Hugging Priority
・余白のできにくさ
・文字列がコントローラの幅よりも短いとき末尾の空白を減らすために値を増加する
・デフォルトの優先度の値は250
わかりずらいのがContent Hugging Priorityの方で、
末尾の空白を減らしたい場合に値を増加すると逆になっています。
今回、この値を変更することでどのように値が変わっていくのかを色々と試してみました。
検索してみると意外と出てこなかったのでコードで優先度を変更しています。
初期表示
import UIKit

class ViewController4: UIViewController {

   let label1: UILabel = {
        let l = UILabel()
        l.font = UIFont.systemFont(ofSize: 16)
        l.numberOfLines = 1
        l.backgroundColor = .gray
        l.text = "aaaaaaaaaaaaaaaaaaaaaaaaaaa"
        l.translatesAutoresizingMaskIntoConstraints = false
        return l
    }()

    let label2: UILabel = {
        let l = UILabel()
        l.font = UIFont.systemFont(ofSize: 16)
        l.numberOfLines = 1
        l.backgroundColor = .gray
        l.text = "bbbbbbbbbbbbbbbbbbbbbbbbbbb"
        l.translatesAutoresizingMaskIntoConstraints = false
        return l
    }()

    override func viewDidLoad() {
        super.viewDidLoad()

        self.view.addSubview(label1)
        self.view.addSubview(label2)

        label1.centerYAnchor.constraint(equalTo: view.centerYAnchor).isActive = true
        label1.leadingAnchor.constraint(equalTo: view.leadingAnchor, constant: 16).isActive = true
        label2.leadingAnchor.constraint(equalTo: label1.trailingAnchor, constant: 16).isActive = true
        label2.centerYAnchor.constraint(equalTo: view.centerYAnchor).isActive = true
        view.trailingAnchor.constraint(greaterThanOrEqualTo: label2.trailingAnchor, constant: 16).isActive = true
    }
}
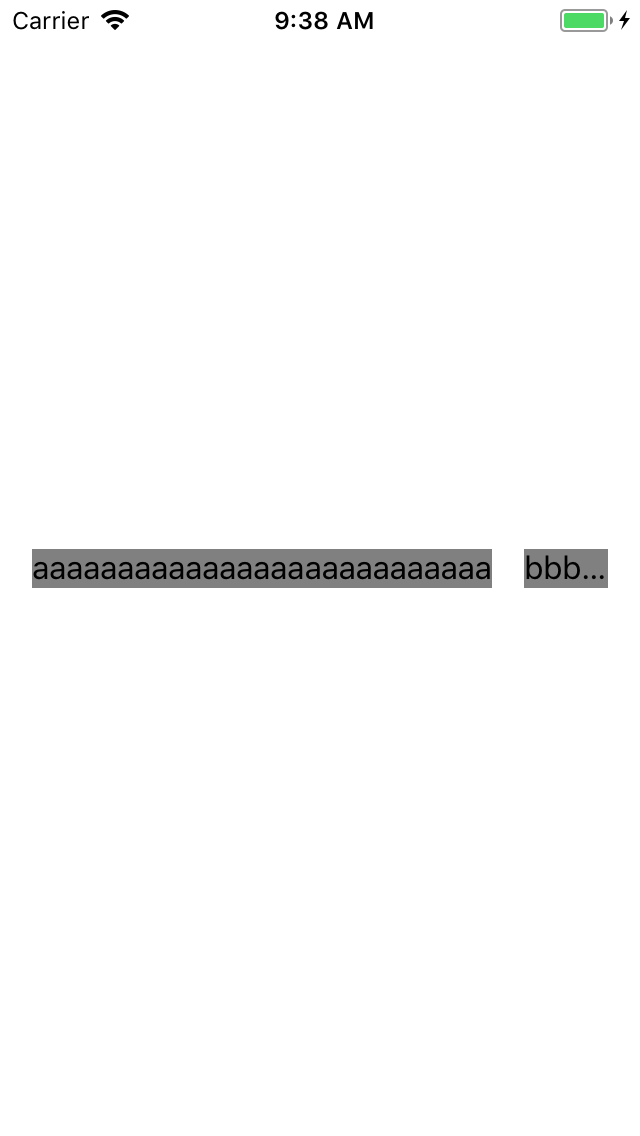
優先度を意識せずに制約を設定しており、Anchorにはデフォルトの優先度1000が設定されます。

この場合、ContentCompressionResistanceにはデフォルトの750が設定され、
label1とlabel2には同じ値が入っていますが、左側が優先的に表示されるようになりました。(左側が優先される理由まで調べきれていないので、時間があれば調べたいです。)
label2にContentCompressionResistanceを設定
let label2: UILabel = {
    let l = UILabel()
    l.font = UIFont.systemFont(ofSize: 16)
    l.numberOfLines = 1

    // ***********ContentCompressionResistanceを751に設定****************
    l.setContentCompressionResistancePriority(UILayoutPriority.init(751), for: .horizontal)
    l.backgroundColor = .gray
    l.text = "bbbbbbbbbbbbbbbbbbbbbbbbbb"
    l.translatesAutoresizingMaskIntoConstraints = false
    return l
}()
意図的にlabel2のContentCompressionResistanceをlabel1よりも高くしました。

結果としてlabel2が優先的に表示されるようになりました。
label1にContentCompressionResistanceを設定
let label1: UILabel = {
    let l = UILabel()
    l.font = UIFont.systemFont(ofSize: 16)
    l.numberOfLines = 1
    l.backgroundColor = .gray

    // ***********ContentCompressionResistanceを751に設定****************
    l.setContentCompressionResistancePriority(UILayoutPriority.init(751), for: .horizontal)
    l.text = "aaaaaaaaaaaaaaaaaaaaaaaaaaa"
    l.translatesAutoresizingMaskIntoConstraints = false
    return l
}()
先ほどと同じ値でlabel1にもContentCompressionResistanceを設定しました。
一番最初の状態と同様にlabel1がlabel2よりも優先的に表示されるようになりました。
label1にWidth制約を設定
override func viewDidLoad() {
    super.viewDidLoad()

    self.view.addSubview(label1)
    self.view.addSubview(label2)

    // ***********幅制約を設定****************
    label1.widthAnchor.constraint(equalToConstant: 100).isActive = true
    label1.centerYAnchor.constraint(equalTo: view.centerYAnchor).isActive = true
    label1.leadingAnchor.constraint(equalTo: view.leadingAnchor, constant: 16).isActive = true
    label2.leadingAnchor.constraint(equalTo: label1.trailingAnchor, constant: 16).isActive = true
    label2.centerYAnchor.constraint(equalTo: view.centerYAnchor).isActive = true
    view.trailingAnchor.constraint(greaterThanOrEqualTo: label2.trailingAnchor, constant: 16).isActive = true
}
label1に固定の幅を設定しました。

Anchorに対するデフォルトの優先度は1000のため、優先的にlabel1を幅100まで表示し、その後label2を表示できる限り表示するようになりました。
label1にWidth制約の優先度をlabel2のContentCompressionResistanceよりも下げる
override func viewDidLoad() {
    super.viewDidLoad()

    self.view.addSubview(label1)
    self.view.addSubview(label2)

    // ************ width制約を750に ***************
    let widthConstraint = label1.widthAnchor.constraint(equalToConstant: 100)
    widthConstraint.priority = UILayoutPriority.init(750)
    widthConstraint.isActive = true
    label1.centerYAnchor.constraint(equalTo: view.centerYAnchor).isActive = true
    label1.leadingAnchor.constraint(equalTo: view.leadingAnchor, constant: 16).isActive = true
    label2.leadingAnchor.constraint(equalTo: label1.trailingAnchor, constant: 16).isActive = true
    label2.centerYAnchor.constraint(equalTo: view.centerYAnchor).isActive = true
    view.trailingAnchor.constraint(greaterThanOrEqualTo: label2.trailingAnchor, constant: 16).isActive = true
}
あえてlabel1のwidthAnchorの優先度をlabel2のContentCompressionResistanceよりも下げました。

label2の表示が優先されるようになりました。
label1にWidth制約の優先度をlabel2のContentCompressionResistanceよりも上げる
override func viewDidLoad() {
    super.viewDidLoad()

    self.view.addSubview(label1)
    self.view.addSubview(label2)

    let widthConstraint = label1.widthAnchor.constraint(equalToConstant: 100)

    // ************ width制約を752に ***************
    widthConstraint.priority = UILayoutPriority.init(752)
    widthConstraint.isActive = true
    label1.centerYAnchor.constraint(equalTo: view.centerYAnchor).isActive = true
    label1.leadingAnchor.constraint(equalTo: view.leadingAnchor, constant: 16).isActive = true
    label2.leadingAnchor.constraint(equalTo: label1.trailingAnchor, constant: 16).isActive = true
    label2.centerYAnchor.constraint(equalTo: view.centerYAnchor).isActive = true
    view.trailingAnchor.constraint(greaterThanOrEqualTo: label2.trailingAnchor, constant: 16).isActive = true
}
上記とは逆にします。

label1の表示が優先されるようになりました。
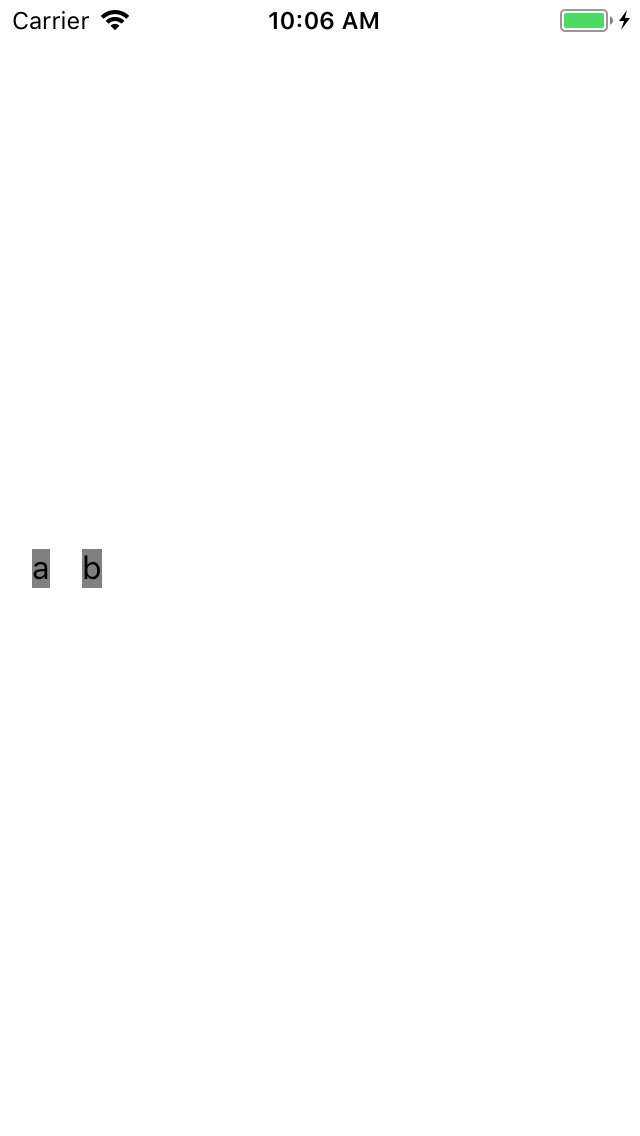
次に文字列が少ない場合を試してみます。
初期表示変更
class ViewController4: UIViewController {

   let label1: UILabel = {
        let l = UILabel()
        l.font = UIFont.systemFont(ofSize: 16)
        l.numberOfLines = 1
        l.backgroundColor = .gray
        l.text = "a"
        l.translatesAutoresizingMaskIntoConstraints = false
        return l
    }()

    let label2: UILabel = {
        let l = UILabel()
        l.font = UIFont.systemFont(ofSize: 16)
        l.numberOfLines = 1
        l.backgroundColor = .gray
        l.text = "b"
        l.translatesAutoresizingMaskIntoConstraints = false
        return l
    }()

    override func viewDidLoad() {
        super.viewDidLoad()

        self.view.addSubview(label1)
        self.view.addSubview(label2)

        label1.centerYAnchor.constraint(equalTo: view.centerYAnchor).isActive = true
        label1.leadingAnchor.constraint(equalTo: view.leadingAnchor, constant: 16).isActive = true
        label2.leadingAnchor.constraint(equalTo: label1.trailingAnchor, constant: 16).isActive = true
        label2.centerYAnchor.constraint(equalTo: view.centerYAnchor).isActive = true
        view.trailingAnchor.constraint(greaterThanOrEqualTo: label2.trailingAnchor, constant: 16).isActive = true
    }
}
特にAnchor以外は制約を設定していません。

各Labelのintrinsic content sizeからLabelの幅が決定され、それに従って表示されています。
label1にwidth制約を設定
override func viewDidLoad() {
    super.viewDidLoad()

    self.view.addSubview(label1)
    self.view.addSubview(label2)

    // ************ width制約を設定 ***************
    label1.widthAnchor.constraint(equalToConstant: 100).isActive = true // デフォルトは1000
    label1.centerYAnchor.constraint(equalTo: view.centerYAnchor).isActive = true
    label1.leadingAnchor.constraint(equalTo: view.leadingAnchor, constant: 16).isActive = true
    label2.leadingAnchor.constraint(equalTo: label1.trailingAnchor, constant: 16).isActive = true
    label2.centerYAnchor.constraint(equalTo: view.centerYAnchor).isActive = true
    view.trailingAnchor.constraint(greaterThanOrEqualTo: label2.trailingAnchor, constant: 16).isActive = true
}
label1に固定の幅を設定します。

ContentHuggingPriorityのデフォルトの優先度は250なのでwidthAnchorのデフォルト優先度の1000が優先され、UILabelが固定の幅まで表示されるようになっています。
label1にContentHuggingPriorityを設定、width制約の優先度をContentHuggingPriorityより下げる
let label1: UILabel = {
    let l = UILabel()
    l.font = UIFont.systemFont(ofSize: 16)
    l.numberOfLines = 1
    l.backgroundColor = .gray
    l.setContentHuggingPriority(UILayoutPriority.init(250), for: .horizontal)
    l.text = "a"
    l.translatesAutoresizingMaskIntoConstraints = false
    return l
}()

override func viewDidLoad() {
    super.viewDidLoad()

    self.view.addSubview(label1)
    self.view.addSubview(label2)

    // *********優先度を249に設定************
    let widthConstraint = label1.widthAnchor.constraint(equalToConstant: 100)
    widthConstraint.priority = UILayoutPriority.init(249)
    widthConstraint.isActive = true
    label1.centerYAnchor.constraint(equalTo: view.centerYAnchor).isActive = true
    label1.leadingAnchor.constraint(equalTo: view.leadingAnchor, constant: 16).isActive = true
    label2.leadingAnchor.constraint(equalTo: label1.trailingAnchor, constant: 16).isActive = true
    label2.centerYAnchor.constraint(equalTo: view.centerYAnchor).isActive = true
    view.trailingAnchor.constraint(greaterThanOrEqualTo: label2.trailingAnchor, constant: 16).isActive = true
}
label1のwidthAnchorをlabel1のContentHuggingPriorityよりも小さくしました。
こうすると、label1の末尾の空白が取り除かれ、文字列の幅と同じように表示されるようになりました。
label2のContentCompressionResistancePriorityを一番高い優先度にする
class ViewController4: UIViewController {

   let label1: UILabel = {
        let l = UILabel()
        l.font = UIFont.systemFont(ofSize: 16)
        l.numberOfLines = 1
        l.backgroundColor = .gray

        // 優先度250
        l.setContentHuggingPriority(UILayoutPriority.init(250), for: .horizontal)
        l.text = "a"
        l.translatesAutoresizingMaskIntoConstraints = false
        return l
    }()

    let label2: UILabel = {
        let l = UILabel()
        l.font = UIFont.systemFont(ofSize: 16)
        l.numberOfLines = 1

        // 優先度751
l.setContentCompressionResistancePriority(UILayoutPriority.init(751), for: .horizontal)
        l.backgroundColor = .gray
        l.text = "bbbbbbbbbbbbbbbbbbbbbbbbbbbbbbbbbbbbbbbbbbbbbbbbb"
        l.translatesAutoresizingMaskIntoConstraints = false
        return l
    }()

    override func viewDidLoad() {
        super.viewDidLoad()

        self.view.addSubview(label1)
        self.view.addSubview(label2)

        // 優先度249
        let widthConstraint = label1.widthAnchor.constraint(equalToConstant: 100)
        widthConstraint.priority = UILayoutPriority.init(249)
        widthConstraint.isActive = true
        label1.centerYAnchor.constraint(equalTo: view.centerYAnchor).isActive = true
        label1.leadingAnchor.constraint(equalTo: view.leadingAnchor, constant: 16).isActive = true


        // 優先度750
        let widthConstraint2 = label2.widthAnchor.constraint(equalToConstant: 100)
        widthConstraint2.priority = UILayoutPriority.init(750)
        widthConstraint2.isActive = true

        label2.leadingAnchor.constraint(equalTo: label1.trailingAnchor, constant: 16).isActive = true
        label2.centerYAnchor.constraint(equalTo: view.centerYAnchor).isActive = true
        view.trailingAnchor.constraint(greaterThanOrEqualTo: label2.trailingAnchor, constant: 16).isActive = true
    }
}
上記のように優先度を設定すると、
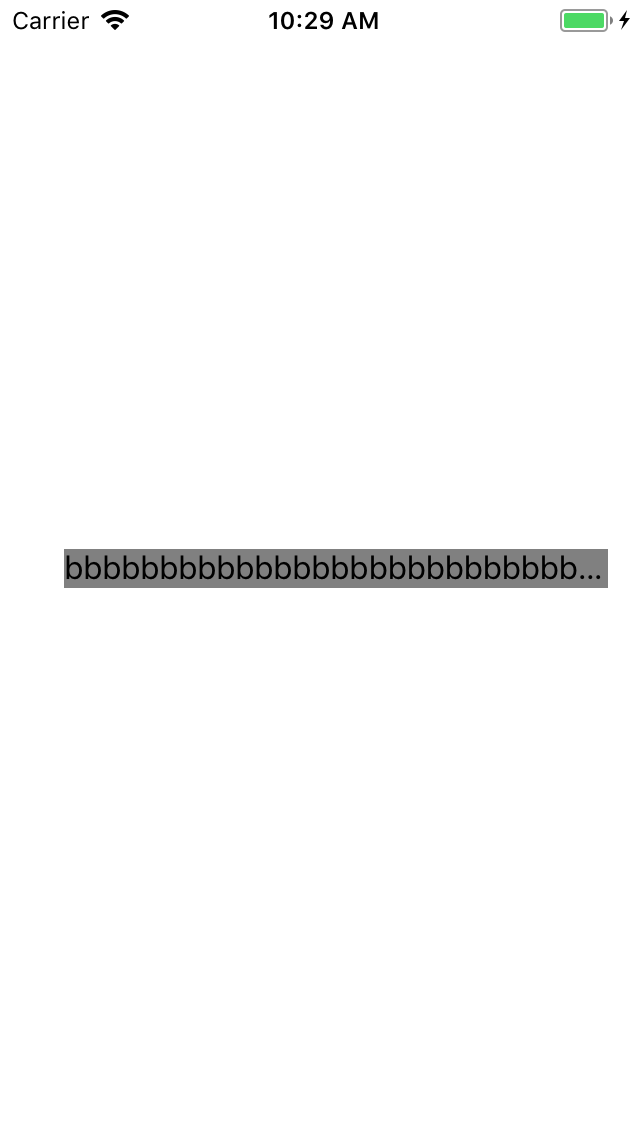
優先度順で考えると、
1.Anchorを使った制約がデフォルトの1000になっているためにまずAnchorの制約が設定される。
2.label2へのContentCompressionResistancePriorityからlabel2を極力大きく表示しようとする。
となるため、2の時点でlabel2の表示が入りきらないために、label1の表示は消えてしまいました。(ここちょっと自信ないです。。。)
label1のContentHuggingPriority→label1のWidthAnchor->label2のContentCompressionResistancePriority→label2のWidthAnchorの順に優先度を設定する
class ViewController4: UIViewController {

   let label1: UILabel = {
        let l = UILabel()
        l.font = UIFont.systemFont(ofSize: 16)
        l.numberOfLines = 1
        l.backgroundColor = .gray

        // 優先度250
        l.setContentHuggingPriority(UILayoutPriority.init(250), for: .horizontal)
        l.text = "a"
        l.translatesAutoresizingMaskIntoConstraints = false
        return l
    }()

    let label2: UILabel = {
        let l = UILabel()
        l.font = UIFont.systemFont(ofSize: 16)
        l.numberOfLines = 1

        // 優先度248
l.setContentCompressionResistancePriority(UILayoutPriority.init(248), for: .horizontal)
        l.backgroundColor = .gray
        l.text = "bbbbbbbbbbbbbbbbbbbbbbbbbbbbbbbbbbbbbbbbbbbbbbbbb"
        l.translatesAutoresizingMaskIntoConstraints = false
        return l
    }()


    override func viewDidLoad() {
        super.viewDidLoad()

        self.view.addSubview(label1)
        self.view.addSubview(label2)

     // 優先度249
        let widthConstraint = label1.widthAnchor.constraint(equalToConstant: 100)
        widthConstraint.priority = UILayoutPriority.init(249)
        widthConstraint.isActive = true
        label1.centerYAnchor.constraint(equalTo: view.centerYAnchor).isActive = true
        label1.leadingAnchor.constraint(equalTo: view.leadingAnchor, constant: 16).isActive = true

     // 優先度247
        let widthConstraint2 = label2.widthAnchor.constraint(equalToConstant: 100)
        widthConstraint2.priority = UILayoutPriority.init(247)
        widthConstraint2.isActive = true
        label2.leadingAnchor.constraint(equalTo: label1.trailingAnchor, constant: 16).isActive = true
        label2.centerYAnchor.constraint(equalTo: view.centerYAnchor).isActive = true
        view.trailingAnchor.constraint(greaterThanOrEqualTo: label2.trailingAnchor, constant: 16).isActive = true
    }
}
優先度順で考えると、
1.Anchorを使った制約がデフォルトの1000になっているためにまずAnchorの制約が設定される。
2.label1へのContentHuggingPriorityからlabel1を文字列の幅で表示しようとする。
3.label2へのContentCompressionResistancePriorityでlabel2の文字列を最大限表示しようとする
となるため、

のようにlabel1は文字列の幅、label2は表示できる限りまで幅を広げて表示されるようになりました。
まとめ
IBを使っているとかちゃかちゃと値の増減をしてなんとなくうまくいったのかなくらいの意識で行なっていましたが、コードで書いてみることで優先度のレイアウトに対する影響への理解をやや高めることができました。
実際に試してやってみた結果ですので、
何か間違っている箇所などのご指摘がございましたらぜひ教えてください![]()