はじめに
Rails API 認証方法としてdevise_token_authを使っているものはよくみるんですが、
既存のサービスで使っているdeviseをそのまま使用する実装方法はあまりありませんでしたので記事を書きました。
前提
- すでに運用開始している Railsアプリケーションに追加で実装する(APIモードではない)
-
deviseを使用する(devise_token_authは使用しない) - 既存の User モデルに適用する
- GraphQL を実装する
- フロント側の実装は割愛
構成
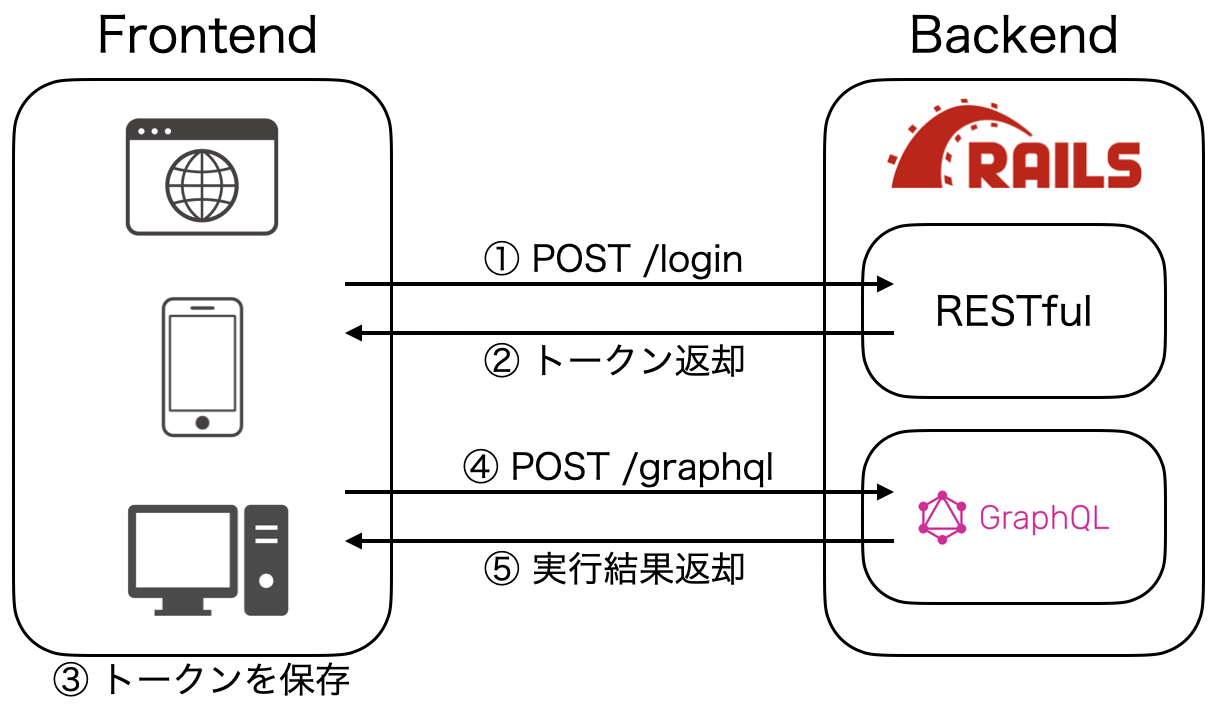
認証フローを図にまとめてみました。
③については、フロント側の実装となりますので、こちらの記事では割愛させていただきます。
実装の流れ
- Rails アプリケーション実装
- GraphQL 実装
- Devise 実装
Rails アプリケーション実装
Rails アプリを新しく作成して、Taskモデルを作成します。
$ rails new graphql_devise_sample
$ rails g model Task body:string
$ rails db:create
$ rails db:migrate
GraphQL 実装
GraphQLの実装方法の詳細については、以下をご覧ください。(本記事でもコマンドは記載しておりますが、詳細の説明については割愛しております。)
- 初めてのGraphQL with Rails
Gemfile に GraphQL の gem を記載します。
gem 'graphql'

group :development do
  gem 'graphiql-rails'
end
bundle install して、 GraphQL をインストール、Task モデルへ適用します。
$ bundle install
$ rails g graphql:install
$ rails g graphql:object Task
クエリを追加します。
module Types
  class QueryType < Types::BaseObject
    # Add `node(id: ID!) and `nodes(ids: [ID!]!)`
    include GraphQL::Types::Relay::HasNodeField
    include GraphQL::Types::Relay::HasNodesField

    field :task, Types::TaskType, null: true do
      description "Find Task by ID"
      argument :id, ID, required: true
    end
    def task(id:)
      Task.find(id)
    end

    field :all_tasks, Types::TaskType.connection_type, null: true do
      description 'All Tasks'
    end
    def all_tasks
      Task.all
    end
  end
end
ここまでできたら、localhost:3000/graphiqlへアクセスし、クエリを実行できることを確認します。
{
  todayTasks {
    edges{
      node{
        id
        body
        createdAt
      }
    }
  }
}
Devise 実装
Devise の実装方法の詳細については、以下をご覧ください。(本記事でもコマンドは記載しておりますが、詳細の説明については割愛しております。)
- 【Rails】deviseを導入してみる
まずは、Gemfile に devise の gem を追加します。
gem 'devise'
bundle install して、 Devise をインストール、User モデルへ適用します。
$ bundle install
$ rails g devise:install
$ rails g devise user
$ rails g migration add_access_token_to_user
User モデルに access_token を追加します。
class AddAccessTokenToUser < ActiveRecord::Migration
  def change
    add_column :users, :access_token, :string
  end
end
$ rails db:migrate
User が作成されたタイミングで access_token を作成します。
class User < ApplicationRecord
  # Include default devise modules. Others available are:
  # :confirmable, :lockable, :timeoutable, :trackable and :omniauthable
  devise :database_authenticatable, :registerable,
         :recoverable, :rememberable, :validatable

  after_create :update_access_token!

  def update_access_token!
    self.access_token = "#{self.id}:#{Devise.friendly_token}"
    save
  end
end
API 実行時に認証時に必要な access_token が一緒に送られてきていることを確認するメソッドを application_controller.rb に追加します。
class ApplicationController < ActionController::Base
  protect_from_forgery with: :null_session

  def authenticate_user_from_token!
    auth_token = request.headers['Authorization']

    if auth_token
      authenticate_with_auth_token(auth_token)
    else
      authenticate_error
    end
  end

  private

  def authenticate_with_auth_token(auth_token)
    unless auth_token.include?(':')
      authenticate_error
      return
    end

    _, token = auth_token.split(' ')
    user_id = token.split(':').first
    user = User.where(id: user_id).first

    if user && Devise.secure_compare(user.access_token, token)
      # User can access
      sign_in user, store: false
    else
      authenticate_error
    end
  end

  ##
  # Authentication Failure
  # Renders a 401 error
  def authenticate_error
    render json: { error: t('devise.failure.unauthenticated') }, status: 401
  end
end
ルーティングを追加します。
Rails.application.routes.draw do
  # 以下を追加
  namespace :api do
    resource :users, only: [:create]
    resource :login, only: [:create], controller: :sessions
  end
end
ここで、access_token取得 API と ユーザー登録 API を作成するために、それぞれ2つファイルを作成します。
-
app/controllers/api/sessions_controller.rb- ログイン(
access_token取得)(構成図の①)
- ログイン(
-
app/controllers/api/users_controller.rb- サインアップ(ユーザー登録)
module Api
  class SessionsController < ApplicationController
    def create
      @user = User.find_for_database_authentication(email: params[:email])
      return invalid_email unless @user

      if @user.valid_password?(params[:password])
        sign_in :user, @user
        render json: @user, root: nil
      else
        invalid_password
      end
    end

    private

    def invalid_email
      warden.custom_failure!
      render json: { error: 'invalid_email' }
    end

    def invalid_password
      warden.custom_failure!
      render json: { error: 'invalid_password' }
    end
  end
end
module Api
  class UsersController < ApplicationController
    def index
      @users = User.all
    end

    def create
      @user = User.new(user_params)
      if @user.save!
        render json: @user
      else
        render json: { error: 'user_create_error' }, status: :unprocessable_entity
      end
    end

    private

    def user_params
      params.require(:user).permit(:email, :password)
    end
  end
end
以上が実装部分となります。次に実行結果を確認します。
実行結果
以下の4点について、ちゃんと実装できていることを確認します。
- ユーザー登録API
-
access_token取得API -
access_tokenを持っていないと、GraphQL の実行結果が取得できないこと -
access_tokenを持っていると、GraphQL の実行結果が取得できないこと
まずは、開発環境にてrails sでサーバーを起動しておきます。
また、POSTMANなどのWebAPI開発用のツールを使用して以下を実行してください。
ユーザー登録API
以下の URL へPOSTを実行することでユーザー登録できることを確認します。
- URL
localhost:3000/api/users?user[email]=test@example.com&user[password]=aaaaaa
access_token取得API
以下の URL へPOSTを実行することでaccess_tokenを取得できることを確認します。
- URL
localhost:3000/login?email=test@example.com&password=aaaaaa
access_token を持っていないと、GraphQL の実行結果が取得できないこと
以下の URL 、Authorization リクエストヘッダー、およびBodyを指定した上でPOSTを実行することで、実行結果が取得できないことを確認します。
- URL
localhost:3000/graphql
- Body
- GraphQL
- Query
- 以下のクエリを記載すること
{
  todayTasks {
    edges{
      node{
        id
        body
        createdAt
      }
    }
  }
}
access_token を持っていると、GraphQL の実行結果が取得できないこと
以下の URL 、Authorization リクエストヘッダー、およびBodyを指定した上でPOSTを実行することで、実行結果が取得できることを確認します。
- URL
localhost:3000/graphql
- Authorization リクエストヘッダー
- Type
- Bearer Token
- Token
- 1:fkib5vzMa1YjqyMnbMUo(access_token取得API実行時に取得したaccess_tokenを記載すること)
- Type
- Body
- GraphQL
- Query
- 以下のクエリを記載すること
{
  todayTasks {
    edges{
      node{
        id
        body
        createdAt
      }
    }
  }
}
GraphQL + Devise認証の実装と確認は以上となります。
まとめ
Rails API 認証方法としてdeviseをそのまま使用する実装方法について記載しました。
長文になってしまいましたが、どなたかの役に立てば幸いです。
P.S.
余談ですが、GitHub Copilot を最近になってようやく使い出したんですが、生産性が爆上がりしていて気に入っています。
参考
- 初めてのGraphQL with Rails
- 【Rails】deviseを導入してみる
- Rails5 API + devise でユーザーの認証と作成機能を実装した API を作成する
- GitHub (skedesu / graphql_devise_sample )
会社紹介
株式会社 Mosaica
最先端テクノロジーで社会課題を解決し、持続可能な未来を創造する IT カンパニー。
AI ソリューション、クラウド統合、DX 推進、経営コンサルティングなど包括的なサービスでビジネス変革を支援しています。
詳しくは 公式サイト までお気軽にご相談ください。
公式サイト: https://mosaica.co.jp/
