はじめに
Flutter を触り始めて1ヶ月ちょっととなります。
GoRouter Version 5.0 リリース されたこともあり使い方を勉強したので、こちらで紹介したいと思います。
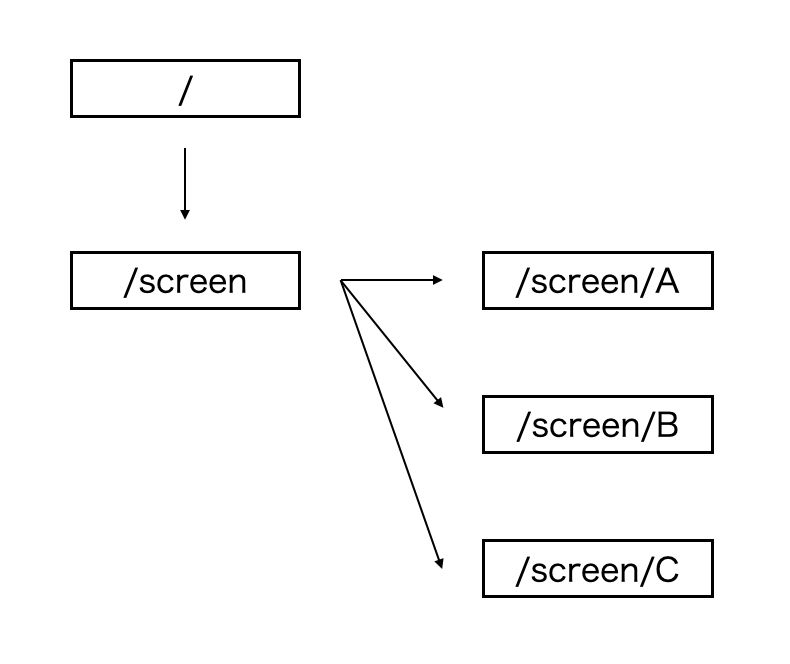
画面遷移
以下の図のような画面遷移を作成しました。
実装
以下の手順で進めていきます。
- Flutterアプリ作成
- パッケージのインポート
- 各ファイル作成
Flutterアプリ作成
$ flutter create go_router_sample
パッケージのインポート
最新のバージョンはこちらから...
https://pub.dev/packages/go_router
pubspec.yaml
dependencies:
  go_router: ^5.0.2
$ flutter pub get
各ファイル作成
以下の3つのファイルを編集していきます。
main.dartlogin.dartscreen.dart
main.dart
MaterialApp の中に、GoRouter インスタンスを作成します。
Simple Navigation と Nested Navigation のサンプルを GoRouter インスタンスに記述します。
main.dart
import 'package:flutter/material.dart';
import 'package:go_router/go_router.dart';

void main() => runApp(App());

class App extends StatelessWidget {
  App({Key? key}) : super(key: key);

  @override
  Widget build(BuildContext context) => MaterialApp.router(
        routerConfig: _router,
      );

  // GoRouter インスタンスを作成
  final GoRouter _router = GoRouter(
    routes: <GoRoute>[

      // Simple Navigation

      // /login へ遷移
      GoRoute(
          name: 'login',
          path: '/',
          pageBuilder: (BuildContext context, GoRouterState state) =>
              MaterialPage(
                key: state.pageKey,
                child: const LogInPage(),
              )),

      // Nested Navigation

      // /screen へ遷移
      GoRoute(
        name: 'selectPage',
        path: '/screen',
        pageBuilder: (BuildContext context, GoRouterState state) =>
            MaterialPage(
          key: state.pageKey,
          child: const ScreenSelect(),
        ),
        routes: <GoRoute>[
          // /screen/A へ遷移
          GoRoute(
            path: 'A',
            builder: (BuildContext context, GoRouterState state) =>
                const ScreenA(),
          ),
          // /screen/B へ遷移
          GoRoute(
            path: 'B',
            builder: (BuildContext context, GoRouterState state) =>
                const ScreenB(),
          ),
          // /screen/C へ遷移
          GoRoute(
            path: 'C',
            builder: (BuildContext context, GoRouterState state) =>
                const ScreenC(),
          ),
        ],
      ),
    ],
  );
}
login.dart
初期表示 Widget を作成します。
login.dart
class LogInPage extends StatelessWidget {
  const LogInPage({Key? key}) : super(key: key);

  @override
  Widget build(BuildContext context) => Scaffold(
        appBar: AppBar(title: const Text('LogIn Page')),
        body: Center(
          child: Column(
            mainAxisAlignment: MainAxisAlignment.center,
            children: <Widget>[
              ElevatedButton(
                // /screen へ遷移
                onPressed: () => context.go('/screen'),
                child: const Text('Login'),
              ),
            ],
          ),
        ),
      );
}
screen.dart
Nested Navigation 用の Widget を作成します。
screen.dart
class ScreenSelect extends StatelessWidget {
  const ScreenSelect({Key? key}) : super(key: key);

  @override
  Widget build(BuildContext context) => Scaffold(
        appBar: AppBar(title: const Text('ScreenSelect')),
        body: Center(
          child: Column(
            mainAxisAlignment: MainAxisAlignment.center,
            children: <Widget>[
              ElevatedButton(
                // /screen/A へ遷移
                onPressed: () => context.go('/screen/A'),
                child: const Text('Go back to screenA page'),
              ),
              const SizedBox(height: 20),
              ElevatedButton(
                // /screen/B へ遷移
                onPressed: () => context.go('/screen/B'),
                child: const Text('Go back to screenB page'),
              ),
              const SizedBox(height: 20),
              ElevatedButton(
                // /screen/C へ遷移
                onPressed: () => context.go('/screen/C'),
                child: const Text('Go back to screenC page'),
              ),
            ],
          ),
        ),
      );
}

class ScreenA extends StatelessWidget {
  const ScreenA({Key? key}) : super(key: key);

  @override
  Widget build(BuildContext context) => Scaffold(
        appBar: AppBar(title: const Text('ScreenA')),
        body: Center(
          child: Column(
            mainAxisAlignment: MainAxisAlignment.center,
            children: <Widget>[
              ElevatedButton(
                onPressed: () => context.go('/screen'),
                child: const Text('Go back to home page'),
              ),
              const SizedBox(height: 20),
              ElevatedButton(
                onPressed: () => context.go('/screen/B'),
                child: const Text('Go back to screenB page'),
              ),
            ],
          ),
        ),
      );
}

class ScreenB extends StatelessWidget {
  const ScreenB({Key? key}) : super(key: key);

  @override
  Widget build(BuildContext context) => Scaffold(
        appBar: AppBar(title: const Text('ScreenB')),
        body: Center(
          child: Column(
            mainAxisAlignment: MainAxisAlignment.center,
            children: <Widget>[
              ElevatedButton(
                onPressed: () => context.go('/screen'),
                child: const Text('Go back to home page'),
              ),
              const SizedBox(height: 20),
              ElevatedButton(
                onPressed: () => context.go('/screen/C'),
                child: const Text('Go back to ScreenC page'),
              ),
            ],
          ),
        ),
      );
}

class ScreenC extends StatelessWidget {
  const ScreenC({Key? key}) : super(key: key);

  @override
  Widget build(BuildContext context) => Scaffold(
        appBar: AppBar(title: const Text('ScreenC')),
        body: Center(
          child: Column(
            mainAxisAlignment: MainAxisAlignment.center,
            children: <Widget>[
              ElevatedButton(
                onPressed: () => context.go('/screen'),
                child: const Text('Go back to home page'),
              ),
              const SizedBox(height: 20),
              ElevatedButton(
                onPressed: () => context.go('/screen/A'),
                child: const Text('Go back to screenA page'),
              ),
            ],
          ),
        ),
      );
}
GoRouter Nested Navigation使い方は以上となります。
まとめ
次は動的なページ遷移ができるように勉強していきたいと思います。
参考
- go_router | Flutter Package - Pub.dev
- GitHub - Umigishi-Aoi / go_router_sample
会社紹介
株式会社 Mosaica
最先端テクノロジーで社会課題を解決し、持続可能な未来を創造する IT カンパニー。
AI ソリューション、クラウド統合、DX 推進、経営コンサルティングなど包括的なサービスでビジネス変革を支援しています。
詳しくは 公式サイト までお気軽にご相談ください。
公式サイト: https://mosaica.co.jp/