Visual Studio Codeの準備
- Visual Studio Codeを開く
- Python 拡張機能をインストール
- Jupyter 拡張機能をインストール
venv仮想環境の準備
- venvで仮想環境を構築
mkdir C:\test\
cd C:\test\
python -m venv data-analytics
- 仮想環境に入ってpandasをpip install
cd data-analytics\
.\Scripts\Activate.ps1
python -m venv data-analytics
- srcとdataフォルダをvenv環境は以下に作成
mkdir .\src
mkdir .\data
Jupyter Notebookの準備
Visual Studio Code上で、srcフォルダにtest.ipynbを作成して開くと、勝手にJupyterNotebook形式のUIになる。
試しにprint("hello")を記述して、コードブロック右側にある再生ボタンとクリック。

接続先Pythonを選択するよう言われるので、候補から先ほど作成した仮想環境名のPythonを選択

ipykernelをインストールするか聞かれるのでインストール
ちょっと時間がかかる
データの準備
今回はe-GOVデータポータルから、日本の人口推移を男女別にまとめたデータを取得してみる。
https://data.e-gov.go.jp/data/ja/dataset/mhlw_20201124_0048
ここから「1_年次・性別人口」のCSVデータをダウンロード
CSVの中には冒頭とデータの最後に説明や注釈があったりするので、削除
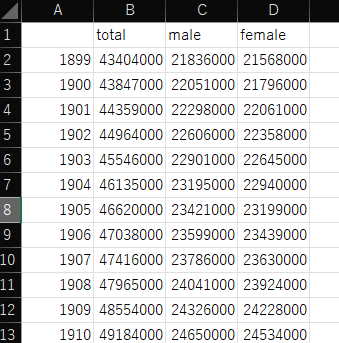
列名も、合計→total、男→male、女→femaleに変更。
あとなぜか年数が十の位になってしまってるので、1899年からオートフィルで4桁年数にする。
こんな感じ↓
Jupyterで以下のようにデータ取り込み準備
import pandas as pd
#CSVファイル読み込み

df= pd.read_csv('../data/test.csv')
print(df)
以下のように表示されるはず。
これで読み込みまでは完了。

