(1)はじめに
普段はソーシャルワーカーとして障がいをお持ちの方の支援をしています。Advent Calendarに合わせてバージョンアップさせているReact Nativeでの3D表示について、続きを書いていきたいと思います。前回はReact Nativeで3Dキャラクターを動かしてみようで3Dキャラクターをバーチャルスティックで動かすコードを紹介しました。今回はチャットやマルチプレイで利用するSocket通信の機能を追加したいと思います。
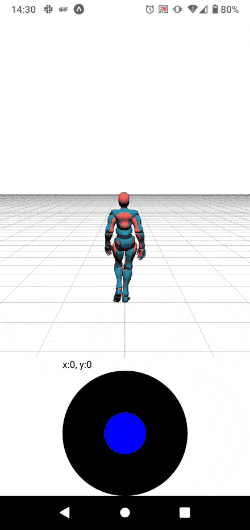
赤色のキャラクターは自身の端末、青色のキャラクターは別の端末で操作しています。
(2)Socket通信のためのサーバー
まずはnodejsでサーバーを作成します。基本的にはアプリから受け取ったデータを配信するだけの機能です。フレームワークはexpressを利用し、端末から送られてきたデータをsocket.onで取得、socket.broadcast.emitで送信してきた端末以外に配信します。
```js const express = require("express"); const cors = require("cors"); const http = require("http"); const socketIO = require("socket.io"); require("events").EventEmitter.defaultMaxListeners = 0;const port = process.env.PORT || 3000;
const app = express();
const server = http.createServer(app);
const io = socketIO(server, {
cors: true,
origins: ["*"],
methods: ["GET", "POST"],
credentials: true,
});
app.use(cors());
app.use(express.urlencoded({ extended: true, limit: "10mb" }));
app.use(express.json({ extended: true, limit: "10mb" }));
io.on("connection", (socket) => {
socket.on("FromAPI", (data) => {
socket.broadcast.emit("FromAPI", data);
socket.on("disconnect", () => {
console.log("クライアント接続が切れました");
});
});
});
server.listen(port, () => {
console.log(listening on *:${port});
});
<p>サーバーですが、herokuだとラグが気になったのでさくらvpnに立てました。KUSANAGIというOSを使うと一瞬で秘密鍵やssl設定ができます。月800円程の定額なので、テスト用にひとつ立てておくと便利です。また、"(node) warning: possible EventEmitter memory leak detected. 11 listeners added. Use emitter.setMaxListeners() to increase limit."がログ表示されるのでrequire("events").EventEmitter.defaultMaxListeners = 0;で対応しています。</p>


<h1>(3)使った技術</h1>

<p>
・react-native<br>
・expo 42.0.1<br>
・expo-gl 10.4.2<br>
・expo-three 6.0.1<br>
・gsap 3.6.0<br>
・three 0.132.0 ← 今回のコードはバージョンによってはエラーになります<br>
・base-64 1.0.0<br>
・expo-asset 8.3.3<br>
・socket.io-client 4.4.0 ← Socket通信用に追加


<p>別端末の相手の3Dキャラクターを追加、表示させます。</p>

<p>参考にしたサイト</a><br>
<a href="https://threejs.org/">Three.js公式</a><br>
<a href="https://docs.expo.dev/versions/latest/sdk/gl-view/">Expo公式 GLView</a><br>
<a href="https://www.mixamo.com/">Mixamo公式</a><br>
<a href="https://socket.IO/">Socket.io公式</a><br><br>

React Native(Expo)のSocket通信についてはあまり情報がなく、実機でのテスト環境では問題なく動作しましたが、ストアにリリースした場合の動作は検証できていませんのでご了承ください。</p>

<h1>(4)3Dモデル表示</h1>
<p>バーチャルスティックは前回同様です。今回は相手の3Dモデルを追加でMixamoで作成し読み込ませます。設定するanimationは自身の3Dモデルと同様になります。自身のモデルをmodelsA 相手をmodelsBとしました。socketについてはuseRefを使い参照しています。このままではログ(
gl.pixelStorei() doesn't support this parameter yet! from TextureLoader)
が大量に出ますのでnode_modulesにある/three/build/three.js 16527行目からの下記3行をコメントアウトしておきます。※github expo-threeのissue#196参照
</p>

```js
// _gl.pixelStorei(_gl.UNPACK_PREMULTIPLY_ALPHA_WEBGL, texture.premultiplyAlpha);
// _gl.pixelStorei(_gl.UNPACK_ALIGNMENT, texture.unpackAlignment);
// _gl.pixelStorei(_gl.UNPACK_COLORSPACE_CONVERSION_WEBGL, _gl.NONE);
できる限りそのままのコードにコメントしました。
//App.js
import React, { useState, useEffect, useRef } from "react";
import { View } from "react-native";
import { GLView } from "expo-gl";
import { Renderer } from "expo-three";
import { TweenMax } from "gsap";
import {
  PointLight,
  GridHelper,
  PerspectiveCamera,
  Scene,
  AnimationMixer, // アニメーションのため追加
  Clock, // アニメーションのため追加
} from "three";
import Positon from "./Position"; // バーチャルスティックのjs
import { GLTFLoader } from "three/examples/jsm/loaders/GLTFLoader";
import { Asset } from "expo-asset"; // ファイル読み込みのため追加
import io from "socket.io-client"; // クライアント用Socket.io

export default function App() {
  const [cameras, setCameras] = useState(null);
  const [modelsA, setModelsA] = useState(null); // 自身の3Dモデルをセットする変数
  const [walkA, setWalkA] = useState(true); // 自身のアニメーションをセットする変数
  const [modelsB, setModelsB] = useState(null); // 相手の3Dモデルをセットする変数
  const [walkB, setWalkB] = useState(true); // 相手のアニメーションをセットする変数
  const [action, setAction] = useState({ z: 0, x: 0 }); // 自身のキャラクターの座標をセットする変数
  const socketRef = useRef();

  useEffect(() => {
    // サーバーのアドレス
    const socket = io("<サーバーのアドレス>");
    socket.on("connect", () => {
    // 接続されたときにFromAPIから座標と回転、歩いているか否かの値を受け取る
      socket.on("FromAPI", (data) => {
        // 相手のキャラクターに値をセットする
        modelsB.position.set(data.x, 0, data.z);
        modelsB.rotation.y = data.y;
        walkB.paused = data.w;
        walkB.play();
      });
    });
    socket.on("disconnect", () => {
      console.log("接続が切れました");
    });
    socket.on("connect", () => {
      console.log("接続されました");
    });
    socketRef.current = socket;
    return () => socket.disconnect();
  }, [modelsB]);

  // FromAPIと名付けて自身のキャラクターの座標と回転、歩いているか否かの値をサーバーに送る
  const send = (props) => {
    socketRef.current.emit("FromAPI", {
      x: props.x,
      y: props.y,
      z: props.z,
      w: props.w,
    });
  };

  const walk = () => {
    // 自身のキャラクターとカメラの視点を同時に座標移動させて三人称視点にする
   // TweenMax.to([何と、何が], { z軸にaction分移動 })
    TweenMax.set([modelsA.position,cameras.position], {
      z: `+= ${action.z}`,
      x: `+= ${action.x}`,
    });
    // Math.atan2で算出したradianに1.5を加算し前後左右にいい感じで向くようにする
    modelsA.rotation.y = Math.atan2(-action.z, action.x) + 1.5;
    // サーバーに自身のキャラクターの座標と回転、歩いているか否かの値を関数sendに渡す
    send({
      x: modelsA.position.x,
      y: modelsA.rotation.y,
      z: modelsA.position.z,
      w: walkA.paused,
    });
  };

  const move = (props) => {
    walkA.paused = false; // キャラクターのポーズを解除
    walkA.play(); // // アニメーションである変数walkを再生
    setAction({ z: props.y, x: props.x }); // Position.jsから受け取った座標を変数actionにセット
    walk(); // walk関数を実行
  };
  // Position.jsから画面から指を離すことで発火する
  const end = () => {
    // アニメーションをストップ
    walkA.paused = true;
    // ストップした時の自身のキャラクターの座標と回転、歩いているか否かの値をsend関数に渡す
    send({
      x: modelsA.position.x,
      y: modelsA.rotation.y,
      z: modelsA.position.z,
      w: walkA.paused,
    });
  };

  return (
    <>
      <View style={{ flex: 1 }}>
        <GLView
          style={{ flex: 1 }}
          onContextCreate={async (gl) => {
            // 3D空間の準備
            const { drawingBufferWidth: width, drawingBufferHeight: height } =
              gl;
            const renderer = new Renderer({ gl }); // レンダラーの準備
            renderer.setSize(width, height); // 3D空間の幅と高さ
            renderer.setClearColor("white"); // 3D空間の配色
            const scene = new Scene(); // これが3D空間
            scene.add(new GridHelper(100, 100)); //グリッドを表示

            // GLTFをロードする
            const loader = new GLTFLoader();
            // 自身のキャラクターを設置
            const assetA = Asset.fromModule(require("./assets/testA.glb"));
            await assetA.downloadAsync();
            let mixerA;
            let clockA = new Clock();
            loader.load(
              assetA.uri || "",
              (gltf) => {
                const modelA = gltf.scene;
                modelA.position.set(0, 0, 0); // 配置される座標 (x,y,z)
                modelA.rotation.y = Math.PI;
                const animations = gltf.animations;
                //Animation Mixerインスタンスを生成
                mixerA = new AnimationMixer(modelA);
                // 設定した一つ目のアニメーションを設定
                let animation = animations[0];
                // アニメーションを変数walkにセット
                setWalkA(mixerA.clipAction(animation));
                // testA.glbを3D空間に追加
                scene.add(modelA);
                setModelsA(modelA);
              },
              (xhr) => {
                console.log("ロード中");
              },
              (error) => {
                console.error("読み込めませんでした");
              }
            );
            // 相手のキャラクターを設置
            let mixerB;
            let clockB = new Clock();
            const assetB = Asset.fromModule(require("./assets/testB.glb"));
            await assetB.downloadAsync();
            loader.load(
              assetB.uri || "",
              (gltf) => {
                const modelB = gltf.scene;
                modelB.position.set(0, 0, 0); // 配置される座標 (x,y,z)
                modelB.rotation.y = Math.PI;
                const animations = gltf.animations;
                //Animation Mixerインスタンスを生成
                mixerB = new AnimationMixer(modelB);
                // 設定した一つ目のアニメーションを設定
                let animation = animations[0];
                // アニメーションを変数walkにセット
                setWalkB(mixerB.clipAction(animation));
                // testB.glbを3D空間に追加;
                scene.add(modelB);
                setModelsB(modelB);
              },
              (xhr) => {
                console.log("ロード中");
              },
              (error) => {
                console.error("読み込めませんでした");
              }
            );

            // 3D空間の光!
            const pointLight = new PointLight(0xffffff, 2, 1000, 1); //一点からあらゆる方向への光源(色, 光の強さ, 距離, 光の減衰率)
            pointLight.position.set(0, 200, 200); //配置される座標 (x,y,z)
            scene.add(pointLight); //3D空間に追加
            // カメラが映し出す設定(視野角, アスペクト比, near, far)
            const camera = new PerspectiveCamera(45, width / height, 1, 1000);
            setCameras(camera);
            // カメラの初期座標
            let cameraInitialPositionX = 0;
            let cameraInitialPositionY = 2;
            let cameraInitialPositionZ = 7;
            // カメラの座標
            camera.position.set(
              cameraInitialPositionX,
              cameraInitialPositionY,
              cameraInitialPositionZ
            );

            const render = () => {
              requestAnimationFrame(render); // アニメーション moveUd関数、moveLr関数でカメラ座標が移動
              renderer.render(scene, camera); // レンダリング
              //Animation Mixerを自身と相手ともに実行
              if (mixerA) {
                mixerA.update(clockA.getDelta());
              }
              if (mixerB) {
                mixerB.update(clockB.getDelta());
              }
              gl.endFrameEXP(); // 現在のフレームを表示する準備ができていることをコンテキストに通知するpresent (Expo公式)
            };
            render();
          }}
        />
      </View>
      <View style={{ flexDirection: "row", alignSelf: "center" }}>
        <Positon
          // Position.jsからonMoveを受け取ってmove関数を実行
          onMove={(data) => {
            move({
              x: (data.x - 60) / 1000,
              y: (data.y - 60) / 1000,
            });
          }}
          // Position.jsからonEndを受け取ってend関数を実行
          onEnd={end}
        />
      </View>
    </>
  );
}
(5)終わりに
座標と向き、歩いているか否かをSocket通信で同期することで、React Nativeでのマルチプレイが可能になりました。VRoidで作成したキャラクターを使ったチャットやゲームも作れそうです。とはいえ、そのようなアプリはUnityで作成することが多いかと思います。Reactで作成するメリットがあれば良いな![]()