前回からのあらすじ
前回:ASP.NET Core 2 API x Identity でユーザー登録とアクセスを管理(JWT) 2. 基本メソッド編 (アカウント作成)
おはようございます、昨日はAPI経由でASP.NET Identityを使って新しアカウント作成してみました。今日は作ったアカウントを使い、ログインするAPIを作ります。ログインにはJWTokenを使います。ログイン情報に対してTokenを返す流れになります。
モデルの作成
リクエストモデル
まずはリクエスト、レスポンスモデルを準備します。 ユーザー名、パスワード、デバイスIDを受取れるようにしておきます。
using SampleApi.Models.ApplicationUsers.DataModels;

namespace SampleApi.Models.ApplicationUsers.RequestModels
{
    public class ApplicationUserRequestModel
    {
        public ApplicationUserDataModel CreateUserRequestModelToApplicationUserDateModel(
            CreateUserRequestModel user)
        {
            return new ApplicationUserDataModel()
            {
                UserName = user.UserName,
                Email = user.Email
            };
        }
    }

    public class CreateUserRequestModel
    {
        public string UserName { get; set; }
        public string Password { get; set; }
        public string Email { get; set; }
    }

    public class LoginRequestModel
    {
        public string UserName { get; set; }
        public string Password { get; set; }
        public string Device { get; set; }
    }
}
レスポンスモデル
基本はトークンを返すだけです。エラー時の場所も宣言しておきます。
using System;
using System.Collections.Generic;
using SampleApi.Models.ApplicationUsers.DataModels;

namespace SampleApi.Models.ApplicationUsers.ResponseModels
{
    public class ApplicationUserResponseModel
    {

        /// <summary>
        /// From ApplicationUserDataModel to CreateUserResponseModel
        /// </summary>
        /// <param name="user"></param>
        /// <returns></returns>
        public CreateUserResponseModel ApplicationUserDataModelToCreateUserRequestMode(
            ApplicationUserDataModel user)
        {
            var response = new CreateUserResponseModel()
            {
                UserName = user.UserName,
                Email = user.Email,
                Created = user.Created
            };

            return response;
        }
    }


    public class CreateUserResponseModel
    {
        public string UserName { get; set; }

        public string Email { get; set; }
        public DateTime Created { get; set; }

        public List<ErrorModel> Errors { get; set; }
    }

    public class LoginResponseModel
    {
        public string Token { get; set; }
        public DateTime Expires { get; set; }
        public List<ErrorModel> Errors { get; set; }
    }
}
設定データモデル
今回はJWTを利用するにあたり、いくつかの設定プロパティーをappsettings.jsonに格納します。設定した値を取得するためのモデルを用意します。
namespace SampleApi
{
    public class AppSettings
    {
        public JwtConfigurableOptions JwtSetting { get; set; }
    }

    public class JwtConfigurableOptions
    {
        public string JwtKey { get; set; }
        public string JwtIssuer { get; set; }
        public string JwtAudience { get; set; }
        public int JwtExpireDays { get; set; }
    }
}
Handlerの作成
コアとなるHandlerを作成します。ここでは2つのHandlerを作成します。
- ログインリクエストデータを処理してログインレスポンスデータを返すもの。
- ログインデータをトークン化するもの。
トークン化Handler
using SampleApi.Handlers.Accounts.Interfaces;
using Microsoft.IdentityModel.Tokens;
using System;
using System.Collections.Generic;
using System.IdentityModel.Tokens.Jwt;
using System.Linq;
using System.Security.Claims;
using System.Text;

namespace SampleApi.Handlers.Accounts
{
    public class JwtHandler : IJwtHandler
    {
        private readonly JwtConfigurableOptions _jwtConfigurableOptions;

        public JwtHandler(JwtConfigurableOptions jwtConfigurableOptions)
        {
            _jwtConfigurableOptions = jwtConfigurableOptions;
        }

        /// <summary>
        /// Take user name, device, roles and generate encoded token.
        /// </summary>
        /// <param name="userName"></param>
        /// <param name="device"></param>
        /// <param name="roles"></param>
        /// <returns>token string</returns>
        public string GenerateEncodedToken(string userName, string device, IList<string> roles = null)
        {
            List<Claim> claims = new List<Claim>
            {
                new Claim(JwtRegisteredClaimNames.Sub, userName),
                new Claim(JwtRegisteredClaimNames.Jti, Guid.NewGuid().ToString()),
                new Claim(JwtRegisteredClaimNames.Iat, DateTime.UtcNow.Ticks.ToString(), ClaimValueTypes.Integer64),
                new Claim(ClaimTypes.System, device)
            };

            if (roles?.Any() == true)
            {
                foreach (string role in roles)
                {
                    claims.Add(new Claim(ClaimTypes.Role, role));
                }
            }

            // Create the JWT security token and encode it.
            JwtSecurityToken jwt = new JwtSecurityToken(
            issuer: _jwtConfigurableOptions.JwtIssuer,
            audience: _jwtConfigurableOptions.JwtAudience,
            claims: claims,
            expires: DateTime.UtcNow.AddDays(_jwtConfigurableOptions.JwtExpireDays),
            signingCredentials: new SigningCredentials(
                new SymmetricSecurityKey(Encoding.UTF8.GetBytes(_jwtConfigurableOptions.JwtKey)),
                SecurityAlgorithms.HmacSha256)
        );

            string encodedJwt = new JwtSecurityTokenHandler().WriteToken(jwt);

            return encodedJwt;
        }
    }
}
アカウントHandler
using SampleApi.Handlers.Accounts.Interfaces;
using SampleApi.Models;
using SampleApi.Models.ApplicationUsers.DataModels;
using SampleApi.Models.ApplicationUsers.RequestModels;
using SampleApi.Models.ApplicationUsers.ResponseModels;
using Microsoft.AspNetCore.Identity;
using System;
using System.Collections.Generic;
using System.Threading.Tasks;

namespace SampleApi.Handlers.Accounts
{
    /// <summary>
    /// Handles all account related operations
    /// </summary>
    public class AccountHandler : IAccountHandler
    {

        private readonly UserManager<ApplicationUserDataModel> _userManager;
        private readonly IJwtHandler _jwtHandler;

        public AccountHandler(UserManager<ApplicationUserDataModel> userManager,
            IJwtHandler jwtHandler)
        {
            _userManager = userManager;
            _jwtHandler = jwtHandler;
        }

        /// <summary>
        /// Create new user
        /// </summary>
        /// <param name="user"></param>
        /// <returns></returns>
        public async Task<CreateUserResponseModel> Create(CreateUserRequestModel user)
        {
            // Request model
            ApplicationUserRequestModel request = new ApplicationUserRequestModel();

            // Request model to data model
            ApplicationUserDataModel applicationUser = request.CreateUserRequestModelToApplicationUserDateModel(user);

            // Timestamping
            applicationUser.Created = DateTime.UtcNow;

            // Create new user
            IdentityResult newUser = await _userManager.CreateAsync(
                applicationUser,
                user.Password);

            if (newUser.Succeeded)
            {
                // Response model
                ApplicationUserResponseModel response = new ApplicationUserResponseModel();

                // Return created user
                return response.ApplicationUserDataModelToCreateUserRequestMode(applicationUser);

            }

            // Error
            CreateUserResponseModel errorResponse = new CreateUserResponseModel();

            if (newUser.Errors != null)
            {
                errorResponse.Errors = new List<ErrorModel>();

                foreach (IdentityError error in newUser.Errors)
                {
                    errorResponse.Errors.Add(
                        new ErrorModel()
                        {
                            ErrorCode = error.Code,
                            ErrorDescription = error.Description
                        });
                }
            }

            return errorResponse;
        }


        /// <summary>
        /// Validate user id, password then generate token (as mean of login)
        /// </summary>
        /// <param name="login"></param>
        /// <returns></returns>
        public async Task<LoginResponseModel> Login(LoginRequestModel login)
        {

            LoginResponseModel response = new LoginResponseModel();

            // Check user name
            ApplicationUserDataModel user = await _userManager.FindByNameAsync(login.UserName);

            if (user != null)
            {

                // Check password
                bool isPasswordOk = await _userManager.CheckPasswordAsync(user, login.Password);

                if (isPasswordOk)
                {
                    // Get roles
                    var roles = await _userManager.GetRolesAsync(user);

                    // If sucess then generate token
                    response.Token = _jwtHandler.GenerateEncodedToken(user.UserName, login.Device, roles);

                    return response;
                }

                response.Errors = new List<ErrorModel>()
                    {
                        new ErrorModel()
                        {
                            ErrorCode = "400",
                            ErrorDescription = "Invalid password"
                        }
                    };

                return response;
            }

            response.Errors = new List<ErrorModel>()
                {
                    new ErrorModel()
                    {
                        ErrorCode = "400",
                        ErrorDescription = "Invalid user"
                    }
                };

            return response;
        }
    }
}
Filter
Headerでトークンを利用してセキュリティーをかけるので、ヘッダーフィルターを事前に構築します。
public class AddAuthorizationHeaderParameterOperationFilter : IOperationFilter
{
  public void Apply(Operation operation, OperationFilterContext context)
  {
    if (operation.Parameters == null)
    {
      operation.Parameters = new List<IParameter>();
    }

    operation.Parameters.Add(new HeaderParameter()
    {
      Name = "Device-Id",
      In = "header",
      Type = "string",
      Required = false
    });
  }
}

internal class HeaderParameter : NonBodyParameter
{
}
DI
モデルとハンドラーが準備できあたら、JWTの各種設定とDIを準備します。ここではトーケンが利用できるように各種プロパティーを設定し、新しく作ったHandlerをControllerからDIできるように設定します。
using SampleApi.Filters;
using SampleApi.Handlers;
using SampleApi.Handlers.Accounts;
using SampleApi.Handlers.Accounts.Interfaces;
using SampleApi.Models.ApplicationUsers.DataModels;
using Microsoft.AspNetCore.Authentication.JwtBearer;
using Microsoft.AspNetCore.Builder;
using Microsoft.AspNetCore.Hosting;
using Microsoft.AspNetCore.Http;
using Microsoft.AspNetCore.Identity;
using Microsoft.AspNetCore.Mvc;
using Microsoft.EntityFrameworkCore;
using Microsoft.Extensions.Configuration;
using Microsoft.Extensions.DependencyInjection;
using Microsoft.Extensions.Options;
using Swashbuckle.AspNetCore.Swagger;
using System;
using System.IdentityModel.Tokens.Jwt;
using System.IO;
using System.Reflection;
using System.Text;
using Microsoft.IdentityModel.Tokens;

namespace SampleApi
{
    public class Startup
    {
        public Startup(IConfiguration configuration, IOptions<AppSettings> optionsAccessor)
        {
            Configuration = configuration;
        }

        public IConfiguration Configuration { get; }

        // This method gets called by the runtime. Use this method to add services to the container.
        public void ConfigureServices(IServiceCollection services)
        {

            // App Setting
            var appSettingSection = Configuration.GetSection("AppSettings");
            AppSettings appSettings = new AppSettings();
            appSettingSection.Bind(appSettings);

            // Sql
            services.AddDbContext<ApplicationDbContext>(options =>
                options.UseSqlServer(
                    Configuration.GetConnectionString("UserDabtaseConnection")));

            services.AddIdentity<ApplicationUserDataModel, IdentityRole>()
                .AddEntityFrameworkStores<ApplicationDbContext>()
                .AddUserManager<UserManager<ApplicationUserDataModel>>()
                .AddDefaultTokenProviders();

            services.Configure<IdentityOptions>(
                options =>
                {
                    // Password settings
                    options.Password.RequireDigit = false;
                    options.Password.RequiredLength = 6;
                    options.Password.RequireNonAlphanumeric = false;
                    options.Password.RequireUppercase = false;
                    options.Password.RequireLowercase = false;
                    options.Password.RequiredUniqueChars = 3;

                    // Lockout settings
                    options.Lockout.DefaultLockoutTimeSpan = TimeSpan.FromMinutes(30);
                    options.Lockout.MaxFailedAccessAttempts = 5;
                    options.Lockout.AllowedForNewUsers = true;

                    // User settings
                    options.User.RequireUniqueEmail = true;
                });

            var tokenValidationParameters = new TokenValidationParameters
            {
                ValidateIssuer = true,
                ValidIssuer = appSettings.JwtSetting.JwtIssuer,
                ValidAudience = appSettings.JwtSetting.JwtAudience,
                ValidateIssuerSigningKey = true,
                IssuerSigningKey = new SymmetricSecurityKey(
                    Encoding.UTF8.GetBytes(
                        appSettings.JwtSetting.JwtKey)),

                RequireExpirationTime = false,
                ValidateLifetime = true,
                ClockSkew = TimeSpan.Zero
            };

            JwtSecurityTokenHandler.DefaultInboundClaimTypeMap.Clear();

            services.AddAuthentication(options =>
            {
                options.DefaultAuthenticateScheme = JwtBearerDefaults.AuthenticationScheme;
                options.DefaultChallengeScheme = JwtBearerDefaults.AuthenticationScheme;
            }).AddJwtBearer(configureOptions =>
            {
                configureOptions.ClaimsIssuer = appSettings.JwtSetting.JwtIssuer;
                configureOptions.TokenValidationParameters = tokenValidationParameters;
                configureOptions.SaveToken = true;
            });

            services.AddSingleton<IHttpContextAccessor, HttpContextAccessor>();
            services.AddTransient<IAccountHandler, AccountHandler>();
            services.AddSingleton<IJwtHandler, JwtHandler>();

            services.AddSingleton(config => appSettings.JwtSetting);

            services.AddMvc().SetCompatibilityVersion(CompatibilityVersion.Version_2_2);

            // Register the Swagger generator, defining 1 or more Swagger documents
            services.AddSwaggerGen(c =>
            {
                c.SwaggerDoc("v1", new Info
                {
                    Title = "{title}",
                    Version = "1",
                    Description = "{description}",
                    Contact = new Contact
                    {
                        Name = "{name}",
                        Email = "{email}",
                        Url = "{url}"
                    }
                });

                c.OperationFilter<AddAuthorizationHeaderParameterOperationFilter>();

                // Set the comments path for the Swagger JSON and UI.
                string xmlFile = $"{Assembly.GetExecutingAssembly().GetName().Name}.xml";
                string xmlPath = Path.Combine(AppContext.BaseDirectory, xmlFile);
                c.IncludeXmlComments(xmlPath);
            });

        }

        // This method gets called by the runtime. Use this method to configure the HTTP request pipeline.
        public void Configure(IApplicationBuilder app, IHostingEnvironment env)
        {
            if (env.IsDevelopment())
            {
                app.UseDeveloperExceptionPage();
            }
            else
            {
                app.UseHsts();
            }

            // Enable middleware to serve generated Swagger as a JSON endpoint.
            app.UseSwagger();

            // Enable middleware to serve swagger-ui (HTML, JS, CSS, etc.),
            // specifying the Swagger JSON endpoint.
            app.UseSwaggerUI(c =>
            {
                c.SwaggerEndpoint("/swagger/v1/swagger.json", "Jeton API V1");

                c.RoutePrefix = string.Empty;
            });

            app.UseAuthentication();
            app.UseHttpsRedirection();
            app.UseMvc();
        }
    }
}
Controllerの作成
最後にAPIのインターフェイスとなるとControllerを作成します。
using System.Threading.Tasks;
using JetonApi.Handlers.Accounts.Interfaces;
using JetonApi.Models.ApplicationUsers.RequestModels;
using JetonApi.Models.ApplicationUsers.ResponseModels;
using Microsoft.AspNetCore.Mvc;

namespace JetonApi.Controllers
{
    [Route("api/[controller]")]
    [ApiController]
    public class AccountController : ControllerBase
    {
        private readonly IAccountHandler _accountHandler;

        public AccountController(IAccountHandler accountHandler)
        {
            _accountHandler = accountHandler;
        }

        [HttpPost, Route("/Account/CreateUser")]
        public async Task<ActionResult<CreateUserResponseModel>> Create([FromBody] CreateUserRequestModel user)
        {
            var response = await _accountHandler.Create(user);

            return response;
        }

        [HttpPost, Route("/Account/Login")]
        public async Task<ActionResult<LoginResponseModel>> Login([FromBody] LoginRequestModel login)
        {

            var response = await _accountHandler.Login(login);

            return response;
        }

    }
}
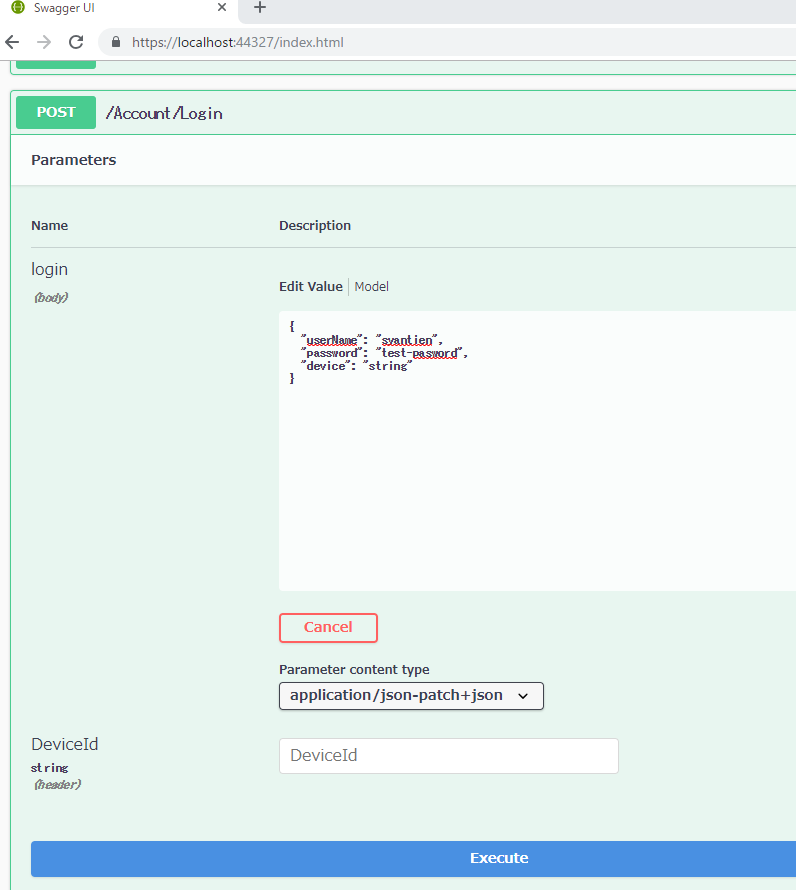
Swaggerからログインのテスト
では、早速APIを試してみます。
正常リクエスト
(パスワードのスペルを前回間違えいました・・)
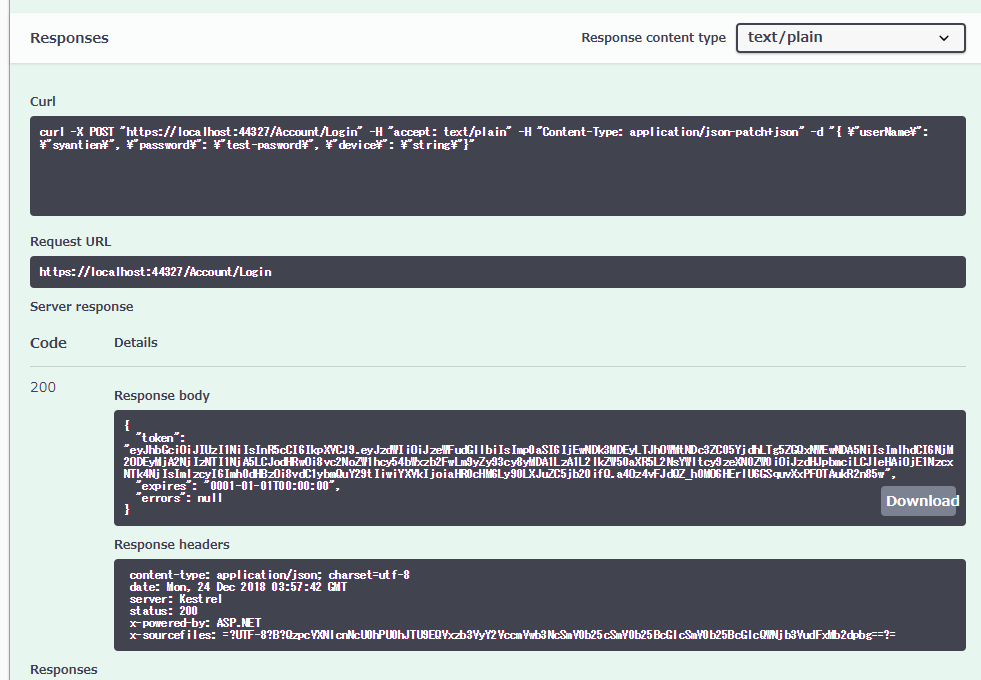
正常レスポンス
それっぽいのが返ってきていますね。(値の確認は次にやります)
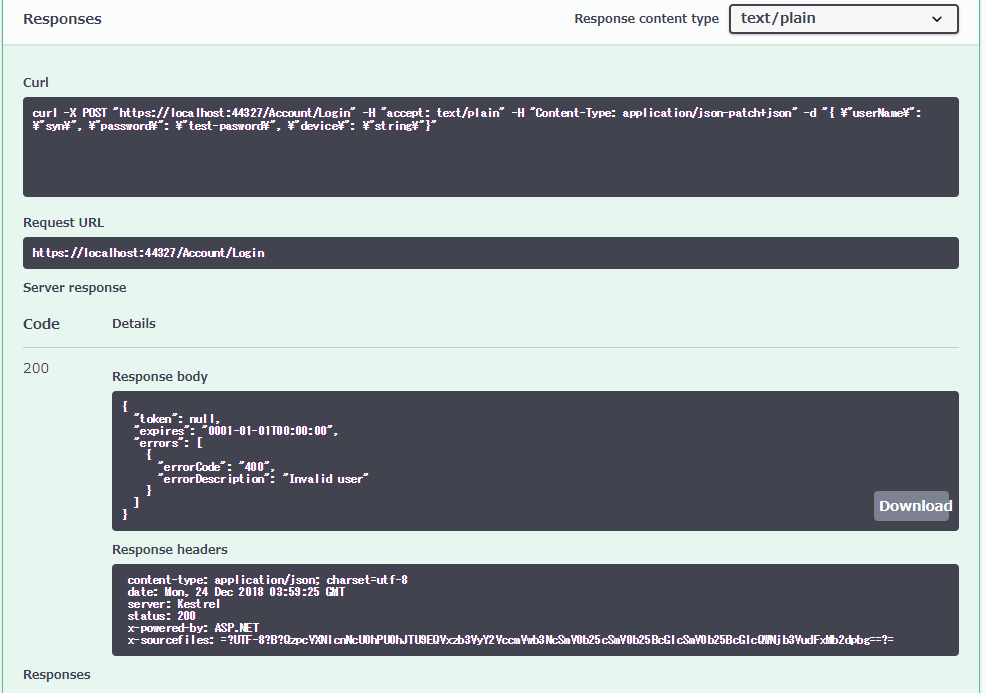
異常リクエスト/レスポンス 存在しないユーザー
存在しないユーザーでリクエスト
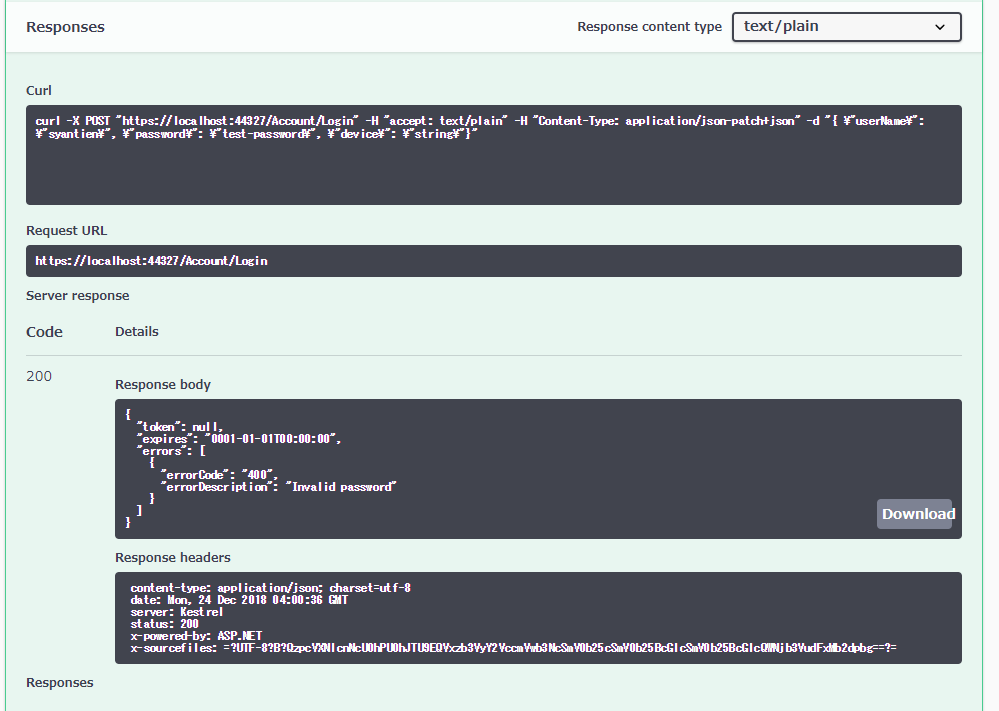
異常リクエスト/レスポンス パスワード間違え
パスワード間違えてリクエスト
次
今回は正しいユーザー名とパスワードに対してトークンを発行しました。この発行したトークンを解読してアプリケーションを構築していきます。