Amazon LightSailからNTT-PC WebARENA Indigo VPSに移動④: VPNサーバ ( Algo )
ぼく「データ通信量無制限型のVPSだったら、やっぱりVPNサーバ立てるでしょう!」
ぼく「トラフィック気にせず繋ぎっぱにできるなんて最高や!」
ぼく「WireGuard使ってみたい!」
追記:Ubuntu22.04でもいけました。 2022.07.12
VPNで何が出来るか
- アプリケーションへの接続元IPアドレスを統一できる。
- 端末からインターネットへの接続先IPアドレスと接続先ポートを統一できる。
- 通信先制限(コンテンツフィルタなど)を回避できる。
- フリーWi-Fiとか繋いだ時に通信路を無線有線問わず暗号化できる。
- ファイアウォールを貫通してVPSのNWに入れるのでVPS上で気軽にローカル検証環境に乗り込める。具体的には以下の手段を使わなくても済むようになる。
- SSHでポートフォワーディング/Socksプロキシ
- Nginxでリバースプロキシ
- SquidでHTTPプロキシ
- ポート開放(iptablesなど)
- 遠隔でも同じL2ドメインに複数の端末が参加できる。
VPNサーバの選定
- 参考: https://opensource.com/article/18/8/open-source-tools-vpn
- 選んだVPN: Algo https://github.com/trailofbits/algo
- Algoの特徴:
- オープンソースで安全なVPNを構築する良くも悪くも自己責任なスクリプト
- 個人サーバに特化した構成で勝手に作ってくれる
- 対応しているVPN
- Wireguardを使える
- 個別SSHトンネルを使える
- IPSec(StrongSwan)を使える
- Algoを選んだ理由
- Ubuntuに対応している
-
Wireguardをすぐに使える!
- 今の時代のインターネットはショートパケットが多い為UDPが効く。(ルータの寿命を縮めるけど...)
- 共用部分が多いインターネットにおいて、UDPは輻輳制御しないので自分だけ高速に通信できる可能性が高い。
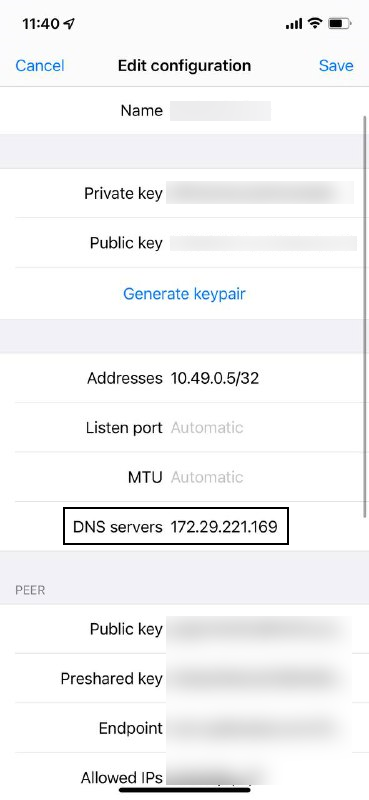
- DNSフォワーダに対応している(後から使わないように変更も出来る写真:例)
VPNサーバの設定
# algoスクリプトをDL
git clone https://github.com/trailofbits/algo.git
# pythonのバージョンは3.6以上、最新のvirtualenvが必要
python3 -V
apt install -y --no-install-recommends python3-virtualenv
cd algo
python3 -m virtualenv --python="$(command -v python3)" .env &&
source .env/bin/activate &&
python3 -m pip install -U pip virtualenv &&
python3 -m pip install -r requirements.txt

vi config.cfg

# 以下の部分を編集しVPNユーザを宣言する
#users:
#- phone
#- laptop
#- desktop

# algoスクリプトの実行
./algo

# ここからインタラクティブ
"""
[Cloud prompt]
What provider would you like to use?
1. DigitalOcean
2. Amazon Lightsail
3. Amazon EC2
4. Microsoft Azure
5. Google Compute Engine
6. Hetzner Cloud
7. Vultr
8. Scaleway
9. OpenStack (DreamCompute optimised)
10. CloudStack (Exoscale optimised)
11. Linode
12. Install to existing Ubuntu 18.04 or 20.04 server (for more advanced users)

# 今回はNTT-PC WebARENA Indigo のUbuntu20.04なので、12と入力。

[Cellular On Demand prompt]
Do you want macOS/iOS clients to enable ""Connect On Demand"" when connected to cellular networks?
[y/N]
:

# AppleのConnect On Demand機能。yと入力。ちなみに、Wireguardアプリ側であとからオフにできる。

Do you want macOS/iOS clients to enable ""Connect On Demand"" when connected to Wi-Fi?
[y/N]
:

# AppleのConnect On Demand機能。yと入力。ちなみに、Wireguardアプリ側であとからオフにできる。

[Trusted Wi-Fi networks prompt]
List the names of any trusted Wi-Fi networks where macOS/iOS clients should not use ""Connect On Demand""
(e.g., your home network. Comma-separated value, e.g., HomeNet,OfficeWifi,AlgoWiFi)
:

# 通常、自宅または会社の""信頼できるWi-Fi""のESSIDを羅列(その場合、VPN経由にしないようにできる)
# ちなみに、Wireguardアプリ側であとから編集できる。


[Retain the PKI prompt]
Do you want to retain the keys (PKI)? (required to add users in the future, but less secure)
[y/N]
:

# 用途によるが、yの入力を推奨。一部ユーザの資格情報が漏洩したら
# そのユーザのIDを削除して別のユーザを作成しないといけなくなる。

[DNS adblocking prompt]
Do you want to enable DNS ad blocking on this VPN server?
[y/N]
:

# yと入力。これをするとVPS「内」に特定ドメイン名前解決遮断機能付きのDNSフォワーダプロセスが動く。
# ちなみに、Wireguardアプリ側であとからDNSを1.1.1.1や1.0.0.1なりに指定できる。
# 広告が多いアプリは動かなくなるので、遮断リストに入っているかチェックしよう。
# https://raw.githubusercontent.com/StevenBlack/hosts/master/hosts

[SSH tunneling prompt]
Do you want each user to have their own account for SSH tunneling?
[y/N]
:

# yを入力。ユーザはシェルは使えないが、Socksプロキシの構築やポート転送ができるようになる。

Enter the IP address of your server: (or use localhost for local installation):
[localhost]
:

# VPSの外向きのIPアドレスを入力

What user should we use to login on the server? (note: passwordless login required, or ignore if you're deploying to localhost)
[root]
:

# よっぽどの事がない限り、個人用サーバの管理者は一人のはず。rootと入力。

Enter the public IP address or domain name of your server: (IMPORTANT! This is used to verify the certificate)
[__***.***.***.***__]
:

# VPNにアクセスするときのドメイン名(ドメインがなければIP)を入力。

**メッセージが続く。以下のメッセージが出たら、秘密の場所にメモしておこう**

ok: [***.***.***.***] => {
""msg"": [
[
"\"#                          Congratulations!                            #\"",
"\"#                     Your Algo server is running.                     #\"",
"\"#    Config files and certificates are in the ./configs/ directory.    #\"",
"\"#              Go to [https://whoer.net/](https://whoer.net/) after connecting               #\"",
"\"#        and ensure that all your traffic passes through the VPN.      #\"",
"\"#                     Local DNS resolver 172.29.221.***                   #\"",
""
],
"    \"#        The p12 and SSH keys password for new users is ********       #\"\n",
"    \"#        The CA key password is *****************       #\"\n",
"    "
]
}
"""
VPNサーバの利用
- ユーザには以下のいくつかのVPN接続の選択肢と個別の認証情報(秘密鍵)が与えられる。
-
./algo/configs/ にユーザに配布すべき接続情報と認証情報が格納されている。
-
Wireguard
- 標準でUDP51820が使用される。
- ./algo/configs/.../wireguard/ 配下に接続用のプロファイルが生成される
-
./algo/configs/.../wireguard/***.png
- WireGuardアプリ(各種OS対応)でこのQRコードを読み込めばすぐにセットアップしてくれる。
- 公開鍵認証方式による接続が可能。
- __./algo/configs/.../wireguard/apple/ios/***.mobileconfig
- Apple仕様の接続プロファイル。
- __./algo/configs/.../wireguard/apple/macos/***.mobileconfig
- Apple仕様の接続プロファイル。
-
./algo/configs/.../wireguard/***.png
-
IPSec(StrongSwan)
- 標準でNATトラバーサル仕様。UDP500とUDP4500が使用される。
- ./algo/configs/.../ipsec/ 配下に接続用のプロファイルが生成される
- ./algo/configs/.../ipsec/manual/***.p12
- 公開鍵認証方式による接続が可能。
- .p12ファイルの復号化キーは
The p12 and SSH keys password for new users is ********に記載されたキーとなっている。 - オレオレCA証明書の内容はopenssl x509 -in cacert.pem -textで確認可能。
Enter the public IP address or domain name of your server:で指定したDNのCA証明書になっている。
- ./algo/configs/.../ipsec/apple/***.mobileconfig
- Apple用のProfileファイル。CA証明書と.p12ファイルの内容が全部入りになっている。
- iPhoneとかは適当にSafariかなんかでこのファイルを開けば一括設定できて便利。
- ./algo/configs/.../ipsec/manual/***.p12
-
認証付きSSH(SOCKSプロキシ、ポートフォワーディング)
- sockプロキシを構築する事ができる。もちろん、ポートフォワーディングを行っても良い。
- ./algo/configs/.../ssh-tunnel/配下に接続用のプロファイルが生成される。
- つなぎ方は・・・以下をコピペするのが早そう。
ssh -D 127.0.0.1:1080 -f -q -C -N <user>@algo -i configs/***.***.***.***/ssh-tunnel/<user>.pem -F configs/***.***.***.***/ssh_config- これを実行したあとは手元のブラウザなどで普通に127.0.0.1:1080をSOCKプロキシ指定すればよい。
-
Algoがやっていること
https://github.com/trailofbits/algo/blob/master/docs/firewalls.md
- DNS(UDP53)
netstat -anp | grep 53

tcp        0      0 172.29.221.169:53       0.0.0.0:*               LISTEN
tcp        0      0 127.0.2.1:53            0.0.0.0:*               LISTEN
tcp        0      0 127.0.0.53:53           0.0.0.0:*               LISTEN

# cloudflareの1.0.0.1:443の暗号化DNSにDNSフォワーディングするDNSプロキシ。ローカルで動く。
lsof -n -i:53

dnscrypt- 422898 _dnscrypt-proxy    7u  IPv4 2923892      0t0  UDP 172.29.221.169:domain
dnscrypt- 422898 _dnscrypt-proxy    8u  IPv4 2923893      0t0  TCP 172.29.221.169:domain (LISTEN)
dnscrypt- 422898 _dnscrypt-proxy    9u  IPv4 2919515      0t0  TCP 127.0.2.1:domain (LISTEN)
dnscrypt- 422898 _dnscrypt-proxy   10u  IPv4 2918538      0t0  UDP 127.0.2.1:domain
- StrongSwan(IPSec UDP500, 4500)
netstat -anp | grep 500
udp        0      0 0.0.0.0:4500            0.0.0.0:*
udp        0      0 0.0.0.0:500             0.0.0.0:*
udp6       0      0 :::4500                 :::*
udp6       0      0 :::500                  :::*
ps aux | grep <PID>
root        1601  0.0  0.0 549660  3572 ?        Sl   12月03   0:00 /usr/bin/docker-proxy -proto udp -host-ip 0.0.0.0 -host-port 4500 -container-ip 172.17.0.2 -container-port 4500
ps aux | grep <PID>
root        1619  0.0  0.0 548252  3484 ?        Sl   12月03   0:00 /usr/bin/docker-proxy -proto udp -host-ip :: -host-port 4500 -container-ip 172.17.0.2 -container-port 4500
- WireGuard(UDP51820)
ポートはconfig.cfg上で変更可能。
- 要注意! iptablesの内容は吹き飛びます。
ufwはdisable無効化されますので、fail2banではiptablesを使いましょう
ポートをオープンしたいなら、以下を編集する事。(http/httpsを許可する例)
/etc/iptables/rules.v4

-A INPUT -p tcp --dport 80 -m conntrack --ctstate NEW -j ACCEPT
-A INPUT -p tcp --dport 443 -m conntrack --ctstate NEW -j ACCEPT
- それ以外のiptablesはだいたいこんな感じ。しっかりプライバシセパレータも実装されているので、もしローカルにサーバを公開する場合は
-A INPUT -d 172.29.221.169/32 -p udp -m udp --dport 53 -j ACCEPTのように10.48.0.0/16や10.49.0.0/16を避ける形でloopbackインターフェースでリッスンする。
#Algo VPN BEGIN
-A INPUT -p esp -j ACCEPT
-A INPUT -p ah -j ACCEPT
-A INPUT -p udp -m multiport --dports 500,4500,51820 -j ACCEPT
-A INPUT -p ipencap -m policy --dir in --pol ipsec --proto esp -j ACCEPT
-A INPUT -d 172.29.221.169/32 -p udp -m udp --dport 53 -j ACCEPT
-A FORWARD -s 10.48.0.0/16 -d 10.48.0.0/16 -j DROP
-A FORWARD -s 10.48.0.0/16 -d 10.49.0.0/16 -j DROP
-A FORWARD -s 10.49.0.0/16 -d 10.48.0.0/16 -j DROP
-A FORWARD -s 10.49.0.0/16 -d 10.49.0.0/16 -j DROP
-A FORWARD -s 10.48.0.0/16 -d 169.254.0.0/16 -j DROP
-A FORWARD -s 10.49.0.0/16 -d 169.254.0.0/16 -j DROP
-A FORWARD -m conntrack --ctstate RELATED,ESTABLISHED -j ACCEPT
-A FORWARD -p tcp -m tcp --dport 445 -j DROP
-A FORWARD -p udp -m multiport --ports 137,138 -j DROP
-A FORWARD -p tcp -m multiport --ports 137,139 -j DROP
-A FORWARD -s 10.48.0.0/16 -m conntrack --ctstate NEW -m policy --dir in --pol ipsec -j ACCEPT
-A FORWARD -s 10.49.0.0/16 -m conntrack --ctstate NEW -m policy --dir in --pol none -j ACCEPT
-A OUTPUT -d 10.48.0.0/16 -m owner --gid-owner 15000 -j DROP
-A OUTPUT -d 10.49.0.0/16 -m owner --gid-owner 15000 -j DROP
-A OUTPUT -d 169.254.0.0/16 -m owner --gid-owner 15000 -j DROP
#Algo VPN END
- ユーザの改廃
https://github.com/trailofbits/algo#adding-or-removing-users
If you chose to save the CA key during the deploy process, then Algo's own scripts can easily add and remove users from the VPN server.

Update the users list in your config.cfg
Open a terminal, cd to the algo directory, and activate the virtual environment with source .env/bin/activate
Run the command: ./algo update-users
After this process completes, the Algo VPN server will contain only the users listed in the config.cfg file.
- アンインストール
不可