はじめに
AWS Cloud9 環境にて Rubyで作成した Lambda関数を Cloud9でzip圧縮→Lambdaにアップロードして動かすまでやってみました。
ポイントは下記の通り
- LambdaのRubyランタイムと合わせる為に、Cloud9 に rvm で Ruby 2.5.0 をインストール
- S3バケットにLambda関数からPDFファイルを書き込む為の権限設定
最終的に、[kintone] → [API Gateway] → [Lambda] → [PDF生成] → [/tmp保存] → [kintone添付ファイルに保存] までの予定ですが、まず [/tmp保存] まで実装します。
実装イメージ
今回はオレンジ色の範囲を実装します。

実行環境
- AWS Cloud9
- macOS 10.13.6
- Ruby 2.5.0
処理の流れ
- Cloud9 に Ruby 2.5.0 をインストール
- kintoneアプリ作成→PDF生成処理の[Lambda]関数を実行する[API Gateway]を叩くJSを仕込みます
- PDF生成用のPDFレイアウトファイルの作成
- PDF生成用のLambda関数の作成
- S3バケットの権限設定
- S3バケットにPDFファイルを生成できることを確認
- /tmp にPDFファイルを保存
一旦前回の処理と同様にS3にPDFファイルを生成することが出来ることを確認してから、/tmpに保存してみたいと思います。
0.(事前準備)Cloud9 に Ruby 2.5.0 をインストール
(2019-10-25現在)Lambdaで実行される Rubyランタイム のバージョンは 2.5.0 です。
作成するライブラリやディレクトリ構成も合わせる必要があるので、Cloud9 に rvm を利用して Ruby 2.5.0 をインストールします。
また、今回必要なライブラリも bundler で プロジェクトディレクトリの下の vendoer/bundle にインストールします。(最終的にZipでまとめて Lambda にアップロードする為です)
rvm で Ruby 2.5.0 をインストール
ターミナルから rvm で Rubyをインストールしていきます。
rvm list で確認すると、現在は Ruby 2.6.0 がデフォルトでインストールされています。
rvm install ruby 2.5.0 で Ruby 2.5.0 をインストールします。
$ rvm list
=* ruby-2.6.3 [ x86_64 ]

# => - current
# =* - current && default
#  * - default

$ rvm install 2.5.0
$ rvm install 2.5.0
Warning, new version of rvm available '1.29.9', you are using older version '1.29.8'.
You can disable this warning with:    echo rvm_autoupdate_flag=0 >> ~/.rvmrc
You can enable  auto-update  with:    echo rvm_autoupdate_flag=2 >> ~/.rvmrc
Searching for binary rubies, this might take some time.
No binary rubies available for: amazon/2018.03/x86_64/ruby-2.5.0.
Continuing with compilation. Please read 'rvm help mount' to get more information on binary rubies.
Checking requirements for amazon.
Requirements installation successful.
Installing Ruby from source to: /home/ec2-user/.rvm/rubies/ruby-2.5.0, this may take a while depending on your cpu(s)...
ruby-2.5.0 - #downloading ruby-2.5.0, this may take a while depending on your connection...
  % Total    % Received % Xferd  Average Speed   Time    Time     Time  Current
                                 Dload  Upload   Total   Spent    Left  Speed
100 13.3M  100 13.3M    0     0  28.0M      0 --:--:-- --:--:-- --:--:-- 28.0M
ruby-2.5.0 - #extracting ruby-2.5.0 to /home/ec2-user/.rvm/src/ruby-2.5.0.....
ruby-2.5.0 - #applying patch /home/ec2-user/.rvm/patches/ruby/2.5.0/prelude_gcc_diagnostic.patch.
ruby-2.5.0 - #applying patch /home/ec2-user/.rvm/patches/ruby/2.5.0/libressl_2_7.patch.
ruby-2.5.0 - #configuring...................................................................
ruby-2.5.0 - #post-configuration..
ruby-2.5.0 - #compiling...................................................................................
ruby-2.5.0 - #installing.............................
ruby-2.5.0 - #making binaries executable..
ruby-2.5.0 - #downloading rubygems-3.0.6
ruby-2.5.0 - #extracting rubygems-3.0.6......
ruby-2.5.0 - #removing old rubygems........
ruby-2.5.0 - #installing rubygems-3.0.6...............................................
ruby-2.5.0 - #gemset created /home/ec2-user/.rvm/gems/ruby-2.5.0@global
ruby-2.5.0 - #importing gemset /home/ec2-user/.rvm/gemsets/global.gems................................................................
ruby-2.5.0 - #generating global wrappers.......
ruby-2.5.0 - #gemset created /home/ec2-user/.rvm/gems/ruby-2.5.0
ruby-2.5.0 - #importing gemsetfile /home/ec2-user/.rvm/gemsets/default.gems evaluated to empty gem list
ruby-2.5.0 - #generating default wrappers.......
ruby-2.5.0 - #adjusting #shebangs for (gem irb erb ri rdoc testrb rake).
Install of ruby-2.5.0 - #complete
Please be aware that you just installed a ruby that requires 2 patches just to be compiled on an up to date linux system.
This may have known and unaccounted for security vulnerabilities.
Please consider upgrading to ruby-2.6.3 which will have all of the latest security patches.
Ruby was built without documentation, to build it run: rvm docs generate-ri
admin-user:~/environment $ rvm list
=> ruby-2.5.0 [ x86_64 ]
 * ruby-2.6.3 [ x86_64 ]

# => - current
# =* - current && default
#  * - default

$ ruby -v
ruby 2.5.0p0 (2017-12-25 revision 61468) [x86_64-linux]
bundle install で aws-sdk-s3, thinreports をインストール
Ruby 2.5.0 がインストールされ利用できる様になりました。
次は以下の2つのRubyライブラリをインストールします。
プロジェクトのディレクトリに移動して、
bundle init
出来たGemfileに追記
gem 'thinreports'
gem 'aws-sdk-s3', '~> 1'
bundle install を実行します
$ bundle install
Fetching gem metadata from https://rubygems.org/...............
Resolving dependencies...
Fetching aws-eventstream 1.0.3
Installing aws-eventstream 1.0.3
Fetching aws-partitions 1.228.0
Installing aws-partitions 1.228.0
Fetching aws-sigv4 1.1.0
Installing aws-sigv4 1.1.0
Fetching jmespath 1.4.0
Installing jmespath 1.4.0
Fetching aws-sdk-core 3.72.0
Installing aws-sdk-core 3.72.0
Fetching aws-sdk-kms 1.25.0
Installing aws-sdk-kms 1.25.0
Fetching aws-sdk-s3 1.51.0
Installing aws-sdk-s3 1.51.0
Using bundler 1.17.3
Fetching pdf-core 0.7.0
Installing pdf-core 0.7.0
Fetching ttfunk 1.5.1
Installing ttfunk 1.5.1
Fetching prawn 2.2.2
Installing prawn 2.2.2
Fetching thinreports 0.10.3
Installing thinreports 0.10.3
Bundle complete! 2 Gemfile dependencies, 12 gems now installed.
Bundled gems are installed into `./vendor/bundle`
ディレクトリ構成確認
プロジェクトディレクトリは下記の構成になっています。
|--hello-world.rb
|--hello_world.tlf
|--kintoneToPdf
| |--index.js
|--template.yaml
|--vendor
| |--bundle
| | |--ruby
| | | |--2.5.0
| | | | |--bin
| | | | |--build_info
| | | | |--cache
| | | | |--doc
| | | | |--extensions
| | | | |--gems

| | | | | |--aws-sdk-s3-1.51.0
| | | | | | |--lib
| | | | | | | |--aws-sdk-s3
| | | | | | | | |--bucket_acl.rb
| | | | | | | | |--bucket_cors.rb
| | | | | | | | |--bucket_lifecycle_configuration.rb
| | | | | | | | |--bucket_lifecycle.rb
| | | | | | | | |--bucket_logging.rb
| | | | | | | | |--bucket_notification.rb
| | | | | | | | |--bucket_policy.rb
| | | | | | | | |--bucket.rb
| | | | | | | | |--bucket_region_cache.rb

| | | | | |--thinreports-0.10.3
| | | | | | |--CHANGELOG.md
| | | | | | |--fonts
| | | | | | |--Gemfile
| | | | | | |--lib
| | | | | | | |--thinreports
| | | | | | | | |--config.rb
| | | | | | | | |--core
vendor/bundle/ruby/2.5.0/gems 以下に aws-sdk-s3, thinreports の Ruby gems(ライブラリ) がインストールされました。
1. kintoneアプリ作成
次の拙稿の記事を参考にして下さい。
https://qiita.com/sy250f/items/0f2aaf17fd670bf82c84#kintone%E3%82%A2%E3%83%97%E3%83%AA%E4%BD%9C%E6%88%90
2. Thinreportsレイアウトファイルの作成
Thinreports は Thinreports Editorを使って作成したレイアウトファイルをテンプレートとして、PDFを生成します。
作成したレイアウトファイルは、後ほど Zip圧縮するためにCloud9のプロジェクトディレクトリにアップロードしておきます。
3. AWS Lambad for Ruby と Thinreports によるPDF出力
前段の記事では、ローカルの mac環境で作成したプログラムをZipにしてLambdaにアップロードしていました。
今回は Cloud9環境 で Lambda を作成してデプロイしてみます。
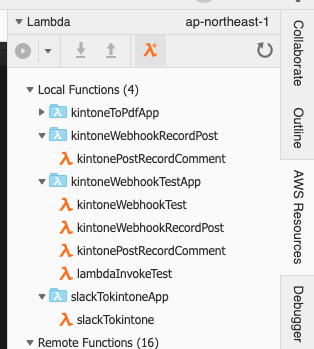
Cloud9 から Lambdaアプリの作成
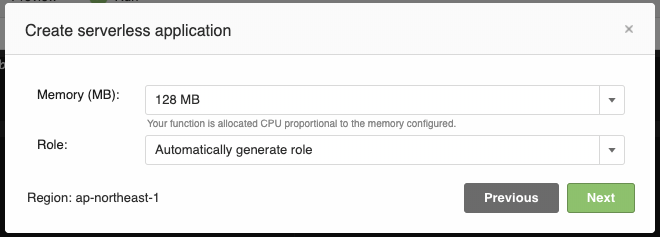
新しく Lambdaアプリを作成していきます。
λ+(create new lambda function)ボタンから作成していきます。下記スクリーンショットを参考にしてください。
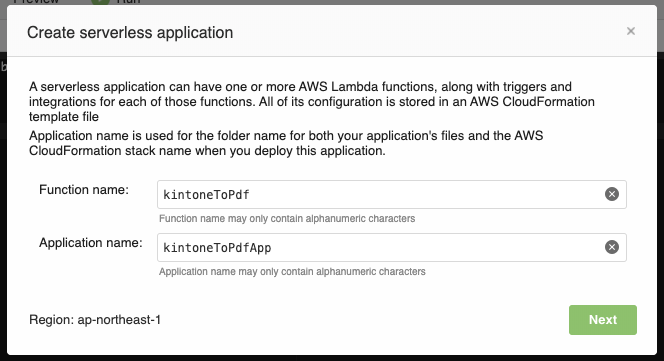
1.λ+ボタン押下
2.ファイル名、アプリ名入力(ディレクトリは アプリ名/ファイル名/ になります)
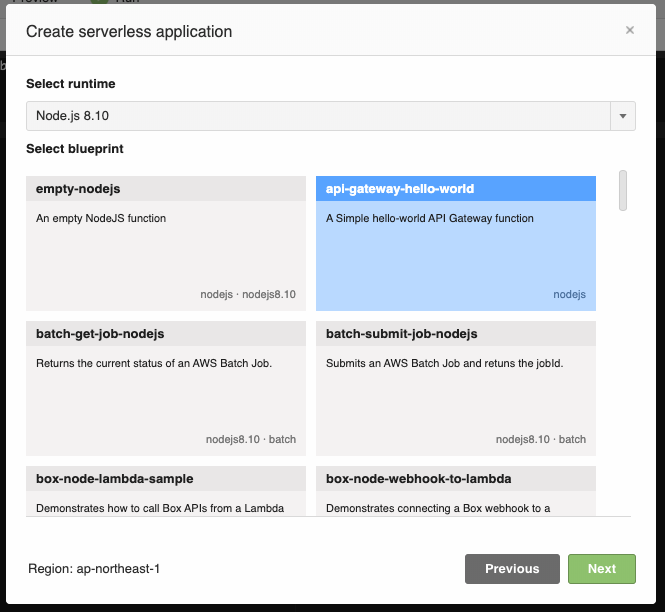
3.blueprintの選択に Ruby が無いのでとりあえず Node.js を選びます。
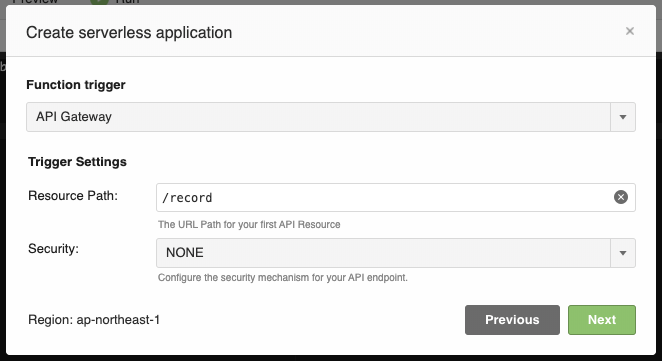
4.API Gateway の設定をします。
5.ロールは自動作成にします。
後ほどS3の権限も合わせて調整します。
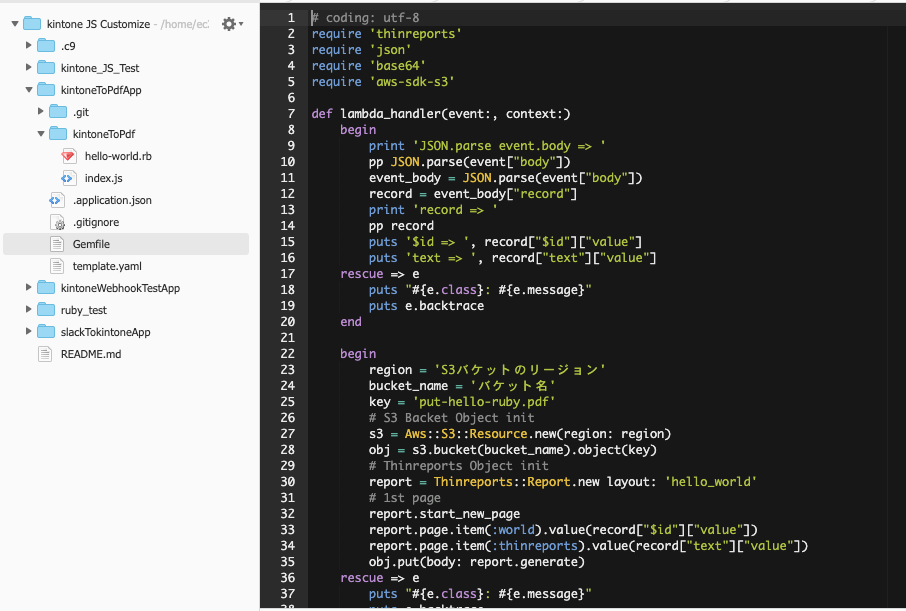
Ruby にて Lambda関数 の作成
Ruby にて Lambda関数を作成します。
Lambdaアプリの直下のディレクトリに右クリックして [hello_world.rb] を作成します。
コードは上記をそのままコピーします。
zipファイル作成
Lambdaの実行に必要なファイルをzip圧縮します。
必要なファイルとフォルダは下記の通り。
- hello-world.rb(プログラム本体)
- hello_world.tlf(Thinreports Editor で作成したレイアウトファイル)
- vendor(gemファイルのディレクトリ)
zip -r アーカイブファイル名 圧縮するファイルやディレクトリをスペース区切りで指定。
詳しくは man zip にて確認してください。
$ ls -la
total 42076
drwxr-xr-x 6 ec2-user ec2-user     4096 Oct 26 01:21 .
drwxr-xr-x 8 ec2-user ec2-user     4096 Oct 24 00:35 ..
-rw-r--r-- 1 ec2-user ec2-user      349 Oct 24 02:26 .application.json
drwxrwxr-x 2 ec2-user ec2-user     4096 Oct 24 02:55 .bundle
-rw-r--r-- 1 ec2-user ec2-user      189 Oct 25 15:57 Gemfile
-rw-rw-r-- 1 ec2-user ec2-user      784 Oct 26 00:19 Gemfile.lock
drwxrwxr-x 8 ec2-user ec2-user     4096 Oct 24 01:15 .git
-rw-r--r-- 1 ec2-user ec2-user       34 Oct 24 02:53 .gitignore
-rw-r--r-- 1 ec2-user ec2-user     1498 Oct 25 09:23 hello-world.rb
-rw-r--r-- 1 ec2-user ec2-user    56945 Oct 24 13:07 hello_world.tlf
drwxr-xr-x 2 ec2-user ec2-user     4096 Oct 24 22:24 kintoneToPdf
-rw-r--r-- 1 ec2-user ec2-user      841 Oct 24 06:15 template.yaml
drwxrwxr-x 3 ec2-user ec2-user     4096 Oct 26 00:19 vendor

$ zip -r hello-world.zip hello-world.rb hello_world.tlf vendor

$ ls -la
total 42076
drwxr-xr-x 6 ec2-user ec2-user     4096 Oct 26 01:21 .
drwxr-xr-x 8 ec2-user ec2-user     4096 Oct 24 00:35 ..
-rw-r--r-- 1 ec2-user ec2-user      349 Oct 24 02:26 .application.json
drwxrwxr-x 2 ec2-user ec2-user     4096 Oct 24 02:55 .bundle
-rw-r--r-- 1 ec2-user ec2-user      189 Oct 25 15:57 Gemfile
-rw-rw-r-- 1 ec2-user ec2-user      784 Oct 26 00:19 Gemfile.lock
drwxrwxr-x 8 ec2-user ec2-user     4096 Oct 24 01:15 .git
-rw-r--r-- 1 ec2-user ec2-user       34 Oct 24 02:53 .gitignore
-rw-r--r-- 1 ec2-user ec2-user     1498 Oct 25 09:23 hello-world.rb
-rw-r--r-- 1 ec2-user ec2-user    56945 Oct 24 13:07 hello_world.tlf
-rw-rw-r-- 1 ec2-user ec2-user 42976393 Oct 26 01:21 hello-world.zip
drwxr-xr-x 2 ec2-user ec2-user     4096 Oct 24 22:24 kintoneToPdf
-rw-r--r-- 1 ec2-user ec2-user      841 Oct 24 06:15 template.yaml
drwxrwxr-x 3 ec2-user ec2-user     4096 Oct 26 00:19 vendor
出来たzipファイルはzipファイル上で右クリック→ダウンロードを選択して、ローカルへダウンロードします。
4. Lambda 及び S3 バケットへの権限設定
S3に書き込み権限を付与した[IAM]を作成して、LambdaにIAMを設定します。
また、S3バケットに作成した[IAM]にてオブジェクト(今回はPDF)を書き込める様に設定します。
下記の図の様に権限設定を行います。
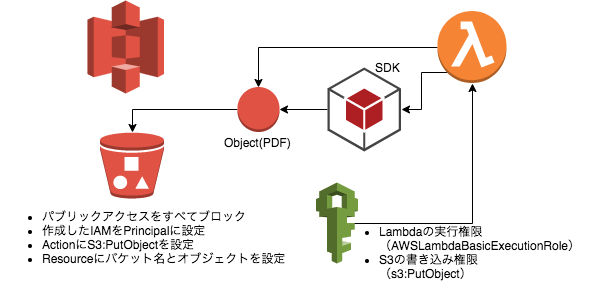
IAM ポリシー
Lambdaの実行ポリシーとS3バケットの書き込み権限を付けます。
Lambdaの実行権限を付与
{
    "Version": "2012-10-17",
    "Statement": [
        {
            "Effect": "Allow",
            "Action": [
                "logs:CreateLogGroup",
                "logs:CreateLogStream",
                "logs:PutLogEvents"
            ],
            "Resource": "*"
        }
    ]
}
S3への書き込み権限を付与
{
    "Version": "2012-10-17",
    "Statement": [
        {
            "Sid": "VisualEditor0",
            "Effect": "Allow",
            "Action": [
                "s3:PutObject"
            ],
            "Resource": "arn:aws:s3:::S3バケット名/*"
        }
    ]
}
S3バケットの権限設定
{
    "Id": "Policy9999999999",
    "Version": "2012-10-17",
    "Statement": [
        {
            "Sid": "Stmt9999999999",
            "Action": [
                "s3:PutObject"
            ],
            "Effect": "Allow",
            "Resource": [
                "arn:aws:s3:::バケット名",
                "arn:aws:s3:::バケット名/*"
            ],
            "Principal": {
                "AWS": [
                    "arn:aws:iam::Lambdaに設定したIAMロール"
                ]
            }
        }
    ]
}
5. S3バケットに生成したPDFの出力を確認する
kintoneアプリに設置したボタンをクリックしてLabmdaを実行し、S3にPDFが生成されていることを確認します。
S3バケットにzipファイルをアップロード
S3ファイルのURLをコピーします。
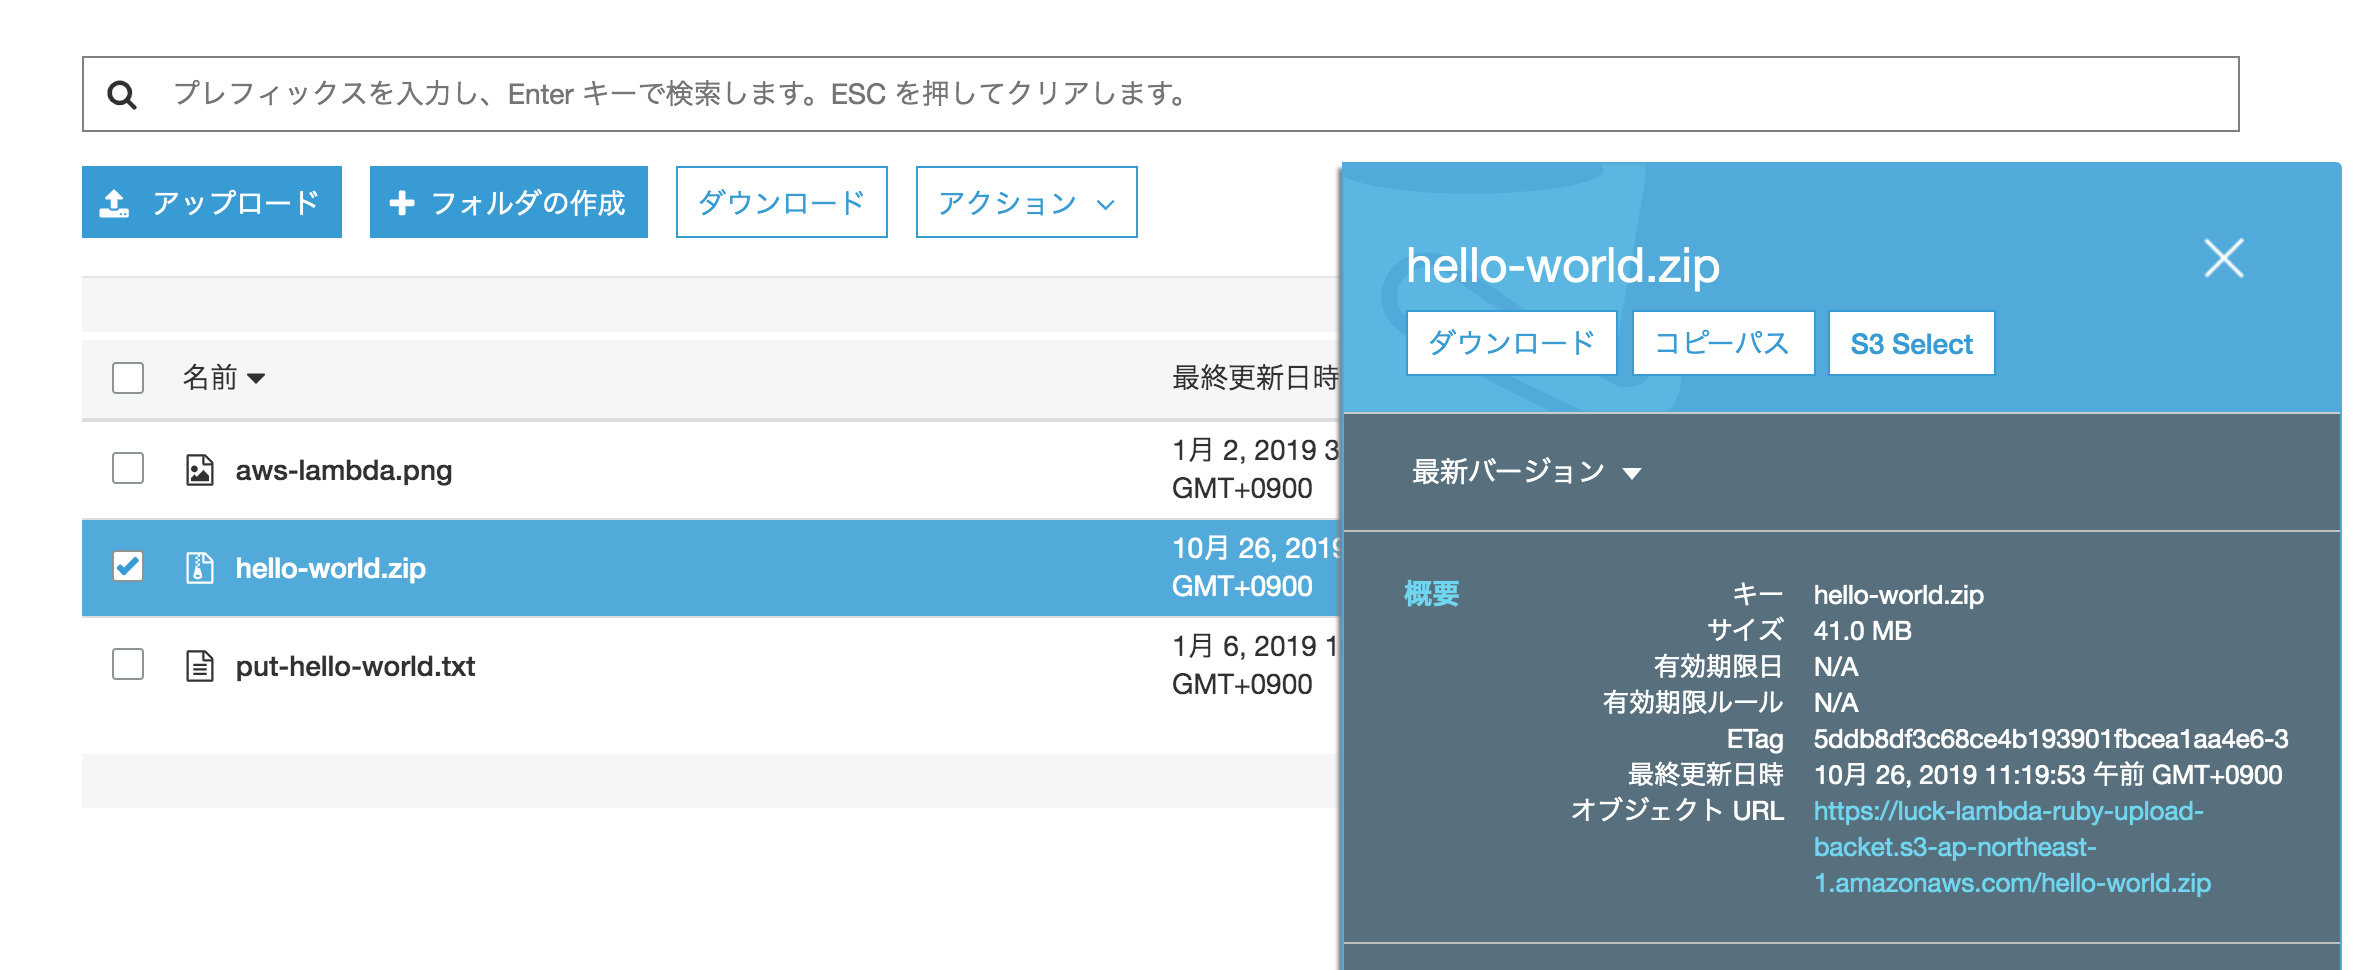
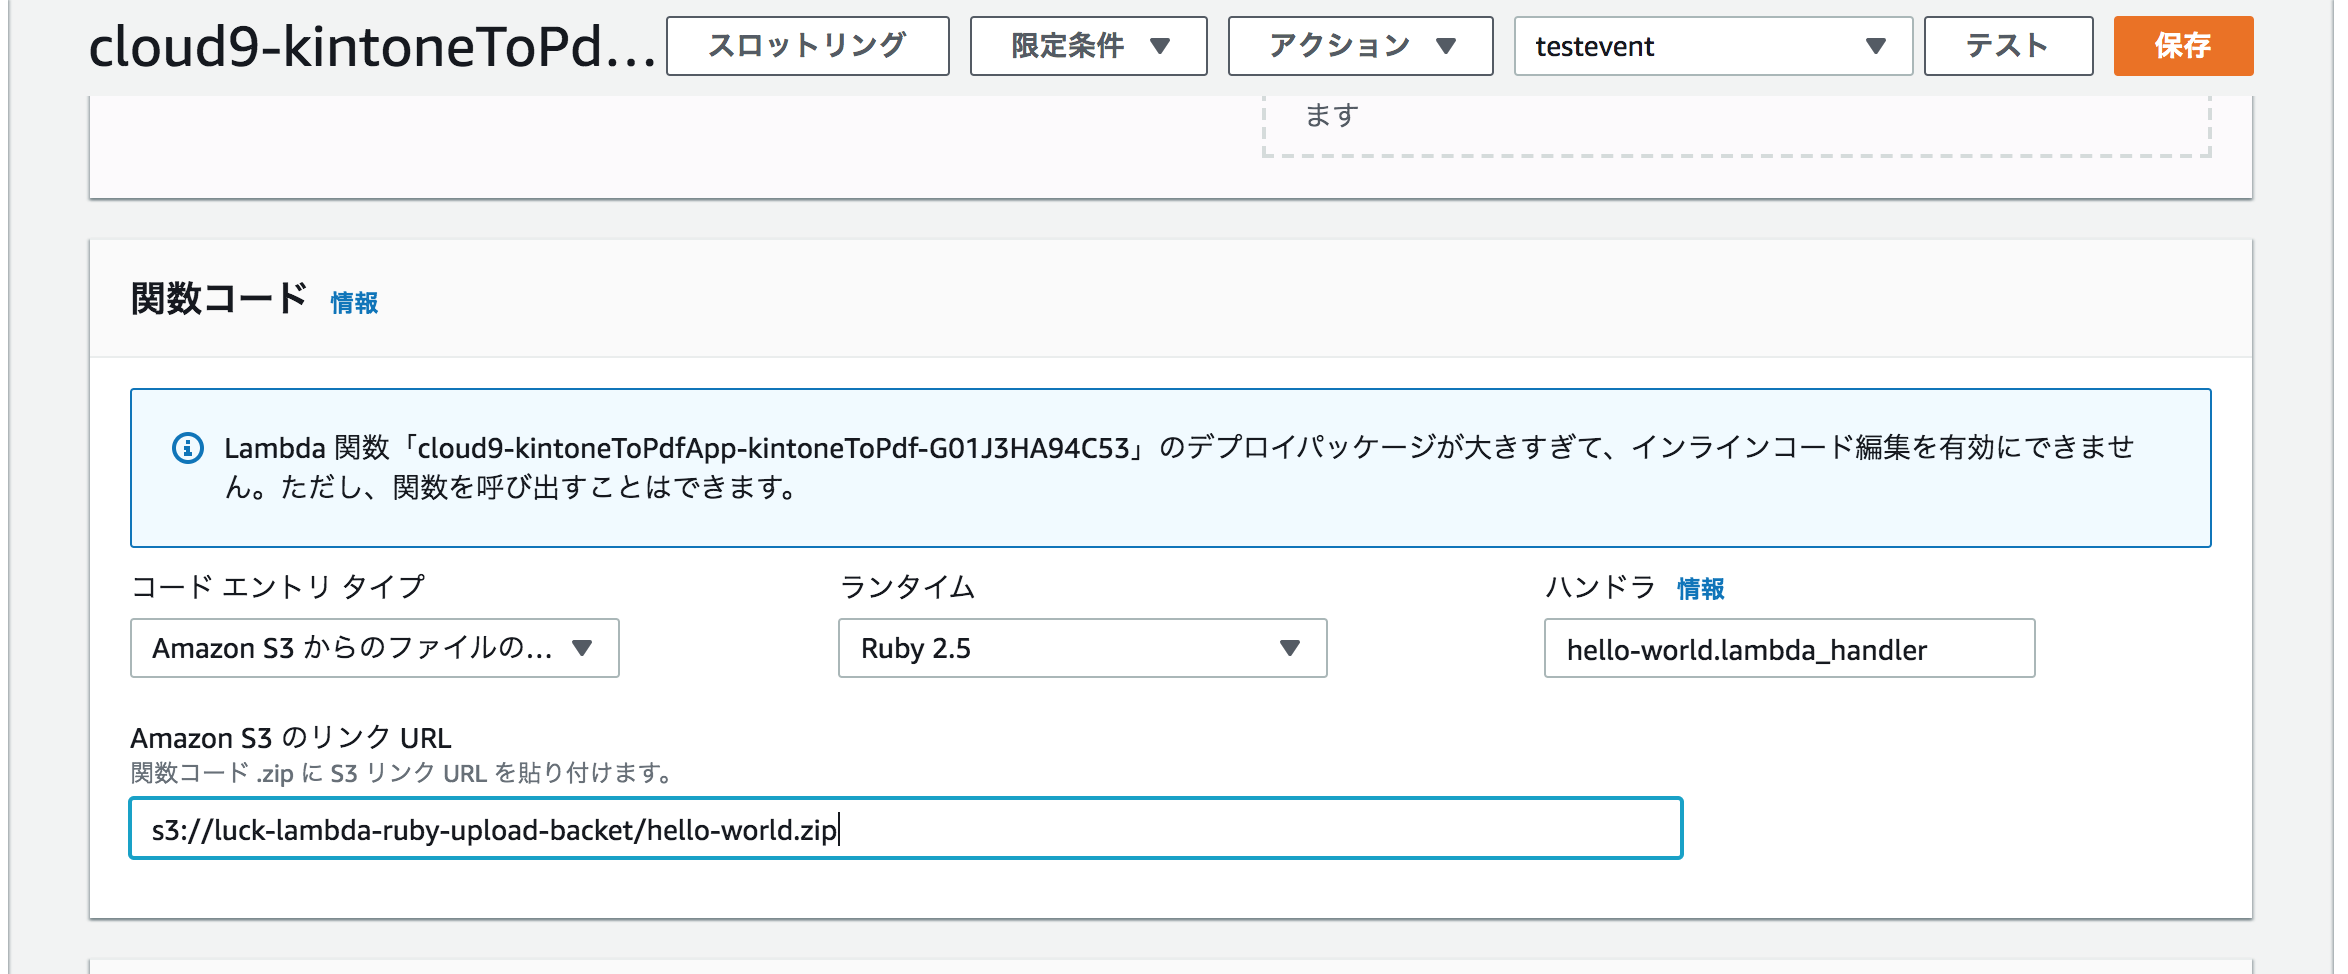
LambdaにS3のzipファイルをアップロード
関数コードをS3からアップロードします。先ほどコピーしたURLを貼り付けます。
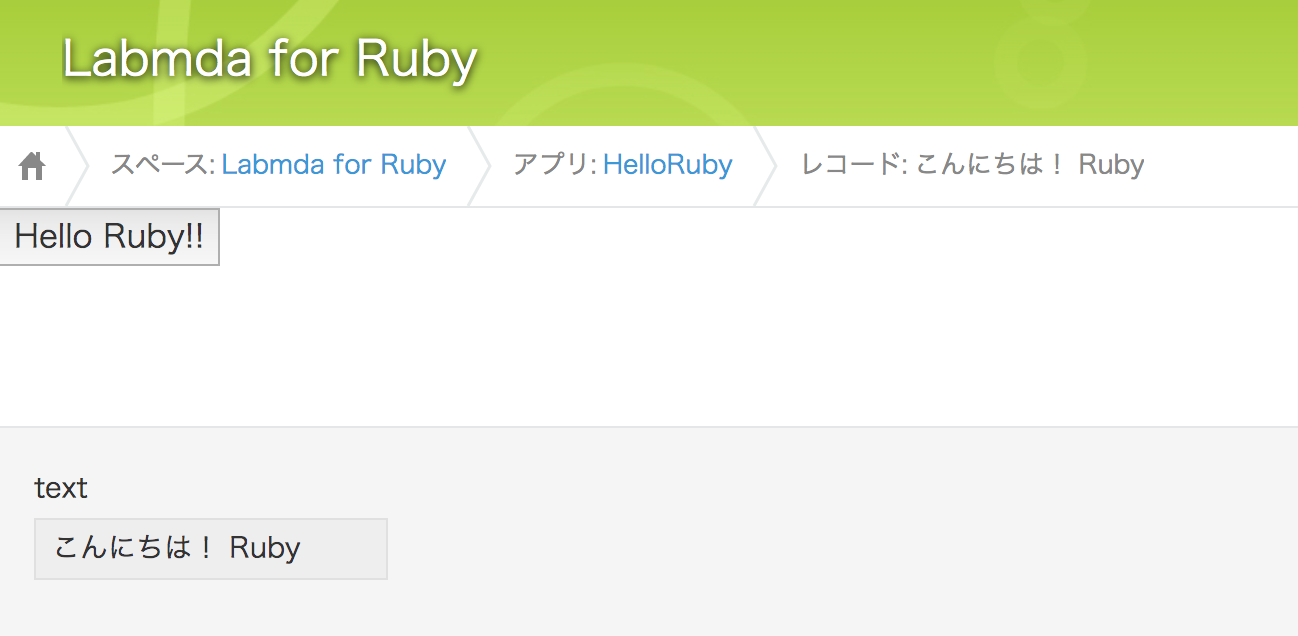
kintoneアプリからLambdaを実行
kintoneアプリから実行します。
PDFファイルの生成を確認
バケットを確認します。
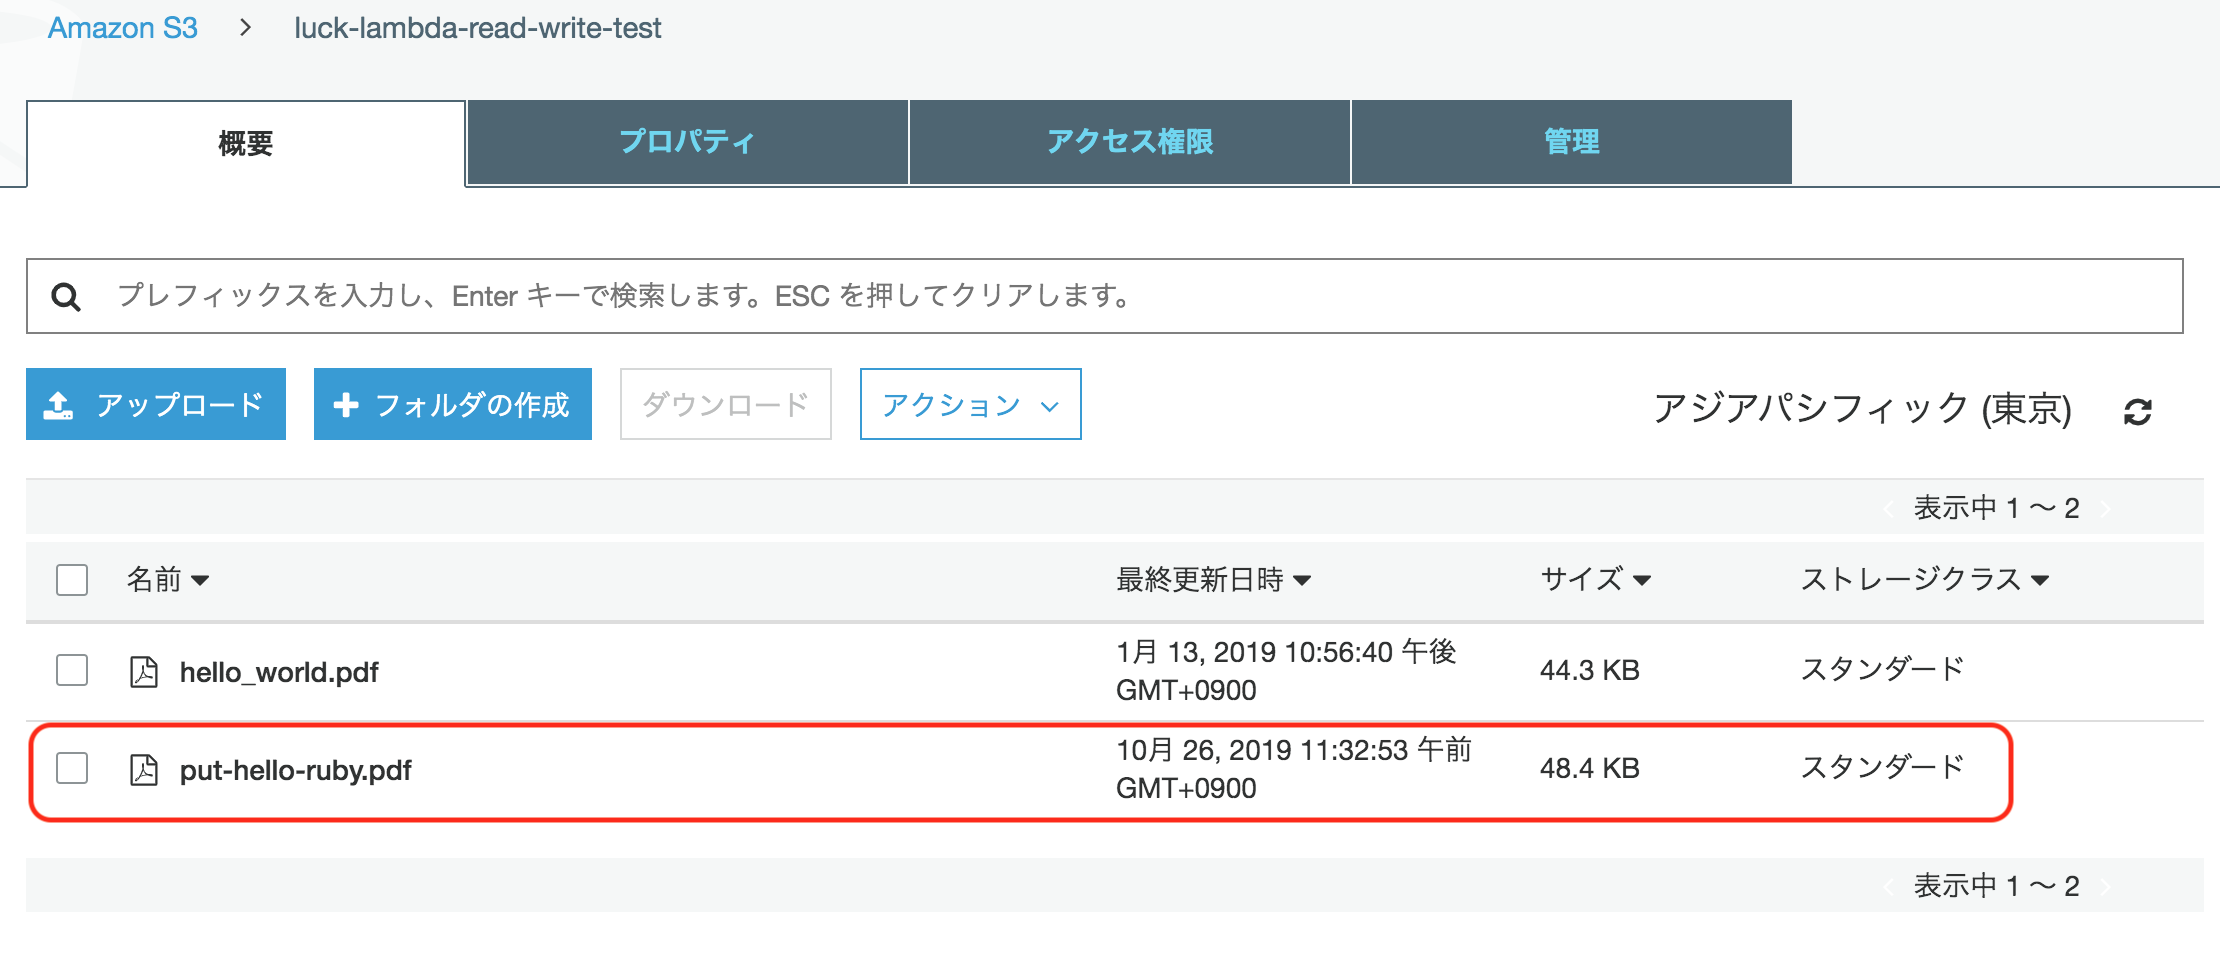
PDFファイルを開いて中身を確認します。

6. /tmp ディレクトリにPDF出力
コードを編集して、Lambda の /tmp ディレクトリにPDFを出力してみます。
# coding: utf-8
require 'thinreports'
require 'json'
require 'aws-sdk-s3'

def lambda_handler(event:, context:)
    begin
        print 'JSON.parse event.body => '
        pp JSON.parse(event["body"])
        event_body = JSON.parse(event["body"])
        record = event_body["record"]
        print 'record => '
        pp record
        puts '$id => ', record["$id"]["value"]
        puts 'text => ', record["text"]["value"]
    rescue => e
        puts "#{e.class}: #{e.message}"
        puts e.backtrace
    end

    begin
        region = 'S3バケットのリージョン'
        bucket_name = 'バケット名'
        key = 'put-hello-ruby.pdf'
        # S3 Backet Object init
        s3 = Aws::S3::Resource.new(region: region)
        obj = s3.bucket(bucket_name).object(key)
        report = Thinreports::Report.new layout: 'hello_world'
        # 1st page
        report.start_new_page
        report.page.item(:world).value(record["$id"]["value"])
        report.page.item(:thinreports).value(record["text"]["value"])
        obj.put(body: report.generate)

        # /tmpファイルに書き込み
        filename = '/tmp/put-hello-ruby-' + Time.new.localtime("+09:00").strftime("%Y%m%d%H%M%S") + '.pdf'
        puts filename
        File.open(filename, 'w+') { |f| f<< report.generate }
        puts `ls -la /tmp`
    rescue => e
        puts "#{e.class}: #{e.message}"
        puts e.backtrace
    end

    { statusCode: 200, body: JSON.generate('Hello Lambda! Thinreports for Ruby') }
end
ログの表示
JSON.parse event.body => {"type"=>"app.record.detail.show",
"appId"=>219,
"recordId"=>3,
"record"=>
{"レコード番号"=>{"type"=>"RECORD_NUMBER", "value"=>"3"},
"更新者"=>
{"type"=>"MODIFIER", "value"=>{"code"=>"aaaaa", "name"=>"アプリ管理者"}},
"作成者"=>{"type"=>"CREATOR", "value"=>{"code"=>"aaaaa", "name"=>"アプリ管理者"}},
"更新日時"=>{"type"=>"UPDATED_TIME", "value"=>"2019-10-26T05:01:00Z"},
"作成日時"=>{"type"=>"CREATED_TIME", "value"=>"2019-10-26T05:01:00Z"},
"text"=>{"type"=>"SINGLE_LINE_TEXT", "value"=>"/tmp に保存"},
"$revision"=>{"type"=>"__REVISION__", "value"=>"1"},
"$id"=>{"type"=>"__ID__", "value"=>"3"}}}
record => {"レコード番号"=>{"type"=>"RECORD_NUMBER", "value"=>"3"},
"更新者"=>{"type"=>"MODIFIER", "value"=>{"code"=>"aaaaa", "name"=>"アプリ管理者"}},
"作成者"=>{"type"=>"CREATOR", "value"=>{"code"=>"aaaaa", "name"=>"アプリ管理者"}},
"更新日時"=>{"type"=>"UPDATED_TIME", "value"=>"2019-10-26T05:01:00Z"},
"作成日時"=>{"type"=>"CREATED_TIME", "value"=>"2019-10-26T05:01:00Z"},
"text"=>{"type"=>"SINGLE_LINE_TEXT", "value"=>"/tmp に保存"},
"$revision"=>{"type"=>"__REVISION__", "value"=>"1"},
"$id"=>{"type"=>"__ID__", "value"=>"3"}}
$id =>
3
text =>
/tmp に保存
/tmp/put-hello-ruby-20191026143607.pdf
total 56
drwx------ 2 sbx_user1051 495 4096 Oct 26 05:36 .
dr-xr-xr-x 21 root root 4096 Sep 24 18:18 ..
-rw-rw-r-- 1 sbx_user1051 495 49084 Oct 26 05:36 put-hello-ruby-20191026143607.pdf
/tmp フォルダにPDFが出力されました。
あとがき
昨日(2019-10-25 Fri)、JAWS-UG浜松 というAWSのユーザー会に参加しました。
今回は参加された方がそれぞれ発表する会の様で、サーバーレスで顔認識するWebアプリの話(Vue,Lambda,Python,DynamoDB,Amplify,AppSync,KMS,OpenCVなど利用)。サーバーレスでブログを作った話(Vue,Python,Lambda,Cognitoなど)。AWSとラズパイで工場にMESを導入した話。などなどとても刺激になる話が聞けてモチベーションだけは高まりました。特にAWSとラズパイの話は興味深かったです。ラズパイを工場のラインに設置して工作機械からの信号をラズパイで受けて3G回線で[AWS IoT]へ送り、CloudWatch,Athena,Kinesis,QuickSightなどで分析してリアルタイムで工場のラインの出来高や稼働率をダッシュボードで表示。工場の異常はビデオで撮影。またデータはDynamoDBに保存。ラズパイを使ったハード回りやプログラミングも全て一人で行ったというのがすごかった。
CloudWathもBIとして使えるなど、AWSのサービスは知らないことが多いなと思いました。
今後も定期的にJAWS-UGに参加したいです。懇親会も楽しかった。
今後やりたいこと
下記のサービスを触ってみたいと思います。
参考リンク
AWS関連
- AWS S3 ポリシーでのアクセス許可の指定
- S3 バケットポリシーを追加する方法
- AWS Lambda 関数を使用する際のベストプラクティス
- Amazon S3: S3 バケットのオブジェクトへの読み取りおよび書き込みアクセスを許可する
- AWS Cloud9 の高度な AWS Lambda チュートリアル
- AWS Lambda ランタイム
- AWS SDK for Ruby - Version 3