本記事について
UdemyでDjangoについて学習した結果のアウトプットページです。
前の記事はこちらです。
今回は、クラスベース汎用ビューを利用して、
Djangoで超シンプルな日記アプリケーションを作成したいと思います。
クラスベース汎用ビューを利用することで、views.pyの表記がとても簡単になります。
成果物
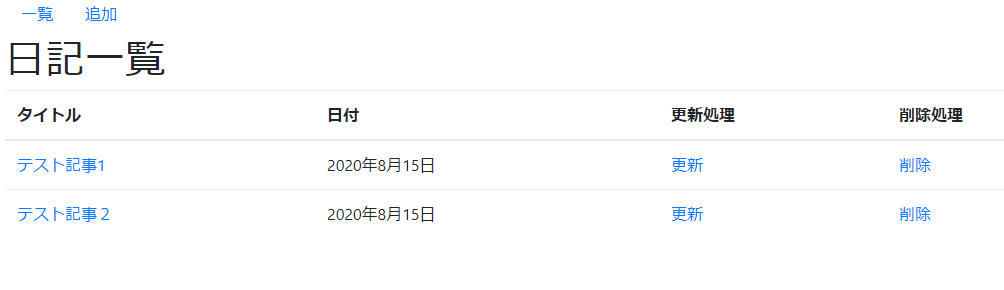
トップページ
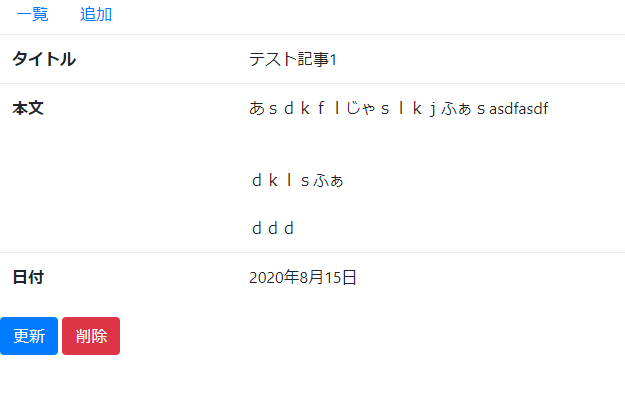
詳細ページ
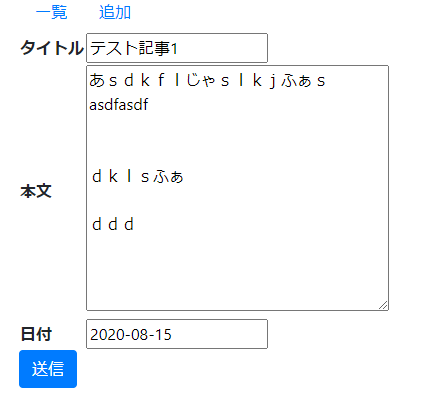
更新ページ
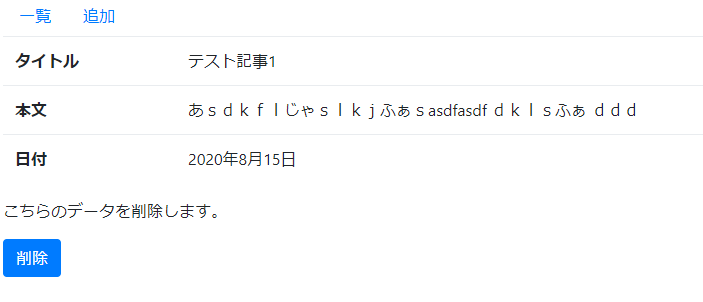
削除ページ
事前準備
まずは環境構築から。前回記事と同じですが念のため記載します。
Secondというプロジェクトを作成し、diaryというDjangoアプリを作成します。
django-admin startproject Second
cd Second
py .\manage.py startapp diary
settings.pyにdiaryアプリを登録して、日本時間をセット
INSTALLED_APPS = [
    'diary',
    'django.contrib.admin',
    'django.contrib.auth',
    'django.contrib.contenttypes',
    'django.contrib.sessions',
    'django.contrib.messages',
    'django.contrib.staticfiles',
]

LANGUAGE_CODE = 'ja'

TIME_ZONE = 'Asia/Tokyo'
admin.py
管理者用のアカウント設定と管理画面の設定です。
今回はログイン機能が無いので不要なのですが、一応やり方だけ記載します。
py .\manage.py makemigrations
py .\manage.py migrate
py manage.py createsuperuser #管理者ユーザーの作成コマンド
admin.pyを下記のように追記。
from django.contrib import admin
from .models import Day

admin.site.register(Day)
models.py
models.pyも前回記事とほぼ同じです。
adminサイトで閲覧したときに分かりやすくなるようdef __str__(self):も追記しておきます。
これを追記しておくことで、adminサイトでDayモデルに登録されたデータを閲覧する際にタイトルの文字列表記になります。
from django.db import models
from django.utils import timezone

class Day(models.Model):
    #ここで宣言はしていないけど、pkという主キーが自動で登録されている
    title = models.CharField('タイトル', max_length=200)
    text = models.TextField('本文')
    date = models.DateField('日付', default=timezone.now)

    def __str__(self):
        return self.title
models.pyの入力が終わったら、manage.pyでDBに登録します。
manage.pyが保存されているフォルダに移動して、以下のコマンドで登録してください。
py .\manage.py makemigrations
py .\manage.py migrate
makemigrations実行時に、RecursionErrorが表示されることがあります。
RecursionError: maximum recursion depth exceeded while calling a Python object
エラーの原因の1つとして、プロジェクト名に半角英数字以外の文字があったり、
パスの中に空白スペースが含まれている場合に発生することがあります。
OneDirveなどの特殊なフォルダに保存していると空白スペースがパスに含まれることがありますので、注意してください。
urls.py
前回記事と同じですが念のため記載します。
プロジェクト直下にあるurls.pyで、アプリ直下にあるurls.pyに行くように設定します。
from django.contrib import admin
from django.urls import path, include

urlpatterns = [
    path('admin/', admin.site.urls),
    path('diary/', include('diary.urls')),
]
アプリ直下にあるurls.pyを以下のように記入。
from django.urls import path
from . import views

app_name = 'diary'

urlpatterns = [
    path('', views.index, name='index'), #一覧ページ
    path('add/', views.add, name='add'), #追加ページ
    path('update/<int:pk>/', views.update, name='update'), #更新ページ
    path('delete/<int:pk>', views.delete, name='delete'), #削除ページ
    path('detail/<int:pk>', views.detail, name='detail'), #詳細ページ
]
forms.py
前回記事と同じですが念のため記載します。
views.pyの作成の前に、forms.pyというファイルを新規に作成します。
views.pyと同じフォルダ(Second\diary)にforms.pyというファイルを作成し、
内容を以下のようにしてください。
from django import forms
from .models import Day


class DayCreateForm(forms.ModelForm):

    class Meta:
        model = Day
        fields = '__all__'
記事を作成したり、更新したりする場合、当然ですがHTMLファイルに入力欄が必要になります。
その入力欄を作成するにあたり、HTMLファイルにFormというものを構成する必要があります。
そのFormに対して、どんなデータを渡すのかを定義するのがこのforms.pyです。
今回はmodels.pyで定義されているDayクラスの全てのデータを渡すことにしましょう。
全てを渡す場合はfields = '__all__'としてください。
DayCreateFormというクラス名は任意ですが、
その中にあるMetaというクラスは定型文です。
変更しないようにしましょう。
views.py
views.pyに一覧、追加、更新、削除、詳細のページを表示するための関数を作成します。
前回はあえて関数で記入しましたが、Djangoにはクラスベース汎用ビューという神機能があります。
この神機能を使うことで、とても簡単に記入できます。
from django.shortcuts import render, redirect, get_object_or_404
from .forms import DayCreateForm
from .models import Day
from django.views import generic
from django.urls import reverse_lazy

class IndexView(generic.ListView):
    model = Day
    paginate_by = 3

class DayCreateView(generic.CreateView):
    model = Day
    form_class = DayCreateForm
    success_url = reverse_lazy('diary:index')

class DayUpdateView(generic.UpdateView):
    # CreateViewとほぼ同じ内容だが、formだけでなくDayオブジェクトも渡している。
    model = Day
    form_class = DayCreateForm
    success_url = reverse_lazy('diary:index')

class DayDeleteView(generic.DeleteView):
    model = Day
    success_url = reverse_lazy('diary:index')

class DayDetailView(generic.DetailView):
    model = Day
htmlファイルの作成
最後にhtmlファイルを作成します。
こちらも前回とほぼ同じなのですが、前回と違う点が1つあります。
それはテンプレートファイル名が標準で定められていることです。
具体的に言うと、ListViewクラスを利用したテンプレートファイルでは、
<アプリ名>_list.htmlというファイル名が標準で登録されています。
DetailViewだと、<アプリ名>_detail.html
DeleteViewだと、<アプリ名>_confirm_delete.html
標準以外の名前でテンプレートファイルも登録することも可能ですが、
他の人が見やすくするためにも標準の名前で登録しておく方が無難かもしれません。
base.htmlの作成
まずbase.htmlを作成します。
すべての大本となるhtmlファイルです。
※CSSやJavaScriptはBootstrapを利用しています。
nav部分で一覧ページと記事の新規作成をリンクしておきます。
リンクは{% url '<アプリ名>:<urls.pyで定義したnameの値>'%}でリンクしましょう。
<!doctype html>
<html lang="ja">
  <head>
    <title>日記アプリケーション</title>
    <!-- Required meta tags -->
    <meta charset="utf-8">
    <meta name="viewport" content="width=device-width, initial-scale=1, shrink-to-fit=no">

    <!-- Bootstrap CSS -->
    <link rel="stylesheet" href="https://maxcdn.bootstrapcdn.com/bootstrap/4.0.0-beta.2/css/bootstrap.min.css" integrity="sha384-PsH8R72JQ3SOdhVi3uxftmaW6Vc51MKb0q5P2rRUpPvrszuE4W1povHYgTpBfshb" crossorigin="anonymous">
  </head>
  <body>

    <div class="container">
      <nav class="nav">
        <a class="nav-link active" href="{% url 'diary:index' %}">一覧</a>
        <a class="nav-link" href="{% url 'diary:add' %}">追加</a>
      </nav>
      {% block content %}
      {% endblock %}
    </div>

    <!-- Optional JavaScript -->
    <!-- jQuery first, then Popper.js, then Bootstrap JS -->
    <script src="https://code.jquery.com/jquery-3.2.1.slim.min.js" integrity="sha384-KJ3o2DKtIkvYIK3UENzmM7KCkRr/rE9/Qpg6aAZGJwFDMVNA/GpGFF93hXpG5KkN" crossorigin="anonymous"></script>
    <script src="https://cdnjs.cloudflare.com/ajax/libs/popper.js/1.12.3/umd/popper.min.js" integrity="sha384-vFJXuSJphROIrBnz7yo7oB41mKfc8JzQZiCq4NCceLEaO4IHwicKwpJf9c9IpFgh" crossorigin="anonymous"></script>
    <script src="https://maxcdn.bootstrapcdn.com/bootstrap/4.0.0-beta.2/js/bootstrap.min.js" integrity="sha384-alpBpkh1PFOepccYVYDB4do5UnbKysX5WZXm3XxPqe5iKTfUKjNkCk9SaVuEZflJ" crossorigin="anonymous"></script>
  </body>
</html>
page.html
今回はページネーション機能を追加します。
page.htmlというファイル名でtemplateフォルダに保存し、以下のように記述します。
<nav aria-label="Page navigation">
<ul class="pagination">
{% if page_obj.has_previous %}
<li class="page-item">
<a class="page-link" href="?page={{ page_obj.previous_page_number }}">
<span aria-hidden="true">«</span>
</a>
</li>
{% endif %}
{% for link_page in page_obj.paginator.page_range %}
{% if link_page == page_obj.number %}
<li class="page-item active">
<a class="page-link" href="?page={{ link_page }}">
{{ link_page }}
</a>
</li>
{% else %}
<li class="page-item">
<a class="page-link" href="?page={{ link_page }}">
{{ link_page }}
</a>
</li>
{% endif %}
{% endfor %}
{% if page_obj.has_next %}
<li class="page-item">
<a class="page-link" href="?page={{ page_obj.next_page_number }}" aria-label="Next">
<span aria-hidden="true">»</span>
</a>
</li>
{% endif %}
</ul>
</nav>
day_list.htmlの作成
記事の一覧ページです。
前回記事ではday_indexというファイル名でしたが、
今回はListViewクラスを利用しているため、
day_list.htmlというファイル名で登録します。
views.pyから、day_listがKeyのcontextを渡されているので、
day_listを使ってDBに保存されている記事のタイトルと日付にアクセスできます。
これをfor文を使って表示させています。
updateとdeleteにはday.pkを渡して、それぞれの記事の更新ページへアクセスする仕組みです。
最後に{% include 'diary/page.html %}でページネーション機能をインクルードします。
{% extends 'diary/base.html' %}

{% block content %}

<h1>日記一覧</h1>

<table class="table">
    <thead>
        <tr>
            <th>タイトル</th>
            <th>日付</th>
            <th>更新処理</th>
            <th>削除処理</th>
        </tr>
    </thead>
    <tbody>
    {% for day in object_list %}
        <tr>
            <td><a href="{% url 'diary:detail' day.pk %}">{{ day.title }}</a></td>
            <td>{{ day.date }}</td>
            <td><a href="{% url 'diary:update' day.pk %}">更新</a></td>
            <td><a href="{% url 'diary:delete' day.pk %}">削除</a></td>
        </tr>
    {% endfor %}
    </tbody>
</table>

{% include 'diary/page.html' %}

{% endblock %}
day_detail.htmlの作成
詳細ページです。
DetailViewクラスを利用しているのでday_detail.htmlという名前で保存します。
title、text、dateを表示しています。
textの後に、linebreaksbrと付け足しているのは、
HTML上で改行を表現するためです。無くても問題はありません。
{% extends 'diary/base.html' %}
{% block content %}
    <table class="table">
        <tr>
            <th>タイトル</th>
            <td>{{ day.title }}</td>
        </tr>
        <tr>
            <th>本文</th>
            <td>{{ day.text | linebreaksbr}}</td>
        </tr>
        <tr>
            <th>日付</th>
            <td>{{ day.date }}</td>
        </tr>
    </table>
    <a href="{% url 'diary:update' day.pk %}"><button class="btn btn-primary">更新</button></a>
    <a href="{% url 'diary:delete' day.pk %}"><button class="btn btn-danger">削除</button></a>

{% endblock %}
day_form.htmlの作成
フォームの作成です。
記事の作成・更新で利用します。
{% extends 'diary/base.html' %}

{% block content %}
<form action="" method="POST">
    <table class="tabel">
        <tr>
            <th>タイトル</th>
            <td>{{ form.title }}</td>
        </tr>
        <tr>
            <th>本文</th>
            <td>{{ form.text }}</td>
        </tr>
        <tr>
            <th>日付</th>
            <td>{{ form.date }}</td>
        </tr>
    </table>

    <button type="submit" class="btn btn-primary">送信</button>
    {% csrf_token %}
</form>
{% endblock %}
day_confirm_delete.htmlの作成
削除ページです。
DeleteViewを利用しているので、
day_confirm_delete.htmlという名前に設定します。
{% extends 'diary/base.html' %}
{% block content %}
<form action="" method="POST">
    <table class="table">
        <tr>
            <th>タイトル</th>
            <td>{{ day.title }}</td>
        </tr>
        <tr>
            <th>本文</th>
            <td>{{ day.text }}</td>
        </tr>
        <tr>
            <th>日付</th>
            <td>{{ day.date }}</td>
        </tr>
    </table>
    <p>こちらのデータを削除します。</p>
    <button type="submit" class="btn btn-primary">削除</button>
    {% csrf_token %}
</form>
{% endblock %}
動作確認
あとはpy manage.py runserverで動作確認しましょう。
記事の作成・更新・削除が出来たら成功です。
また、ページネーション機能が有効化されていることも確認しましょう。