はじめに
Google サポートで Anthos Clusters on bare metal 環境上で利用できる Anthos VM Runtime という KubeVirt ベースの VM 管理機能がある
KubeVirt は 2022年4月に CNCF インキュベーションプロジェクトになっており、2023年7月に v1.0 がリリースされている
Anthos VM Runtime / KubeVirt の概要の確認や、自宅ラボ環境で動作含め試してみたので、その内容を記載する
Anthos VM Runtime
Anthos VM Runtime は KubeVirt ベースのため、KubeVirt と紐付けてアーキテクチャなどの概要を確認したのでその内容を記載する
KubeVirt
下記、KubeVirt の GitHub の READMEから抜粋
KubeVirt とは 仮想マシン管理をする Kubernetes アドオンであり、 Kubernetes 上で共通の仮想化基盤を提供する
- Kubernetes CRD API に追加の仮想化リソース タイプ (特に VM タイプ) を追加する
- Kubernetes が提供する他のすべてのリソースとともに VM リソースを管理できる
- 必要なコントローラーとエージェントは KubeVirt によって提供される
- 現時点で、KubeVirt は宣言的に使用できる
- 事前定義された VM を作成する
- Kubernetes クラスター上で VM をスケジュールする
- VMを起動、停止、削除する
minikube や kind でのクイックスタートや killercoda で試せる方法・環境がドキュメントで公開されている
Anthos VM Runtime と KubeVirt との違い
Anthos VM ランタイムは KubeVirt から機能拡張されており、API も異なるところがあるので、
詳細はドキュメントにまとまっているのでそちらを要確認
現時点 (2023.09) で最新の Anthos v1.16 バージョンでは KubeVirt は v0.59.0 がベースとなっている (v1.16 リリースガイドより)
Anthos VM Runtime のリリースノートは単独ページとして下記リンクにある
KubeVirt アーキテクチャ
libvirt / qemu をコンテナランタイム上で制御する
アーキテクチャは kubevirt のドキュメントにまとめられていて、下記の画像リンクがわかりやすい
上記図の Pod 構成概要は下記の通り
- admin node
- virt-controller
- virt-api
- worker node
- virt-handler (daemonset)
- virt-launcher (per VM Instance)
- libvirtd
- qemu
VM 構築時の Pod, Process 状況 (Anthos の場合)
実際に動かしてみると、下記のような Pod が作成された (作成方法は後述)
アーキテクチャ通り、Admin Node には virt-controller-xxxやvirt-api-xxx Pod が、Workder Node には virt-handler-xxx Pod が、VM名称でvirt-launcher-[VM名]-xxx Pod が動作する
virt-launcher Pod 内には 3つの compute log volumekubevm-agent-installation-disk というコンテナが動作していることも見える
$ k get vms
NAME     AGE   STATUS    READY
testvm    8m   Running   True

$ k get po -owide -n vm-system | grep admin
cdi-apiserver-545cc5947c-xv6j8                      1/1     Running   0          17m   10.4.1.76        admin01    <none>           <none>
cdi-deployment-65f8db7cd7-2j9pf                     1/1     Running   0          17m   10.4.1.23        admin01    <none>           <none>
cdi-operator-78c4f44495-dn68w                       1/1     Running   0          17m   10.4.1.128       admin01    <none>           <none>
cdi-uploadproxy-568cb5676f-7t4hr                    1/1     Running   0          17m   10.4.1.68        admin01    <none>           <none>
macvtap-pnb2l                                       1/1     Running   0          17m   192.168.133.11   admin01    <none>           <none>
virt-api-5949c6fd4f-l5mz8                           1/1     Running   0          17m   10.4.1.195       admin01    <none>           <none>
virt-api-5949c6fd4f-z6cc9                           1/1     Running   0          17m   10.4.1.111       admin01    <none>           <none>
virt-controller-5856f6b487-mzrd7                    1/1     Running   0          16m   10.4.1.72        admin01    <none>           <none>
virt-controller-5856f6b487-nlvlg                    1/1     Running   0          16m   10.4.1.231       admin01    <none>           <none>
virt-operator-c4d5cb9d7-6dgpl                       2/2     Running   0          17m   10.4.1.153       admin01    <none>           <none>
virt-operator-c4d5cb9d7-fttql                       2/2     Running   0          17m   10.4.1.219       admin01    <none>           <none>
vm-controller-controller-manager-59669b5669-pzx7f   2/2     Running   0          17m   10.4.1.239       admin01    <none>           <none>
vmruntime-controller-manager-84fd966cff-vd87v       2/2     Running   0          26m   10.4.1.41        admin01    <none>           <none>

$ k get po -owide -n vm-system | grep worker
macvtap-fg2s7                                       1/1     Running   0          18m   192.168.133.22   worker02   <none>           <none>
virt-handler-gcrmn                                  1/1     Running   0          17m   10.4.0.52        worker02   <none>           <none>

$ k get po -owide -n default | grep worker
virt-launcher-testvm-v8qm4   3/3     Running   0          8m56s   10.4.0.198   worker02   <none>           1/1

$ k describe po -n default virt-launcher-testvm-v8qm4
...
Containers:
  compute:
    Image:           gcr.io/anthos-baremetal-release/kubevirt/virt-launcher:v0.59.0-anthos1.16-gke.2
...
  log:
    Image:         gcr.io/anthos-baremetal-release/kubevirt/serial-log-catter:v0.59.0-anthos1.16-gke.2
...
  volumekubevm-agent-installation-disk:
    Image:         gcr.io/anthos-baremetal-release/kubevm/kubevm-guest-agent:v1.16.0-gke.1
下記に virt-launcher-[VM名称]-xxx Pod 内のプロセスを確認すると、libvirt/qemudなどが動作しているので、アーキテクチャ図のlibvirtd qemu はvirt-launcher Pod 内のプロセスとして動作しているようだった
$ k exec -n default virt-launcher-testvm-v8qm4 -- ps aux
USER         PID %CPU %MEM    VSZ   RSS TTY      STAT START   TIME COMMAND
root           1  0.0  0.0 1168236 10096 ?       Ssl  03:31   0:00 /usr/bin/virt-launcher-monitor --qemu-timeout 260s --name testvm --uid 43eb4f3f-ccaa-4a7e-9afa-f18a4e82016e --namespace default --kubevirt-share-dir /var/run/kubevirt --ephemeral-disk-dir /var/run/kubevirt-ephemeral-disks --container-disk-dir /var/run/kubevirt/container-disks --grace-period-seconds 45 --hook-sidecars 0 --ovmf-path /usr/share/OVMF
root          12  0.0  0.3 1770872 57264 ?       Sl   03:31   0:00 /usr/bin/virt-launcher --qemu-timeout 260s --name testvm --uid 43eb4f3f-ccaa-4a7e-9afa-f18a4e82016e --namespace default --kubevirt-share-dir /var/run/kubevirt --ephemeral-disk-dir /var/run/kubevirt-ephemeral-disks --container-disk-dir /var/run/kubevirt/container-disks --grace-period-seconds 45 --hook-sidecars 0 --ovmf-path /usr/share/OVMF
root          20  0.0  0.0  57544 12492 ?        S    03:31   0:00 /usr/sbin/virtlogd -f /etc/libvirt/virtlogd.conf
root          21  0.0  0.1 1387196 24660 ?       Sl   03:31   0:00 /usr/sbin/virtqemud -f /var/run/libvirt/virtqemud.conf
qemu          74  1.7  6.2 5139268 1017224 ?     Sl   03:31   0:39 /usr/bin/qemu-system-x86_64 -name guest=default_testvm,debug-threads=on -S -object {"qom-type":"secret","id":"masterKey0","format":"raw","file":"/var/lib/libvirt/qemu/domain-1-default_testvm/master-key.aes"} -machine pc-q35-rhel9.2.0,usb=off,dump-guest-core=off,memory-backend=pc.ram -accel kvm -cpu Snowridge,ss=on,vmx=on,fma=on,avx=on,f16c=on,hypervisor=on,tsc-adjust=on,bmi1=on,avx2=on,bmi2=on,invpcid=on,adx=on,pku=on,vaes=on,vpclmulqdq=on,rdpid=on,fsrm=on,md-clear=on,serialize=on,stibp=on,avx-vnni=on,xsaves=on,abm=on,ibpb=on,ibrs=on,amd-stibp=on,amd-ssbd=on,rdctl-no=on,ibrs-all=on,skip-l1dfl-vmentry=on,mds-no=on,pschange-mc-no=on,mpx=off,cldemote=off,core-capability=off,split-lock-detect=off -m 4096 -object {"qom-type":"memory-backend-ram","id":"pc.ram","size":4294967296} -overcommit mem-lock=off -smp 2,sockets=1,dies=1,cores=2,threads=1 -object {"qom-type":"iothread","id":"iothread1"} -uuid 5a9fc181-957e-5c32-9e5a-2de5e9673531 -smbios type=1,manufacturer=KubeVirt,product=None,uuid=5a9fc181-957e-5c32-9e5a-2de5e9673531,family=KubeVirt -no-user-config -nodefaults -chardev socket,id=charmonitor,fd=22,server=on,wait=off -mon chardev=charmonitor,id=monitor,mode=control -rtc base=utc -no-shutdown -boot strict=on -device {"driver":"pcie-root-port","port":16,"chassis":1,"id":"pci.1","bus":"pcie.0","multifunction":true,"addr":"0x2"} -device {"driver":"pcie-root-port","port":17,"chassis":2,"id":"pci.2","bus":"pcie.0","addr":"0x2.0x1"} -device {"driver":"pcie-root-port","port":18,"chassis":3,"id":"pci.3","bus":"pcie.0","addr":"0x2.0x2"} -device {"driver":"pcie-root-port","port":19,"chassis":4,"id":"pci.4","bus":"pcie.0","addr":"0x2.0x3"} -device {"driver":"pcie-root-port","port":20,"chassis":5,"id":"pci.5","bus":"pcie.0","addr":"0x2.0x4"} -device {"driver":"pcie-root-port","port":21,"chassis":6,"id":"pci.6","bus":"pcie.0","addr":"0x2.0x5"} -device {"driver":"pcie-root-port","port":22,"chassis":7,"id":"pci.7","bus":"pcie.0","addr":"0x2.0x6"} -device {"driver":"pcie-root-port","port":23,"chassis":8,"id":"pci.8","bus":"pcie.0","addr":"0x2.0x7"} -device {"driver":"virtio-scsi-pci-non-transitional","id":"scsi0","bus":"pci.2","addr":"0x0"} -device {"driver":"virtio-serial-pci-non-transitional","id":"virtio-serial0","bus":"pci.3","addr":"0x0"} -blockdev {"driver":"file","filename":"/var/run/kubevirt-private/vmi-disks/disk0/disk.img","aio":"native","node-name":"libvirt-5-storage","cache":{"direct":true,"no-flush":false},"auto-read-only":true,"discard":"unmap"} -blockdev {"node-name":"libvirt-5-format","read-only":false,"discard":"unmap","cache":{"direct":true,"no-flush":false},"driver":"raw","file":"libvirt-5-storage"} -device {"driver":"virtio-blk-pci-non-transitional","bus":"pci.4","addr":"0x0","drive":"libvirt-5-format","id":"ua-disk0","bootindex":1,"write-cache":"on","serial":"testvm-boot-dv","werror":"stop","rerror":"stop"} -blockdev {"driver":"file","filename":"/var/run/kubevirt-ephemeral-disks/cloud-init-data/default/testvm/noCloud.iso","aio":"native","node-name":"libvirt-4-storage","cache":{"direct":true,"no-flush":false},"auto-read-only":true,"discard":"unmap"} -blockdev {"node-name":"libvirt-4-format","read-only":false,"discard":"unmap","cache":{"direct":true,"no-flush":false},"driver":"raw","file":"libvirt-4-storage"} -device {"driver":"virtio-blk-pci-non-transitional","bus":"pci.5","addr":"0x0","drive":"libvirt-4-format","id":"ua-cloud-init","write-cache":"on","werror":"stop","rerror":"stop"} -blockdev {"driver":"file","filename":"/var/run/kubevirt-private/service-account-disk/service-account.iso","aio":"native","node-name":"libvirt-3-storage","cache":{"direct":true,"no-flush":false},"auto-read-only":true,"discard":"unmap"} -blockdev {"node-name":"libvirt-3-format","read-only":false,"discard":"unmap","cache":{"direct":true,"no-flush":false},"driver":"raw","file":"libvirt-3-storage"} -device {"driver":"ide-hd","bus":"ide.0","drive":"libvirt-3-format","id":"ua-kubevm-agent-sa-disk","write-cache":"on","serial":"agentSADisk","werror":"stop","rerror":"stop"} -blockdev {"driver":"file","filename":"/var/run/kubevirt/container-disks/disk_2.img","aio":"native","node-name":"libvirt-2-storage","cache":{"direct":true,"no-flush":false},"auto-read-only":true,"discard":"unmap"} -blockdev {"node-name":"libvirt-2-format","read-only":true,"discard":"unmap","cache":{"direct":true,"no-flush":false},"driver":"raw","file":"libvirt-2-storage"} -blockdev {"driver":"file","filename":"/var/run/kubevirt-ephemeral-disks/disk-data/kubevm-agent-installation-disk/disk.qcow2","aio":"native","node-name":"libvirt-1-storage","cache":{"direct":true,"no-flush":false},"auto-read-only":true,"discard":"unmap"} -blockdev {"node-name":"libvirt-1-format","read-only":false,"discard":"unmap","cache":{"direct":true,"no-flush":false},"driver":"qcow2","file":"libvirt-1-storage","backing":"libvirt-2-format"} -device {"driver":"ide-hd","bus":"ide.1","drive":"libvirt-1-format","id":"ua-kubevm-agent-installation-disk","write-cache":"on","serial":"agentInstallation","werror":"stop","rerror":"stop"} -netdev {"type":"tap","fd":"23","vhost":true,"vhostfd":"25","id":"hostua-eth0"} -device {"driver":"virtio-net-pci-non-transitional","host_mtu":1450,"netdev":"hostua-eth0","id":"ua-eth0","mac":"f8:8f:ca:00:00:01","bus":"pci.1","addr":"0x0","romfile":""} -add-fd set=0,fd=21,opaque=serial0-log -chardev socket,id=charserial0,fd=19,server=on,wait=off,logfile=/dev/fdset/0,logappend=on -device {"driver":"isa-serial","chardev":"charserial0","id":"serial0","index":0} -chardev socket,id=charchannel0,fd=20,server=on,wait=off -device {"driver":"virtserialport","bus":"virtio-serial0.0","nr":1,"chardev":"charchannel0","id":"channel0","name":"org.qemu.guest_agent.0"} -audiodev {"id":"audio1","driver":"none"} -vnc vnc=unix:/var/run/kubevirt-private/43eb4f3f-ccaa-4a7e-9afa-f18a4e82016e/virt-vnc,audiodev=audio1 -device {"driver":"VGA","id":"video0","vgamem_mb":16,"bus":"pcie.0","addr":"0x1"} -global ICH9-LPC.noreboot=off -watchdog-action reset -device {"driver":"virtio-balloon-pci-non-transitional","id":"balloon0","bus":"pci.6","addr":"0x0"} -sandbox on,obsolete=deny,elevateprivileges=deny,spawn=deny,resourcecontrol=deny -device {"driver":"vhost-vsock-pci-non-transitional","id":"vsock0","guest-cid":1734321906,"vhostfd":"16","bus":"pci.7","addr":"0x0"} -msg timestamp=on
API
KubeVirt API は複数あり、VM インスタンス定義は kind: VirtualMachineInstance を使用する
(yaml の記載例は (https://kubevirt.io/user-guide/virtual_machines/virtual_machine_instances/#virtualmachineinstance-api) にある)
Anthos VM Runtime の API は拡張されており、apiVersion: kubevirt.io/v1 ではなく apiVersion: vm.cluster.gke.io/v1 として拡張された API を使用することになる
(QuickStart ドキュメントに yaml 記載方法がある)
操作方法
virtctl cli ツール や、kubectl virt という kubectl 拡張といった形で操作可能な kubectl-virt-plugin プラグインを使用して操作が可能 (ドキュメント)
Anthos VM Runtime でも Anthos Baremetal の CLI ツールを通して virtctlとkubectl-virt-pluginをインストールする方法が案内されている (Anthos ドキュメント Install the virtctl client tool)
Ansible を使用した VM 管理も可能 (ドキュメント)
実施環境
自宅ラボ環境の ESXi 上の Ubuntu 22.04LTS VM 上で構築した Anthos Baremetal 上で実施した
- Kubernetes Version: v1.27.4
- Anthos Version: v1.16.0
詳細は下記リンク先に記載
実施
下記の順番・内容で試した
- vmruntime 有効化
- ツールインストール
- VM 作成
- VM ネットワーク設定
- VM 電源オンオフ
- 切り戻し
1. vmruntime 有効化
ドキュメントに従って有効化を実施する (kubeconfigパスは環境依存のもの)
bmctl enable vmruntime --kubeconfig bmctl-workspace/usercluster1/usercluster1-kubeconfig
実施結果
$ bmctl enable vmruntime --kubeconfig bmctl-workspace/usercluster1/usercluster1-kubeconfig
[2023-09-23 04:17:58+0000] Waiting for vmruntime to become ready. OK
2. virtctl のインストール
ドキュメントに従ってvirtctlをインストールする (GOOGLE_APPLICATION_CREDENTIALSのパスは環境依存のもの)
export GOOGLE_APPLICATION_CREDENTIALS="$HOME/anthos/bmctl-workspace/.sa-keys/anthos-baremetal-gcr.json"
sudo -E $HOME/anthos/bin/bmctl install virtctl
kubectl plugin list
3. VM 作成
ドキュメントを参考に VM を作成する
※ ~/google-virtctl ディレクトリに設定 YAML が作成される
export VM_NAME="testvm"
export USERNAME="suzuyu"
export PASSWORD="YOUR_PASSWORD"

kubectl virt create vm $VM_NAME \
    --image ubuntu20.04 \
    --configure-initial-password $USERNAME:$PASSWORD
実施結果
$ kubectl virt create vm $VM_NAME \
    --image ubuntu20.04 \
    --configure-initial-password $USERNAME:$PASSWORD
PVC default/testvm-boot-dv not found
DataVolume default/testvm-boot-dv created
Waiting for PVC testvm-boot-dv upload pod to be ready...
Pod now ready
Uploading data to https://192.168.134.33

 611.44 MiB / 611.44 MiB [==================================================================================================================================================] 100.00% 45s

Processing completed successfully
Uploading /home/suzuyu/google-virtctl/ubuntu-20.04-server-cloudimg-amd64.img completed successfully
Created the boot disk "testvm-boot-dv" with local image /home/suzuyu/google-virtctl/ubuntu-20.04-server-cloudimg-amd64.img
Constructing manifest for vm "testvm":
Manifest for vm "testvm" is saved to /home/suzuyu/google-virtctl/testvm.yaml
Applying manifest for vm "testvm"
Created gvm "testvm"
下記コマンドで VM リソースを確認できる
kubectl get gvm
実施結果
$ kubectl get gvm
NAME     STATUS    AGE    IP
testvm   Running   102s   10.4.1.113
Cloud Console で下記のように確認もできる
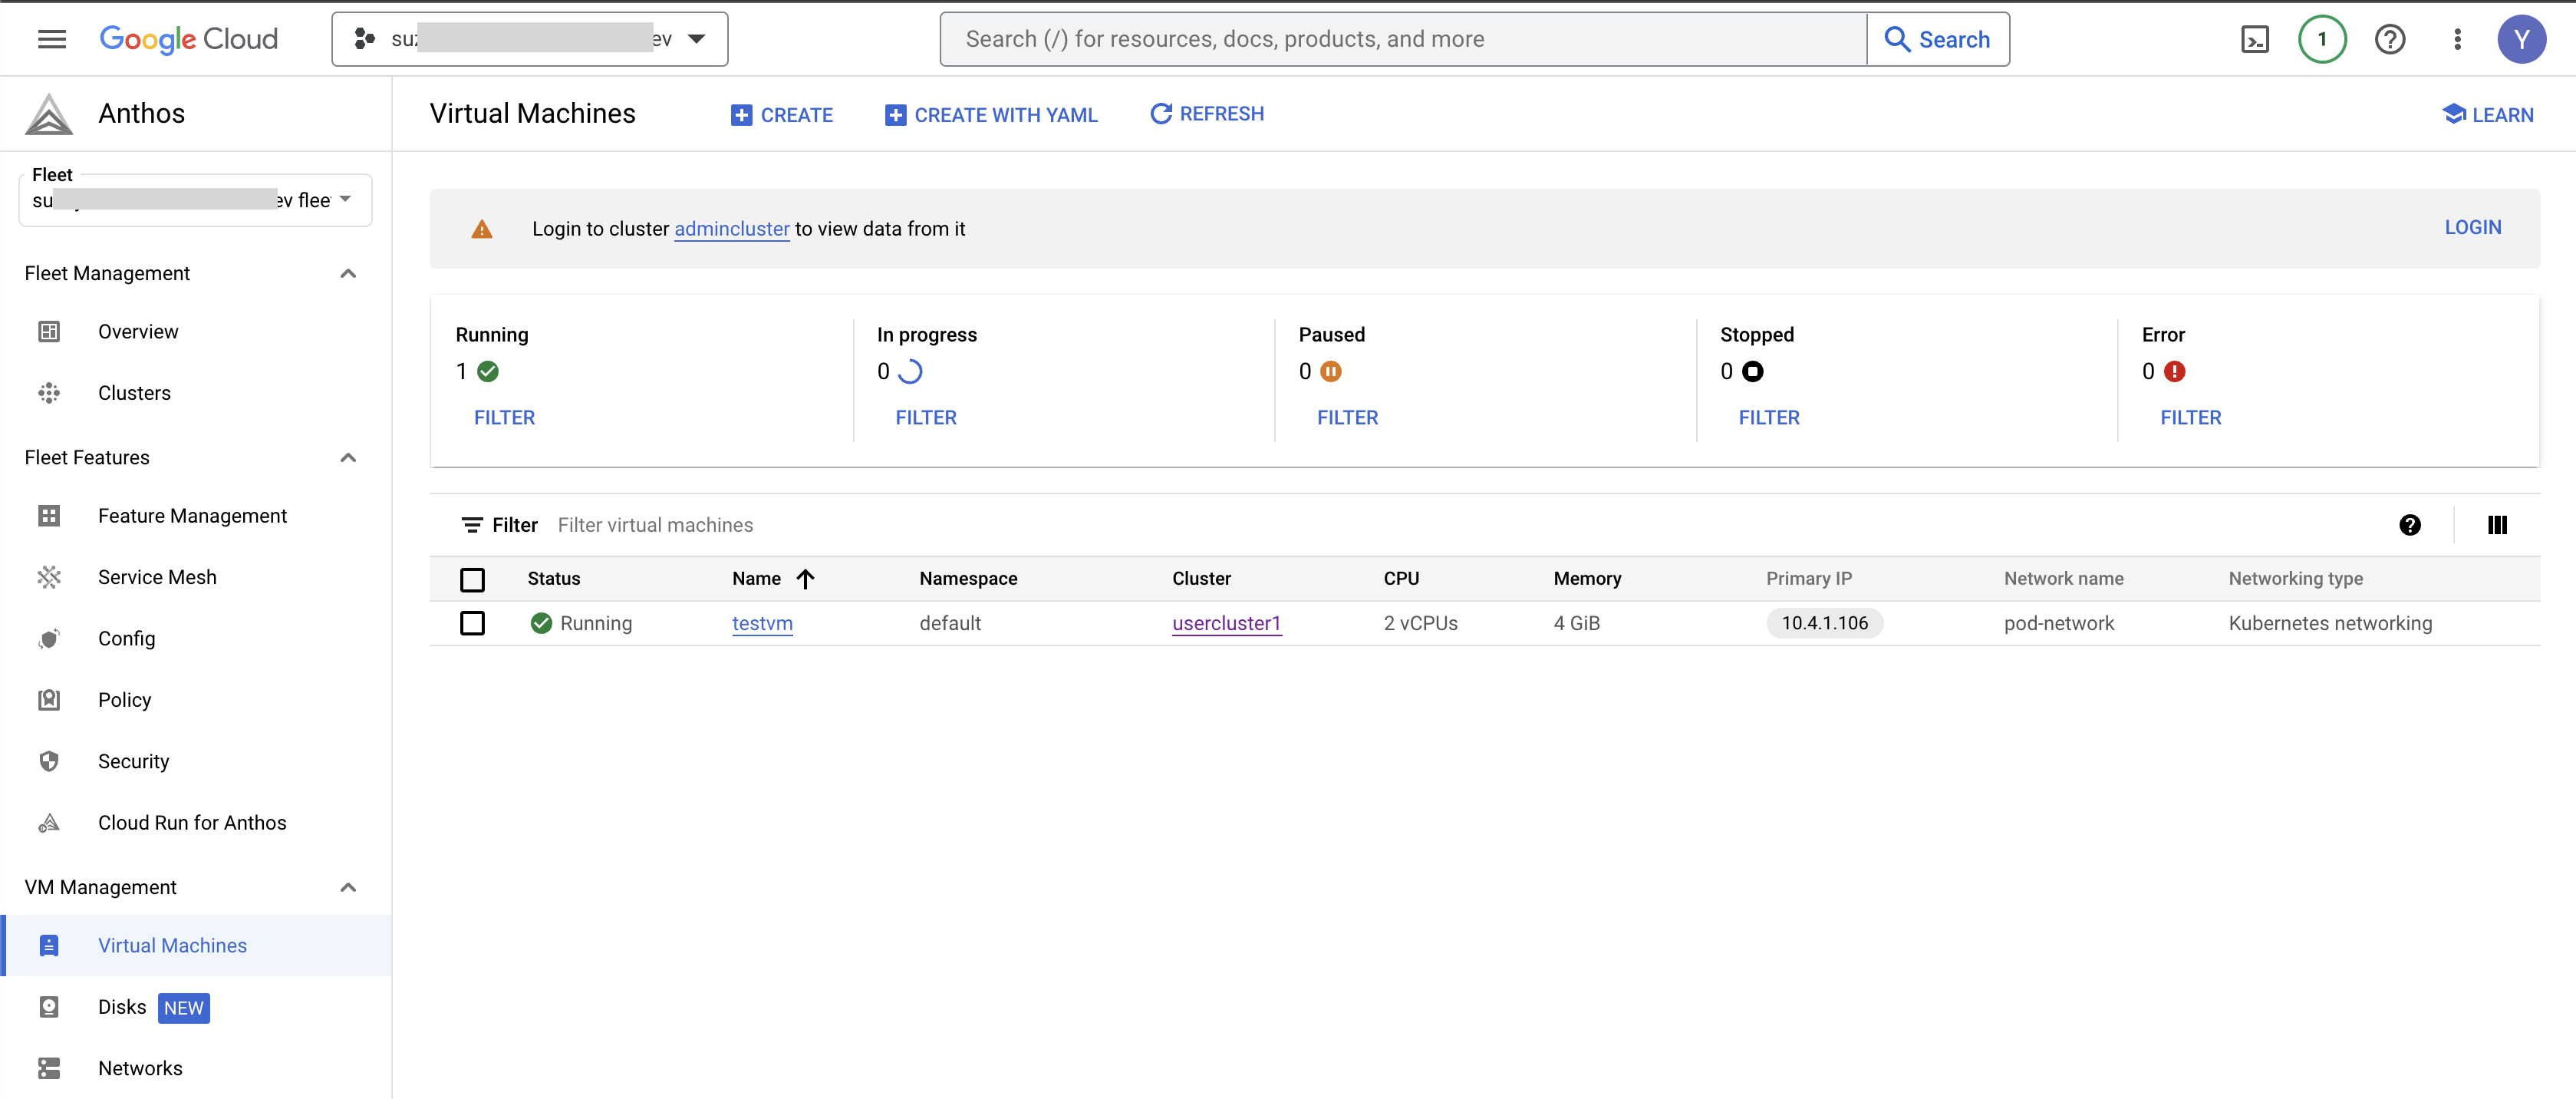
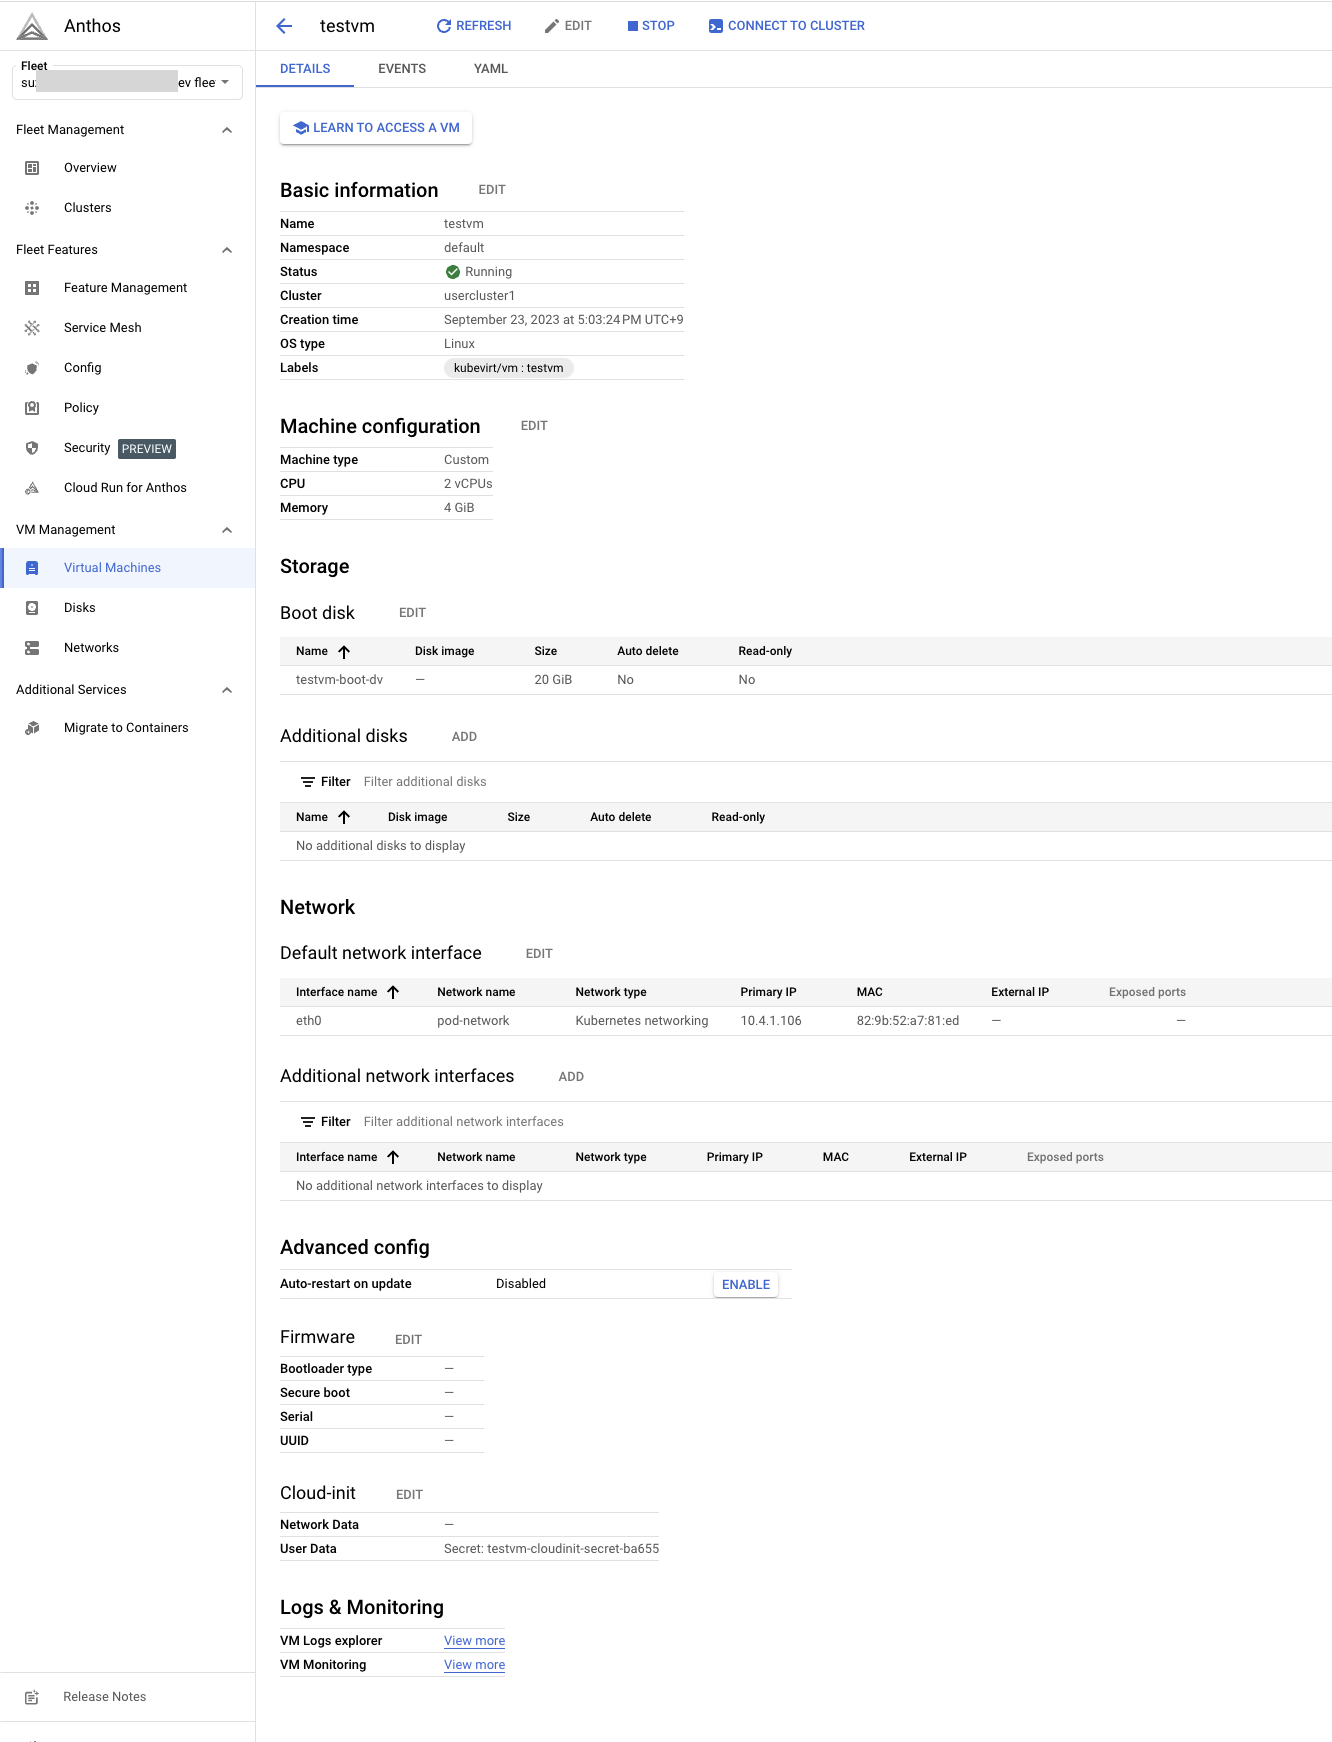
VM の詳細表示で情報も詳しく取得できる
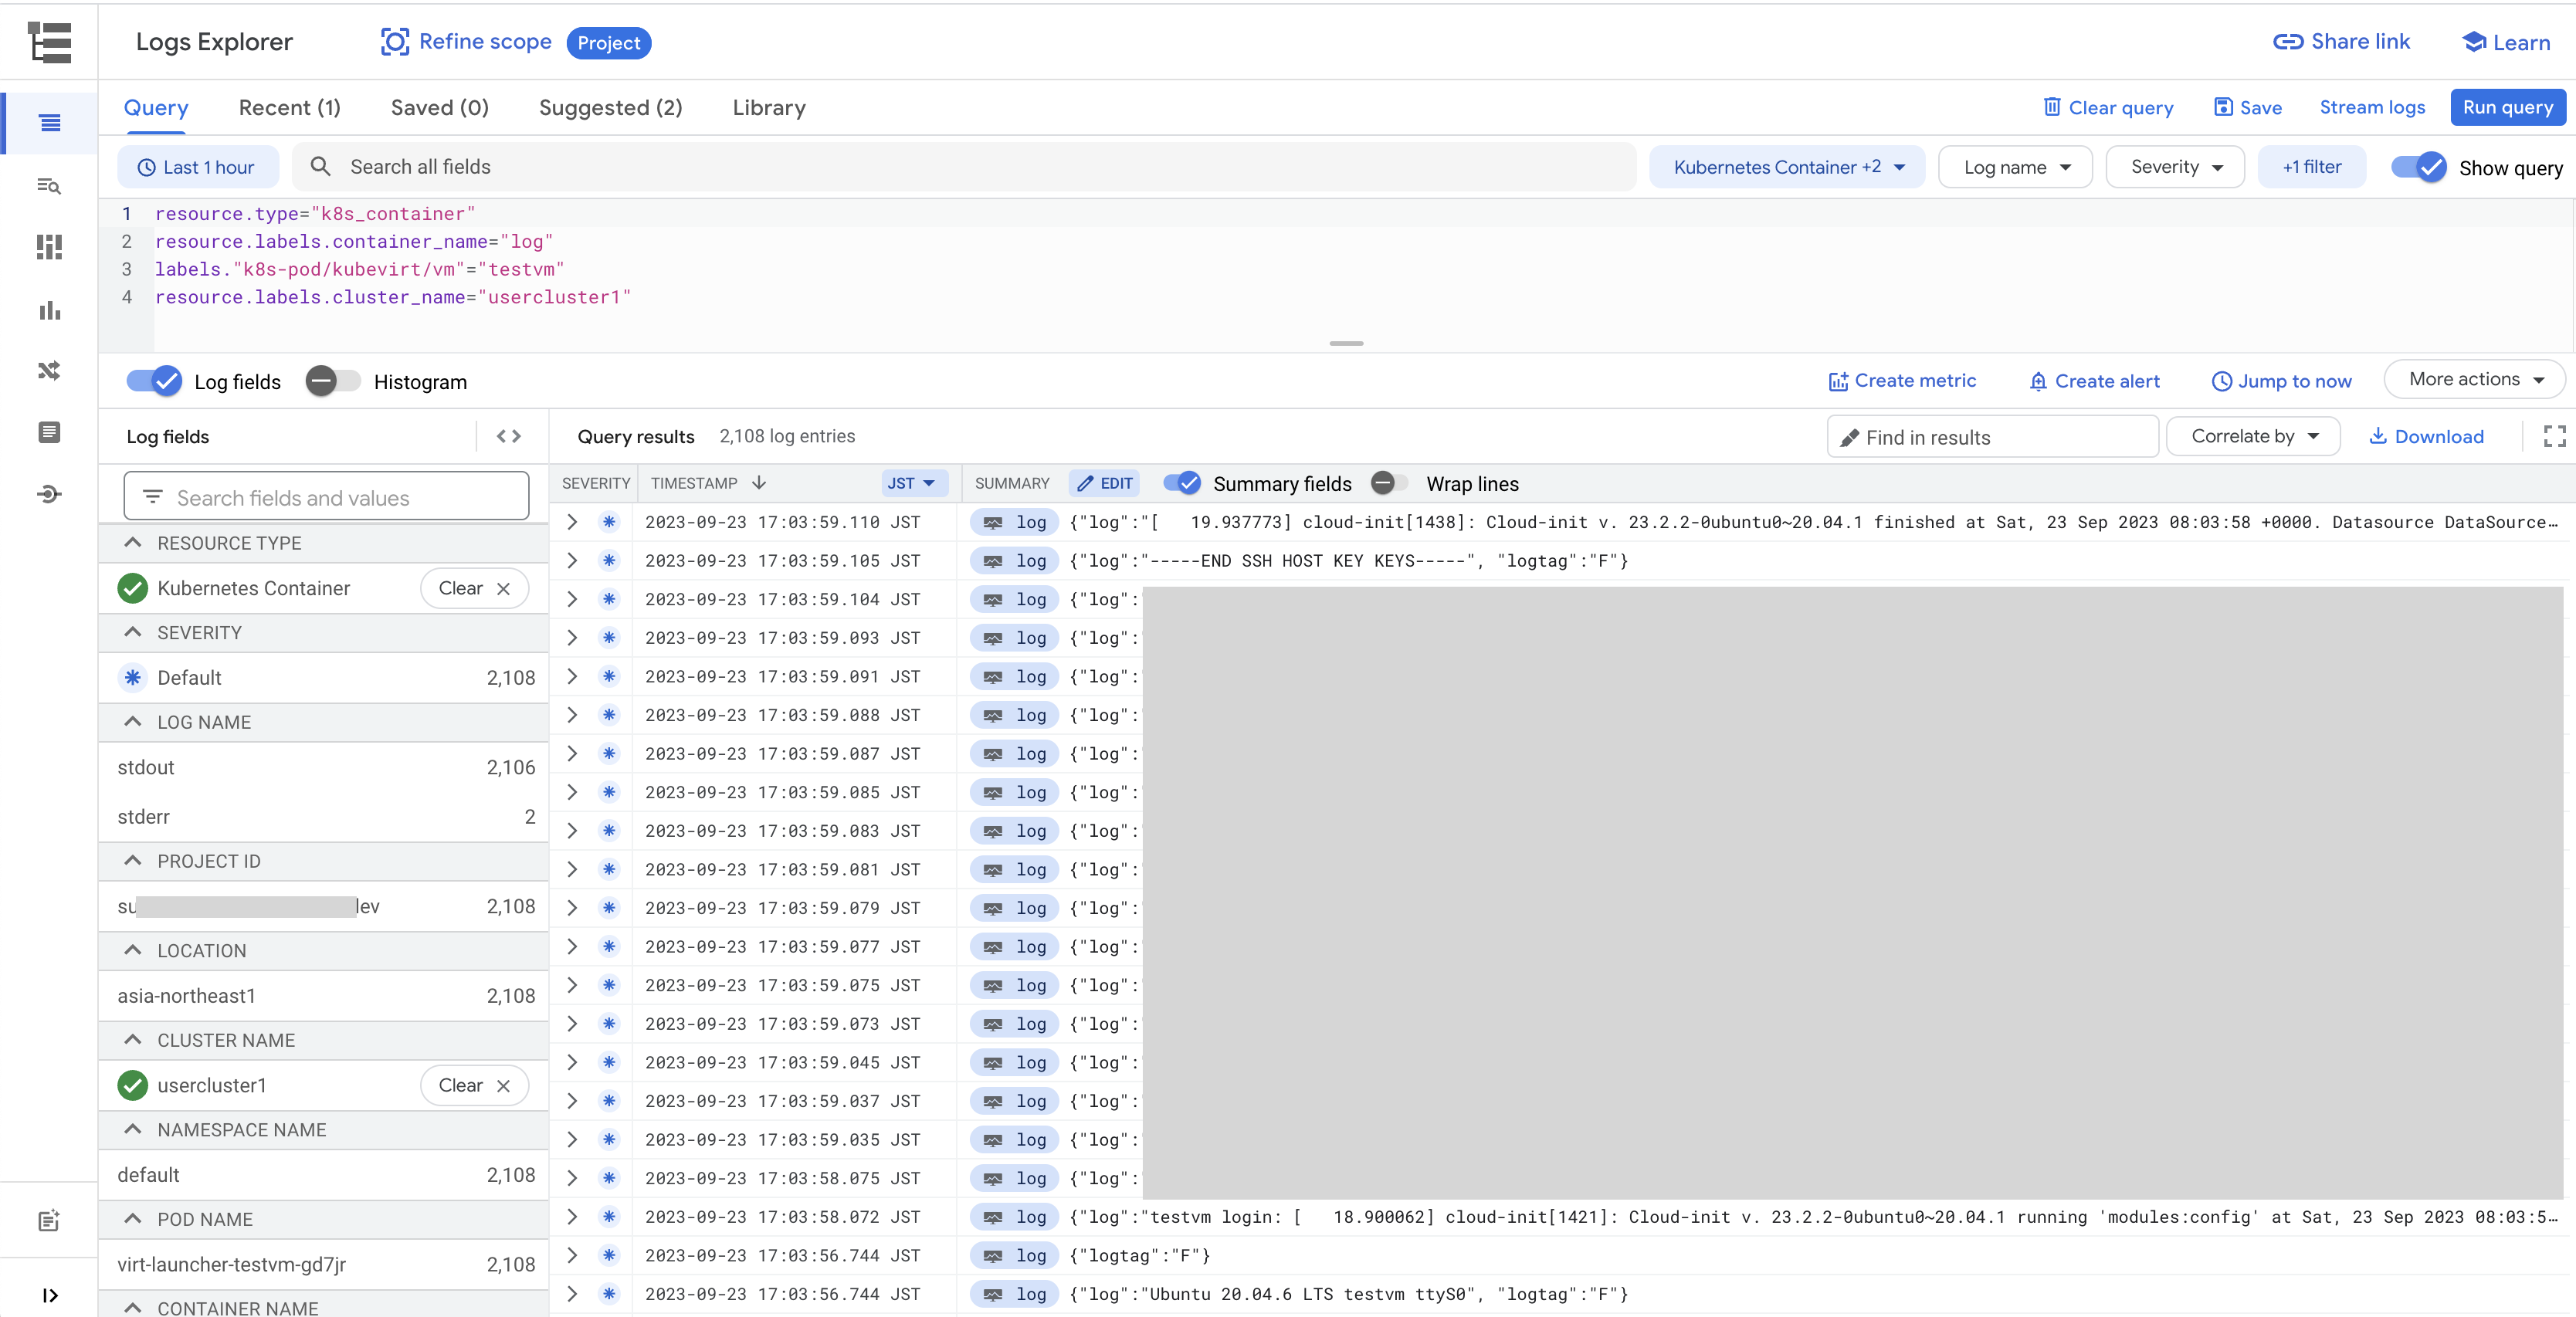
VM Logs explorer の View more を押すと Cloud Logging で自動でフィルタされた画面が下記のように開く
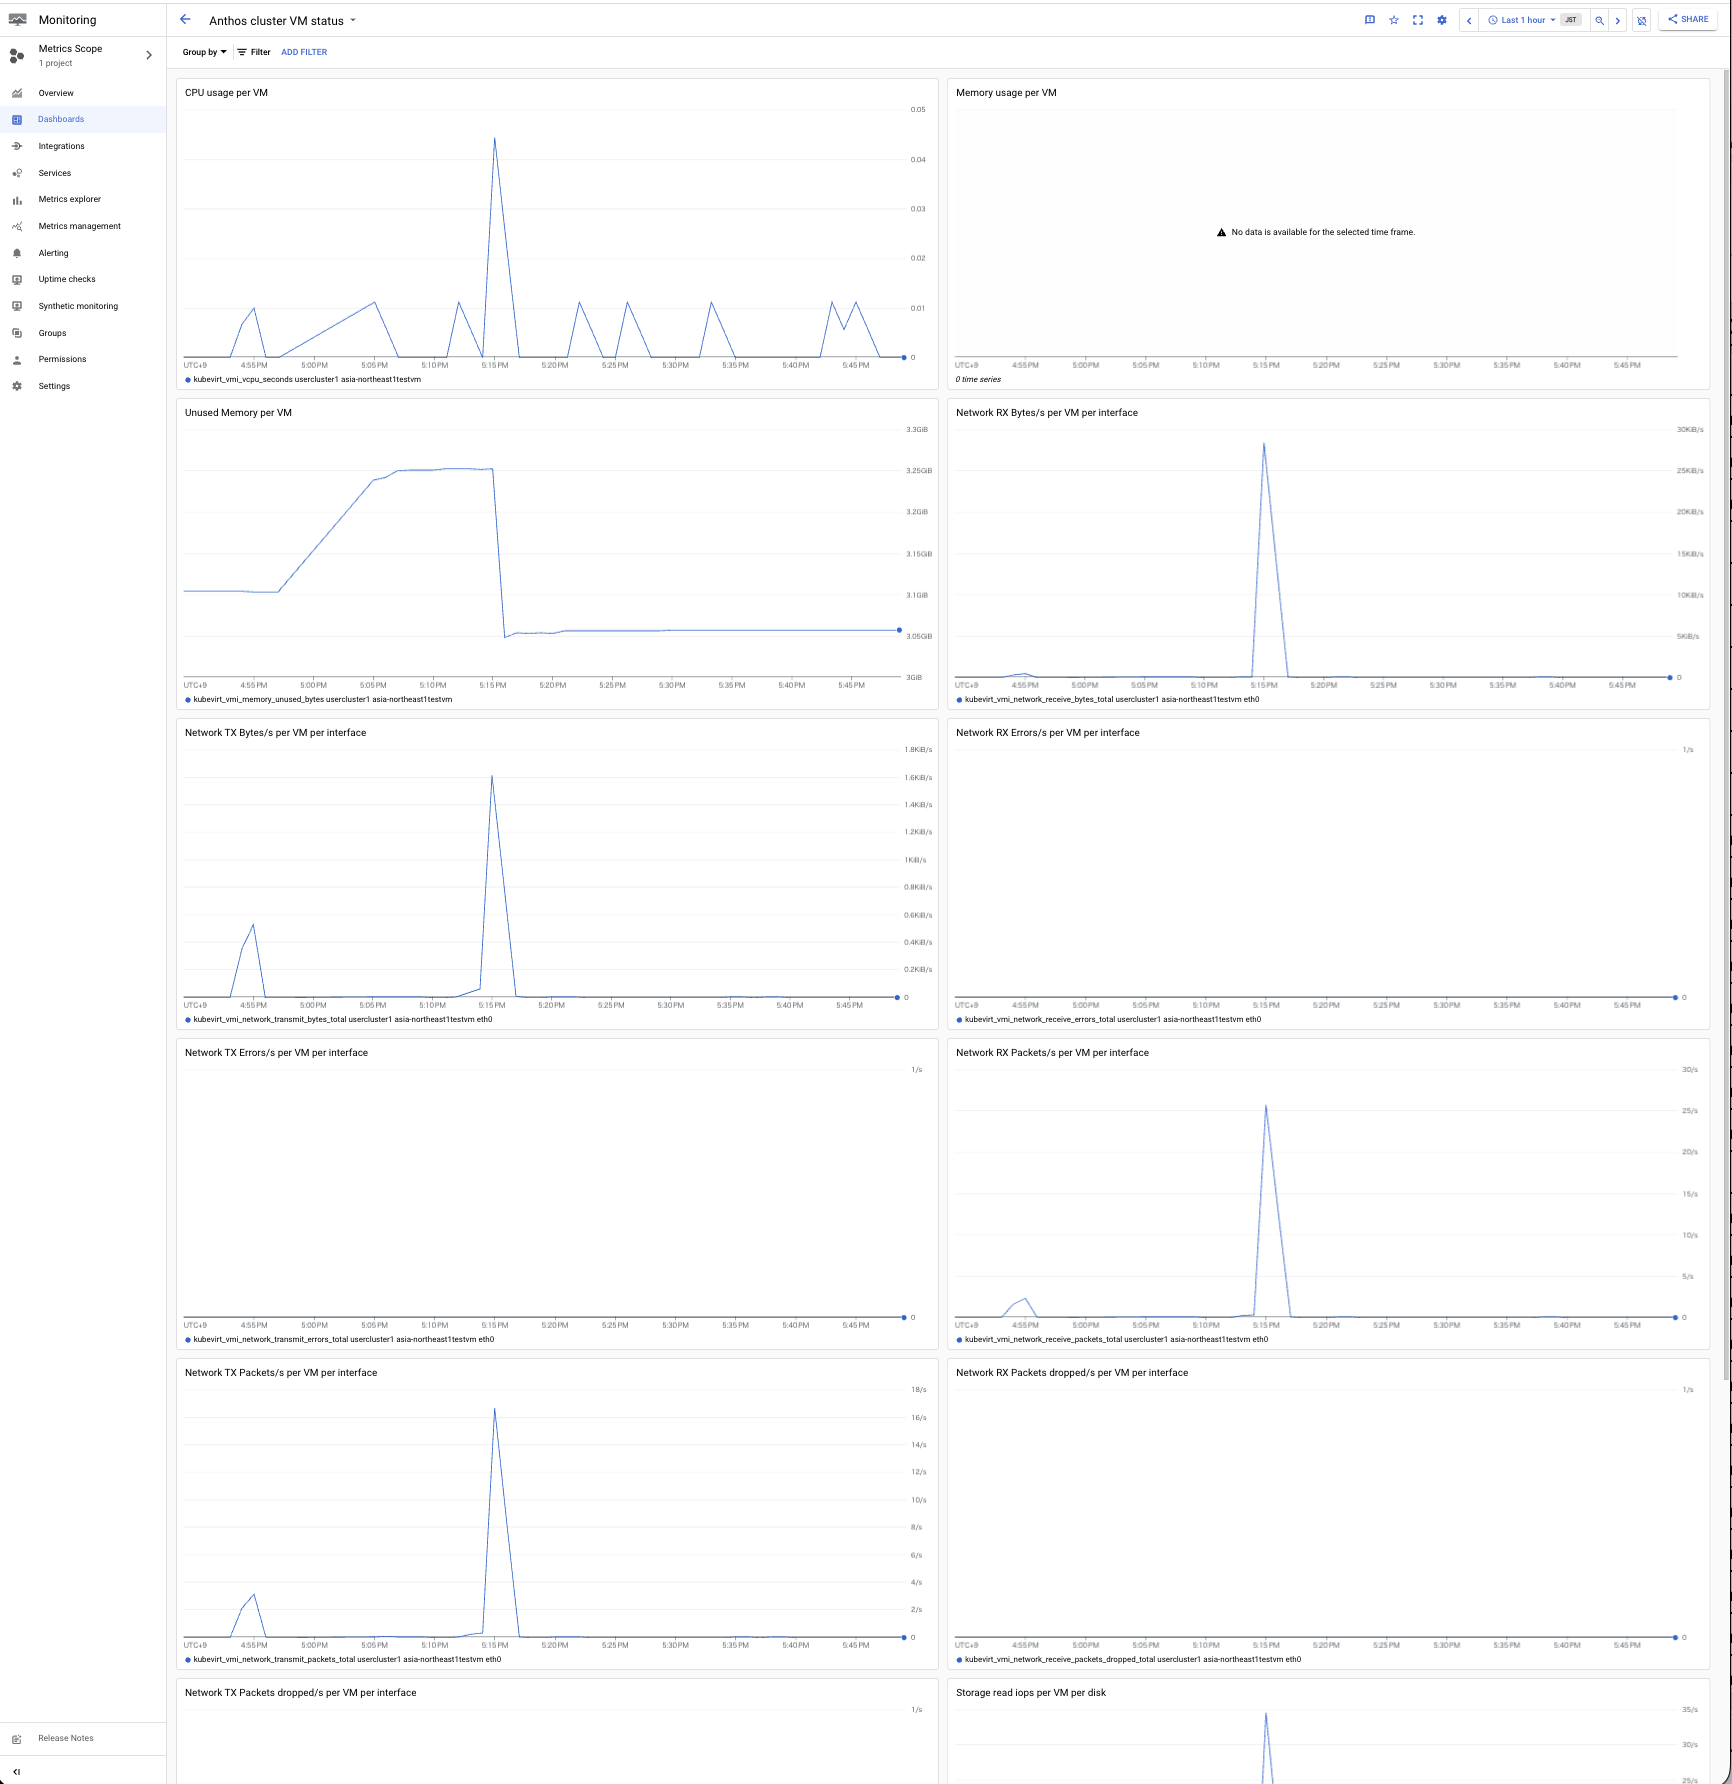
VM Monitoring の View more を押すと Cloud Monitoring で下記のような画面がひらく
自動で CPU Memory Network Disk の使用率等を取得しているのが見えた
ちなみに EVENTS を見ると下記のような Warning が確認できた
PV が RWX で構築されていないとアップグレード時にライブマイグレーションが適用されないと出ている

コンソールへの接続は下記コマンドで接続可能
kubectl virt console $VM_NAME
下記コマンドでコンソールから抜けられる
Ctrl + ]
実施結果
$ kubectl virt console $VM_NAME
Successfully connected to testvm console. The escape sequence is ^]

testvm login: suzuyu
Password:
Welcome to Ubuntu 20.04.6 LTS (GNU/Linux 5.4.0-163-generic x86_64)

 * Documentation:  https://help.ubuntu.com
 * Management:     https://landscape.canonical.com
 * Support:        https://ubuntu.com/advantage

  System information as of Sat Sep 23 07:26:00 UTC 2023

  System load:  0.05              Processes:               133
  Usage of /:   7.6% of 19.20GB   Users logged in:         0
  Memory usage: 5%                IPv4 address for enp1s0: 10.0.2.2
  Swap usage:   0%

Expanded Security Maintenance for Applications is not enabled.

0 updates can be applied immediately.

Enable ESM Apps to receive additional future security updates.
See https://ubuntu.com/esm or run: sudo pro status


The programs included with the Ubuntu system are free software;
the exact distribution terms for each program are described in the
individual files in /usr/share/doc/*/copyright.

Ubuntu comes with ABSOLUTELY NO WARRANTY, to the extent permitted by
applicable law.

To run a command as administrator (user "root"), use "sudo <command>".
See "man sudo_root" for details.

suzuyu@testvm:~$
suzuyu@testvm:~$ ip addr show
1: lo: <LOOPBACK,UP,LOWER_UP> mtu 65536 qdisc noqueue state UNKNOWN group default qlen 1000
    link/loopback 00:00:00:00:00:00 brd 00:00:00:00:00:00
    inet 127.0.0.1/8 scope host lo
       valid_lft forever preferred_lft forever
    inet6 ::1/128 scope host
       valid_lft forever preferred_lft forever
2: enp1s0: <BROADCAST,MULTICAST,UP,LOWER_UP> mtu 1450 qdisc fq_codel state UP group default qlen 1000
    link/ether f8:8f:ca:00:00:01 brd ff:ff:ff:ff:ff:ff
    inet 10.0.2.2/24 brd 10.0.2.255 scope global dynamic enp1s0
       valid_lft 86313436sec preferred_lft 86313436sec
    inet6 fe80::fa8f:caff:fe00:1/64 scope link
       valid_lft forever preferred_lft forever
suzuyu@testvm:~$
下記コマンドで VM へ SSH 接続が可能
kubectl virt ssh $VM_NAME
VM の設定は $HOME/google-virtctl/[VM名].yaml に保存される
実施結果
apiVersion: v1
data:
  userdata: [MASK]
kind: Secret
metadata:
  creationTimestamp: null
  name: testvm-cloudinit-secret-42f0d
  namespace: default
type: Opaque

---
apiVersion: vm.cluster.gke.io/v1
kind: VirtualMachine
metadata:
  creationTimestamp: null
  labels:
    kubevirt/vm: testvm
  name: testvm
  namespace: default
spec:
  cloudInit:
    noCloud:
      secretRef:
        name: testvm-cloudinit-secret-42f0d
  compute:
    cpu:
      vcpus: 2
    memory:
      capacity: 4Gi
  disks:
  - boot: true
    driver: virtio
    virtualMachineDiskName: testvm-boot-dv
  interfaces:
  - default: true
    name: eth0
    networkName: pod-network
  osType: Linux
status: {}
ちなみに Secret の data を base64 decode してみると下記のような data が入っていた(パスワード箇所はマスク)
#cloud-config
user: suzuyu
password: [MASK]
lock_passwd: false
chpasswd: {expire: false}
稼働中の設定は下記のようにも見れる
$ k get gvm testvm -oyaml
apiVersion: vm.cluster.gke.io/v1
kind: VirtualMachine
metadata:
  creationTimestamp: "2023-09-30T03:31:53Z"
  finalizers:
  - vm.cluster.gke.io/vm-finalizer
  generation: 1
  labels:
    kubevirt/vm: testvm
  name: testvm
  namespace: default
  resourceVersion: "13120"
  uid: 110d2d67-8336-4fc1-b70f-e24806d1fefe
spec:
  cloudInit:
    noCloud:
      secretRef:
        name: testvm-cloudinit-secret-42f0d
  compute:
    cpu:
      vcpus: 2
    memory:
      capacity: 4Gi
  disks:
  - boot: true
    driver: virtio
    virtualMachineDiskName: testvm-boot-dv
  interfaces:
  - default: true
    name: eth0
    networkName: pod-network
  osType: Linux
status:
  autoInstallGuestAgent: Enabled
  conditions:
  - lastTransitionTime: "2023-09-30T03:31:54Z"
    message: ""
    observedGeneration: 1
    reason: VirtualMachineInstantiated
    status: "False"
    type: Editable
  - lastTransitionTime: "2023-09-30T03:31:54Z"
    message: ""
    observedGeneration: 1
    reason: UserConfiguration
    status: "True"
    type: GuestEnvironmentEnabled
  - lastTransitionTime: "2023-09-30T03:32:54Z"
    message: ""
    observedGeneration: 1
    reason: GuestEnvironmentDataSynced
    status: "True"
    type: GuestEnvironmentSynced
  - lastTransitionTime: "2023-09-30T03:31:54Z"
    message: ""
    observedGeneration: 1
    reason: ConfigurationSynced
    status: "True"
    type: ConfigurationSynced
  diskStatus:
  - virtualMachineDiskName: testvm-boot-dv
  interfaces:
  - dnsConfig:
      nameservers:
      - 10.96.0.10
    ipAddresses:
    - 10.4.0.198
    - fd12::1:f1
    macAddress: 36:d6:6d:d8:24:01
    name: eth0
    podName: virt-launcher-testvm-v8qm4
    resourceName: testvm-eth0-3da49
    routes:
    - to: 10.4.0.0/16
    - to: 10.96.0.0/20
  provisionTime:
    initProvisionTime: 6.334479829s
    lastProvisionTime: 6.334479829s
  state: Running
  stateTransitionTime:
    Running: "2023-09-30T03:31:59Z"
    Starting: "2023-09-30T03:31:54Z"
たとえば、構築した VM に手動で Nginx をインストールするには ssh か console で下記のようにログインして VM としてインストールすれば OK。
kubectl virt ssh testvm
sudo apt install nginx
4. VM ネットワーク設定
外部からアクセスできるようにするには、kind: Service で Kubernetes のように公開するか、仮想ネットワークを追加作成して VM の NIC へ外部ネットワーク IP を直接アサインする方法がある
上記2パターンを試す
Service を使用した外部 IP 公開
KubeVirt 側のドキュメント参照してサービスを作成する
cat <<EOF > testvm-service.yaml
apiVersion: v1
kind: Service
metadata:
  name: testvm-80
  annotations:
    metallb.universe.tf/allow-shared-ip: "testvm"
spec:
  externalTrafficPolicy: Cluster
  ports:
  - port: 80
    protocol: TCP
    targetPort: 80
  selector:
    kubevirt/vm: testvm
  type: LoadBalancer
---
apiVersion: v1
kind: Service
metadata:
  name: testvm-22
  annotations:
    metallb.universe.tf/allow-shared-ip: "testvm"
spec:
  externalTrafficPolicy: Cluster
  ports:
  - port: 22
    protocol: TCP
    targetPort: 22
  selector:
    kubevirt/vm: testvm
  type: LoadBalancer
EOF
kubectl apply -f testvm-service.yaml
上記マニフェスト適用結果
$ kubectl apply -f testvm-service.yaml
service/testvm-service created

$ k get svc
NAME         TYPE           CLUSTER-IP     EXTERNAL-IP      PORT(S)        AGE
kubernetes   ClusterIP      10.96.0.1      <none>           443/TCP        23h
testvm-22    LoadBalancer   10.96.15.139   192.168.134.34   22:31867/TCP   17h
testvm-80    LoadBalancer   10.96.15.119   192.168.134.34   80:31195/TCP   17h

$ curl 192.168.134.34
<!DOCTYPE html>
<html>
<head>
<title>Welcome to nginx!</title>
<style>
    body {
        width: 35em;
        margin: 0 auto;
        font-family: Tahoma, Verdana, Arial, sans-serif;
    }
</style>
</head>
<body>
<h1>Welcome to nginx!</h1>
<p>If you see this page, the nginx web server is successfully installed and
working. Further configuration is required.</p>

<p>For online documentation and support please refer to
<a href="http://nginx.org/">nginx.org</a>.<br/>
Commercial support is available at
<a href="http://nginx.com/">nginx.com</a>.</p>

<p><em>Thank you for using nginx.</em></p>
</body>
</html>
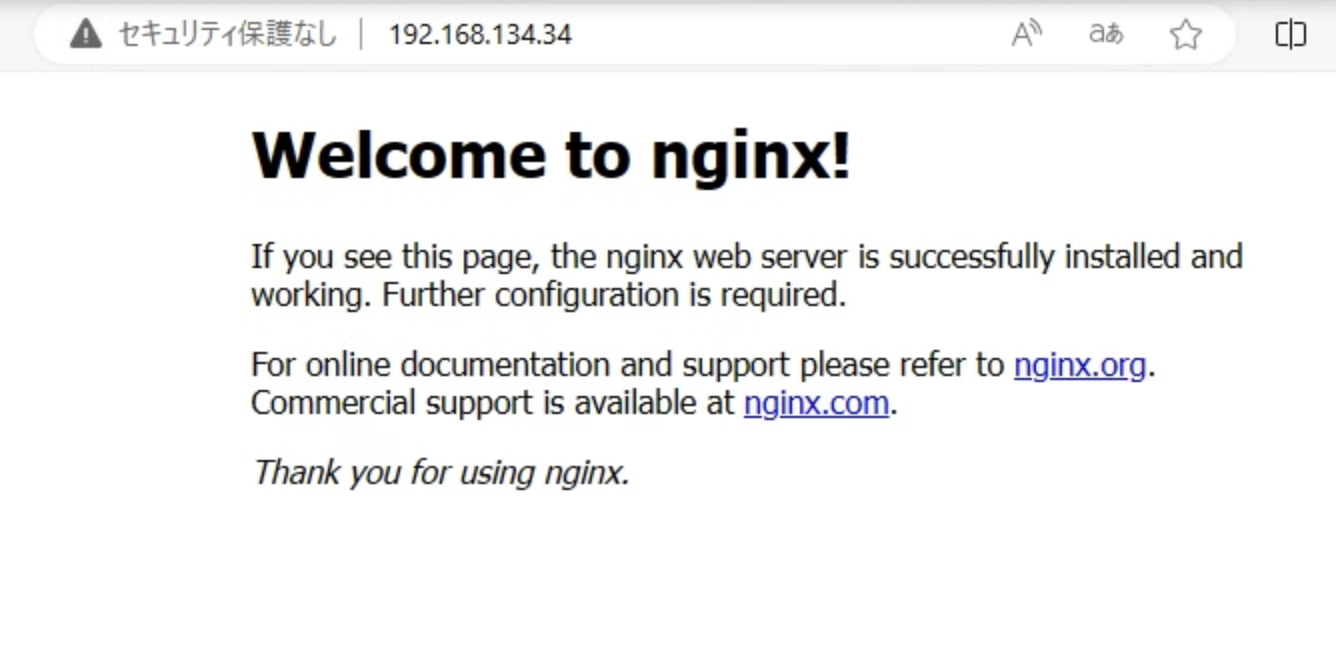
ブラウザで割り当てられた EXTERNAL-IP へアクセスすると nginx のページが開けた
SSH も kubectl virt ssh で一度ログインして authorized_keys に登録すれば同じく EXTERNAL-IP の IP に直接 SSH ログイン可能になる
kubectl virt ssh testvm
echo "ログイン元のid_rsa.pubの中身" >> ~/.ssh/authorized_keys
exit
ssh "$(kubectl get svc testvm-22 -o jsonpath='{.status.loadBalancer.ingress[0].ip}')"
仮想ネットワークを作成する
Kubernetes Service を使用せずに直接クラスタ外部ネットワークの IP を VM の NIC へアサインする方法を試す
ドキュメントを参照して設定する。下記は要約。
- 仮想ネットワークのタイプは L2 のみで、
DHCPか静的 IPかを選ぶ- DHCP は Anthos 側では提供されないので、クラスタ外部ネットワーク側で DHCP を提供する
- 静的 IP の場合は、VM作成時に静的にアサインする必要がある
- サーバのインターフェース名を指定する必要がある
- VLAN ID を指定して複数の外部 L2 ネットワークを引き込むことができる
- サーバインターフェースをタグ VLAN (Trunk) で対応させる必要がある
ここでは、静的 IPで VLAN を使用しない 方法で仮想ネットワークを作成する
下記はラボ環境で使用する YAML 設定例
export INTERFACE_NAME=ens34
export GATEWAY_ADDRESS=192.168.133.1
export NAMESERVER_ADDRESS=192.168.133.1
cat <<EOF > user-managed-network.yaml
apiVersion: networking.gke.io/v1
kind: Network
metadata:
  name: node-external-network
spec:
  type: L2
  nodeInterfaceMatcher:
    interfaceName: $INTERFACE_NAME
  gateway4: $GATEWAY_ADDRESS
  dnsConfig:
    nameservers:
    - $NAMESERVER_ADDRESS
EOF
kubectl apply -f user-managed-network.yaml
実施結果
$ kubectl apply -f user-managed-network.yaml
network.networking.gke.io/node-external-network created

$ kubectl get network
NAME                    AGE
node-external-network   29s
pod-network             27h
次に、作成した仮想ネットワークを指定して、外部 IP を直接 IP アサインする VM を作成する (静的IPの場合は--ipで指定する)
export EXTERNAL_VM_NAME="testvm-external"
export USERNAME="suzuyu"
export PASSWORD="YOUR_PASSWORD"
export EXTERNAL_VM_IP="192.168.133.100/24"
kubectl virt create vm $EXTERNAL_VM_NAME \
  --image ubuntu20.04 \
  --network node-external-network \
  --ip $EXTERNAL_VM_IP \
  --configure-initial-password $USERNAME:$PASSWORD
実施結果
下記は VM 作成および Nginx / SSH 設定を実施して外部アクセスができるところを試した出力結果の抜粋
$ kubectl virt create vm $EXTERNAL_VM_NAME \
  --image ubuntu20.04 \
  --network node-external-network \
  --ip $EXTERNAL_VM_IP \
  --configure-initial-password $USERNAME:$PASSWORD
Using existing PVC default/testvm-external-boot-dv
Uploading data to https://192.168.134.33

 611.44 MiB / 611.44 MiB [==================================================================================================================================================] 100.00% 34s

Processing completed successfully
Uploading /home/suzuyu/google-virtctl/ubuntu-20.04-server-cloudimg-amd64.img completed successfully
Created the boot disk "testvm-external-boot-dv" with local image /home/suzuyu/google-virtctl/ubuntu-20.04-server-cloudimg-amd64.img
Constructing manifest for vm "testvm-external":
Manifest for vm "testvm-external" is saved to /home/suzuyu/google-virtctl/testvm-external.yaml
Applying manifest for vm "testvm-external"
Created gvm "testvm-external"

$ k get gvm
NAME              STATUS    AGE   IP
testvm            Running   26h   10.4.0.198
testvm-external   Running   25s   192.168.133.100/24

$ kubectl virt ssh $EXTERNAL_VM_NAME
...
$ sudo apt install nginx
...
Get:17 http://archive.ubuntu.com/ubuntu focal-updates/main amd64 nginx all 1.18.0-0ubuntu1.4 [3620 B]
Fetched 2437 kB in 3s (939 kB/s)
Preconfiguring packages ...

$ echo "ログイン元のid_rsa.pubの中身" >> ~/.ssh/authorized_keys

$ exit
$ curl 192.168.133.100
<!DOCTYPE html>
<html>
<head>
<title>Welcome to nginx!</title>
<style>
    body {
        width: 35em;
        margin: 0 auto;
        font-family: Tahoma, Verdana, Arial, sans-serif;
    }
</style>
</head>
<body>
<h1>Welcome to nginx!</h1>
<p>If you see this page, the nginx web server is successfully installed and
working. Further configuration is required.</p>

<p>For online documentation and support please refer to
<a href="http://nginx.org/">nginx.org</a>.<br/>
Commercial support is available at
<a href="http://nginx.com/">nginx.com</a>.</p>

<p><em>Thank you for using nginx.</em></p>
</body>
</html>

$ ssh 192.168.133.100
Welcome to Ubuntu 20.04.6 LTS (GNU/Linux 5.4.0-163-generic x86_64)
...
Last login: Sun Oct  1 06:29:43 2023
suzuyu@testvm-external:~$
suzuyu@testvm-external:~$ logout
Connection to 192.168.133.100 closed.
5. 電源オンオフ
ドキュメント参照して下記コマンドで VM の電源管理ができる
export VM_NAME="testvm"
kubectl virt stop $VM_NAME    # 電源オフ
kubectl virt start $VM_NAME   # 電源オン
kubectl virt restart $VM_NAME # 再起動
エフェメラル Pod IP アドレスを使用していると、VM を再起動するたびにアドレスが変わる
実施結果
$ kubectl virt stop $VM_NAME
VM testvm was scheduled to stop
$ kubectl get gvm $VM_NAM
NAME     STATUS    AGE   IP
testvm   Stopped   76m   10.4.1.106

$ kubectl virt start $VM_NAME
VM testvm was scheduled to start
$ kubectl get gvm $VM_NAME
NAME     STATUS     AGE   IP
testvm   Starting   77m   10.4.1.208
$ kubectl get gvm $VM_NAME
NAME     STATUS    AGE   IP
testvm   Running   77m   10.4.1.208

$ kubectl virt restart $VM_NAME
VM testvm was scheduled to restart
$ kubectl get gvm $VM_NAME -w
NAME     STATUS     AGE   IP
testvm   Stopping   77m   10.4.1.208
testvm   Stopping   77m   10.4.1.208
testvm   ErrorConfiguration   77m   10.4.1.208
testvm   Starting             77m   10.4.1.208
testvm   Starting             77m   10.4.1.244
testvm   Running              77m   10.4.1.244
6. 切り戻し
環境のクリーンアップする場合は作成した VM を削除して vmruntime を無効化する
下記コマンドで Service の試験で作成した VM を削除する
export VM_NAME="testvm"
kubectl delete -f testvm-service.yaml
kubectl virt delete vm $VM_NAME --all
実施結果
$ kubectl virt delete vm $VM_NAME --all
vm "testvm" used the following resources:
  gvm: testvm
  VirtualMachineDisk: testvm-boot-dv
  secret: testvm-cloudinit-secret-8bbec
Start deleting the resources:
  Deleted gvm "testvm".
  Deleted VirtualMachineDisk "testvm-boot-dv".
  Deleted secret "testvm-cloudinit-secret-8bbec".
下記コマンドで仮想ネットワーク作成試験で作成した VM を削除する
export EXTERNAL_VM_NAME="testvm-external"
kubectl virt delete vm $EXTERNAL_VM_NAME --all
kubectl delete -f user-managed-network.yaml
ドキュメントに従って下記コマンドで vmruntime 無効化を実施する
bmctl disable vmruntime --kubeconfig KUBECONFIG_PATH \
  --timeout TIMEOUT_IN_MINUTES \
  --force true
実施結果
$ bmctl disable vmruntime --kubeconfig bmctl-workspace/usercluster1/usercluster1-kubeconfig
[2023-10-01 07:26:57+0000] Waiting for vmruntime to become ready. OK
まとめ
Anthos VM Runtime をインストールして基本的な VM 構築を試してみた
実際の採用には、オーバーヘッドの確認や複数の仮想ネットワーク作成、RWXを使用したライブマイグレーションなど色々検証などが必要そう
Kubernetes on KubeVirt on Kubernetes のようなことができれば、オンプレミス環境での Kubernetes クラスタと VM の共通管理や、複数のシングルテナントクラスタの作成・管理などもしやすくなるので、KubeVirt の成長を今後も確認していきたい
参照