Deprecated(2016/7/14 追記)
Chrome Custom Tabs、または、CoordinatorLayout + AppBarLayout + NestedScrollView を利用した実装を推奨します。
Chrome Custom Tabs
https://developer.chrome.com/multidevice/android/customtabs
http://qiita.com/droibit/items/66704f96a602adec5a35
CoordinatorLayout + AppBarLayout + NestedScrollView の実装例
dependencies {
    ...
    compile 'com.android.support:appcompat-v7:23.4.0'
    compile 'com.android.support:design:23.4.0'
}
<?xml version="1.0" encoding="utf-8"?>
<android.support.design.widget.CoordinatorLayout
    xmlns:android="http://schemas.android.com/apk/res/android"
    xmlns:app="http://schemas.android.com/apk/res-auto"
    android:layout_width="match_parent"
    android:layout_height="match_parent"
    >

    <android.support.design.widget.AppBarLayout
        android:layout_width="match_parent"
        android:layout_height="wrap_content"
        >

        <android.support.v7.widget.Toolbar
            android:id="@+id/toolbar"
            android:layout_width="match_parent"
            android:layout_height="?actionBarSize"
            app:layout_collapseMode="pin"
            app:layout_scrollFlags="scroll|enterAlways|snap"
            />
    </android.support.design.widget.AppBarLayout>

    <android.support.v4.widget.NestedScrollView
        android:layout_width="match_parent"
        android:layout_height="match_parent"
        app:layout_behavior="@string/appbar_scrolling_view_behavior"
        >

        <WebView
            android:id="@+id/webView"
            android:layout_width="match_parent"
            android:layout_height="wrap_content"
            />
    </android.support.v4.widget.NestedScrollView>
</android.support.design.widget.CoordinatorLayout>
はじめに
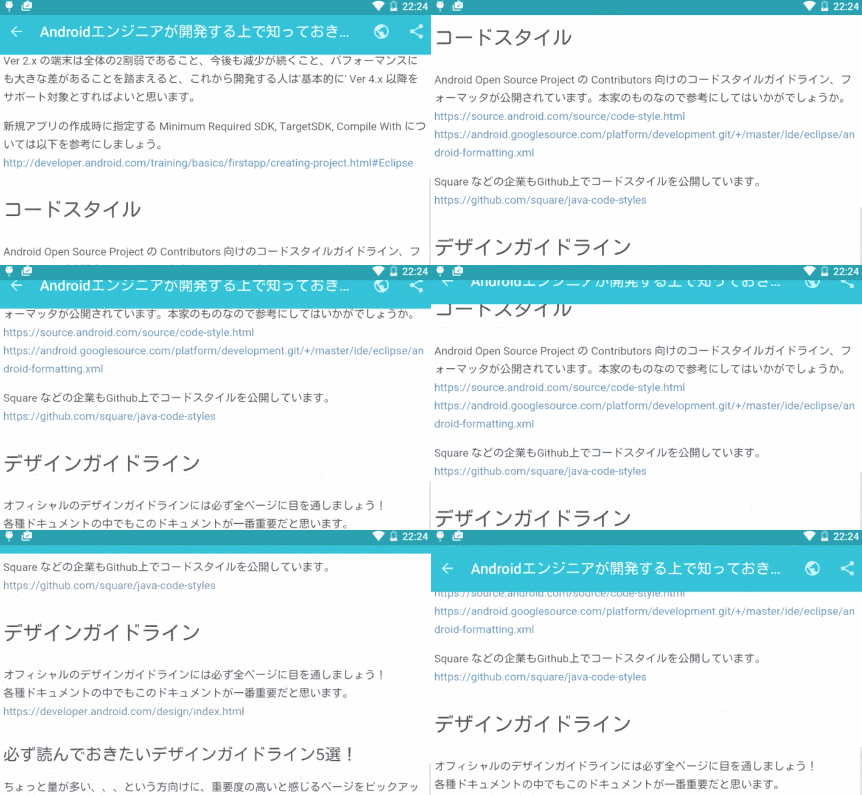
WebView, ScrollView で使える Chrome ブラウザ風のスクロールトリックを紹介します。Roman Nurik 氏による Quick Return パターンより簡単な方法かなと思います。
今回初めて Toolbar を使ってみましたが、いい感じです! ActionBar にさようならして、これからどんどん取り込んでいきたいと思います。
メインコンテンツをなるべく大きな画面で見せる、スクロールに合わせてツールバーに遊びを入れるなどして、使いやすくて楽しいアプリを作っていきたいですね!
前準備 1: ObservableScrollView を作る
スクロールイベントを拾うために、下記のようなクラスを作成します。とりあえず動かしたい人はコピペで OK です。
(参考)
http://stackoverflow.com/questions/3948934/synchronise-scrollview-scroll-positions-android
import android.content.Context;
import android.util.AttributeSet;
import android.widget.ScrollView;

public class ObservableScrollView extends ScrollView {

    public interface ScrollViewListener {
        void onScrollChanged(int l, int t, int oldl, int oldt);
    }

    private ScrollViewListener scrollViewListener = null;

    public ObservableScrollView(Context context) {
        super(context);
    }

    public ObservableScrollView(Context context, AttributeSet attrs) {
        super(context, attrs);
    }

    public ObservableScrollView(Context context, AttributeSet attrs, int defStyle) {
        super(context, attrs, defStyle);
    }

    public void setScrollViewListener(ScrollViewListener scrollViewListener) {
        this.scrollViewListener = scrollViewListener;
    }

    // onScrollChanged が複数回呼び出されるのを防止するために利用
    private int lastt = 0;

    @Override
    protected void onScrollChanged(int l, int t, int oldl, int oldt) {
        super.onScrollChanged(l, t, oldl, oldt);

        // 高速にスクロールした場合、画面上部で t, oldt がマイナスとなる場合は処理をスキップ
        if (scrollViewListener == null || lastt == t || t < 0 || oldt < 0) return;

        lastt = t;
        scrollViewListener.onScrollChanged(l, t, oldl, oldt);
    }

}
前準備 2: レイアウトを作成する
さきほど作成した ObservableScrollView の上に Toolbar を重ねて表示させます。低レイヤ層の View には Toolbar の高さだけスペーシングを入れます。
下記例では、スペーシングの高さをベタで書いてますが、電話、タブレット、縦向き、横向きで高さが異なるので、dimen で定義してあげたほうがベターです。
ActionBar でいう "?android:attr/actionBarSize" は Toolbar にはないんですかね。どなたかご存知の方がいたら、教えて下さると嬉しいです。
WebView の場合
<FrameLayout xmlns:android="http://schemas.android.com/apk/res/android"
    xmlns:app="http://schemas.android.com/apk/res-auto"
    android:layout_width="match_parent"
    android:layout_height="match_parent">

    <com.example.app.widget.ObservableScrollView
        android:id="@+id/scrollview"
        android:layout_width="match_parent"
        android:layout_height="match_parent">

        <LinearLayout
            android:layout_width="match_parent"
            android:layout_height="match_parent"
            android:orientation="vertical">

            <View
                android:layout_width="match_parent"
                android:layout_height="56dp" />

            <WebView
                android:id="@+id/webview"
                android:layout_width="match_parent"
                android:layout_height="match_parent" />
        </LinearLayout>
    </com.example.app.widget.ObservableScrollView>

    <android.support.v7.widget.Toolbar
        android:id="@+id/toolbar"
        android:layout_width="match_parent"
        android:layout_height="wrap_content"
        app:theme="@style/ThemeOverlay.AppCompat.Dark.ActionBar" />

</FrameLayout>
ScrollView の場合
下記 xml でいけると思いますが未検証です(念のため)。
<FrameLayout xmlns:android="http://schemas.android.com/apk/res/android"
    xmlns:app="http://schemas.android.com/apk/res-auto"
    android:layout_width="match_parent"
    android:layout_height="match_parent">

    <com.example.app.widget.ObservableScrollView
        android:id="@+id/scrollview"
        android:layout_width="match_parent"
        android:layout_height="match_parent"
        android:paddingTop="56dp" />

    <android.support.v7.widget.Toolbar
        android:id="@+id/toolbar"
        android:layout_width="match_parent"
        android:layout_height="wrap_content"
        app:theme="@style/ThemeOverlay.AppCompat.Dark.ActionBar" />

</FrameLayout>
スクロールトリック! イベントに合わせて Toolbar の transitionY を変更する
縦軸の移動量から位置計算をしてツールバーの setTranslationY を呼んであげれば終了です!
final Toolbar toolbar = (Toolbar) findViewById(R.id.toolbar);

...

ObservableScrollView scrollView = (ObservableScrollView) findViewById(R.id.scrollview);

scrollView.setScrollViewListener(new ObservableScrollView.ScrollViewListener() {
    @Override
    public void onScrollChanged(int l, int t, int oldl, int oldt) {

        int diff = t - oldt; // 縦軸の移動量

        int translationY = 0 < diff
                ? Math.max((int) toolbar.getY() - diff, -toolbar.getHeight())
                : Math.min((int) toolbar.getY() - diff, 0);

        toolbar.setTranslationY(translationY);
    }
});
