はじめに
マテリアルデザインに Bottom Navigation が追加されましたが、アプリの操作感を見てみたかったので実際のアプリに導入してみました。
本稿では導入時のメモを記載します。今後、導入を検討している方の参考になれば幸いです。
アプリURL
https://play.google.com/store/apps/details?id=com.appspot.parisienneapps.qiita
ガイドライン
Bottom Navigation
https://www.google.com/design/spec/components/bottom-navigation.html
ライブラリ
GitHub にたくさんライブラリがあります。以下一例です。
https://github.com/sephiroth74/Material-BottomNavigation
https://github.com/aurelhubert/ahbottomnavigation
https://github.com/roughike/BottomBar
アニメーションのエフェクトなど、自前実装だと面倒そうなので、使い勝手のよさそうなものがあれば、それを使えばよいかなと思います。
今回のアプリでは、Material-BottomNavigation にしました。XML でメニュー定義できるもので、最初に見つかったものを選びましたが、スター数で言えば、BottomBar のほうがよさそうです。
そのうちサポートライブラリでも対応してくれるような気もしています。
レイアウト構成
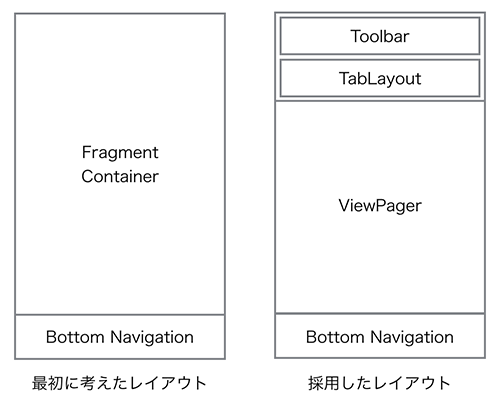
はじめは左側のレイアウト構成でよいかと思いましたが、上下のバーにスクロールトリックを入れたかったので右側のようなレイアウトにしました。
BottomMenu が変わる度に ViewPager をアップデートするようにしています。
実際のレイアウトは下記のとおりです。
<?xml version="1.0" encoding="utf-8"?>
<android.support.design.widget.CoordinatorLayout
    xmlns:android="http://schemas.android.com/apk/res/android"
    xmlns:app="http://schemas.android.com/apk/res-auto"
    android:layout_width="match_parent"
    android:layout_height="match_parent"
    >

    <android.support.design.widget.AppBarLayout
        android:layout_width="match_parent"
        android:layout_height="wrap_content"
        >

        <android.support.v7.widget.Toolbar
            android:id="@+id/toolbar"
            android:layout_width="match_parent"
            android:layout_height="?actionBarSize"
            app:layout_collapseMode="pin"
            app:layout_scrollFlags="scroll|enterAlways|snap"
            app:title="@string/posts"
            />

        <android.support.design.widget.TabLayout
            android:id="@+id/tabLayout"
            android:layout_width="match_parent"
            android:layout_height="48dp"
            android:textAllCaps="false"
            app:tabMode="scrollable"
            />
    </android.support.design.widget.AppBarLayout>

    <android.support.v4.view.ViewPager
        android:id="@+id/viewPager"
        android:layout_width="match_parent"
        android:layout_height="match_parent"
        app:layout_behavior="@string/appbar_scrolling_view_behavior"
        />

    <it.sephiroth.android.library.bottomnavigation.BottomNavigation
        android:id="@+id/bottomNavigation"
        android:layout_width="match_parent"
        android:layout_height="wrap_content"
        android:layout_gravity="bottom"
        app:bbn_entries="@menu/bottom_navigation"
        app:elevation="8dp"
        app:layout_behavior="@string/bbn_phone_view_behavior"
        />

</android.support.design.widget.CoordinatorLayout>
コードは下記のようなイメージです。
PagerAdapter の中身は省略します。
public enum BottomMenu {

    MENU_1(0, R.string.menu_1, View.VISIBLE, TabLayout.MODE_SCROLLABLE),
    MENU_2(1, R.string.menu_2, View.VISIBLE, TabLayout.MODE_FIXED),
    MENU_3(2, R.string.menu_3, View.GONE, TabLayout.MODE_FIXED),
    MENU_4(3, R.string.menu_4, View.GONE, TabLayout.MODE_FIXED),
    MENU_5(4, R.string.menu_5, View.VISIBLE, TabLayout.MODE_FIXED),;

    private int position;
    private int titleId;
    private int tabLayoutVisibility;
    private int tabLayoutMode;

    BottomMenu(int position, int titleId, int tabLayoutVisibility, int tabLayoutMode) {
        this.position = position;
        this.titleId = titleId;
        this.tabLayoutVisibility = tabLayoutVisibility;
        this.tabLayoutMode = tabLayoutMode;
    }

    public static BottomMenu fromPosition(int position) {
        for (BottomMenu bottomMenu : values()) {
            if (position == bottomMenu.getPosition()) {
                return bottomMenu;
            }
        }
        return null;
    }

    public int getPosition() {
        return position;
    }

    public int getTitleId() {
        return titleId;
    }

    public int getTabLayoutVisibility() {
        return tabLayoutVisibility;
    }

    public int getTabLayoutMode() {
        return tabLayoutMode;
    }
}
@SuppressWarnings("ResourceType")
@Override
protected void onCreate(Bundle savedInstanceState) {
    ...

    adapter = new MainPagerAdapter(this, getSupportFragmentManager());
    viewPager.setAdapter(adapter);
    tabLayout.setupWithViewPager(viewPager);

    bottomNavigation.setOnMenuItemClickListener(new BottomNavigation.OnMenuItemSelectionListener() {
        @Override
        public void onMenuItemSelect(@IdRes int menuId, int position) {
            BottomMenu bottomMenu = BottomMenu.fromPosition(position);

            // PagerAdapter の更新
            adapter.setBottomMenu(bottomMenu);
            adapter.notifyDataSetChanged();

            // View の更新
            toolbar.setTitle(bottomMenu.getTitleId());
            tabLayout.setVisibility(bottomMenu.getTabLayoutVisibility());
            tabLayout.setTabMode(bottomMenu.getTabLayoutMode());
            viewPager.setCurrentItem(0, false);
        }

        @Override
        public void onMenuItemReselect(@IdRes int menuId, int position) {
        }
    });
}
BottomMenu には FragmentPagerAdapter 用に下記のようなメソッドを実装してあげてもよいと思います。
public interface PagerAdapterFunctions {
    Fragment getItem(int position);
    int getCount();
    CharSequence getPageTitle(int position);
}

