Swift3でテーブルのセルを横にずらす(スワイプできる)ようにする
今回の目標
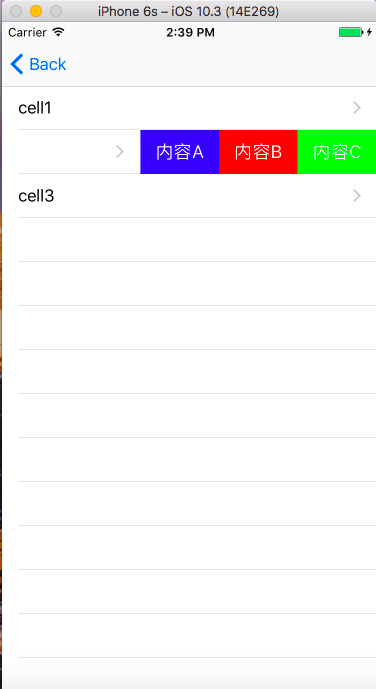
テーブルのセルをスライドできるようにする。
開発環境
- Xcode:8.2.1
- 言語:Swift 3
- OS:MacOS
実行方法
事前準備としてテーブルの表示ができるようにしておきます。
その後、下記二つのメソッドを追加します。
追加メソッド
func tableView(_ tableView: UITableView, editActionsForRowAt: IndexPath) -> [UITableViewRowAction]? {}func tableView(_ tableView: UITableView, canEditRowAt indexPath: IndexPath) -> Bool {}
一つ目のメソッドでアクションを追加して、二つ目のメソッドでアクションを許可しています。
サンプルコード
ViewVontroller.swift
    // Cellのスワイプメソッドを実装します
    func tableView(_ tableView: UITableView, editActionsForRowAt indexPath: IndexPath) -> [UITableViewRowAction]? {
        let swipeCellA = UITableViewRowAction(style: .default, title: "内容A") { action, index in
            self.swipeContentsTap(content: "CellA", index: index.row) // 押されたときの動きを定義しています
        }
        let swipeCellB = UITableViewRowAction(style: .default, title: "内容B") { action, index in
            self.swipeContentsTap(content: "CellB", index: index.row)
        }
        let swipeCellC = UITableViewRowAction(style: .default, title: "内容C") { action, index in
            self.swipeContentsTap(content: "CellC", index: index.row)
        }
        swipeCellA.backgroundColor = .blue // 背景色
        swipeCellB.backgroundColor = .red
        swipeCellC.backgroundColor = .green

        return [swipeCellC, swipeCellB, swipeCellA] // A,B,Cという順で表示される
    }

    // trueを返すことでCellのアクションを許可しています
    func tableView(_ tableView: UITableView, canEditRowAt indexPath: IndexPath) -> Bool {
        return true
    }

    // 独自に作成した押されたとき用のメソッド。Cell番号と押された内容をprint
    func swipeContentsTap(content: String, index: Int) {
        print("タップされたのは" + index.description + "番のセルで" + "内容は" + content + "でした")
    }
