2019年1月5日追記: Gatsby.jsがv1であることを明記。チュートリアルへのリンクが最新版(現時点ではv2)になっていたので、v1へのリンクに修正。
Reactベースの静的サイトジェネレータ**Gatsby.js (v1)**のチュートリアルを、TypeScriptで動かしました。
TypeScriptはJavaScriptに静的型付けを追加した言語です。Visual Studio Codeなどのエディタで補完が効くといった嬉しい事があります。
環境
- Windows 10 Pro Insider Preview Build 17074 (Windows Subsystem for Linux)
- Gatsby.js v1.9.207
準備
まずは公式のチュートリアルに沿ってプロジェクトを構築します。
$ yarn add gatsby-cli
$ ./node_modules/.bin/gatsby new gatsby_ts
$ cd gatsby_ts
$ npm run develop
http://localhost:8000 にアクセスすると閲覧できます。
gatsby-plugin-typescript
Gatsby.jsには公式のTypeScriptプラグインが提供されています。
まずプラグインをインストールします。
$ yarn add gatsby-plugin-typescript typescript
gatsby-config.jsに、プラグインを有効化する設定を追加します。
  plugins: [
    `gatsby-plugin-typescript`
  ];
tsconfig.jsonを追加します。
{
  "compilerOptions": {
    "outDir": "./dist/",
    "sourceMap": true,
    "noImplicitAny": true,
    "module": "commonjs",
    "target": "esnext",
    "jsx": "react",
    "lib": ["dom", "es2015", "es2017"]
  },
  "include": ["./src/**/*"]
}
これで、.tsx拡張子のファイルをTypeScriptとしてコンパイルしてくれるようになります。
Gatsby.js Tutorial
ここから実際にGatsby.jsのチュートリアルを進めていきます。
なおJavaScriptとTypeScriptは共存できるので、今回はチュートリアル通りに進めてから部分的にTypeScriptにしていく事で違いを調べていきました。
Part 1: Interactive page
ReactのStateを使って動的なページを作るパートです。
React+TypeScriptでは、stateとpropsについては別途interfaceを宣言することで型情報を定義することができます。
src/pages/counter.tsxを下記のようにすることで、チュートリアルと同じようなカウンタを実現できます。
import * as React from "react";

interface CounterState {
  count: number;
}

class Counter extends React.Component<any, CounterState> {
  constructor(args) {
    super(args)
    this.state = { count: 0 }
  }
  render() {
    return (
      <div>
        <h1>Counter</h1>
        <p>current count: {this.state.count}</p>
        <button onClick={() => this.setState({ count: this.state.count + 1 })}>plus
        </button>
        <button onClick={() => this.setState({ count: this.state.count - 1 })}>minus
        </button>
      </div>
    )
  }
}

export default Counter;
Part 2: CSS Modules
コンポーネントを定義するパートです。
CSS ModulesでCSSファイルをimportするところで、CSSには型定義情報が無いためTypeScriptでは警告が出てしまいます。
解決方法はいくつかありますが、ここではimportの代わりにrequireで読み込んでいます。
import * as React from "react";
import Container from "../components/container";

declare function require(x: string): any;
const styles = require('./about-css-modules.module.css');
console.log(styles);

const User = props =>
  <div className={styles.user}>
    <img src={props.avatar} className={styles.avatar} alt="" />
    <div className={styles.description}>
      <h2 className={styles.username}>
        {props.username}
      </h2>
      <p className={styles.excerpt}>
        {props.excerpt}
      </p>
    </div>
  </div>

export default () =>
  <Container>
    <h1>About CSS Modules</h1>
    <p>CSS Modules are cool</p>
    <User
      username="Jane Doe"
      avatar="https://s3.amazonaws.com/uifaces/faces/twitter/adellecharles/128.jpg"
      excerpt="I'm Jane Doe. Lorem ipsum dolor sit amet, consectetur adipisicing elit."
    />

    <User
      username="Bob Smith"
      avatar="https://s3.amazonaws.com/uifaces/faces/twitter/vladarbatov/128.jpg"
      excerpt="I'm Bob smith, a vertically aligned type of guy. Lorem ipsum dolor sit amet, consectetur adipisicing elit."
    />

  </Container>
import * as React from "react";

export default ({ children }) => (
  <div style={{ margin: "3rem auto", maxWidth: 600 }}>{children}</div>
);
参考:
- How to use CSS Modules with TypeScript and webpack – Artem Sapegin – Medium
- TypeScriptでNode.jsのモジュールをrequireする - Qiita
Part 3: Our first layout component
レイアウトテンプレートを作るパートです。
ここはTypeScriptにおいて特筆することはありません。
import * as React from "react";
import Link from "gatsby-link";

const ListLink = props =>
  <li style={{ display: `inline-block`, marginRight: `1rem` }}>
    <Link to={props.to}>
      {props.children}
    </Link>
  </li>

export default ({ children }) => (
  <div style={{ margin: `0 auto`, maxWidth: 650, padding: `1.25rem 1rem` }}>
    <header style={{ marginBottom: `1.5rem` }}>
      <Link to="/" style={{ textShadow: `none`, backgroundImage: `none` }}>
        <h3 style={{ display: `inline` }}>MySweetSite</h3>
      </Link>
      <ul style={{ listStyle: `none`, float: `right` }}>
        <ListLink to="/">Home</ListLink>
        <ListLink to="/about/">About</ListLink>
        <ListLink to="/contact/">Contact</ListLink>
      </ul>
    </header>
    <h3>MySweetSite</h3>
    {children()}
  </div>
);
Part 4: Programmatically creating pages from data
GraphQLを使ってブログを作るパートです。
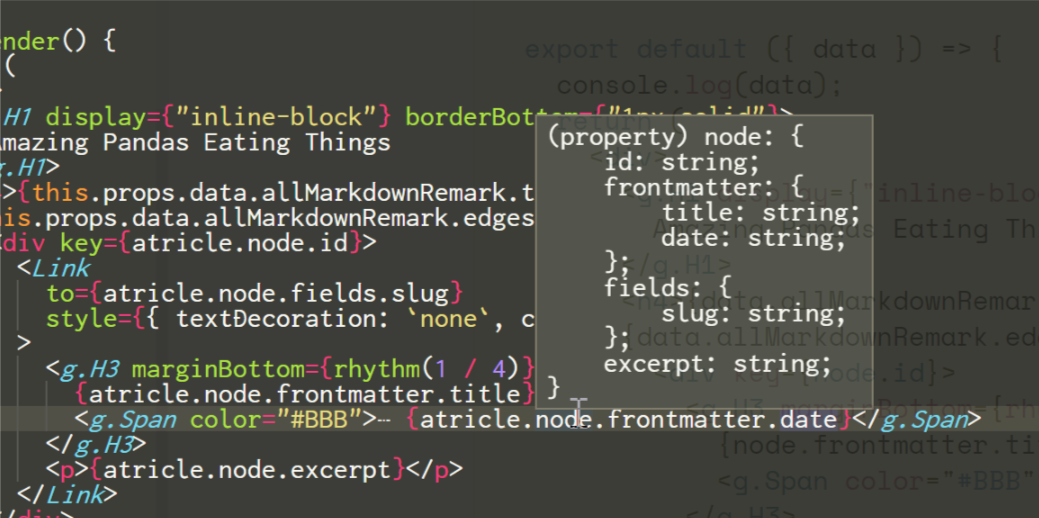
TypeScriptにおいて大きく異なるのは、GraphQLで取得するデータのinterfaceを定義する所です。
import * as React from "react";
import g from "glamorous";
import Link from "gatsby-link";
import { rhythm } from "../utils/typography";

export default class extends React.Component<IndexPageProps, any> {
  constructor(props:IndexPageProps, state: any){
    super(props, state);
  }

  public render() {
    return (
      <div>
        <g.H1 display={"inline-block"} borderBottom={"1px solid"}>
          Amazing Pandas Eating Things
        </g.H1>
        <h4>{this.props.data.allMarkdownRemark.totalCount} Posts</h4>
        {this.props.data.allMarkdownRemark.edges.map(( atricle ) => (
          <div key={atricle.node.id}>
            <Link
              to={atricle.node.fields.slug}
              // チュートリアルではcss=だが、style=にしている。参考: https://github.com/gatsbyjs/gatsby/pull/3320
              style={{ textDecoratison: `none`, color: `inherit` }}
            >
              <g.H3 marginBottom={rhythm(1 / 4)}>
                {atricle.node.frontmatter.title}{" "}
                <g.Span color="#BBB">— {atricle.node.frontmatter.date}</g.Span>
              </g.H3>
              <p>{atricle.node.excerpt}</p>
            </Link>
          </div>
        ))}
      </div>
    );
  }
};

interface IndexPageProps {
  data: {
    allMarkdownRemark: {
      totalCount: number;
      edges: [
        {
          node: {
            id: string;
            frontmatter: {
              title: string;
              date: string;
            }
            fields: {
              slug: string;
            }
            excerpt: string;
          }
        }
      ]
    }
  };
}

// 本当はここも何とかしたい
declare function graphql(x: TemplateStringsArray): any;
export const query = graphql`
  query IndexQuery {
    allMarkdownRemark {
      totalCount
      edges {
        node {
          id
          frontmatter {
            title
            date(formatString: "DD MMMM, YYYY")
          }
          fields {
            slug
          }
          excerpt
        }
      }
    }
  }
`;
interfaceの定義は一見面倒ですが、こうすることでエディタ上で補完したり定義情報が確認できるようになります。
このあたりがTypeScriptの強みです。
templatesも、同様にして下記のように定義できます。
import * as React from "react";

export default class extends React.Component<BlogPostPageProps, any> {
  constructor(props:BlogPostPageProps, state: any){
    super(props, state);
  }

  public render() {
    const post = this.props.data.markdownRemark;
    return (
      <div>
        <h1>{post.frontmatter.title}</h1>
        <div dangerouslySetInnerHTML={{ __html: post.html }} />
      </div>
    );
  }
};

interface BlogPostPageProps {
  data: {
    markdownRemark: {
      html: string;
      frontmatter: {
        title: string;
      }
    }
  };
}

declare function graphql(x: TemplateStringsArray): any;
export const query = graphql`
  query BlogPostQuery($slug: String!) {
    markdownRemark(fields: { slug: { eq: $slug } }) {
      html
      frontmatter {
        title
      }
    }
  }
`;
gatsby-node.jsでの読み込むテンプレートファイル名を変更するのも忘れないようにしましょう。
        result.data.allMarkdownRemark.edges.forEach(({ node }) => {
          createPage({
            path: node.fields.slug,
-           component: path.resolve(`./src/templates/blog-post.js`),
+           component: path.resolve(`./src/templates/blog-post.tsx`),
            context: {
              // Data passed to context is available in page queries as GraphQL variables.
              slug: node.fields.slug,
まとめ
このように、TypeScriptでもGatsby.jsを動かすことができました。
大規模なサイトや複雑なデータ構造を扱う際にはTypeScriptの静的型付けが効果的だと思います。しかしGatsby.jsが想定しているような利用範囲内でTypeScriptと相性が良いかどうかは未知数です。簡単なサイトをさくっと作りたい場合はJavaScriptの方が生産性が高いのではないかと思われます。