はじめに
TypeORMとInterceptorの勉強のため、新しくAPIを作成してみました。
NestJSに関する過去の記事は以下になります。
実装
以下の機能をもった中古車価格に関するAPIを作成します。
- ユーザの新規登録/ログイン
POST /auth/signupPOST /auth/signin - モデル/年式/走行距離をもとに計算された見積額の取得
GET /reports - 売却額の登録(レポート)
POST /reports - 管理者によるレポートの承認
PATCH /reports
ユーザに関するモジュールUsersModuleとレポートに関するモジュールReportsModuleを作成します。
- UsersModule
- UsersController
- UsersService
- UsersRepository
- ReportsModule
- ReportsController
- ReportsService
- ReportsRepository
TypeORM
NestではいろんなORMを利用できますが、中でもTypeORMとMongooseがよく使われるようです。
MongooseはMongoDB専用のORMなので、MySQLなどのRDMSを利用したい場合はTypeORMを選択する必要があります。
DBとの主な対応関係は以下のようになります。
- TypeORM: SQLite, Postgres, MySQL, MongoDB
- Mongoose: MongoDB
今回は簡単にセットアップするためにSQLiteを利用します。
以下のパッケージをインストールします。
npm install @nestjs/typeorm typeorm sqlite3
UsersModuleやReportsModuleとSQLite
の接続は、直接ではなくAppModuleを経由するようにします。
AppModuleのimports内でTypeORMの設定を読み込みます。
import { Module } from '@nestjs/common';
import { TypeOrmModule } from '@nestjs/typeorm';
import { AppController } from './app.controller';
import { AppService } from './app.service';
import { UsersModule } from './users/users.module';
import { ReportsModule } from './reports/reports.module';

@Module({
  imports: [
    TypeOrmModule.forRoot({
      type: 'sqlite',
      database: 'db.sqlite',
      entities: [],
      synchronize: true,
    }),
    UsersModule,
    ReportsModule,
  ],
  controllers: [AppController],
  providers: [AppService],
})
export class AppModule {}
npm run start:devでルートディレクトリにdb.sqliteが作成されます。
Entity
テーブル定義のために、以下の手順でEntityを作成します。
1.テーブルプロパティのリストをもつクラスをEntityファイルとして作成する
import { Entity, Column, PrimaryGeneratedColumn } from 'typeorm';

@Entity()
export class User {
  @PrimaryGeneratedColumn()
  id: number;

  @Column()
  email: string;

  @Column()
  password: string;
}
2.Entityを親モジュールと接続する(Repositoryが作られる)
このとき、forFeature()メソッドを用いて、現在のスコープに登録されているRepositoryを定義します。
import { Module } from '@nestjs/common';
import { TypeOrmModule } from '@nestjs/typeorm';
import { UsersController } from './users.controller';
import { UsersService } from './users.service';
import { User } from './user.entity';

@Module({
  imports: [TypeOrmModule.forFeature([User])],
  controllers: [UsersController],
  providers: [UsersService],
})
export class UsersModule {}
3.EntityをAppModuleと接続する
@Module({
  imports: [
    TypeOrmModule.forRoot({
      type: 'sqlite',
      database: 'db.sqlite',
      entities: [User],
      synchronize: true,
    }),
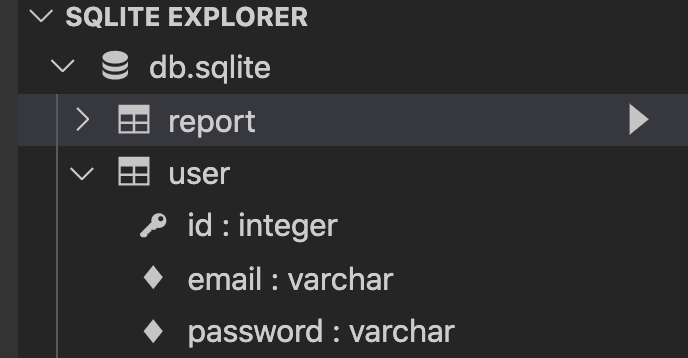
VSCodeの拡張機能を入れてdb.sqliteを開くとテーブルが作成されています。
synchronize: trueにすることで、Entityの内容がDBに同期されます。
素早く挙動を確認したりするには便利な機能なのですが、運用で不都合が生じる可能性があるので本番環境では使いません。

Repository
TypeORMは以下のようなRepository APIをもっています。
- create(): Entityの新しいインスタンスを作成する
- save(): DBにレコードを追加、もしくは更新する
- find(): クエリを実行しEntityのリストを返す
- findOne(): クエリを実行し検索条件を満たした最初のレコードを返す
- remove(): DBからレコードを削除する
まずはユーザの新規登録部分create()を考えます。
Entityを作成した際にUsersModuleでリポジトリを定義したので、@InjectRepository()デコレータを使用してUsersRepositoryをUsersServiceにインジェクションします。
つぎに、create()メソッド内のthis.repo.create()でEntityのインスタンスを作成し、this.repo.save()でDBにデータを保存します。
import { Injectable, NotFoundException } from '@nestjs/common';
import { Repository } from 'typeorm';
import { InjectRepository } from '@nestjs/typeorm';
import { User } from './user.entity';

@Injectable()
export class UsersService {
  constructor(@InjectRepository(User) private repo: Repository<User>) {}

  create(email: string, password: string) {
    // create()でEntityのインスタンスを作成
    const user = this.repo.create({ email, password });

    // save()でDBにデータを保存
    return this.repo.save(user);
  }
}
UsersContollerのcreateUser()でcreate()メソッドを実行します。
このとき、bodyはCreateUserDtoで定義しています。
@Controller('auth')
export class UsersController {
  constructor(private usersService: UsersService) {}

  @Post('/signup')
  createUser(@Body() body: CreateUserDto) {
    this.usersService.create(body.email, body.password);
  }
}
つぎにユーザのデータ更新部分update()を考えます。
this.findOne()でユーザを指定して、ユーザがいなければNotFoundExceptionでエラーを返し、ユーザがいればObject.assign()でデータを上書きし、this.repo.save()でDBに保存します。
attrsの型をPartial<User>と注釈していますが、これはUserのプロパティ(email, password)のいずれか(もしくは両方)が含まれるということを意味しています。
  findOne(id: number) {
    return this.repo.findOne(id);
  }

  async update(id: number, attrs: Partial<User>) {
    const user = await this.findOne(id);
    if (!user) {
      throw new NotFoundException('user not found');
    }

    Object.assign(user, attrs);
    return this.repo.save(user);
  }
ControllerのupdateUserには@Patch()デコレータを付加します。
引数のbodyにはUpdateUserDtoを注釈します。
  @Patch('/:id')
  updateUser(@Param('id') id: string, @Body() body: UpdateUserDto) {
    return this.usersService.update(parseInt(id), body);
  }
UpdateUserDtoでは、emailとpasswordに@IsOptional()デコレータを付加します。
こうすることで、これらのプロパティの入力を任意とすることができます。
export class UpdateUserDto {
  @IsEmail()
  @IsOptional()
  email: string;

  @IsString()
  @IsOptional()
  password: string;
}
Entity Listener
Entityは特定のイベントで発火するメソッド(Hooks)をいくつかもっています。
例えば、@AfterInsertはsave()でEntityが挿入された後、@AfterUpdateはsave()でEntityが更新された後、@AfterRemoveはremove()でEntityが削除された後に発火するようになっています。
データの保存や更新を行う際、Hooksの利用を想定していればsave()を使い、利用を想定していなければinsert()やupdate()を使います。
また、データの削除を行う際、Hooksの利用を想定していればremove()を使い、利用を想定していなければdelete()を使います。
@Entity()
export class User {
  @PrimaryGeneratedColumn()
  id: number;

  @Column()
  email: string;

  @Column()
  password: string;

  @AfterInsert()
  logInsert() {
    console.log('Inserted User with id', this.id);
  }

  @AfterUpdate()
  logUpdateAfterUpdate() {
    console.log('Updated User with id', this.id);
  }

  @AfterRemove()
  logRemove() {
    console.log('Removeed User with id', this.id);
  }
}
Interceptor
GETリクエストを送る際、パスワードなどの機密データをレスポンスに含まないような工夫が必要となります。
このような場合にInterceptorを使用します。
Interceptorは、リクエストがControllerのメソッド(route handler)に渡されるとき、もしくはレスポンスがクライアントに返ってくるときに追加のロジックを付加するものです。
まず、Pipeでバリデーションを行うときのようにDTOUserDtoを定義します。
そして、レスポンスに含みたいプロパティid emailに@Expose()デコレータを付加します。
export class UserDto {
  @Expose()
  id: number;

  @Expose()
  email: string;
}
次にInterceptorSerializeInterceptorを作成します。
UserDtoに依存しないようにconstructorで読み込みます。
intercept()のhandler.handle().pipe()内にレスポンスに付加したい処理を書くことができます。
レスポンスの加工処理にはmap()演算子を利用します。
plainToClass()のexcludeExtraneousValues: trueで、UserDtoで@Expose()が付加されていないプロパティをレスポンスから除きます。
import {
  UseInterceptors,
  NestInterceptor,
  ExecutionContext,
  CallHandler,
} from '@nestjs/common';
import { Observable } from 'rxjs';
import { map } from 'rxjs/operators';
import { plainToClass } from 'class-transformer';

interface ClassConstructor {
  new (...args: any[]): {};
}

//カスタムデコレータ
export function Serialize(dto: ClassConstructor) {
  return UseInterceptors(new SerializeInterceptor(dto));
}

export class SerializeInterceptor implements NestInterceptor {
  constructor(private dto: any) {}

  intercept(context: ExecutionContext, handler: CallHandler): Observable<any> {
    return handler.handle().pipe(
      map((data: any) => {
        return plainToClass(this.dto, data, {
          excludeExtraneousValues: true,
        });
      }),
    );
  }
}
作成したInterceptorを適用するには、Controllerに@UseInterceptors(new SerializeInterceptor(UserDto))を付加すればOKなのですが、これだと少し記述が長いので@Serialize(UserDto)というカスタムデコレータにします。
以下のようにControllerへデコレータを付加することで、全メソッドのレスポンスにInterceptorが適用されるようになります。
@Controller('auth')
@Serialize(UserDto)
export class UsersController {
参考資料