はじめに
これまでTypeScriptの基礎やReactプロジェクトにTypeScriptを導入する方法について学習してきたのですが、ReduxへのTypeScriptの導入については現場でReduxを使っていないこともありタッチしていませんでした。
しかし、今後Redux+TypeScriptの案件に携わる可能性がないともいいきれないので、この機に学んでみることにしました。
プロジェクト設計
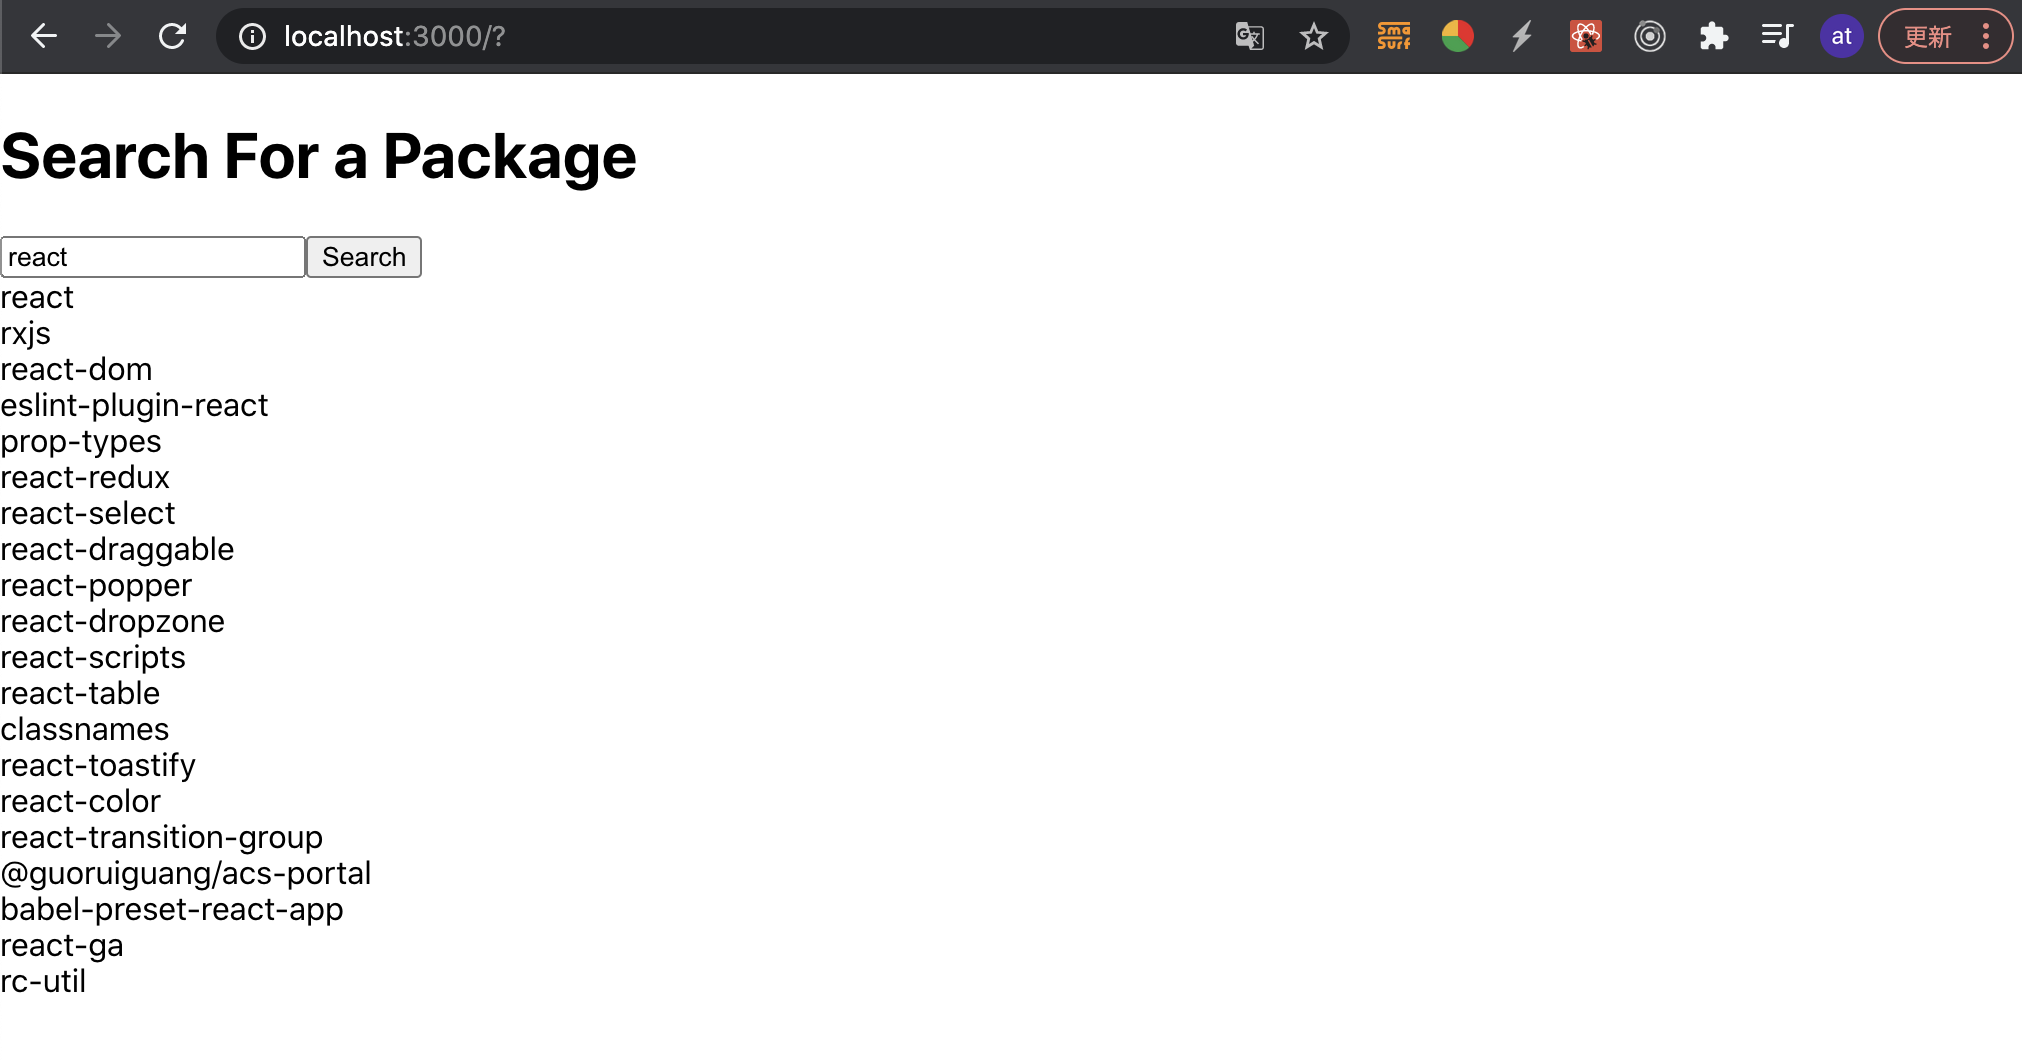
NPMのAPIでパッケージ名を検索する簡単なプロジェクトをReact+Redux+TypeScriptで作成しました。
Store設計
Reduxのプロジェクトを作成する際に一番最初にすべきことがStoreの設計です。
これはTypeScriptを導入する際にはさらに重要なステップとなります。
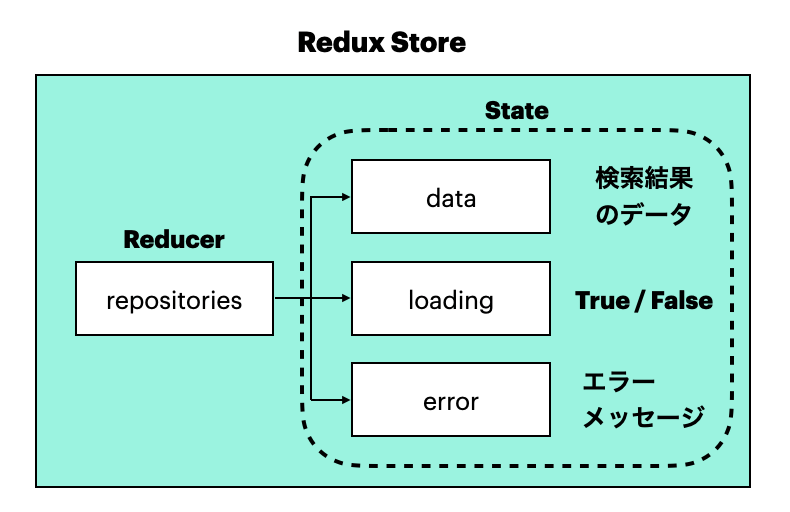
今回のケースでは、repositoriesというReducerをつくり、data(検索結果のデータ)、loading(ロード状態の判定)、error(エラーメッセージ)のプロパティをもったオブジェクトがstateとして返ってくるような構成となります。
このとき、packageがTypeScriptでは予約語にあたるので、packagesのことをrepositoriesとしています。
Redux設計
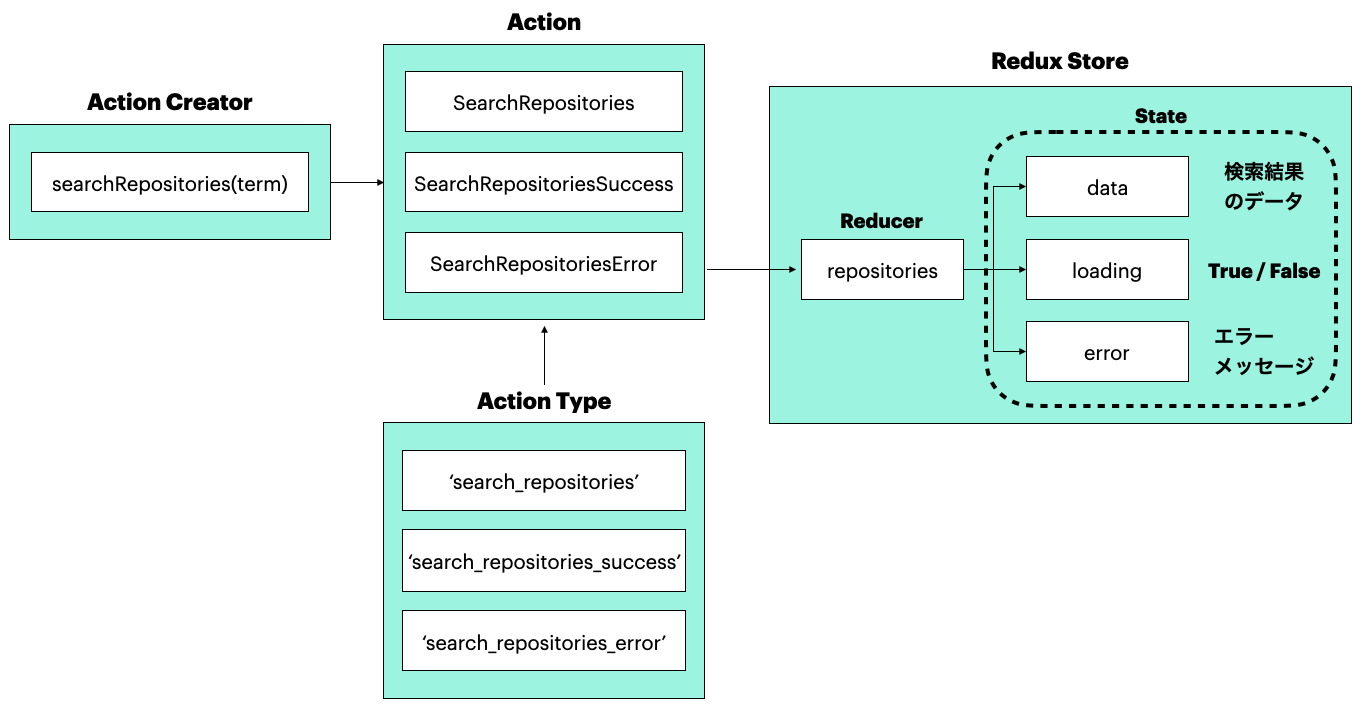
Storeの設計ができたら、次にAction CreatorやActionを加えた全体の設計を考えます。
今回はAction Creator1つに対して3つのActionを用意します。
SearchRepositoriesはロード、SearchRepositoriesSuccessは検索結果、SearchRepositoriesErrorはエラーを返したいときにDispatchするActionとなります。
React/Redux連携
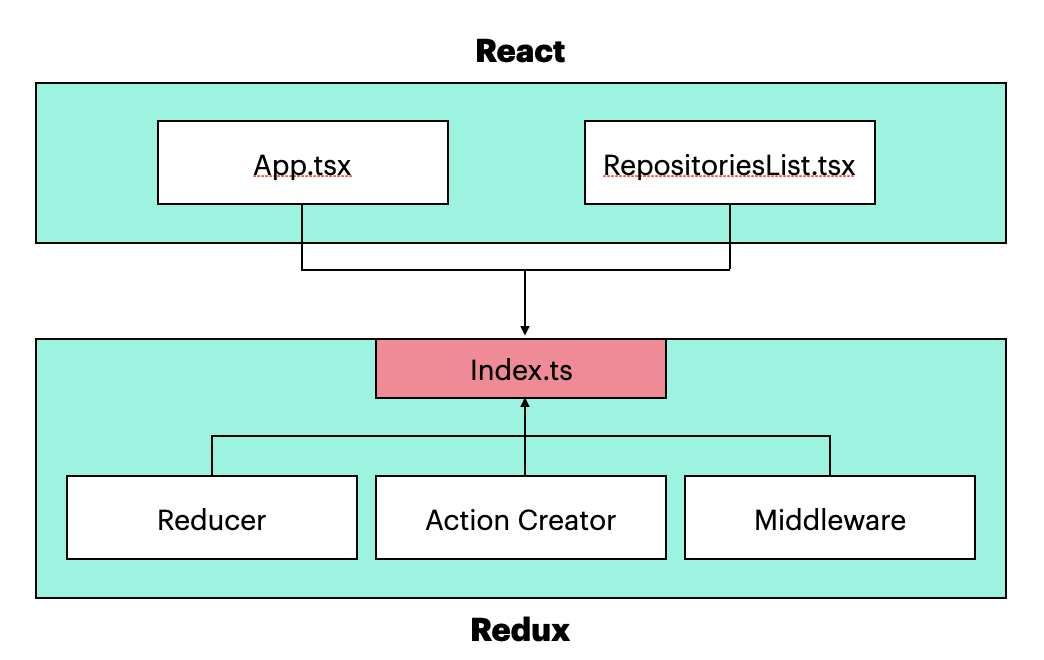
ReduxではReducer、Action Creator、Middlewareが必要になるため、それぞれのフォルダやファイルがつくられます。
ReactとReduxを連携する際、Reactのコンポーネントでこれらのファイルをインポートすることになるのですが、インポート先がバラバラなため若干複雑な構成になってしまいます。
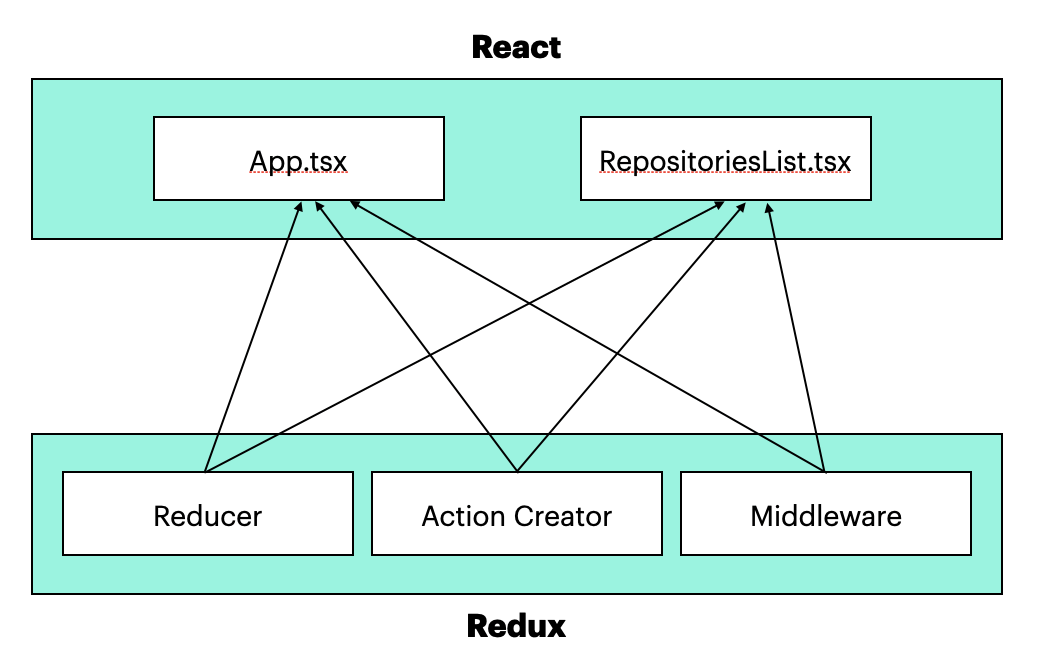
ここでRedux側にindex.tsというエンドポイントをつくり、ここからReduxの各フォルダにアクセスできるようにします。
こうすることで、ReactとReduxをシンプルに連携することができます。
実装
プロジェクト設計が終わったら実装に入ります。
Redux側とReact側で分けて説明します。
Reduxの実装
Reducer, Action Creator, エンドポイントの作成について主に説明します。
Reducerの作成
SearchRepositories, SearchRepositoriesSuccess, SearchRepositoriesErrorの各Actionに対して、ロード中、検索結果のデータ、エラーの状態(State)を返すようなReducerを作成します。
例えば、ロード中であれば{ loading: true, error: null, data: [] }というStateを返し、検索が成功したら{ loading: false, error: null, data: action.payload }のようにデータの入ったStateを返すようにします。
import { ActionType } from '../action-types';
import { Action } from '../actions';

interface RepositoriesState {
  loading: boolean;
  error: string | null;
  data: string[];
}

const initialState = {
  loading: false,
  error: null,
  data: [],
};

const reducer = (
  state: RepositoriesState = initialState,
  action: Action
): RepositoriesState => {
  switch (action.type) {
    case ActionType.SEARCH_REPOSITORIES:
      return { loading: true, error: null, data: [] };
    case ActionType.SEARCH_REPOSITORIES_SUCCESS:
      return { loading: false, error: null, data: action.payload };
    case ActionType.SEARCH_REPOSITORIES_ERROR:
      return { loading: false, error: action.payload, data: [] };
    default:
      return state;
  }
};

export default reducer;
また、ActionのTypeについては、Reducer以外にもActionの型定義やAction Creatorなどの複数のファイルで使用するため、src/action-types/index.tsで管理します。
export enum ActionType {
  SEARCH_REPOSITORIES = 'search_repositories',
  SEARCH_REPOSITORIES_SUCCESS = 'search_repositories_success',
  SEARCH_REPOSITORIES_ERROR = 'search_repositories_error',
}
repositoriesReducer.tsと同じ階層にindex.tsを作成し、作成したReducer(repositoriesReducer)をcombineReducersでラッピングします。
今後新しくReducerを作成したとしても、CombineReducerに登録するだけで1つのまとまったReducerとして扱うことができます。
import { combineReducers } from 'redux';
import repositoriesReducer from './repositoriesReducer';

const reducers = combineReducers({
  repositories: repositoriesReducer,
});

export default reducers;

export type RootState = ReturnType<typeof reducers>;
Reducerの型定義
Recucerは引数にStateとAction、戻り値に最新のStateをもつため、それぞれに対して型定義を行う必要があります。
const reducer = (
  state: RepositoriesState = initialState,
  action: Action
): RepositoriesState => {
まず、Stateの型は以下のように定義します。
loadingはロード中の可否(true/false)を返すためboolean、dataは空の場合も含めたデータのリストを返すためstring[]、errorはエラーメッセージを返す場合と返さない場合があるためstring | nullのUnion型で定義します。
interface RepositoriesState {
  loading: boolean;
  error: string | null;
  data: string[];
}
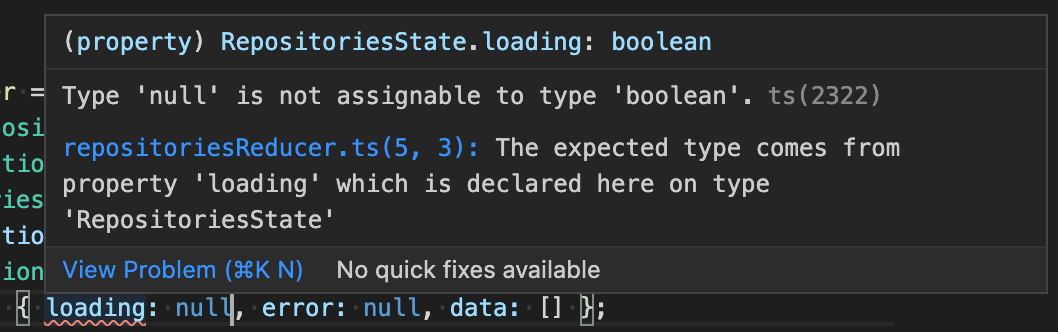
試しにcase ActionType.SEARCH_REPOSITORIES:の戻り値のStateの一部をloading: nullとしてみると、「nullはboolean型じゃありませんよ!」とちゃんと怒ってくれます。
次に、Actionの型については、3つのAction(SearchRepositoriesAction, SearchRepositoriesSuccessAction, SearchRepositoriesErrorAction)のUnion型として定義します。
SearchRepositoriesSuccessActionとSearchRepositoriesErrorActionについては、検索結果やエラーメッセージを返すためpayloadをもちます。
検索結果はリストのためstring[]、エラーメッセージはstringとして定義します。
import { ActionType } from '../action-types';

interface SearchRepositoriesAction {
  type: ActionType.SEARCH_REPOSITORIES;
}

interface SearchRepositoriesSuccessAction {
  type: ActionType.SEARCH_REPOSITORIES_SUCCESS;
  payload: string[];
}

interface SearchRepositoriesErrorAction {
  type: ActionType.SEARCH_REPOSITORIES_ERROR;
  payload: string;
}

export type Action =
  | SearchRepositoriesAction
  | SearchRepositoriesSuccessAction
  | SearchRepositoriesErrorAction;
Action Creatorの作成
非同期でDispatch(ActionをReducerに渡すもの)を返すようなAction Creator(searchRepositories)を作成します。
一見中身が複雑ですが、処理の流れは以下のようにシンプルです。
- SearchRepositoriesActionをDispatch(Reducerでロード中のStateに更新)
- 検索ワード
termをパラメータとして渡しnpm APIからデータを取得 - 【データ取得に成功時】SearchRepositoriesActionSuccessをDispatch(Reducerで検索結果のStateに更新)
- 【データ取得に失敗時】SearchRepositoriesActionErrorをDispatch(ReducerでエラーメッセージのStateに更新)
import axios from 'axios';
import { Dispatch } from 'redux';
import { ActionType } from '../action-types';
import { Action } from '../actions';

export const searchRepositories = (term: string) => {
  return async (dispatch: Dispatch<Action>) => {
    //SearchRepositoriesActionのDispatch(ロード中のStateに更新)
    dispatch({
      type: ActionType.SEARCH_REPOSITORIES,
    });

    try {
      //非同期でnpmのAPIからデータ取得
      const { data } = await axios.get(
        'https://registry.npmjs.org/-/v1/search',
        {
          params: {
            text: term,
          },
        }
      );

      //取得データかパッケージ名のみを配列で返す
      const names = data.objects.map((result: any) => {
        return result.package.name;
      });

      //SearchRepositoriesActionSuccessのDispatch(検索結果のStateに更新)
      dispatch({
        type: ActionType.SEARCH_REPOSITORIES_SUCCESS,
        payload: names,
      });
    } catch (err) { //データ取得に失敗した場合
      //SearchRepositoriesActionErrorのDispatch(エラーメッセージのStateに更新)
      dispatch({
        type: ActionType.SEARCH_REPOSITORIES_ERROR,
        payload: err.message,
      });
    }
  };
};
Action Creatorの型定義
dispatchの型定義をdispatch: Dispatch<Action>のように行います。
ジェネリクスとしてsrc/actions/index.tsで定義したActionの型を渡しています。
export type Action =
  | SearchRepositoriesAction
  | SearchRepositoriesSuccessAction
  | SearchRepositoriesErrorAction;
こうすることで、型定義していないActionを誤って記述してしまったときにWarningを出してくれるようになります。
Redux側のエンドポイント(index.ts)の作成
React/Redux連携の部分で説明した、Redux側のエンドポイントとなるファイルを以下のように作成します。
export * from './store';
export * as actionCreators from './action-creators';
export * from './reducers';
これでReact側からこのファイルにアクセスするだけで、StoreとAction CreatorとReducerすべてにアクセスすることができるようになります。
ちなみにStoreの中身は以下のようになっています。
import { createStore, applyMiddleware } from 'redux';
import thunk from 'redux-thunk';
import reducers from './reducers';

export const store = createStore(reducers, {}, applyMiddleware(thunk));
React(表示側)の実装
Reduxの実装ができたので、Reactのコンポーネント側でReduxとの接続を行っていきます。
RepositoriesList.tsxの作成
検索文字の入力と送信を行って、検索結果を表示するような画面を作成します。
useActions()とuseTypedSelector()というカスタムフックがありますが、これらを使用することでそれぞれStoreのStateの更新、取得を行っています。
Stateの更新と検索結果表示の流れは以下のようになります。
-
Inputで入力した文字(term)をボタンを押したときにformで送信 -
onSubmit内でuseActions()で定義したsearchRepositories(term)を実行(Stateの更新) - Stateが更新されることで
useTypedSelector()のdataも更新 - 検索結果を表示
import { useState } from 'react';
import { useActions } from '../hooks/useActions';
import { useTypedSelector } from '../hooks/useTypedSelector';

const RepositoriesList: React.FC = () => {
  const [term, setTerm] = useState('');
  const { searchRepositories } = useActions();
  const { data, error, loading } = useTypedSelector(
    (state) => state.repositories
  );

  const onSubmit = (e: React.FormEvent<HTMLFormElement>) => {
    e.preventDefault();
    searchRepositories(term);
  };

  return (
    <div>
      <form onSubmit={onSubmit}>
        <input value={term} onChange={(e) => setTerm(e.target.value)} />
        <button>Search</button>
        {error && <h3>{error}</h3>}
        {loading && !loading && data}
        {!error && !loading && data.map((name) => <div key={name}>{name}</div>)}
      </form>
    </div>
  );
};

export default RepositoriesList;
useActions()の作成
useActions()はuseDispatch()とbindActionCreatorsによって、作成したActionをReactコンポーネント内でDispatchできるようにしたカスタムフックです。
useDispatch()を使用するとmapDispatchToPropsやconnect関数を書かずにStoreとの接続を行い、ActionをDispatchできるようになります。
useDispatch()で定義したdispatchをbindActionCreatorsでAction Creatorと接続してあげることで、作成したActionをReactコンポーネント内でDispatchできるようになります。
import { useDispatch } from 'react-redux';
import { bindActionCreators } from 'redux';
import { actionCreators } from '../state';

export const useActions = () => {
  const dispatch = useDispatch();

  return bindActionCreators(actionCreators, dispatch);
};
useTypedSelector()の作成
useTypedSelector()はuseSelectorに型定義を行ったカスタムフックです。
useSelector()を使用するとmapStateToPropsやconnect関数を書かずにStoreとの接続を行い、Reactコンポーネント内でStoreのStateを使えるようになります。
import { useSelector, TypedUseSelectorHook } from 'react-redux';
import { RootState } from '../state';

export const useTypedSelector: TypedUseSelectorHook<RootState> = useSelector;
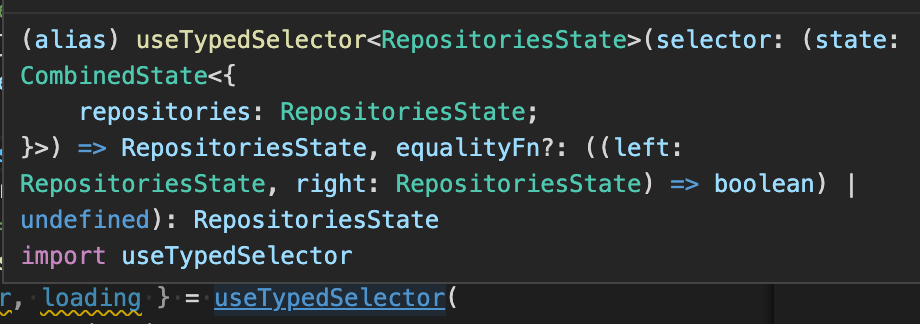
useTypedSelectorの型定義にはTypedUseSelectorHook<T>を使用し、ジェネリクスとしてRootStateを渡しています。
このRootStateはsrc/reducers/index.ts内で定義したReturnType<typeof reducers>です。
export type RootState = ReturnType<typeof reducers>;
RepositoriesList.tsx内のuseTypedSelectorにカーソルをあてると、以下のように型定義されていることを確認することができます。
カスタムフックの作成については、以下の記事をあわせて参考にしていただければと思います。
App.tsxの作成
あとはApp.tsxでProviderをラッピングしてあげるだけです。
import { Provider } from 'react-redux';
import { store } from '../state';
import RepositoriesList from './RepositoriesList';

const App = () => {
  return (
    <Provider store={store}>
      <div>
        <h1>Search For a Package</h1>
        <RepositoriesList />
      </div>
    </Provider>
  );
};

export default App;
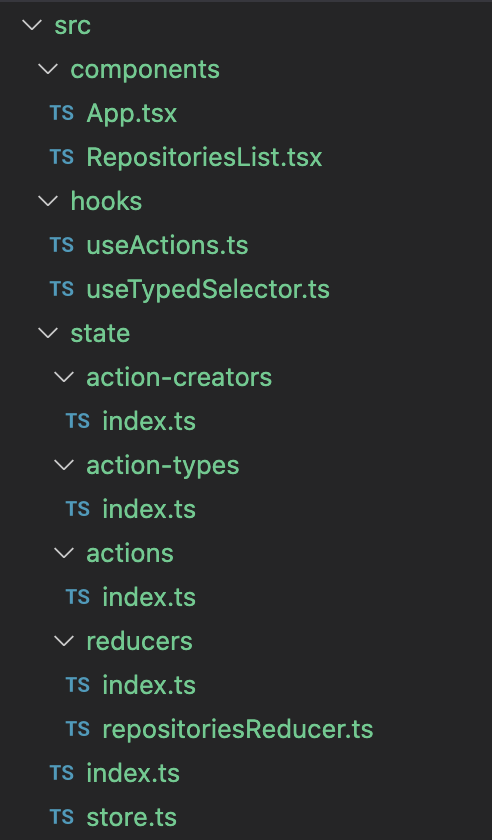
最終的なsrcの構成は以下のようになります。
参考資料