FirebaseのAuthenticationは、firebase init をしなくても、適当なHTMLファイルを作れば簡単に試せるようです。
(Google CloudにFirebaseのプロジェクトを用意しておくことは必要です)
今回は、メールアドレスとパスワードによる認証画面のサンプルを作ってみましたので、JavaScriptのコードを残しておきます。画面の制御にVue.jsを併用しています。
前提
- Firebaseのプロジェクトがある
- Firebaseのプロジェクトにウェブアプリを登録済み
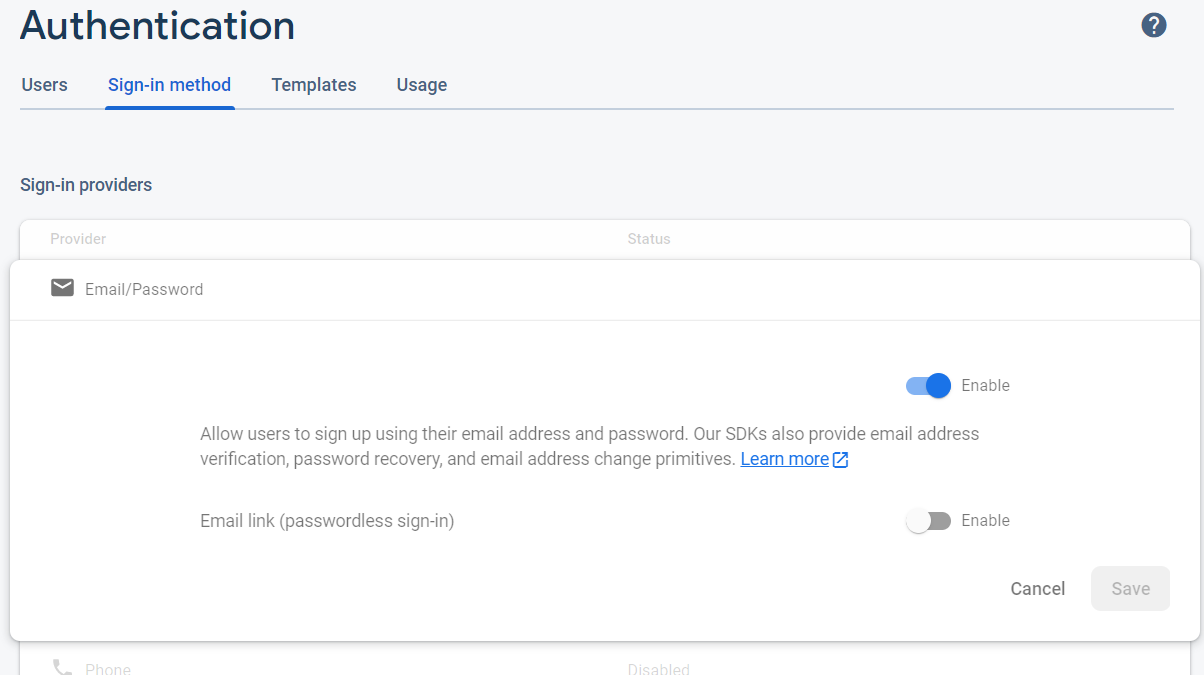
- FirebaseのAuthenticationでメールアドレスによる認証を有効化済み
FirebaseのAuthenticationでメールアドレスによる認証を有効化は以下の画面です。FirebaseのウェブコンソールのAuthenticationの画面にあります。
HTMLファイル作成
作成したファイルは index.html 1つだけです。
このHTMLファイルをどこか静的ファイルをホスティングできるところに置くか、ローカルならば python -m http.server 8080 などして、ブラウザでアクセスすれば、動かせます。ユーザ新規登録、メール確認、ログイン、ログアウトの一連の動きを試せます。firebaseコマンドは不要です。
JSファイル読み込み
Firebase AuthenticationとVue.jsに必要なファイルをHTMLファイルで読み込みます。
<script src="https://cdn.jsdelivr.net/npm/vue@2"></script>
<script src="https://www.gstatic.com/firebasejs/8.3.0/firebase-app.js"></script>
<script src="https://www.gstatic.com/firebasejs/8.3.0/firebase-auth.js"></script>
firebaseConfig
firebaseConfig は以下のドキュメントに従って取得します。
設定ファイルをダウンロードする - Firebase ヘルプ
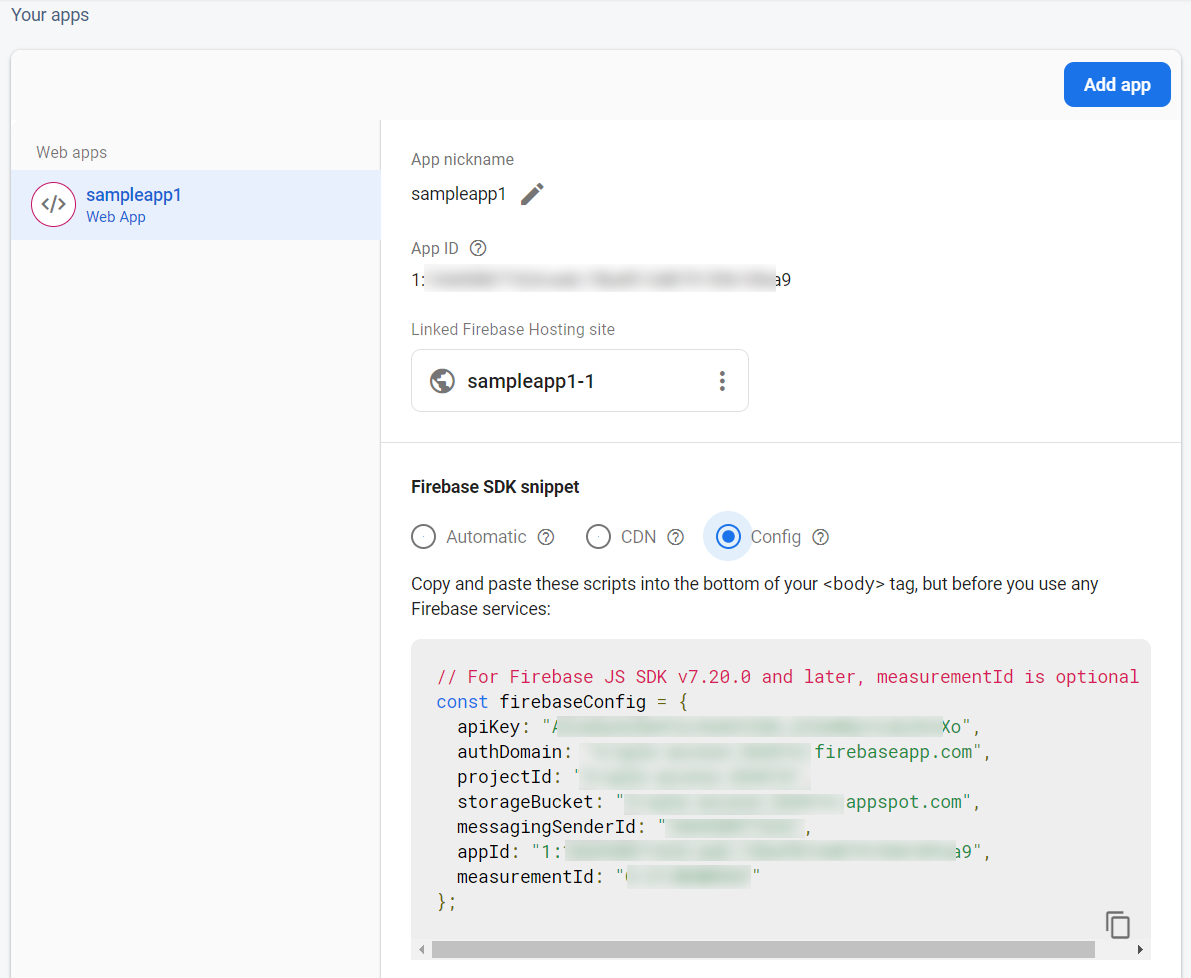
firebaseオブジェクト初期化
取得した firebaseConfig を使って初期化するコードをJavaScriptで書きます。
const firebaseConfig = {
    apiKey: "xxxxxxxxxxxxxxxx",
    authDomain: "xxxxxxxx.firebaseapp.com",
    projectId: "xxxxxxxx",
    storageBucket: "xxxxxxxx.appspot.com",
    messagingSenderId: "xxxxxxxx",
    appId: "xxxxxxxxxxxxxxxx",
    measurementId: "xxxxxxxxxxxxxxxx"
};
firebase.initializeApp(firebaseConfig);
ユーザ登録
try {
    await firebase.auth().createUserWithEmailAndPassword(registerEmail, registerPassword);
} catch (e) {
    console.log(e);
}
ユーザ登録すると、直ちにログイン状態になりますが、メールアドレス確認済みかどうかのフラグ user.emailVerified を参照すると false になっています。
メールアドレス確認用メール送信
ログインユーザに対してメールアドレス確認用メールを送信するコードです。
try {
    await firebase.auth().currentUser.sendEmailVerification();
} catch (e) {
    console.log(e);
}
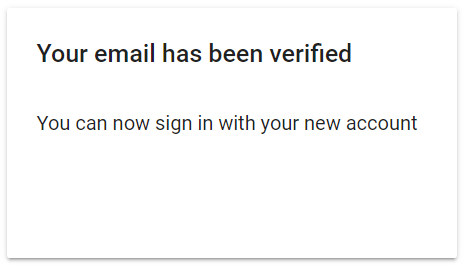
送信されるメールはデフォルトでは次のような文面でした。Firebaseのウェブコンソールでテンプレートを編集できます。
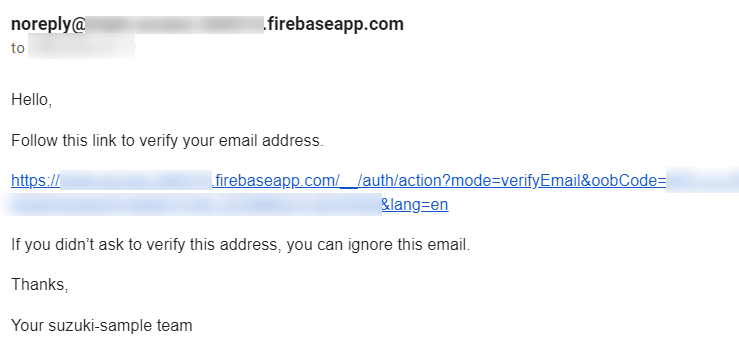
URLをクリックしたらこんな画面でした。
ログイン
try {
    await firebase.auth().setPersistence(firebase.auth.Auth.Persistence.SESSION);
    await firebase.auth().signInWithEmailAndPassword(loginEmail, loginPassword);
} catch (e) {
    console.log(e);
}
ログアウト
try {
    await firebase.auth().signOut();
} catch (e) {
    console.log(e);
}
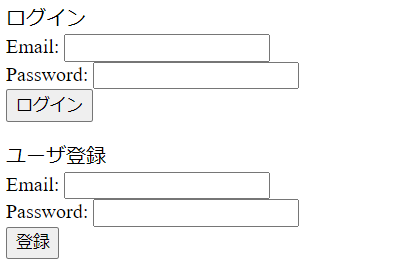
画面サンプル
これらのコードを書けば、ユーザ登録からログイン、ログアウトまでの流れが簡単に実装できます。
<未ログイン状態>
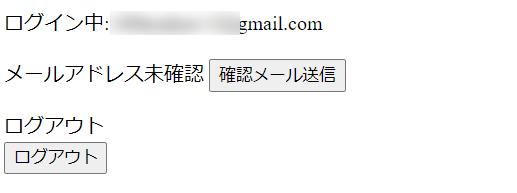
<ユーザ登録したけどメールアドレスの認証がまだの状態>
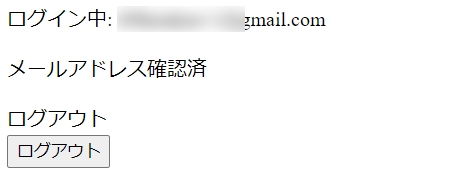
<ログイン状態>
HTMLソース全文
<!DOCTYPE html>
<html>
<head>
  <meta charset="utf-8"/>
  <script src="https://cdn.jsdelivr.net/npm/vue@2"></script>
  <script src="https://www.gstatic.com/firebasejs/8.3.0/firebase-app.js"></script>
  <script src="https://www.gstatic.com/firebasejs/8.3.0/firebase-auth.js"></script>
</head>
<body>
  <div id="app">
    <div v-if="authInitialized">
      <p v-if="message">
        {{message}}
      </p>
      <p v-if="!user">
        ログイン<br>
        Email: <input v-model="loginEmail"><br>
        Password: <input v-model="loginPassword" type="password"><br>
        <input value="ログイン" type="submit" @click.prevent="submitLogin"><br>
      </p>
      <p v-if="!user">
        ユーザ登録<br>
        Email: <input v-model="registerEmail"><br>
        Password: <input v-model="registerPassword" type="password"><br>
        <input value="登録" type="submit" @click.prevent="submitRegister"><br>
      </p>
      <div v-if="user">
        <p>
          ログイン中: {{email}}
        </p>
        <p v-if="emailVerified">
          メールアドレス確認済
        </p>
        <p v-else-if="verificationSent">
          確認メール送信済み
          <input value="再送信" type="submit" @click.prevent="sendEmailVerification">
        </p>
        <p v-else>
          メールアドレス未確認
          <input value="確認メール送信" type="submit" @click.prevent="sendEmailVerification">
        </p>
      </div>
      <p v-if="user">
        ログアウト<br>
        <input value="ログアウト" type="submit" @click.prevent="submitLogout"><br>
      </p>
    </div>
  </div>
  <script>
    const firebaseConfig = {
        apiKey: "xxxxxxxxxxxxxxxx",
        authDomain: "xxxxxxxx.firebaseapp.com",
        projectId: "xxxxxxxx",
        storageBucket: "xxxxxxxx.appspot.com",
        messagingSenderId: "xxxxxxxx",
        appId: "xxxxxxxxxxxxxxxx",
        measurementId: "xxxxxxxxxxxxxxxx"
    };
    firebase.initializeApp(firebaseConfig);
    const app = new Vue({
        el: "#app",
        data: {
            authInitialized: false,
            user: null,
            message: "",
            registerEmail: "",
            registerPassword: "",
            loginEmail: "",
            loginPassword: "",
            verificationSent: false,
        },
        computed: {
            email() {
                if (this.user) {
                    return this.user.email;
                } else {
                    return "";
                }
            },
            emailVerified() {
                if (this.user) {
                    return this.user.emailVerified;
                } else {
                    return false;
                }
            },
        },
        methods: {
            async submitRegister() {
                try {
                    await firebase.auth().createUserWithEmailAndPassword(this.registerEmail, this.registerPassword);
                } catch (e) {
                    console.log(e);
                    if (e.message) {
                        this.message = e.message;
                    }
                }
            },
            async sendEmailVerification() {
                try {
                    await firebase.auth().currentUser.sendEmailVerification();
                    this.verificationSent = true;
                } catch (e) {
                    console.log(e);
                    if (e.message) {
                        this.message = e.message;
                    }
                }
            },
            async submitLogin() {
                try {
                    await firebase.auth().setPersistence(firebase.auth.Auth.Persistence.SESSION);
                    await firebase.auth().signInWithEmailAndPassword(this.loginEmail, this.loginPassword);
                } catch (e) {
                    console.log(e);
                    if (e.message) {
                        this.message = e.message;
                    }
                }
            },
            async submitLogout() {
                try {
                    await firebase.auth().signOut();
                } catch (e) {
                    console.log(e);
                    if (e.message) {
                        this.message = e.message;
                    }
                }
            },
        },
        created() {
            firebase.auth().onAuthStateChanged(user => {
                // ユーザ登録やログイン、ログアウトをすることここが呼び出される。
                // ページをロードした直後もここが呼び出される。

                // ログイン中であっても、ページがいったん表示されてからここが呼び出されるようで、
                // 表示上は一瞬は未ログインの状態になってしまう。
                // 未ログインであれば user=null でここが呼び出される。
                this.user = user;

                this.authInitialized = true; // 一瞬未ログイン状態で表示されてしまうのを防ぐためのフラグ
            });
        },
    });
  </script>
</body>
</html>