- 本ページは、以下LangGraph Quick Startを個人的に日本語に翻訳したものです(2024.12.26現在)よって、最新の情報を確認する場合は公式を参照してください
LangGraph Quick Start
このチュートリアルでは、LangGraph で次の機能を持つサポート チャットボットを構築します。
✅ Web を検索して一般的な質問に回答する
✅ 通話全体で会話の状態を維持する
✅ 複雑なクエリを人間にルーティングして確認する
✅ カスタム状態を使用して動作を制御する
✅ 会話のパスを巻き戻して代替パスを探索する
基本的なチャットボットから始めて、徐々に高度な機能を追加し、その過程で LangGraph の主要な概念を紹介します。
さっそく始めてみましょう! 🌟
セットアップ
- 最初に、必要なパッケージをインストールし、環境を作ります:
%%capture --no-stderr
%pip install -U langgraph langsmith langchain_anthropic
import getpass
import os


def _set_env(var: str):
    if not os.environ.get(var):
        os.environ[var] = getpass.getpass(f"{var}: ")


_set_env("ANTHROPIC_API_KEY")
ANTHROPIC_API_KEY: ········
LangSmith を LangGraph 開発用にセットアップ
LangSmith にサインアップして、問題をすばやく特定し、LangGraph プロジェクトのパフォーマンスを改善します。LangSmith を使用すると、トレース データを使用して、LangGraph で構築された LLM アプリをデバッグ、テスト、監視できます。開始方法の詳細については、こちらをご覧ください。
パート 1: 基本的なチャットボットの作成
まず、LangGraph を使用してシンプルなチャットボットを作成します。このチャットボットは、ユーザー メッセージに直接応答します。シンプルですが、LangGraph を使用した構築のコア コンセプトを示します。このセクションの終わりまでで、基本的なチャットボットが構築できます
まず、StateGraph を作成します。StateGraph オブジェクトは、チャットボットの構造を「state machine(ステート マシン)」として定義します。チャットボットが呼び出すことができる llm とfunction(関数)を表すnode(ノード)と、これらのfunction(関数)間でボットが遷移する方法を指定するedge(エッジ)を追加します
from typing import Annotated

from typing_extensions import TypedDict

from langgraph.graph import StateGraph, START, END
from langgraph.graph.message import add_messages


class State(TypedDict):
    # Messages have the type "list". The `add_messages` function
    # in the annotation defines how this state key should be updated
    # (in this case, it appends messages to the list, rather than overwriting them)
    # メッセージのタイプは「リスト」です。アノテーション内の `add_messages`
    # 関数は、この状態キーの更新方法を定義します (この場合、メッセージを
    # 上書きするのではなく、リストに追加します)
    messages: Annotated[list, add_messages]


graph_builder = StateGraph(State)
- API リファレンス: StateGraph | START | END | add_messages
これで、グラフは 2 つの主要なタスクを処理できるようになりました。
- 各
nodeは、現在の状態(State)を入力として受け取り、状態(state)の更新を出力できます -
Annotated(注釈付き)構文で使用される事前に用意されたadd_messages関数により、messagesのアップデートは既存のリストに上書きされるのではなく、追加されます
コンセプト(concept)
グラフを定義するとき、最初のステップは「State(状態)」を定義することです。「State(状態)」には、「グラフのスキーマ(graph's schema)」と状態の更新を処理する「reducer functions (リデューサー関数)」が含まれます。この例では、State(状態)は 1 つのキー:messages を持つ TypedDict です。add_messages リデューサー関数は、リストを上書きするのではなく、新しいメッセージをリストに追加するために使用されます。リデューサー アノテーション(reducer annotation)のないキーは、前の値を上書きします。このガイドを読んで、状態(state)、リデューサー(reducer)、および関連するコンセプトについて詳しく学習してください
次に、「chatbot(チャットボット)」ノードを追加します。node(ノード)は作業単位を表します。これらは通常、一般的な Python の関数です
from langchain_anthropic import ChatAnthropic

llm = ChatAnthropic(model="claude-3-5-sonnet-20240620")


def chatbot(state: State):
    return {"messages": [llm.invoke(state["messages"])]}


# The first argument is the unique node name
# The second argument is the function or object that will be called whenever
# the node is used.
# 最初の引数は一意のノード名です
# 2 番目の引数はノードが使用されるたびに呼び出される関数またはオブジェクトです
graph_builder.add_node("chatbot", chatbot)
API Reference: ChatAnthropic
注意: chatbot ノード関数が現在のState(状態)を入力として受け取り、key:"messages"の下に、アップデートされたmessagesのlist を含む辞書(dict)を返す手法。これは、すべての LangGraphにおいて、ノード関数の基本的なパターンです
State(状態)の add_messages 関数は、State内で、すでに存在するメッセージのあとに llm の応答メッセージを追加します
次に、entry point (エントリー ポイント)を追加します。これにより、実行する都度、グラフ自身が「 どこから作業を開始するか 」が判断できます
graph_builder.add_edge(START, "chatbot")
同様に、finish point(終了点)を設定します。これにより、グラフに「このノードが実行されると終了」という指示が与えられます
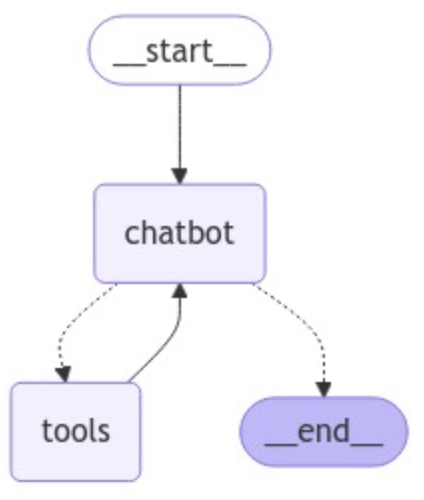
graph_builder.add_edge("chatbot", END)
最後に、グラフを実行できるようにします。そのためには、グラフ ビルダーで「compile()」を呼び出します。これにより、「CompiledGraph」が作成され、state(状態)に対してinvokeが使用できます
graph = graph_builder.compile()
get_graph メソッドと、draw_ascii や draw_png などの「draw」メソッドのいずれかを使用してグラフを視覚化できます。各描画メソッドには追加の依存関係が必要です
from IPython.display import Image, display

try:
    display(Image(graph.get_graph().draw_mermaid_png()))
except Exception:
    # This requires some extra dependencies and is optional
    # これには追加の依存関係が必要であり、オプションです
    pass

それでは、チャットボットを実行しましょう!
Tip: quit、exit、またはqと入力すると、いつでもチャット ループを終了できます
def stream_graph_updates(user_input: str):
    for event in graph.stream({"messages": [("user", user_input)]}):
        for value in event.values():
            print("Assistant:", value["messages"][-1].content)


while True:
    try:
        user_input = input("User: ")
        if user_input.lower() in ["quit", "exit", "q"]:
            #print("Goodbye!")
            print("さよなら!")
            break

        stream_graph_updates(user_input)
    except:
        # fallback if input() is not available
        #user_input = "What do you know about LangGraph?"
        # もしinput() が利用できない場合はフォールバックする
        user_input = "LangGraph について何を知っていますか?"
        print("User: " + user_input)
        stream_graph_updates(user_input)
        break
Assistant(アシスタント): LangGraph は、言語モデルを使用してステートフルなマルチエージェント アプリケーションを構築できるように設計されたライブラリです。複数の AI エージェントまたは言語モデルのインタラクションを調整するためのワークフローとステート マシンを作成するためのツールを提供します。LangGraph は LangChain 上に構築されており、そのコンポーネントを活用しながらグラフベースの調整機能を追加しています。単純なクエリ応答インタラクションを超えた、より複雑でステートフルな AI アプリケーションを開発する場合に特に便利です。
さようなら!
おめでとうございます! LangGraph を使用して最初のチャットボットを構築しました。このボットは、ユーザー入力を受け取り、LLM を使用して応答を生成することで、基本的な会話を行うことができます。提供されているリンクで、上記の呼び出しの LangSmith Trace を調べることができます。
ただし、ボットの知識はトレーニング データに含まれるものだけに限定されていることに気付いたかもしれません。次の部分では、ボットの知識を拡張してより有能にするため、Web 検索ツールを追加します。
以下は、参考までにこのセクションの完全なコードです。
Full Code ソースコードを表示(折りたたみ)
from typing import Annotated

from langchain_anthropic import ChatAnthropic
from typing_extensions import TypedDict

from langgraph.graph import StateGraph
from langgraph.graph.message import add_messages


class State(TypedDict):
    messages: Annotated[list, add_messages]


graph_builder = StateGraph(State)


llm = ChatAnthropic(model="claude-3-5-sonnet-20240620")


def chatbot(state: State):
    return {"messages": [llm.invoke(state["messages"])]}


# The first argument is the unique node name
# The second argument is the function or object that will be called whenever
# the node is used.
# 最初の引数は一意のノード名です
# 2 番目の引数はノードが使用されるたびに呼び出される関数またはオブジェクトです
graph_builder.add_node("chatbot", chatbot)
graph_builder.set_entry_point("chatbot")
graph_builder.set_finish_point("chatbot")
graph = graph_builder.compile()
パート 2: 🛠️ ツールによるチャットボットの強化
チャットボットが「memoryから」回答できないクエリを処理するために、Web 検索ツールを加えます。ボットはこのツールを使用して関連情報を検索し、より適切な応答を提供できます
Requirements
開始する前に、必要なパッケージがインストールされ、API キーが設定されていることを確認してください。
まず、Tavily 検索エンジンを使用するための要件をインストールし、TAVILY_API_KEY を設定します
%%capture --no-stderr
%pip install -U tavily-python langchain_community
_set_env("TAVILY_API_KEY")
TAVILY_API_KEY: ········
次に、ツールを定義します:
from langchain_community.tools.tavily_search import TavilySearchResults

tool = TavilySearchResults(max_results=2)
tools = [tool]
tool.invoke("What's a 'node' in LangGraph?")
API Reference: TavilySearchResults
[{'url': 'https://medium.com/@cplog/introduction-to-langgraph-a-beginners-guide-14f9be027141',
  'content': 'Nodes: Nodes are the building blocks of your LangGraph. Each node represents a function or a computation step. You define nodes to perform specific tasks, such as processing input, making ...'},
 {'url': 'https://saksheepatil05.medium.com/demystifying-langgraph-a-beginner-friendly-dive-into-langgraph-concepts-5ffe890ddac0',
  'content': 'Nodes (Tasks): Nodes are like the workstations on the assembly line. Each node performs a specific task on the product. In LangGraph, nodes are Python functions that take the current state, do some work, and return an updated state. Next, we define the nodes, each representing a task in our sandwich-making process.'}]
結果は、チャット ボットが質問に答えるため、使用できるページの概要です。
次に、グラフの定義を開始します。以下はパート 1 と同じですが、LLM に bind_tools を追加した点が異なります。これにより、LLM は検索エンジンを使用する場合に使用する正しい JSON フォーマットが認識できます
from typing import Annotated

from langchain_anthropic import ChatAnthropic
from typing_extensions import TypedDict

from langgraph.graph import StateGraph, START, END
from langgraph.graph.message import add_messages


class State(TypedDict):
    messages: Annotated[list, add_messages]


graph_builder = StateGraph(State)


llm = ChatAnthropic(model="claude-3-5-sonnet-20240620")
# Modification: tell the LLM which tools it can call
# 変更点: bind_toolを使ってLLMにどのツールを呼び出すことができるかを伝えます
llm_with_tools = llm.bind_tools(tools)


def chatbot(state: State):
    return {"messages": [llm_with_tools.invoke(state["messages"])]}


graph_builder.add_node("chatbot", chatbot)
API Reference: ChatAnthropic | StateGraph | START | END | add_messages
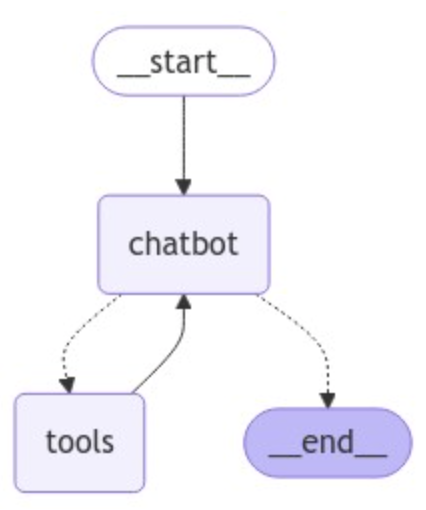
次に、ツールが呼び出された場合に実際にツールを実行する関数を作成する必要があります。これは、ツールを新しいノードに追加することで行います
以下では、状態内の最新のメッセージをチェックし、メッセージに tool_calls が含まれている場合にツールを呼び出す BasicToolNode を実装します。これは、Anthropic、OpenAI、Google Gemini、およびその他の多くの LLM プロバイダーで利用できる LLM の tool_calling サポートに依存しています
後でこれを LangGraph の事前構築された ToolNode に置き換えて処理を高速化しますが、最初に自分で構築することは有益な知識となります
import json

from langchain_core.messages import ToolMessage


class BasicToolNode:
    """A node that runs the tools requested in the last AIMessage."""

    def __init__(self, tools: list) -> None:
        self.tools_by_name = {tool.name: tool for tool in tools}

    def __call__(self, inputs: dict):
        if messages := inputs.get("messages", []):
            message = messages[-1]
        else:
            raise ValueError("入力にメッセージが見つかりません")
        outputs = []
        for tool_call in message.tool_calls:
            tool_result = self.tools_by_name[tool_call["name"]].invoke(
                tool_call["args"]
            )
            outputs.append(
                ToolMessage(
                    content=json.dumps(tool_result),
                    name=tool_call["name"],
                    tool_call_id=tool_call["id"],
                )
            )
        return {"messages": outputs}


tool_node = BasicToolNode(tools=[tool])
graph_builder.add_node("tools", tool_node)
API Reference: ToolMessage
ツール ノードを追加したら、conditional_edges を定義できます。
edges(エッジ)は、制御フローを 1 つのノードから次のノードにルーティングすることを思い出してください。conditional_edges(条件付きエッジ) には通常、現在のグラフ状態に応じて異なるノードにルーティングするための「if」ステートメントが含まれます。これらの関数は、現在のグラフstate(状態)を受け取り、次に呼び出すノードを示す「文字列」または「文字列のリスト」を返します。
以下では、チャットボットの出力で tool_calls をチェックする route_tools というルーター関数を定義しています。 add_conditional_edges を呼び出してこの関数をグラフに提供します。これは、chatbot(チャットボット) ノードが完了するたびにこの関数をチェックして次に進む場所を確認するようにグラフに指示します。
condition(条件)が、tool calls(ツール呼び出し)が存在する場合はtoolsにルーティングされ、存在しない場合は END にルーティングされます
後で、より簡潔にするため、これをあらかじめ用意された tools_conditionに置き換えることになりますが、最初に自分で実装すれば、より理解が明確になります
def route_tools(
    state: State,
):
    """
    Use in the conditional_edge to route to the ToolNode if the last message
    has tool calls. Otherwise, route to the end.
    最後のメッセージにtool callsがある場合に、conditional_edge を利用して
    ToolNode にルーティングします。それ以外の場合は、endにルーティングします
    """
    if isinstance(state, list):
        ai_message = state[-1]
    elif messages := state.get("messages", []):
        ai_message = messages[-1]
    else:
        raise ValueError(f"No messages found in input state to tool_edge: {state}")
    if hasattr(ai_message, "tool_calls") and len(ai_message.tool_calls) > 0:
        return "tools"
    return END


# The `tools_condition` function returns "tools" if the chatbot asks to use a tool, and "END" if
# it is fine directly responding. This conditional routing defines the main agent loop.
# `tools_condition` 関数は、チャットボットがツールの使用を要求した場合には「tools」を返し、
# 直接応答しても問題ない場合は「END」を返します。この条件付きルーティングは、メインのエージェント ループを定義します
graph_builder.add_conditional_edges(
    "chatbot",
    route_tools,
    # The following dictionary lets you tell the graph to interpret the condition's outputs as a specific node
    # It defaults to the identity function, but if you
    # want to use a node named something else apart from "tools",
    # You can update the value of the dictionary to something else
    # e.g., "tools": "my_tools"
    # 次のように辞書型を使用すると、グラフに条件の出力を、特定のノードとして解釈するように指示できます
    # デフォルトでは恒等関数(identity function)ですが、
    # "tools" 以外の名前のノードを使用する場合は、
    # 辞書型のvalueを別のvalueにすれば更新できます
    # たとえば、"tools": "my_tools"のようにします
    {"tools": "tools", END: END},
)
# Any time a tool is called, we return to the chatbot to decide the next step
# ツールが呼び出されるたびに、チャットボットに戻って次のステップを決定します
graph_builder.add_edge("tools", "chatbot")
graph_builder.add_edge(START, "chatbot")
graph = graph_builder.compile()
注意: 条件付きエッジは単一のノードから始まります。これはグラフに「chatbot(チャットボット)」ノードが実行されるたびに、ツールを呼び出す場合は「tools」に移動し、直接応答する場合は「ループを終了する」ことを指示します。
事前に構築された tools_condition と同様に、ツール呼び出しが行われない場合、関数は END の文字列(string)を返します。グラフが END に遷移すると、完了するタスクがなくなり、実行が停止します。条件は END を返すことができるため、今回は明示的にfinish_point(終了ポイント)を設定する必要はありません。グラフは既にEND(終了)にする術を持っています
構築したグラフを可視化してみましょう。次の関数には、このチュートリアルでは重要ではない、実行する追加の依存関係がいくつかあります
from IPython.display import Image, display

try:
    display(Image(graph.get_graph().draw_mermaid_png()))
except Exception:
    # This requires some extra dependencies and is optional
    # これには追加の依存関係が必要であり、オプションです
    pass
これで、トレーニング データ以外でchatbot(ボット)に質問できるようになりました。
while True:
    try:
        user_input = input("User: ")
        if user_input.lower() in ["quit", "exit", "q"]:
            print("Goodbye!")
            break

        stream_graph_updates(user_input)
    except:
        # fallback if input() is not available
        user_input = "What do you know about LangGraph?"
        print("User: " + user_input)
        stream_graph_updates(user_input)
        break
Assistant: [{'text': "To provide you with accurate and up-to-date information about LangGraph, I'll need to search for the latest details. Let me do that for you.", 'type': 'text'}, {'id': 'toolu_01Q588CszHaSvvP2MxRq9zRD', 'input': {'query': 'LangGraph AI tool information'}, 'name': 'tavily_search_results_json', 'type': 'tool_use'}]
Assistant: [{"url": "https://www.langchain.com/langgraph", "content": "LangGraph sets the foundation for how we can build and scale AI workloads \u2014 from conversational agents, complex task automation, to custom LLM-backed experiences that 'just work'. The next chapter in building complex production-ready features with LLMs is agentic, and with LangGraph and LangSmith, LangChain delivers an out-of-the-box solution ..."}, {"url": "https://github.com/langchain-ai/langgraph", "content": "Overview. LangGraph is a library for building stateful, multi-actor applications with LLMs, used to create agent and multi-agent workflows. Compared to other LLM frameworks, it offers these core benefits: cycles, controllability, and persistence. LangGraph allows you to define flows that involve cycles, essential for most agentic architectures ..."}]
Assistant: Based on the search results, I can provide you with information about LangGraph:

1. Purpose:
   LangGraph is a library designed for building stateful, multi-actor applications with Large Language Models (LLMs). It's particularly useful for creating agent and multi-agent workflows.

2. Developer:
   LangGraph is developed by LangChain, a company known for its tools and frameworks in the AI and LLM space.

3. Key Features:
   - Cycles: LangGraph allows the definition of flows that involve cycles, which is essential for most agentic architectures.
   - Controllability: It offers enhanced control over the application flow.
   - Persistence: The library provides ways to maintain state and persistence in LLM-based applications.

4. Use Cases:
   LangGraph can be used for various applications, including:
   - Conversational agents
   - Complex task automation
   - Custom LLM-backed experiences

5. Integration:
   LangGraph works in conjunction with LangSmith, another tool by LangChain, to provide an out-of-the-box solution for building complex, production-ready features with LLMs.

6. Significance:
   LangGraph is described as setting the foundation for building and scaling AI workloads. It's positioned as a key tool in the next chapter of LLM-based application development, particularly in the realm of agentic AI.

7. Availability:
   LangGraph is open-source and available on GitHub, which suggests that developers can access and contribute to its codebase.

8. Comparison to Other Frameworks:
   LangGraph is noted to offer unique benefits compared to other LLM frameworks, particularly in its ability to handle cycles, provide controllability, and maintain persistence.

LangGraph appears to be a significant tool in the evolving landscape of LLM-based application development, offering developers new ways to create more complex, stateful, and interactive AI systems.
Goodbye!
おめでとうございます。langgraph で、必要に応じて検索エンジンを使用して更新情報を取得できる会話エージェントを作成しました。これで、より幅広いユーザー クエリを処理できるようになりました。エージェントが実行したすべての手順を確認するには、この LangSmith traceを確認してください。
チャットボットは、過去のやり取りを自分で思い出すことがまだできないため、一貫性のあるマルチ・ターン(複数のやり取り)の会話を行う能力が制限されています。次の部分では、memory (メモリー)を追加してこの問題に対処します
このセクションで作成したグラフの完全なコードを以下に示します。BasicToolNode を事前に構築済みの ToolNode に置き換え、route_tools 条件を事前に用意された tools_condition に置き換えます。
Full Code ソースコードを表示(クリックで展開します)
from typing import Annotated

from langchain_anthropic import ChatAnthropic
from langchain_community.tools.tavily_search import TavilySearchResults
from langchain_core.messages import BaseMessage
from typing_extensions import TypedDict

from langgraph.graph import StateGraph
from langgraph.graph.message import add_messages
from langgraph.prebuilt import ToolNode, tools_condition


class State(TypedDict):
    messages: Annotated[list, add_messages]


graph_builder = StateGraph(State)


tool = TavilySearchResults(max_results=2)
tools = [tool]
llm = ChatAnthropic(model="claude-3-5-sonnet-20240620")
llm_with_tools = llm.bind_tools(tools)


def chatbot(state: State):
    return {"messages": [llm_with_tools.invoke(state["messages"])]}


graph_builder.add_node("chatbot", chatbot)

tool_node = ToolNode(tools=[tool])
graph_builder.add_node("tools", tool_node)

graph_builder.add_conditional_edges(
    "chatbot",
    tools_condition,
)
# Any time a tool is called, we return to the chatbot to decide the next step
graph_builder.add_edge("tools", "chatbot")
graph_builder.set_entry_point("chatbot")
graph = graph_builder.compile()
パート 3: チャットボットにメモリ追加
チャットボットは、ツールを使用してユーザーの質問に答えることができるようになりましたが、以前のやり取りのコンテキストを記憶していません。これにより、一貫性のある「複数やり取りができる会話 (マルチ・ターン・カンバセーション(multi-turn conversations)」を行う能力が制限されています
LangGraph は、persistent checkpointing(永続的なチェックポイント)によってこの問題を解決します。グラフをコンパイルするときにチェックポインターを指定し、グラフを呼び出すときに thread_id を指定すると、LangGraph は各ステップの後に状態を自動的に保存します。同じ thread_id を使用してグラフを再度呼び出すと、グラフは保存された状態をロードし、チャットボットは中断したところから再開できます
後で説明しますが、checkpointing(チェックポイント)は単純なチャット メモリよりもはるかに強力です。これにより、エラー回復、ヒューマン イン ザ ループ ワークフロー、タイム トラベル インタラクションなどのために、複雑な状態をいつでも保存して再開できます。しかし、先走りしすぎる前に、まずはcheckpointing(チェックポイント)を追加して「マルチ・ターンでの会話」を有効にさせましょう
まず、MemorySaver チェックポインターを作成します
from langgraph.checkpoint.memory import MemorySaver

memory = MemorySaver()
API Reference: MemorySaver
注意: メモリ内のチェックポイントを使用しています。これはチュートリアルに便利です (すべてメモリ内で保存されてます)が、実際の本番環境でのアプリケーションでは、これを変更して SqliteSaver または PostgresSaver を使用し、独自の DB に接続する必要性があります
次に、グラフを定義します。独自に BasicToolNode は既に構築したので、これを LangGraph が用意してくれた ToolNode と tools_condition に置き換えます。これらは、並列 API 実行などの便利な機能を実行するためです。それ以外は、以下はすべてパート 2 からコピーしたものです
from typing import Annotated

from langchain_anthropic import ChatAnthropic
from langchain_community.tools.tavily_search import TavilySearchResults
from langchain_core.messages import BaseMessage
from typing_extensions import TypedDict

from langgraph.graph import StateGraph, START, END
from langgraph.graph.message import add_messages
from langgraph.prebuilt import ToolNode, tools_condition


class State(TypedDict):
    messages: Annotated[list, add_messages]


graph_builder = StateGraph(State)


tool = TavilySearchResults(max_results=2)
tools = [tool]
llm = ChatAnthropic(model="claude-3-5-sonnet-20240620")
llm_with_tools = llm.bind_tools(tools)


def chatbot(state: State):
    return {"messages": [llm_with_tools.invoke(state["messages"])]}


graph_builder.add_node("chatbot", chatbot)

tool_node = ToolNode(tools=[tool])
graph_builder.add_node("tools", tool_node)

graph_builder.add_conditional_edges(
    "chatbot",
    tools_condition,
)
# Any time a tool is called, we return to the chatbot to decide the next step
# ツールが呼び出されるたびに、チャットボットに戻って次のステップを決定します
graph_builder.add_edge("tools", "chatbot")
graph_builder.add_edge(START, "chatbot")
API Reference: ChatAnthropic | TavilySearchResults | BaseMessage | StateGraph | START | END | add_messages | ToolNode | tools_condition
最後に、提供されたチェックポインターを使用してグラフをコンパイルします
graph = graph_builder.compile(checkpointer=memory)
グラフの接続性はパート 2 から変更されていないことに注意してください。ここで行っているのは、グラフが各ノードを通過するときに状態のチェックポイントを設定することだけです
from IPython.display import Image, display

try:
    display(Image(graph.get_graph().draw_mermaid_png()))
except Exception:
    # This requires some extra dependencies and is optional
    pass
これでボットと対話できるようになりました。まず、この会話のキーとして使用するスレッドを選択します
config = {"configurable": {"thread_id": "1"}}
次に、チャットボットを呼び出します
user_input = "Hi there! My name is Will."

# The config is the **second positional argument** to stream() or invoke()!
# config は stream() または invoke() の **2 番目の位置での引数** です
events = graph.stream(
    {"messages": [("user", user_input)]}, config, stream_mode="values"
)
for event in events:
    event["messages"][-1].pretty_print()
================================[1m Human Message [0m=================================

Hi there! My name is Will.
==================================[1m Ai Message [0m==================================

Hello Will! It's nice to meet you. How can I assist you today? Is there anything specific you'd like to know or discuss?
注: グラフを呼び出すときに、configは 2 番目の位置での引数(second positional argument)として提供されました。重要なのは、グラフ入力 ({'messages': []}) 内にネストされていないことです
フォローアップの質問をしてみましょう。あなたの名前を覚えているかどうかを確認してみます
user_input = "Remember my name?"

# The config is the **second positional argument** to stream() or invoke()!
events = graph.stream(
    {"messages": [("user", user_input)]}, config, stream_mode="values"
)
for event in events:
    event["messages"][-1].pretty_print()
================================[1m Human Message [0m=================================

Remember my name?
==================================[1m Ai Message [0m==================================

Of course, I remember your name, Will. I always try to pay attention to important details that users share with me. Is there anything else you'd like to talk about or any questions you have? I'm here to help with a wide range of topics or tasks.
注意: メモリに外部リストを使用していないことに注意してください。すべてチェックポインターによって処理されます。この LangSmith traceで実行全体を検査すれば、何が起こっているかを確認できます
信じられないですか? 別の config を使用して試してください
# The only difference is we change the `thread_id` here to "2" instead of "1"
# 唯一の違いは、`thread_id` を "1" ではなく "2" に変更することです
events = graph.stream(
    {"messages": [("user", user_input)]},
    {"configurable": {"thread_id": "2"}},
    stream_mode="values",
)
for event in events:
    event["messages"][-1].pretty_print()
================================[1m Human Message [0m=================================

Remember my name?
==================================[1m Ai Message [0m==================================

I apologize, but I don't have any previous context or memory of your name. As an AI assistant, I don't retain information from past conversations. Each interaction starts fresh. Could you please tell me your name so I can address you properly in this conversation?
注意: 行った変更は、構成内の thread_id を変更することだけです。比較のために、この呼び出しの LangSmith traceを参照してください。
これまでに、2 つの異なるスレッドにわたっていくつかのチェックポイントを作成しました。しかし、チェックポイントには何が含まれるのでしょうか。特定のconfigでの、グラフのstate(状態)を調べるには、get_state(config) を呼び出します
snapshot = graph.get_state(config)
snapshot
StateSnapshot(values={'messages': [HumanMessage(content='Hi there! My name is Will.', additional_kwargs={}, response_metadata={}, id='8c1ca919-c553-4ebf-95d4-b59a2d61e078'), AIMessage(content="Hello Will! It's nice to meet you. How can I assist you today? Is there anything specific you'd like to know or discuss?", additional_kwargs={}, response_metadata={'id': 'msg_01WTQebPhNwmMrmmWojJ9KXJ', 'model': 'claude-3-5-sonnet-20240620', 'stop_reason': 'end_turn', 'stop_sequence': None, 'usage': {'input_tokens': 405, 'output_tokens': 32}}, id='run-58587b77-8c82-41e6-8a90-d62c444a261d-0', usage_metadata={'input_tokens': 405, 'output_tokens': 32, 'total_tokens': 437}), HumanMessage(content='Remember my name?', additional_kwargs={}, response_metadata={}, id='daba7df6-ad75-4d6b-8057-745881cea1ca'), AIMessage(content="Of course, I remember your name, Will. I always try to pay attention to important details that users share with me. Is there anything else you'd like to talk about or any questions you have? I'm here to help with a wide range of topics or tasks.", additional_kwargs={}, response_metadata={'id': 'msg_01E41KitY74HpENRgXx94vag', 'model': 'claude-3-5-sonnet-20240620', 'stop_reason': 'end_turn', 'stop_sequence': None, 'usage': {'input_tokens': 444, 'output_tokens': 58}}, id='run-ffeaae5c-4d2d-4ddb-bd59-5d5cbf2a5af8-0', usage_metadata={'input_tokens': 444, 'output_tokens': 58, 'total_tokens': 502})]}, next=(), config={'configurable': {'thread_id': '1', 'checkpoint_ns': '', 'checkpoint_id': '1ef7d06e-93e0-6acc-8004-f2ac846575d2'}}, metadata={'source': 'loop', 'writes': {'chatbot': {'messages': [AIMessage(content="Of course, I remember your name, Will. I always try to pay attention to important details that users share with me. Is there anything else you'd like to talk about or any questions you have? I'm here to help with a wide range of topics or tasks.", additional_kwargs={}, response_metadata={'id': 'msg_01E41KitY74HpENRgXx94vag', 'model': 'claude-3-5-sonnet-20240620', 'stop_reason': 'end_turn', 'stop_sequence': None, 'usage': {'input_tokens': 444, 'output_tokens': 58}}, id='run-ffeaae5c-4d2d-4ddb-bd59-5d5cbf2a5af8-0', usage_metadata={'input_tokens': 444, 'output_tokens': 58, 'total_tokens': 502})]}}, 'step': 4, 'parents': {}}, created_at='2024-09-27T19:30:10.820758+00:00', parent_config={'configurable': {'thread_id': '1', 'checkpoint_ns': '', 'checkpoint_id': '1ef7d06e-859f-6206-8003-e1bd3c264b8f'}}, tasks=())
snapshot.next  # (since the graph ended this turn, `next` is empty. If you fetch a state from within a graph invocation, next tells which node will execute next)
# (グラフはこのターンで終了したので、`next` は空です。グラフ呼び出し内から状態を取得する場合、next は次にどのノードが実行されるかを指示します)
()
上記のスナップショットには、現在の状態値、対応する構成、および処理する次のノードが含まれています。この場合、グラフは END 状態に達したため、next は空です
おめでとうございます! LangGraph のチェックポイント システムのおかげで、チャットボットはセッション間で会話の状態を維持できるようになりました。これにより、より自然でコンテキストに沿ったインタラクションのエキサイティングな可能性が開かれます。LangGraph のチェックポイントは、arbitrarily complex graph states(任意の複雑なグラフ状態)も処理します。これは、単純なチャット メモリよりもはるかに表現力があり強力です
次の部分では、ボットに人間による監視を導入して、先に進む前にガイダンスや検証が必要になる可能性がある状況に対処します
このセクションのグラフを確認するには、以下のコード スニペットを確認してください。
Full Code ソースコードを表示(クリックで展開します)
from typing import Annotated

from langchain_anthropic import ChatAnthropic
from langchain_community.tools.tavily_search import TavilySearchResults
from langchain_core.messages import BaseMessage
from typing_extensions import TypedDict

from langgraph.checkpoint.memory import MemorySaver
from langgraph.graph import StateGraph
from langgraph.graph.message import add_messages
from langgraph.prebuilt import ToolNode


class State(TypedDict):
    messages: Annotated[list, add_messages]


graph_builder = StateGraph(State)


tool = TavilySearchResults(max_results=2)
tools = [tool]
llm = ChatAnthropic(model="claude-3-5-sonnet-20240620")
llm_with_tools = llm.bind_tools(tools)


def chatbot(state: State):
    return {"messages": [llm_with_tools.invoke(state["messages"])]}


graph_builder.add_node("chatbot", chatbot)

tool_node = ToolNode(tools=[tool])
graph_builder.add_node("tools", tool_node)

graph_builder.add_conditional_edges(
    "chatbot",
    tools_condition,
)
graph_builder.add_edge("tools", "chatbot")
graph_builder.set_entry_point("chatbot")
graph = graph_builder.compile(checkpointer=memory)
API Reference: ChatAnthropic | TavilySearchResults | BaseMessage | MemorySaver | StateGraph | add_messages | ToolNode
パート 4: human-in-the-loop(ヒューマン・イン・ザ・ループ)
Agents(エージェント)は信頼性が低く、タスクを正常に完了するには人間の入力が必要になる場合があります。同様に、一部のアクションでは、すべてが意図したとおりに実行されていることを確認するために、実行前に人間の承認が必要になる場合があります
LangGraph は、さまざまな方法でhuman-in-the-loop (ヒューマン-イン-ザ-ループ) ワークフローをサポートしています。このセクションでは、LangGraph の interrupt_before 機能を使用して、常にツール ノードを中断します
まず、既存のコードから始めます。以下はパート 3 からコピーしたものです。
from typing import Annotated

from langchain_anthropic import ChatAnthropic
from langchain_community.tools.tavily_search import TavilySearchResults
from typing_extensions import TypedDict

from langgraph.checkpoint.memory import MemorySaver
from langgraph.graph import StateGraph, START
from langgraph.graph.message import add_messages
from langgraph.prebuilt import ToolNode, tools_condition

memory = MemorySaver()


class State(TypedDict):
    messages: Annotated[list, add_messages]


graph_builder = StateGraph(State)


tool = TavilySearchResults(max_results=2)
tools = [tool]
llm = ChatAnthropic(model="claude-3-5-sonnet-20240620")
llm_with_tools = llm.bind_tools(tools)


def chatbot(state: State):
    return {"messages": [llm_with_tools.invoke(state["messages"])]}


graph_builder.add_node("chatbot", chatbot)

tool_node = ToolNode(tools=[tool])
graph_builder.add_node("tools", tool_node)

graph_builder.add_conditional_edges(
    "chatbot",
    tools_condition,
)
graph_builder.add_edge("tools", "chatbot")
graph_builder.add_edge(START, "chatbot")
API Reference: ChatAnthropic | TavilySearchResults | MemorySaver | StateGraph | START | add_messages | ToolNode | tools_condition
次に、tools ノードを interrupt_before に指定してグラフをコンパイルします。
graph = graph_builder.compile(
    checkpointer=memory,
    # This is new!(ここが新しいところです!)
    interrupt_before=["tools"],
    # Note: can also interrupt __after__ tools, if desired.
    # interrupt_after=["tools"]
    # 注: 必要に応じて、__after__ ツールを中断することもできます
    # interrupt_after=["tools"]
)
user_input = "I'm learning LangGraph. Could you do some research on it for me?"
config = {"configurable": {"thread_id": "1"}}
# The config is the **second positional argument** to stream() or invoke()!
# config は stream() または invoke() の 2 番目の位置引数 です。
events = graph.stream(
    {"messages": [("user", user_input)]}, config, stream_mode="values"
)
for event in events:
    if "messages" in event:
        event["messages"][-1].pretty_print()
================================[1m Human Message [0m=================================

I'm learning LangGraph. Could you do some research on it for me?
==================================[1m Ai Message [0m==================================

[{'text': "Certainly! I'd be happy to research LangGraph for you. To get the most up-to-date and comprehensive information, I'll use the Tavily search engine to look this up. Let me do that for you now.", 'type': 'text'}, {'id': 'toolu_01R4ZFcb5hohpiVZwr88Bxhc', 'input': {'query': 'LangGraph framework for building language model applications'}, 'name': 'tavily_search_results_json', 'type': 'tool_use'}]
Tool Calls:
  tavily_search_results_json (toolu_01R4ZFcb5hohpiVZwr88Bxhc)
 Call ID: toolu_01R4ZFcb5hohpiVZwr88Bxhc
  Args:
    query: LangGraph framework for building language model applications
グラフの状態を調べて、動作していることを確認しましょう
snapshot = graph.get_state(config)
snapshot.next
('tools',)
注意:前回とは異なり、「next」ノードが「tools」に設定されていることに注意してください。ここで中断しました。ツールの呼び出しを確認しましょう。
existing_message = snapshot.values["messages"][-1]
existing_message.tool_calls
[{'name': 'tavily_search_results_json',
  'args': {'query': 'LangGraph framework for building language model applications'},
  'id': 'toolu_01R4ZFcb5hohpiVZwr88Bxhc',
  'type': 'tool_call'}]
このクエリは妥当なようです。ここではフィルタリングするものはありません。人間ができる最も簡単なことは、グラフの実行を継続させることです。以下でそれを実行してみましょう。
次に、グラフを続行します。None を渡すと、グラフは中断したところから続行され、状態に新しいものが追加されません。
# `None` will append nothing new to the current state, letting it resume as if it had never been interrupted
# `None` は現在の状態に何も追加せず、中断されなかったかのように再開します
events = graph.stream(None, config, stream_mode="values")
for event in events:
    if "messages" in event:
        event["messages"][-1].pretty_print()
==================================[1m Ai Message [0m==================================

[{'text': "Certainly! I'd be happy to research LangGraph for you. To get the most up-to-date and comprehensive information, I'll use the Tavily search engine to look this up. Let me do that for you now.", 'type': 'text'}, {'id': 'toolu_01R4ZFcb5hohpiVZwr88Bxhc', 'input': {'query': 'LangGraph framework for building language model applications'}, 'name': 'tavily_search_results_json', 'type': 'tool_use'}]
Tool Calls:
  tavily_search_results_json (toolu_01R4ZFcb5hohpiVZwr88Bxhc)
 Call ID: toolu_01R4ZFcb5hohpiVZwr88Bxhc
  Args:
    query: LangGraph framework for building language model applications
=================================[1m Tool Message [0m=================================
Name: tavily_search_results_json

[{"url": "https://towardsdatascience.com/from-basics-to-advanced-exploring-langgraph-e8c1cf4db787", "content": "LangChain is one of the leading frameworks for building applications powered by Lardge Language Models. With the LangChain Expression Language (LCEL), defining and executing step-by-step action sequences — also known as chains — becomes much simpler. In more technical terms, LangChain allows us to create DAGs (directed acyclic graphs). As LLM applications, particularly LLM agents, have ..."}, {"url": "https://github.com/langchain-ai/langgraph", "content": "Overview. LangGraph is a library for building stateful, multi-actor applications with LLMs, used to create agent and multi-agent workflows. Compared to other LLM frameworks, it offers these core benefits: cycles, controllability, and persistence. LangGraph allows you to define flows that involve cycles, essential for most agentic architectures ..."}]
==================================[1m Ai Message [0m==================================

Thank you for your patience. I've found some valuable information about LangGraph for you. Let me summarize the key points:

1. LangGraph is a library for building stateful, multi-actor applications with Large Language Models (LLMs).

2. It is particularly useful for creating agent and multi-agent workflows.

3. LangGraph is built on top of LangChain, which is one of the leading frameworks for building LLM-powered applications.

4. Key benefits of LangGraph compared to other LLM frameworks include:
   a) Cycles: It allows you to define flows that involve cycles, which is essential for most agent architectures.
   b) Controllability: Offers more control over the application flow.
   c) Persistence: Provides ways to maintain state across interactions.

5. LangGraph works well with the LangChain Expression Language (LCEL), which simplifies the process of defining and executing step-by-step action sequences (chains).

6. In technical terms, LangGraph enables the creation of Directed Acyclic Graphs (DAGs) for LLM applications.

7. It's particularly useful for building more complex LLM agents and multi-agent systems.

LangGraph seems to be an advanced tool that builds upon LangChain to provide more sophisticated capabilities for creating stateful and multi-actor LLM applications. It's especially valuable if you're looking to create complex agent systems or applications that require maintaining state across interactions.

Is there any specific aspect of LangGraph you'd like to know more about? I'd be happy to dive deeper into any particular area of interest.
この呼び出しの LangSmith traceを確認して、上記の呼び出しで行われた正確な作業を確認してください。最初のステップで状態が読み込まれ、チャットボットが中断したところから続行できることに注目してください
おめでとうございます! 割り込みを使用して、チャットボットに人間が関与する実行を追加し、必要に応じて人間による監視と介入を可能にしました。これにより、AI システムで作成できる潜在的な UI が広がります。checkpointer(チェックポインター)をすでに追加しているため、グラフをindefinitely (いつまでも、無期限で)に一時停止し、何も起こらなかったかのようにいつでも再開できます
次に、カスタム状態更新を使用してボットの動作をさらにカスタマイズする方法を探ります
以下は、このセクションで使用したコードのコピーです。これと前の部分との唯一の違いは、interrupt_before 引数の追加です。
Full Code ソースコードを表示(クリックで展開します)
from typing import Annotated

from langchain_anthropic import ChatAnthropic
from langchain_community.tools.tavily_search import TavilySearchResults
from langchain_core.messages import BaseMessage
from typing_extensions import TypedDict

from langgraph.checkpoint.memory import MemorySaver
from langgraph.graph import StateGraph
from langgraph.graph.message import add_messages
from langgraph.prebuilt import ToolNode, tools_condition


class State(TypedDict):
    messages: Annotated[list, add_messages]


graph_builder = StateGraph(State)


tool = TavilySearchResults(max_results=2)
tools = [tool]
llm = ChatAnthropic(model="claude-3-5-sonnet-20240620")
llm_with_tools = llm.bind_tools(tools)


def chatbot(state: State):
    return {"messages": [llm_with_tools.invoke(state["messages"])]}


graph_builder.add_node("chatbot", chatbot)

tool_node = ToolNode(tools=[tool])
graph_builder.add_node("tools", tool_node)

graph_builder.add_conditional_edges(
    "chatbot",
    tools_condition,
)
graph_builder.add_edge("tools", "chatbot")
graph_builder.set_entry_point("chatbot")

memory = MemorySaver()
graph = graph_builder.compile(
    checkpointer=memory,
    # ここが新しい箇所です!
    interrupt_before=["tools"],
    # 注: 必要に応じて、__after__ ツールを中断することもできます
    # interrupt_after=["tools"]
)
パート 5: State(状態)を手動更新
前のセクションでは、グラフを中断して人間がそのアクションを検査できるようにする方法を示しました。これにより、人間は状態を読み取ることができますが、エージェントの進路を変更する場合は書き込みアクセス権が必要です。
ありがたいことに、LangGraph ではstate (状態)を手動で更新 (manually update state)できます。state(状態)を更新すると、エージェントのアクションを変更して (過去を変更することさえも) エージェントの軌跡を制御できます。この機能は、エージェントの間違いを修正したり、別のパスを探したり、エージェントを特定の目標に導いたりする場合に特に便利です。
以下では、チェックポイントされたstate(状態)を更新する方法を示します。前と同様に、まずグラフを定義します。前と同じグラフを再利用します
from typing import Annotated

from langchain_anthropic import ChatAnthropic
from langchain_community.tools.tavily_search import TavilySearchResults
from typing_extensions import TypedDict

from langgraph.checkpoint.memory import MemorySaver
from langgraph.graph import StateGraph, START
from langgraph.graph.message import add_messages
from langgraph.prebuilt import ToolNode, tools_condition


class State(TypedDict):
    messages: Annotated[list, add_messages]


graph_builder = StateGraph(State)


tool = TavilySearchResults(max_results=2)
tools = [tool]
llm = ChatAnthropic(model="claude-3-5-sonnet-20240620")
llm_with_tools = llm.bind_tools(tools)


def chatbot(state: State):
    return {"messages": [llm_with_tools.invoke(state["messages"])]}


graph_builder.add_node("chatbot", chatbot)

tool_node = ToolNode(tools=[tool])
graph_builder.add_node("tools", tool_node)

graph_builder.add_conditional_edges(
    "chatbot",
    tools_condition,
)
graph_builder.add_edge("tools", "chatbot")
graph_builder.add_edge(START, "chatbot")
memory = MemorySaver()
graph = graph_builder.compile(
    checkpointer=memory,
    # This is new!
    interrupt_before=["tools"],
    # Note: can also interrupt **after** actions, if desired.
    # interrupt_after=["tools"]
)

user_input = "I'm learning LangGraph. Could you do some research on it for me?"
config = {"configurable": {"thread_id": "1"}}
# The config is the **second positional argument** to stream() or invoke()!
events = graph.stream({"messages": [("user", user_input)]}, config)
for event in events:
    if "messages" in event:
        event["messages"][-1].pretty_print()
snapshot = graph.get_state(config)
existing_message = snapshot.values["messages"][-1]
existing_message.pretty_print()
==================================[1m Ai Message [0m==================================

[{'text': "Certainly! I'd be happy to research LangGraph for you. To get the most up-to-date and comprehensive information, I'll use the Tavily search engine to look this up. Let me do that for you now.", 'type': 'text'}, {'id': 'toolu_018YcbFR37CG8RRXnavH5fxZ', 'input': {'query': 'LangGraph: what is it, how is it used in AI development'}, 'name': 'tavily_search_results_json', 'type': 'tool_use'}]
Tool Calls:
  tavily_search_results_json (toolu_018YcbFR37CG8RRXnavH5fxZ)
 Call ID: toolu_018YcbFR37CG8RRXnavH5fxZ
  Args:
    query: LangGraph: what is it, how is it used in AI development
ここまでは、すべて前のセクションの正確な繰り返しです。LLM が検索エンジン ツールの使用を要求したため、グラフが中断されました。前と同じように進めると、ツールが呼び出されて Web を検索します。
しかし、ユーザーが介入したい場合はどうなりますか? チャット ボットがツールを使用する必要がないと思われる場合はどうなりますか?
正しい応答を直接提供しましょう!
from langchain_core.messages import AIMessage, ToolMessage

# answer=("LangGraph は、LLM を使用してステートフルなマルチアクター アプリケーションを構築するためのライブラリです")
answer = (
    "LangGraph is a library for building stateful, multi-actor applications with LLMs."
)
new_messages = [
    # The LLM API expects some ToolMessage to match its tool call. We'll satisfy that here.
    # LLM API は、ツール呼び出しに一致する ToolMessage を期待しています。ここでそれを満たします
    ToolMessage(content=answer, tool_call_id=existing_message.tool_calls[0]["id"]),
    # And then directly "put words in the LLM's mouth" by populating its response.
    # そして、応答を入力することで、LLM の口に直接「言葉を入れる」のです。
    AIMessage(content=answer),
]

new_messages[-1].pretty_print()
graph.update_state(
    # Which state to update (どの状態を更新するか)
    config,
    # The updated values to provide. The messages in our `State` are "append-only", meaning this will be appended
    # to the existing state. We will review how to update existing messages in the next section!
    # 提供する更新された値。`State` 内のメッセージは「追加のみ」です。つまり、これは既存の状態に追加されます。次のセクションでは、既存のメッセージを更新する方法について説明します
    {"messages": new_messages},
)

print("\n\nLast 2 messages;")
print(graph.get_state(config).values["messages"][-2:])
API Reference: AIMessage | ToolMessage
==================================[1m Ai Message [0m==================================

LangGraph is a library for building stateful, multi-actor applications with LLMs.


Last 2 messages;
[ToolMessage(content='LangGraph is a library for building stateful, multi-actor applications with LLMs.', id='675f7618-367f-44b7-b80e-2834afb02ac5', tool_call_id='toolu_018YcbFR37CG8RRXnavH5fxZ'), AIMessage(content='LangGraph is a library for building stateful, multi-actor applications with LLMs.', additional_kwargs={}, response_metadata={}, id='35fd5682-0c2a-4200-b192-71c59ac6d412')]
最終的な応答メッセージを提供したので、グラフは完成しました。状態の更新はグラフ ステップをシミュレートするため、対応するトレースも生成されます。何が起こっているかを確認するには、上記の update_state 呼び出しの LangSmith traceを Inspec してください。
注意:新しいメッセージが、すでにState(状態)にあるメッセージに追加されていることに注意してください。State タイプをどのように定義したか覚えていますか?
class State(TypedDict):
    messages: Annotated[list, add_messages]
事前に用意されている add_messages 関数を使用して、messages メッセージにAnnotated(注釈)を付けました。これにより、グラフは、リストを直接上書きするのではなく、常に既存のリストに値を追加するように指示されます。ここでも同じロジックが適用されているため、update_state に渡したメッセージは同じ方法で追加されました。
update_state 関数は、グラフ内のノードの 1 つであるかのように動作します。デフォルトでは、更新操作では最後に実行されたノードが使用されますが、以下で手動で指定できます。更新を追加し、グラフにそれを「chatbotチャットボット」からのものとして扱うように指示しましょう
graph.update_state(
    config,
    {"messages": [AIMessage(content="I'm an AI expert!")]},
    # Which node for this function to act as. It will automatically continue
    # processing as if this node just ran.
    # この関数がどのノードとして機能するか。このノードが実行されたかのように自動的に処理が続行されます。
    as_node="chatbot",
)
{'configurable': {'thread_id': '1',
  'checkpoint_ns': '',
  'checkpoint_id': '1ef7d134-3958-6412-8002-3f4b4112062f'}}
提供されているリンクで、この更新呼び出しの LangSmith traceを調べてください。
注意: トレースから、グラフが tools_condition エッジまで続いていることに注意してください。グラフに更新を as_node="chatbot"として扱うように指示しただけです。下の図に従ってチャットボット ノードから開始すると、更新されたメッセージにツール呼び出しがないため、自然に tools_condition エッジに到達し、次に __end__ に到達します。
from IPython.display import Image, display

try:
    display(Image(graph.get_graph().draw_mermaid_png()))
except Exception:
    # This requires some extra dependencies and is optional
    pass

前と同じように現在の状態を検査し、チェックポイントに手動更新が反映されていることを確認します
snapshot = graph.get_state(config)
print(snapshot.values["messages"][-3:])
print(snapshot.next)
[ToolMessage(content='LangGraph is a library for building stateful, multi-actor applications with LLMs.', id='675f7618-367f-44b7-b80e-2834afb02ac5', tool_call_id='toolu_018YcbFR37CG8RRXnavH5fxZ'), AIMessage(content='LangGraph is a library for building stateful, multi-actor applications with LLMs.', additional_kwargs={}, response_metadata={}, id='35fd5682-0c2a-4200-b192-71c59ac6d412'), AIMessage(content="I'm an AI expert!", additional_kwargs={}, response_metadata={}, id='288e2f74-f1cb-4082-8c3c-af4695c83117')]
()
注意: 引き続き AI メッセージをState(状態)に追加しています。chatbotとして動作し、tool_calls を含まない AIMessage で応答しているため、グラフは終了状態 (next はempty(空)) に入ったことを認識しています。
既存のメッセージを上書きしたい場合はどうするのか?
上記のグラフの状態を注釈するために使用した add_messages 関数は、メッセージ キーの更新方法を制御します。この関数は、新しいメッセージ リスト内のメッセージ ID を調べます。ID が既存の状態のメッセージと一致する場合、add_messages は既存のメッセージを新しいコンテンツで上書きします。
例として、ツールの呼び出しを更新して、検索エンジンから適切な結果が得られるようにしてみましょう。まず、新しいスレッドを開始します。
user_input = "I'm learning LangGraph. Could you do some research on it for me?"
config = {"configurable": {"thread_id": "2"}}  # we'll use thread_id = 2 here
events = graph.stream(
    {"messages": [("user", user_input)]}, config, stream_mode="values"
)
for event in events:
    if "messages" in event:
        event["messages"][-1].pretty_print()
================================[1m Human Message [0m=================================

I'm learning LangGraph. Could you do some research on it for me?
==================================[1m Ai Message [0m==================================

[{'text': "Certainly! I'd be happy to research LangGraph for you. To get the most up-to-date and accurate information, I'll use the Tavily search engine to look this up. Let me do that for you now.", 'type': 'text'}, {'id': 'toolu_01TfAeisrpx4ddgJpoAxqrVh', 'input': {'query': 'LangGraph framework for language models'}, 'name': 'tavily_search_results_json', 'type': 'tool_use'}]
Tool Calls:
  tavily_search_results_json (toolu_01TfAeisrpx4ddgJpoAxqrVh)
 Call ID: toolu_01TfAeisrpx4ddgJpoAxqrVh
  Args:
    query: LangGraph framework for language models
次に、エージェントのツール呼び出しを更新しましょう。特に、人間が関与するワークフローを検索したい場合があります。
from langchain_core.messages import AIMessage

snapshot = graph.get_state(config)
existing_message = snapshot.values["messages"][-1]
print("Original")
print("Message ID", existing_message.id)
print(existing_message.tool_calls[0])
new_tool_call = existing_message.tool_calls[0].copy()
new_tool_call["args"]["query"] = "LangGraph human-in-the-loop workflow"
new_message = AIMessage(
    content=existing_message.content,
    tool_calls=[new_tool_call],
    # Important! The ID is how LangGraph knows to REPLACE the message in the state rather than APPEND this messages
    # 重要!IDは、LangGraphがメッセージを追加するのではなく、状態内のメッセージを置き換える方法を知るためのものです。
    id=existing_message.id,
)

print("Updated")
print(new_message.tool_calls[0])
print("Message ID", new_message.id)
graph.update_state(config, {"messages": [new_message]})

print("\n\nTool calls")
graph.get_state(config).values["messages"][-1].tool_calls
API Reference: AIMessage
Original
Message ID run-342f3f54-356b-4cc1-b747-573f6aa31054-0
{'name': 'tavily_search_results_json', 'args': {'query': 'LangGraph framework for language models'}, 'id': 'toolu_01TfAeisrpx4ddgJpoAxqrVh', 'type': 'tool_call'}
Updated
{'name': 'tavily_search_results_json', 'args': {'query': 'LangGraph human-in-the-loop workflow'}, 'id': 'toolu_01TfAeisrpx4ddgJpoAxqrVh', 'type': 'tool_call'}
Message ID run-342f3f54-356b-4cc1-b747-573f6aa31054-0


Tool calls
[{'name': 'tavily_search_results_json',
  'args': {'query': 'LangGraph human-in-the-loop workflow'},
  'id': 'toolu_01TfAeisrpx4ddgJpoAxqrVh',
  'type': 'tool_call'}]
注意:AI のツール呼び出しを変更して、単純な「LangGraph」ではなく「LangGraph human-in-the-loop workflow(LangGraph ヒューマン-イン-ザ-ループ ワークフロー)」を検索するようにしたことを注目してください。
LangSmith traceをチェックして、状態更新呼び出しを確認します。新しいメッセージによって以前の AI メッセージが正常に更新されたことがわかります。
None の入力と既存の構成を使用してストリーミングすることで、グラフを再開します
events = graph.stream(None, config, stream_mode="values")
for event in events:
    if "messages" in event:
        event["messages"][-1].pretty_print()
==================================[1m Ai Message [0m==================================

[{'text': "Certainly! I'd be happy to research LangGraph for you. To get the most up-to-date and accurate information, I'll use the Tavily search engine to look this up. Let me do that for you now.", 'type': 'text'}, {'id': 'toolu_01TfAeisrpx4ddgJpoAxqrVh', 'input': {'query': 'LangGraph framework for language models'}, 'name': 'tavily_search_results_json', 'type': 'tool_use'}]
Tool Calls:
  tavily_search_results_json (toolu_01TfAeisrpx4ddgJpoAxqrVh)
 Call ID: toolu_01TfAeisrpx4ddgJpoAxqrVh
  Args:
    query: LangGraph human-in-the-loop workflow
=================================[1m Tool Message [0m=================================
Name: tavily_search_results_json

[{"url": "https://www.youtube.com/watch?v=9BPCV5TYPmg", "content": "In this video, I'll show you how to handle persistence with LangGraph, enabling a unique Human-in-the-Loop workflow. This approach allows a human to grant an..."}, {"url": "https://medium.com/@kbdhunga/implementing-human-in-the-loop-with-langgraph-ccfde023385c", "content": "Implementing a Human-in-the-Loop (HIL) framework in LangGraph with the Streamlit app provides a robust mechanism for user engagement and decision-making. By incorporating breakpoints and ..."}]
==================================[1m Ai Message [0m==================================

Thank you for your patience. I've found some information about LangGraph, particularly focusing on its human-in-the-loop workflow capabilities. Let me summarize what I've learned for you:

1. LangGraph Overview:
   LangGraph is a framework for building stateful, multi-actor applications with Large Language Models (LLMs). It's particularly useful for creating complex, interactive AI systems.

2. Human-in-the-Loop (HIL) Workflow:
   One of the key features of LangGraph is its support for human-in-the-loop workflows. This means that it allows for human intervention and decision-making within AI-driven processes.

3. Persistence Handling:
   LangGraph offers capabilities for handling persistence, which is crucial for maintaining state across interactions in a workflow.

4. Implementation with Streamlit:
   There are examples of implementing LangGraph's human-in-the-loop functionality using Streamlit, a popular Python library for creating web apps. This combination allows for the creation of interactive user interfaces for AI applications.

5. Breakpoints and User Engagement:
   LangGraph allows the incorporation of breakpoints in the workflow. These breakpoints are points where the system can pause and wait for human input or decision-making, enhancing user engagement and control over the AI process.

6. Decision-Making Mechanism:
   The human-in-the-loop framework in LangGraph provides a robust mechanism for integrating user decision-making into AI workflows. This is particularly useful in scenarios where human judgment or expertise is needed to guide or validate AI actions.

7. Flexibility and Customization:
   From the information available, it seems that LangGraph offers flexibility in how human-in-the-loop processes are implemented, allowing developers to customize the interaction points and the nature of human involvement based on their specific use case.

LangGraph appears to be a powerful tool for developers looking to create more interactive and controllable AI applications, especially those that benefit from human oversight or input at crucial stages of the process.

Would you like me to research any specific aspect of LangGraph in more detail, or do you have any questions about what I've found so far?
traceをチェックして、ツールの呼び出しとその後の LLM 応答を確認してください。グラフが更新されたクエリ用語を使用して検索エンジンにクエリを実行していることに注目してください。ここでは、LLM の検索を手動で上書きできました。
これらすべてがグラフのチェックポイント メモリに反映されます。つまり、会話を続行すると、変更された状態がすべて呼び出されます。
events = graph.stream(
    {
        "messages": (
            "user",
            "Remember what I'm learning about?",
        )
    },
    config,
    stream_mode="values",
)
for event in events:
    if "messages" in event:
        event["messages"][-1].pretty_print()
================================[1m Human Message [0m=================================

Remember what I'm learning about?
==================================[1m Ai Message [0m==================================

I apologize for my oversight. You're absolutely right to remind me. You mentioned that you're learning LangGraph. Thank you for bringing that back into focus.

Since you're in the process of learning LangGraph, it would be helpful to know more about your current level of understanding and what specific aspects of LangGraph you're most interested in or finding challenging. This way, I can provide more targeted information or explanations that align with your learning journey.

Are there any particular areas of LangGraph you'd like to explore further? For example:

1. Basic concepts and architecture of LangGraph
2. Setting up and getting started with LangGraph
3. Implementing specific features like the human-in-the-loop workflow
4. Best practices for using LangGraph in projects
5. Comparisons with other similar frameworks

Or if you have any specific questions about what you've learned so far, I'd be happy to help clarify or expand on those topics. Please let me know what would be most useful for your learning process.
おめでとうございます! 人間参加型ワークフローの一部として、interrupt_before と update_state を使用して状態を手動で変更しました。中断と状態の変更により、エージェントの動作を制御できます。永続的なチェックポイントと組み合わせると、アクションをpause(一時停止)して、任意の時点でresume(再開)できます。グラフが中断したときにユーザーが対応する必要はありません!
このセクションのグラフ コードは、以前のものと同じです。覚えておくべき重要なスニペットは、グラフがノードに到達するたびに明示的に一時停止する場合は、.compile(..., interrupt_before=[...]) (または interrupt_after) を追加することです。次に、update_state を使用してチェックポイントを変更し、グラフの進行方法を制御できます。
パート 6: 状態のカスタマイズ
これまでは、単純な状態 (メッセージのリストだけ) に依存してきました。この単純な状態でも十分ですが、メッセージ リストに依存せずに複雑な動作を定義したい場合は、状態にフィールドを追加できます。このセクションでは、新しいノードを使用してチャット ボットを拡張し、これを説明します。
上記の例では、人間を決定論的に関与させました。つまり、ツールが呼び出されるたびにグラフは常に中断されました。チャット ボットに対して、人間に依存するかどうかの選択肢を持たせたいとします。
これを行う 1 つの方法は、パススルーの「human(人間)」ノードを作成することです。このノードの前では、グラフは常に停止します。LLM が「human(人間)」ツールを呼び出す場合にのみ、このノードを実行します。便宜上、グラフ状態に「ask_human」フラグを含め、LLM がこのツールを呼び出すと反転します。
以下では、更新されたState(状態)を使用して、この新しいグラフを定義します。
from typing import Annotated

from langchain_anthropic import ChatAnthropic
from langchain_community.tools.tavily_search import TavilySearchResults
from typing_extensions import TypedDict

from langgraph.checkpoint.memory import MemorySaver
from langgraph.graph import StateGraph, START
from langgraph.graph.message import add_messages
from langgraph.prebuilt import ToolNode, tools_condition


class State(TypedDict):
    messages: Annotated[list, add_messages]
    # This flag is new
    ask_human: bool
API Reference: ChatAnthropic | TavilySearchResults | MemorySaver | StateGraph | START | add_messages | ToolNode | tools_condition
次に、モデルに支援を要求するかどうかを判断させるスキーマを定義します
Pydantic を LangChain で使用する
このノートブックは Pydantic v2 BaseModel を使用します。これには langchain-core >= 0.3 が必要です。langchain-core < 0.3 を使用すると、Pydantic v1 と v2 BaseModel が混在するためエラーが発生します。
from pydantic import BaseModel


class RequestAssistance(BaseModel):
    """Escalate the conversation to an expert. Use this if you are unable to assist directly or if the user requires support beyond your permissions.

    To use this function, relay the user's 'request' so the expert can provide the right guidance.
    """

    request: str
次に、chatbot(チャットボット) ノードを定義します。ここでの主な変更は、チャットボットが RequestAssistance フラグを呼び出したことがわかった場合に ask_human フラグを反転することです
tool = TavilySearchResults(max_results=2)
tools = [tool]
llm = ChatAnthropic(model="claude-3-5-sonnet-20240620")
# We can bind the llm to a tool definition, a pydantic model, or a json schema
llm_with_tools = llm.bind_tools(tools + [RequestAssistance])


def chatbot(state: State):
    response = llm_with_tools.invoke(state["messages"])
    ask_human = False
    if (
        response.tool_calls
        and response.tool_calls[0]["name"] == RequestAssistance.__name__
    ):
        ask_human = True
    return {"messages": [response], "ask_human": ask_human}
次に、グラフ ビルダーを作成し、前と同じようにチャットボット ノードとツール ノードをグラフに追加します
graph_builder = StateGraph(State)

graph_builder.add_node("chatbot", chatbot)
graph_builder.add_node("tools", ToolNode(tools=[tool]))
次に、「human(人間)」ノードを作成します。このnode(ノード)関数は、主にグラフ内のプレースホルダーであり、割り込みをトリガーします。interrupt(割り込み)中に人間が手動で状態をupdate(更新)しない場合は、ツール メッセージが挿入され、LLM はユーザーが要求されたが応答しなかったことを認識します。このノードは ask_human フラグも設定解除するため、グラフは、さらに要求が行われない限り、ノードを再訪しないことを認識します。
from langchain_core.messages import AIMessage, ToolMessage


def create_response(response: str, ai_message: AIMessage):
    return ToolMessage(
        content=response,
        tool_call_id=ai_message.tool_calls[0]["id"],
    )


def human_node(state: State):
    new_messages = []
    if not isinstance(state["messages"][-1], ToolMessage):
        # Typically, the user will have updated the state during the interrupt.
        # If they choose not to, we will include a placeholder ToolMessage to
        # let the LLM continue.
        new_messages.append(
            create_response("No response from human.", state["messages"][-1])
        )
    return {
        # Append the new messages
        "messages": new_messages,
        # Unset the flag
        "ask_human": False,
    }


graph_builder.add_node("human", human_node)
API Reference: AIMessage | ToolMessage
次に、条件付きロジックを定義します。フラグが設定されている場合、select_next_node はhumanノードにルーティングします。そうでない場合は、事前構築された tools_condition 関数に次のノードを選択させます。
tools_condition 関数は、チャットボットが応答メッセージで tool_calls で応答したかどうかを確認するだけであることを思い出してください。応答した場合は、アクション ノードにルーティングします。それ以外の場合は、グラフを終了します。
def select_next_node(state: State):
    if state["ask_human"]:
        return "human"
    # Otherwise, we can route as before
    return tools_condition(state)


graph_builder.add_conditional_edges(
    "chatbot",
    select_next_node,
    {"human": "human", "tools": "tools", END: END},
)
最後に、単純な有向エッジを追加してグラフをコンパイルします。これらのエッジは、a の実行が終了するたびに、グラフが常にノード a->b から流れるように指示します
# The rest is the same
graph_builder.add_edge("tools", "chatbot")
graph_builder.add_edge("human", "chatbot")
graph_builder.add_edge(START, "chatbot")
memory = MemorySaver()
graph = graph_builder.compile(
    checkpointer=memory,
    # We interrupt before 'human' here instead.
    interrupt_before=["human"],
)
可視化の依存関係がインストールされている場合は、以下のグラフ構造を確認できます
from IPython.display import Image, display

try:
    display(Image(graph.get_graph().draw_mermaid_png()))
except Exception:
    # This requires some extra dependencies and is optional
    pass

チャットボットは、人間に助けを求める (chatbot(チャットボット) -> select(選択) -> human(人間))、検索エンジン ツールを呼び出す (chatbot(チャットボット) -> select(選択) -> action(アクション))、または直接応答する (chatbot(チャットボット) -> select(選択) -> end (終了)) ことができます。アクションまたはリクエストが行われると、グラフは chatbotノードに戻り、操作を続行します。
このグラフの動作を見てみましょう。グラフを説明するために、専門家の支援をリクエストします。
user_input = "I need some expert guidance for building this AI agent. Could you request assistance for me?"
config = {"configurable": {"thread_id": "1"}}
# The config is the **second positional argument** to stream() or invoke()!
events = graph.stream(
    {"messages": [("user", user_input)]}, config, stream_mode="values"
)
for event in events:
    if "messages" in event:
        event["messages"][-1].pretty_print()
================================[1m Human Message [0m=================================

I need some expert guidance for building this AI agent. Could you request assistance for me?
==================================[1m Ai Message [0m==================================

[{'text': "Certainly! I understand that you need expert guidance for building an AI agent. I'll use the RequestAssistance function to escalate your request to an expert who can provide you with the specialized knowledge and support you need. Let me do that for you right away.", 'type': 'text'}, {'id': 'toolu_01Mo3N2c1byuSZwT1vyJWRia', 'input': {'request': 'The user needs expert guidance for building an AI agent. They require specialized knowledge and support in AI development and implementation.'}, 'name': 'RequestAssistance', 'type': 'tool_use'}]
Tool Calls:
  RequestAssistance (toolu_01Mo3N2c1byuSZwT1vyJWRia)
 Call ID: toolu_01Mo3N2c1byuSZwT1vyJWRia
  Args:
    request: The user needs expert guidance for building an AI agent. They require specialized knowledge and support in AI development and implementation.
注意: LLM は、提供された「RequestAssistance」ツールを呼び出し、割り込みが設定されました。グラフの状態を調べて確認してみましょう。
snapshot = graph.get_state(config)
snapshot.next
('human',)
グラフの状態は、実際には「human(人間)」ノードの前で中断されます。このシナリオでは、「expert(エキスパート)」として行動し、入力で新しい ToolMessage を追加して状態を手動で更新できます。
次に、チャットボットのリクエストに次のように応答します。1. 応答で ToolMessage を作成します。これはchatbotに返されます。2. update_state を呼び出して、グラフの状態を手動で更新します
ai_message = snapshot.values["messages"][-1]
human_response = (
    "We, the experts are here to help! We'd recommend you check out LangGraph to build your agent."
    " It's much more reliable and extensible than simple autonomous agents."
)
tool_message = create_response(human_response, ai_message)
graph.update_state(config, {"messages": [tool_message]})
{'configurable': {'thread_id': '1',
  'checkpoint_ns': '',
  'checkpoint_id': '1ef7d092-bb30-6bee-8002-015e7e1c56c0'}}
state(状態)を検査して、応答が追加されたかどうかを確認できます
graph.get_state(config).values["messages"]
[HumanMessage(content='I need some expert guidance for building this AI agent. Could you request assistance for me?', additional_kwargs={}, response_metadata={}, id='3f28f959-9ab7-489a-9c58-7ed1b49cedf3'),
 AIMessage(content=[{'text': "Certainly! I understand that you need expert guidance for building an AI agent. I'll use the RequestAssistance function to escalate your request to an expert who can provide you with the specialized knowledge and support you need. Let me do that for you right away.", 'type': 'text'}, {'id': 'toolu_01Mo3N2c1byuSZwT1vyJWRia', 'input': {'request': 'The user needs expert guidance for building an AI agent. They require specialized knowledge and support in AI development and implementation.'}, 'name': 'RequestAssistance', 'type': 'tool_use'}], additional_kwargs={}, response_metadata={'id': 'msg_01VRnZvVbgsVRbQaQuvsziDx', 'model': 'claude-3-5-sonnet-20240620', 'stop_reason': 'tool_use', 'stop_sequence': None, 'usage': {'input_tokens': 516, 'output_tokens': 130}}, id='run-4e3f7906-5887-40d9-9267-5beefe7b3b76-0', tool_calls=[{'name': 'RequestAssistance', 'args': {'request': 'The user needs expert guidance for building an AI agent. They require specialized knowledge and support in AI development and implementation.'}, 'id': 'toolu_01Mo3N2c1byuSZwT1vyJWRia', 'type': 'tool_call'}], usage_metadata={'input_tokens': 516, 'output_tokens': 130, 'total_tokens': 646}),
 ToolMessage(content="We, the experts are here to help! We'd recommend you check out LangGraph to build your agent. It's much more reliable and extensible than simple autonomous agents.", id='8583b899-d898-4051-9f36-f5e5d11e9a37', tool_call_id='toolu_01Mo3N2c1byuSZwT1vyJWRia')]
次に、入力として None を指定してグラフを呼び出してresume(再開)します。
events = graph.stream(None, config, stream_mode="values")
for event in events:
    if "messages" in event:
        event["messages"][-1].pretty_print()
=================================[1m Tool Message [0m=================================

We, the experts are here to help! We'd recommend you check out LangGraph to build your agent. It's much more reliable and extensible than simple autonomous agents.
=================================[1m Tool Message [0m=================================

We, the experts are here to help! We'd recommend you check out LangGraph to build your agent. It's much more reliable and extensible than simple autonomous agents.
==================================[1m Ai Message [0m==================================

Thank you for your patience. I've escalated your request to our expert team, and they have provided some initial guidance. Here's what they suggest:

The experts recommend that you check out LangGraph for building your AI agent. They mention that LangGraph is a more reliable and extensible option compared to simple autonomous agents.

LangGraph is likely a framework or tool designed specifically for creating complex AI agents. It seems to offer advantages in terms of reliability and extensibility, which are crucial factors when developing sophisticated AI systems.

To further assist you, I can provide some additional context and next steps:

1. Research LangGraph: Look up documentation, tutorials, and examples of LangGraph to understand its features and how it can help you build your AI agent.

2. Compare with other options: While the experts recommend LangGraph, it might be useful to understand how it compares to other AI agent development frameworks or tools you might have been considering.

3. Assess your requirements: Consider your specific needs for the AI agent you want to build. Think about the tasks it needs to perform, the level of complexity required, and how LangGraph's features align with these requirements.

4. Start with a small project: If you decide to use LangGraph, consider beginning with a small, manageable project to familiarize yourself with the framework.

5. Seek community support: Look for LangGraph user communities, forums, or discussion groups where you can ask questions and get additional support as you build your agent.

6. Consider additional training: Depending on your current skill level, you might want to look into courses or workshops that focus on AI agent development, particularly those that cover LangGraph.

Do you have any specific questions about LangGraph or AI agent development that you'd like me to try to answer? Or would you like me to search for more detailed information about LangGraph and its features?
注意:チャットボットが最終応答に更新された状態を組み込んでいることに注目してください。すべてがチェックポイント化されたため、ループ内の「expert(エキスパート)」な人間は、グラフの実行に影響を与えることなく、いつでもupdate(更新)を実行できます
おめでとうございます これで、アシスタント グラフにノードが追加され、チャットボットが実行を中断する必要があるかどうかを自分で判断できるようになりました。これを行うには、新しい ask_human フィールドでグラフのstate(状態)を更新し、グラフをコンパイルするときに中断ロジックを変更します。これにより、グラフを実行するたびにメモリを完全に維持しながら、ループに人間を動的に含めることができます。
チュートリアルはほぼ完了ですが、終了する前に、checkpointing(チェックポイント) と state updates.(状態の更新)を結び付けるもう 1 つのコンセプトを確認する必要があります。
このセクションのコードは、参考のために以下に再現しています
Full Code ソースコードを表示(折りたたみ)
from typing import Annotated

from langchain_anthropic import ChatAnthropic
from langchain_community.tools.tavily_search import TavilySearchResults
from langchain_core.messages import BaseMessage
# NOTE: you must use langchain-core >= 0.3 with Pydantic v2
from pydantic import BaseModel
from typing_extensions import TypedDict

from langgraph.checkpoint.memory import MemorySaver
from langgraph.graph import StateGraph
from langgraph.graph.message import add_messages
from langgraph.prebuilt import ToolNode, tools_condition


class State(TypedDict):
    messages: Annotated[list, add_messages]
    # This flag is new
    ask_human: bool


class RequestAssistance(BaseModel):
    """Escalate the conversation to an expert. Use this if you are unable to assist directly or if the user requires support beyond your permissions.

    To use this function, relay the user's 'request' so the expert can provide the right guidance.
    """

    request: str


tool = TavilySearchResults(max_results=2)
tools = [tool]
llm = ChatAnthropic(model="claude-3-5-sonnet-20240620")
# We can bind the llm to a tool definition, a pydantic model, or a json schema
llm_with_tools = llm.bind_tools(tools + [RequestAssistance])


def chatbot(state: State):
    response = llm_with_tools.invoke(state["messages"])
    ask_human = False
    if (
        response.tool_calls
        and response.tool_calls[0]["name"] == RequestAssistance.__name__
    ):
        ask_human = True
    return {"messages": [response], "ask_human": ask_human}


graph_builder = StateGraph(State)

graph_builder.add_node("chatbot", chatbot)
graph_builder.add_node("tools", ToolNode(tools=[tool]))


def create_response(response: str, ai_message: AIMessage):
    return ToolMessage(
        content=response,
        tool_call_id=ai_message.tool_calls[0]["id"],
    )


def human_node(state: State):
    new_messages = []
    if not isinstance(state["messages"][-1], ToolMessage):
        # Typically, the user will have updated the state during the interrupt.
        # If they choose not to, we will include a placeholder ToolMessage to
        # let the LLM continue.
        new_messages.append(
            create_response("No response from human.", state["messages"][-1])
        )
    return {
        # Append the new messages
        "messages": new_messages,
        # Unset the flag
        "ask_human": False,
    }


graph_builder.add_node("human", human_node)


def select_next_node(state: State):
    if state["ask_human"]:
        return "human"
    # Otherwise, we can route as before
    return tools_condition(state)


graph_builder.add_conditional_edges(
    "chatbot",
    select_next_node,
    {"human": "human", "tools": "tools", "__end__": "__end__"},
)
graph_builder.add_edge("tools", "chatbot")
graph_builder.add_edge("human", "chatbot")
graph_builder.set_entry_point("chatbot")
memory = MemorySaver()
graph = graph_builder.compile(
    checkpointer=memory,
    interrupt_before=["human"],
)
パート 7: タイム トラベル
一般的なチャット ボットのワークフローでは、ユーザーはタスクを完了するために 1 回以上ボットと対話します。前のセクションでは、メモリとヒューマン イン ザ ループを追加してグラフの状態をチェックポイントし、手動で状態をオーバーライドして将来の応答を制御する方法について説明しました。
しかし、ユーザーが以前の応答から開始して「分岐」し、別の結果を探索できるようにする場合はどうでしょうか。または、ユーザーがアシスタントの作業を「巻き戻して」間違いを修正したり、別の戦略を試したりできるようにする場合はどうでしょうか (自律型ソフトウェア エンジニアなどのアプリケーションでは一般的)。
LangGraph に組み込まれている「タイム トラベル」機能を使用すると、これらのエクスペリエンスとその他のエクスペリエンスを作成できます。
このセクションでは、グラフの get_state_history メソッドを使用してチェックポイントを取得してグラフを「巻き戻します」。その後、この前の時点で実行を再開できます。
まず、チャット ボット グラフを呼び出します。以前から変更する必要はありません
from typing import Annotated

from langchain_anthropic import ChatAnthropic
from langchain_community.tools.tavily_search import TavilySearchResults
from langchain_core.messages import AIMessage, ToolMessage

# NOTE: you must use langchain-core >= 0.3 with Pydantic v2
from pydantic import BaseModel
from typing_extensions import TypedDict

from langgraph.checkpoint.memory import MemorySaver
from langgraph.graph import StateGraph, START
from langgraph.graph.message import add_messages
from langgraph.prebuilt import ToolNode, tools_condition


class State(TypedDict):
    messages: Annotated[list, add_messages]
    # This flag is new
    ask_human: bool


class RequestAssistance(BaseModel):
    """Escalate the conversation to an expert. Use this if you are unable to assist directly or if the user requires support beyond your permissions.

    To use this function, relay the user's 'request' so the expert can provide the right guidance.
    """

    request: str


tool = TavilySearchResults(max_results=2)
tools = [tool]
llm = ChatAnthropic(model="claude-3-5-sonnet-20240620")
# We can bind the llm to a tool definition, a pydantic model, or a json schema
llm_with_tools = llm.bind_tools(tools + [RequestAssistance])


def chatbot(state: State):
    response = llm_with_tools.invoke(state["messages"])
    ask_human = False
    if (
        response.tool_calls
        and response.tool_calls[0]["name"] == RequestAssistance.__name__
    ):
        ask_human = True
    return {"messages": [response], "ask_human": ask_human}


graph_builder = StateGraph(State)

graph_builder.add_node("chatbot", chatbot)
graph_builder.add_node("tools", ToolNode(tools=[tool]))


def create_response(response: str, ai_message: AIMessage):
    return ToolMessage(
        content=response,
        tool_call_id=ai_message.tool_calls[0]["id"],
    )


def human_node(state: State):
    new_messages = []
    if not isinstance(state["messages"][-1], ToolMessage):
        # Typically, the user will have updated the state during the interrupt.
        # If they choose not to, we will include a placeholder ToolMessage to
        # let the LLM continue.
        new_messages.append(
            create_response("No response from human.", state["messages"][-1])
        )
    return {
        # Append the new messages
        "messages": new_messages,
        # Unset the flag
        "ask_human": False,
    }


graph_builder.add_node("human", human_node)


def select_next_node(state: State):
    if state["ask_human"]:
        return "human"
    # Otherwise, we can route as before
    return tools_condition(state)


graph_builder.add_conditional_edges(
    "chatbot",
    select_next_node,
    {"human": "human", "tools": "tools", END: END},
)
graph_builder.add_edge("tools", "chatbot")
graph_builder.add_edge("human", "chatbot")
graph_builder.add_edge(START, "chatbot")
memory = MemorySaver()
graph = graph_builder.compile(
    checkpointer=memory,
    interrupt_before=["human"],
)
API Reference: ChatAnthropic | TavilySearchResults | AIMessage | ToolMessage | MemorySaver | StateGraph | START | add_messages | ToolNode | tools_condition
from IPython.display import Image, display

try:
    display(Image(graph.get_graph().draw_mermaid_png()))
except Exception:
    # This requires some extra dependencies and is optional
    pass

グラフにいくつかのステップを実行させてみましょう。各ステップは状態履歴にチェックポイントが設定されます:
config = {"configurable": {"thread_id": "1"}}
events = graph.stream(
    {
        "messages": [
            ("user", "I'm learning LangGraph. Could you do some research on it for me?")
        ]
    },
    config,
    stream_mode="values",
)
for event in events:
    if "messages" in event:
        event["messages"][-1].pretty_print()
================================[1m Human Message [0m=================================

I'm learning LangGraph. Could you do some research on it for me?
==================================[1m Ai Message [0m==================================

[{'text': "Certainly! I'd be happy to research LangGraph for you. To get the most up-to-date and accurate information, I'll use the Tavily search function to gather details about LangGraph. Let me do that for you now.", 'type': 'text'}, {'id': 'toolu_019HPZEw6v1eSLBXnwxk6MZm', 'input': {'query': 'LangGraph framework for language models'}, 'name': 'tavily_search_results_json', 'type': 'tool_use'}]
Tool Calls:
  tavily_search_results_json (toolu_019HPZEw6v1eSLBXnwxk6MZm)
 Call ID: toolu_019HPZEw6v1eSLBXnwxk6MZm
  Args:
    query: LangGraph framework for language models
=================================[1m Tool Message [0m=================================
Name: tavily_search_results_json

[{"url": "https://medium.com/@cplog/introduction-to-langgraph-a-beginners-guide-14f9be027141", "content": "LangGraph is a powerful tool for building stateful, multi-actor applications with Large Language Models (LLMs). It extends the LangChain library, allowing you to coordinate multiple chains (or ..."}, {"url": "https://towardsdatascience.com/from-basics-to-advanced-exploring-langgraph-e8c1cf4db787", "content": "LangChain is one of the leading frameworks for building applications powered by Lardge Language Models. With the LangChain Expression Language (LCEL), defining and executing step-by-step action sequences — also known as chains — becomes much simpler. In more technical terms, LangChain allows us to create DAGs (directed acyclic graphs)."}]
==================================[1m Ai Message [0m==================================

Thank you for your patience. I've gathered some information about LangGraph for you. Let me summarize the key points:

1. What is LangGraph?
   LangGraph is a powerful tool designed for building stateful, multi-actor applications using Large Language Models (LLMs). It's an extension of the LangChain library, which is already a popular framework for developing LLM-powered applications.

2. Purpose and Functionality:
   - LangGraph allows developers to coordinate multiple chains or actors within a single application.
   - It enhances the capabilities of LangChain by introducing more complex, stateful workflows.

3. Relation to LangChain:
   - LangGraph builds upon LangChain, which is one of the leading frameworks for creating LLM-powered applications.
   - LangChain itself uses the LangChain Expression Language (LCEL) to define and execute step-by-step action sequences, also known as chains.
   - LangChain allows the creation of DAGs (Directed Acyclic Graphs), which represent the flow of operations in an application.

4. Key Features:
   - Stateful Applications: Unlike simple query-response models, LangGraph allows the creation of applications that maintain state across interactions.
   - Multi-Actor Systems: It supports coordinating multiple AI "actors" or components within a single application, enabling more complex interactions and workflows.

5. Use Cases:
   While not explicitly mentioned in the search results, LangGraph is typically used for creating more sophisticated AI applications such as:
   - Multi-turn conversational agents
   - Complex task-planning systems
   - Applications requiring memory and context management across multiple steps or actors

Learning LangGraph can be a valuable skill, especially if you're interested in developing advanced applications with LLMs that go beyond simple question-answering or text generation tasks. It allows for the creation of more dynamic, interactive, and stateful AI systems.

Is there any specific aspect of LangGraph you'd like to know more about, or do you have any questions about how it compares to or works with LangChain?
events = graph.stream(
    {
        "messages": [
            ("user", "Ya that's helpful. Maybe I'll build an autonomous agent with it!")
        ]
    },
    config,
    stream_mode="values",
)
for event in events:
    if "messages" in event:
        event["messages"][-1].pretty_print()
================================[1m Human Message [0m=================================

Ya that's helpful. Maybe I'll build an autonomous agent with it!
==================================[1m Ai Message [0m==================================

[{'text': "That's an excellent idea! Building an autonomous agent with LangGraph is a great way to explore its capabilities and learn about advanced AI application development. LangGraph's features make it well-suited for creating autonomous agents. Let me provide some additional insights and encouragement for your project.", 'type': 'text'}, {'id': 'toolu_017t6BS5rNCzFWcpxRizDKjE', 'input': {'query': 'building autonomous agents with LangGraph examples and tutorials'}, 'name': 'tavily_search_results_json', 'type': 'tool_use'}]
Tool Calls:
  tavily_search_results_json (toolu_017t6BS5rNCzFWcpxRizDKjE)
 Call ID: toolu_017t6BS5rNCzFWcpxRizDKjE
  Args:
    query: building autonomous agents with LangGraph examples and tutorials
=================================[1m Tool Message [0m=================================
Name: tavily_search_results_json

[{"url": "https://medium.com/@lucas.dahan/hands-on-langgraph-building-a-multi-agent-assistant-06aa68ed942f", "content": "Building the Graph. With our agents defined, we'll create a graph.py file to orchestrate their interactions. The basic graph structure in LangGraph is really simple, here we are going to use ..."}, {"url": "https://medium.com/@cplog/building-tool-calling-conversational-ai-with-langchain-and-langgraph-a-beginners-guide-8d6986cc589e", "content": "Introduction to AI Agent with LangChain and LangGraph: A Beginner’s Guide Two powerful tools revolutionizing this field are LangChain and LangGraph. In this guide, we’ll explore how these technologies can be combined to build a sophisticated AI assistant capable of handling complex conversations and tasks. Tool calling is a standout feature in agentic design, allowing the LLM to interact with external systems or perform specific tasks via the @tool decorator. While the Assistant class presented here is one approach, the flexibility of tool calling and LangGraph allows for a wide range of designs. With LangChain and LangGraph, you can build a powerful, flexible AI assistant capable of handling complex tasks and conversations. Tool calling significantly enhances the AI’s capabilities by enabling interaction with external systems."}]
==================================[1m Ai Message [0m==================================

Your enthusiasm for building an autonomous agent with LangGraph is fantastic! This project will not only help you learn more about LangGraph but also give you hands-on experience with cutting-edge AI development. Here are some insights and tips to get you started:

1. Multi-Agent Systems:
   LangGraph excels at creating multi-agent systems. You could design your autonomous agent as a collection of specialized sub-agents, each handling different aspects of tasks or knowledge domains.

2. Graph Structure:
   The basic graph structure in LangGraph is straightforward. You'll create a graph.py file to orchestrate the interactions between your agents or components.

3. Tool Calling:
   A key feature you can incorporate is tool calling. This allows your LLM-based agent to interact with external systems or perform specific tasks. You can implement this using the @tool decorator in your code.

4. Flexibility in Design:
   LangGraph offers great flexibility in designing your agent. While there are example structures like the Assistant class, you have the freedom to create a wide range of designs tailored to your specific needs.

5. Complex Conversations and Tasks:
   Your autonomous agent can be designed to handle sophisticated conversations and complex tasks. This is where LangGraph's stateful nature really shines, allowing your agent to maintain context over extended interactions.

6. Integration with LangChain:
   Since LangGraph builds upon LangChain, you can leverage features from both. This combination allows for powerful, flexible AI assistants capable of managing intricate workflows.

7. External System Interaction:
   Consider incorporating external APIs or databases to enhance your agent's capabilities. This could include accessing real-time data, performing calculations, or interacting with other services.

8. Tutorial Resources:
   There are tutorials available that walk through the process of building AI assistants with LangChain and LangGraph. These can be excellent starting points for your project.

To get started, you might want to:
1. Set up your development environment with LangChain and LangGraph.
2. Define the core functionalities you want your autonomous agent to have.
3. Design the overall structure of your agent, possibly as a multi-agent system.
4. Implement basic interactions and gradually add more complex features like tool calling and state management.
5. Test your agent thoroughly with various scenarios to ensure robust performance.

Remember, building an autonomous agent is an iterative process. Start with a basic version and progressively enhance its capabilities. This approach will help you understand the intricacies of LangGraph while creating a sophisticated AI application.

Do you have any specific ideas about what kind of tasks or domain you want your autonomous agent to specialize in? This could help guide the design and implementation process.
エージェントにいくつかのステップを実行させたので、完全な状態履歴を再生して、発生したすべての内容を確認できます
to_replay = None
for state in graph.get_state_history(config):
    print("Num Messages: ", len(state.values["messages"]), "Next: ", state.next)
    print("-" * 80)
    if len(state.values["messages"]) == 6:
        # We are somewhat arbitrarily selecting a specific state based on the number of chat messages in the state.
        to_replay = state
Num Messages:  8 Next:  ()
--------------------------------------------------------------------------------
Num Messages:  7 Next:  ('chatbot',)
--------------------------------------------------------------------------------
Num Messages:  6 Next:  ('tools',)
--------------------------------------------------------------------------------
Num Messages:  5 Next:  ('chatbot',)
--------------------------------------------------------------------------------
Num Messages:  4 Next:  ('__start__',)
--------------------------------------------------------------------------------
Num Messages:  4 Next:  ()
--------------------------------------------------------------------------------
Num Messages:  3 Next:  ('chatbot',)
--------------------------------------------------------------------------------
Num Messages:  2 Next:  ('tools',)
--------------------------------------------------------------------------------
Num Messages:  1 Next:  ('chatbot',)
--------------------------------------------------------------------------------
Num Messages:  0 Next:  ('__start__',)
--------------------------------------------------------------------------------
注意:グラフの各ステップごとにチェックポイントが保存されることに注意してください。これは呼び出しにまたがるため、スレッドの履歴全体を巻き戻すことができます。再開する状態として to_replay を選択しました。これは、上記の 2 番目のグラフ呼び出しのチャットボット ノードの後の状態です。
このポイントから再開すると、次にaction ノードが呼び出されます
print(to_replay.next)
print(to_replay.config)
('tools',)
{'configurable': {'thread_id': '1', 'checkpoint_ns': '', 'checkpoint_id': '1ef7d094-2634-687c-8006-49ddde5b2f1c'}}
注意: チェックポイントの設定 (to_replay.config) には checkpoint_id timestamp が含まれています。この checkpoint_id 値を指定すると、LangGraph のチェックポインターにその時点からの状態をloadするように指示します。以下で試してみましょう
# The `checkpoint_id` in the `to_replay.config` corresponds to a state we've persisted to our checkpointer.
for event in graph.stream(None, to_replay.config, stream_mode="values"):
    if "messages" in event:
        event["messages"][-1].pretty_print()
==================================[1m Ai Message [0m==================================

[{'text': "That's an excellent idea! Building an autonomous agent with LangGraph is a great way to explore its capabilities and learn about advanced AI application development. LangGraph's features make it well-suited for creating autonomous agents. Let me provide some additional insights and encouragement for your project.", 'type': 'text'}, {'id': 'toolu_017t6BS5rNCzFWcpxRizDKjE', 'input': {'query': 'building autonomous agents with LangGraph examples and tutorials'}, 'name': 'tavily_search_results_json', 'type': 'tool_use'}]
Tool Calls:
  tavily_search_results_json (toolu_017t6BS5rNCzFWcpxRizDKjE)
 Call ID: toolu_017t6BS5rNCzFWcpxRizDKjE
  Args:
    query: building autonomous agents with LangGraph examples and tutorials
=================================[1m Tool Message [0m=================================
Name: tavily_search_results_json

[{"url": "https://blog.langchain.dev/how-to-build-the-ultimate-ai-automation-with-multi-agent-collaboration/", "content": "Learn how to create an autonomous research assistant using LangGraph, an extension of LangChain for agent and multi-agent flows. Follow the steps to define the graph state, initialize the graph, and run the agents for planning, research, review, writing and publishing."}, {"url": "https://medium.com/@lucas.dahan/hands-on-langgraph-building-a-multi-agent-assistant-06aa68ed942f", "content": "Building the Graph. With our agents defined, we'll create a graph.py file to orchestrate their interactions. The basic graph structure in LangGraph is really simple, here we are going to use ..."}]
==================================[1m Ai Message [0m==================================

Great choice! Building an autonomous agent with LangGraph is an excellent way to dive deep into its capabilities. Based on the additional information I've found, here are some insights and steps to help you get started:

1. LangGraph for Autonomous Agents:
   LangGraph is particularly well-suited for creating autonomous agents, especially those involving multi-agent collaboration. It allows you to create complex, stateful workflows that can simulate autonomous behavior.

2. Example Project: Autonomous Research Assistant
   One popular example is building an autonomous research assistant. This type of project can help you understand the core concepts of LangGraph while creating something useful.

3. Key Steps in Building an Autonomous Agent:
   a. Define the Graph State: This involves setting up the structure that will hold the agent's state and context.
   b. Initialize the Graph: Set up the initial conditions and parameters for your agent.
   c. Create Multiple Agents: For a complex system, you might create several specialized agents, each with a specific role (e.g., planning, research, review, writing).
   d. Orchestrate Interactions: Use LangGraph to manage how these agents interact and collaborate.

4. Components of an Autonomous Agent:
   - Planning Agent: Determines the overall strategy and steps.
   - Research Agent: Gathers necessary information.
   - Review Agent: Evaluates and refines the work.
   - Writing Agent: Produces the final output.
   - Publishing Agent: Handles the final distribution or application of results.

5. Implementation Tips:
   - Start with a simple graph structure in LangGraph.
   - Define clear roles and responsibilities for each agent or component.
   - Use LangGraph's features to manage state and context across the different stages of your agent's workflow.

6. Learning Resources:
   - Look for tutorials and examples specifically on building multi-agent systems with LangGraph.
   - The LangChain documentation and community forums can be valuable resources, as LangGraph builds upon LangChain.

7. Potential Applications:
   - Autonomous research assistants
   - Complex task automation systems
   - Interactive storytelling agents
   - Autonomous problem-solving systems

Building an autonomous agent with LangGraph is an exciting project that will give you hands-on experience with advanced concepts in AI application development. It's a great way to learn about state management, multi-agent coordination, and complex workflow design in AI systems.

As you embark on this project, remember to start small and gradually increase complexity. You might begin with a simple autonomous agent that performs a specific task, then expand its capabilities and add more agents or components as you become more comfortable with LangGraph.

Do you have a specific type of autonomous agent in mind, or would you like some suggestions for beginner-friendly autonomous agent projects to start with?
注意 グラフが action ノードから実行を再開したことに注目してください。上に表示された最初の値は検索エンジン ツールからの応答であるため、これが当てはまることがわかります。
おめでとうございます! これで、LangGraph でtime-travel checkpoint traversal(タイム トラベル チェックポイント トラバーサル)を使用できました。巻き戻して代替パスを探索できることで、デバッグ、実験、インタラクティブ アプリケーションの可能性が広がります。
次のステップ
デプロイメントと高度な機能を調べて、さらに先へ進みましょう。
Server Quickstart (サーバー クイックスタート)
- LangGraph Server Quickstart: LangGraph サーバーをローカルで起動し、REST API と LangGraph Studio Web UI を使用して操作します
LangGraph Cloud
- LangGraph Cloud QuickStart: LangGraph Cloud を使用して LangGraph アプリをデプロイします
LangGraph Framework
- LangGraph Concepts: LangGraph の基本的な概念を学びます
- LangGraph How-to Guides: LangGraph を使用した一般的なタスクのガイド
LangGraph Platform
これらのリソースで知識を広げましょう:
- LangGraph Platform Concepts: LangGraph プラットフォームの基本的な概念を理解します
- LangGraph Platform How-to Guides: LangGraph プラットフォームでの一般的なタスクのガイド