はじめに
私は音ゲーを作ってみたいと思ったのですが、主に外部Assetを使用することが多かったです。
なのでUnity且音ゲー初心者の私は、ノーツ作成からリザルトまでを全て自作で作成することにしました。(処理が重くなる可能性があった場合、ご容赦ください。)
この記事では、選択メニュー➡音ゲー本体➡リザルト画面といった流れで作っていきます。
選択メニュー作成手順
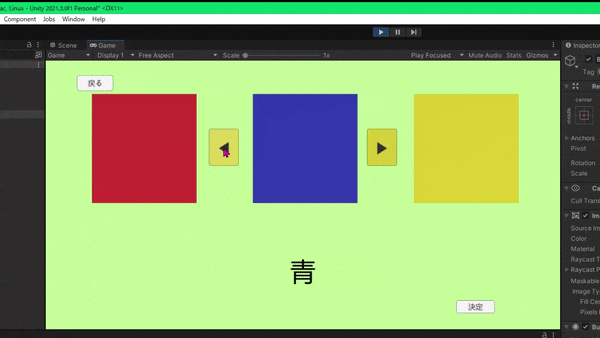
上記のようなシステムを作ってみます。
まず左右のボタンを作成し、右のボタンを押すと右の画像が、左のボタンを押すと左の画像が表示し、選択された音声を流すようにします。
スクリプトはこのような形です。
using System.Collections;
using System.Collections.Generic;
using UnityEngine;

public class aimasu : MonoBehaviour
{
    public GameObject box1Prefab;//画像
    public GameObject box2Prefab;
    public GameObject box3Prefab;
    public static int cshape = 0;//画像位置判定のための値
    public AudioClip sound2;//音声
    public AudioClip sound3;
    public AudioClip sound4;
    AudioSource audioSource;
    public static int del = 0;//音の再生を円滑に進めるための値

    void Start()
    {
        Vector3 pos = new Vector3(-6f, 1.7f, 0);  // 画像表示 今回は3つ
        Instantiate(box1Prefab, pos, Quaternion.identity);

        Vector3 pos2 = new Vector3(0f, 1.7f, 0);
        Instantiate(box2Prefab, pos2, Quaternion.identity);

        Vector3 pos3 = new Vector3(6f, 1.7f, 0);
        Instantiate(box3Prefab, pos3, Quaternion.identity);

    }
    public void meme()
    {
        audioSource = GetComponent<AudioSource>();//音声再生
        audioSource.PlayOneShot(sound2);//真ん中の曲
    }
    public void meme2()
    {
        audioSource = GetComponent<AudioSource>();
        audioSource.PlayOneShot(sound3);//右の曲
    }
    public void meme3()
    {
        audioSource = GetComponent<AudioSource>();
        audioSource.PlayOneShot(sound4);//左の曲
    }

    void Update()
    {
        if (del == 0)
        {
            if (cshape == 0)//最初の画面
            {
                meme();
                del= 2;//一回だけ実行するための値
            }
            if(cshape == 1)//右に押されたとき
            {
                meme2();
                del = 2;
            }
            if (cshape == -1)//左に押されたとき
            {
                meme3();
                del = 2;
            }
        }
        if(del==1)//左右ボタンを押されたら音をいったん止める
        {
            audioSource.Stop();
            del = 0;//そして再生
        }
    }
}
Start()では画像を表示し、Update()では後々に作成するボタンからの値を判定し、正しい画像と音声を実行するコードとなっております。
このスクリプトはgameobjectにアタッチをしましょう。
また、このgameobjectに動かしたい画像と音声をいれてください。
using System.Collections;
using System.Collections.Generic;
using UnityEngine;

public class move : MonoBehaviour
{
    private int ooohidari = 0;//画像一枚あたりに値を付与
    public static int ppphidari = 0;//画像すべてが移動したか判定
    private int ooomigi = 0;//画像一枚あたりに値を付与
    public static int pppmigi = 0;
    public void hidari2()
    {
        transform.Translate(6, 0, 0);//右に移動
    }
    public void migi2()
    {
        transform.Translate(-6, 0, 0);//左に移動
    }

    void Update()
    {
        if (ppphidari==3) {//今回は三つなので三個画像が移動したら、移動をやめるための判定
            buttons.nmnhidari = 1;
            ooohidari = 0;
        }
        if (pppmigi == 3)
        {
            buttons.nmnmigi = 1;
            ooomigi = 0;
        }

        //mnm,nmnはトリガー
        //ooo,ooo2はプライベートそれぞれ
        //ppp,ppp2は統一

        if (buttons.nmnhidari == 0)//左の判定
            {
                if (ooohidari == 0)//privateで一度だけ実行
                {
                    hidari2();
                    ooohidari = 1;//このスクリプトにアタッチしている画像はこれで移動不可
                    ppphidari = ppphidari + 1;//上の判定に関わる
                }
            }
        if(buttons.nmnmigi==0)//右の判定
        {
            if (ooomigi == 0)
            {
                migi2();
                ooomigi = 1;
                pppmigi = pppmigi + 1;
            }
        }
    }
}
このスクリプトでは画像の移動を調整しております。
privateで変数を用意しそれぞれが、ボタン通り移動したかを判定しております。
少々変数などが多くなってしまっているので、もう少しうまくできる方がいらっしゃいましたらコメントでご教授ください。
このスクリプトはそれぞれ移動させたい画像にアタッチしてください。
using System.Collections;
using System.Collections.Generic;
using UnityEngine;
using UnityEngine.SceneManagement;
public class buttons : MonoBehaviour
{
    public static int nmnhidari = 1;//ボタン押したときに0になる(左
    public static int nmnmigi = 1;//右)
    public static int enter = 0;//変数cshapeを代入
    public static int end = 0;

    // Start is called before the first frame update

    public static void hidari()//左ボタンにアタッチ
    {
        if (aimasu.cshape>-1)//これ以上左に行かないように判定
        {
            aimasu.cshape = aimasu.cshape - 1;//左に行けばー1
            aimasu.del = 1;//音の再生をとめ、次の再生を行う
            nmnhidari = 0;//画像の動きの停止を解除
            if(move.ppphidari==3) {
                move.ppphidari = 0;//これを0にすることでprivateの値も0になる

            }
        }

    }

    public static void migi()//右ボタンにアタッチ
    {
        {
            aimasu.cshape = aimasu.cshape + 1;
            nmnmigi = 0;
            aimasu.del = 1;
            if (move.pppmigi == 3)
            {
                move.pppmigi = 0;
            }
        }
    }
    public static void modoru()//スタート画面に戻る
    {
        aimasu.del = 1;
        aimasu.cshape = 0;
        SceneManager.LoadScene("前のシーン", LoadSceneMode.Single);//スタート画面
    }
    public static void awase()//テスト用-処理を合わせる
    {//外部のスクリプトから関数を呼び出すことで今後音ゲーにノーツを代入していく
        testvs1.tests();
        testvs1.tests2();
        testvs1.tests3();
        testvs1.tests4();
        if (testvs1.xxx == 4)//4つのレーンにノーツがすべて追加されると音ゲー画面に移行
        {
            SceneManager.LoadScene("次のシーン", LoadSceneMode.Single);

        }
        aimasu.cshape = -2;
    }
    public static void kettei()//決定ボタンを押した際に現在真ん中にある画像(enter変数の値に紐づけされている音楽)に決定される
    {
        if (enter==-1) {//左押した
            //amaterasu.amaterasu1();例
            //amaterasu.amaterasu2();
            //amaterasu.amaterasu3();
            //amaterasu.amaterasu4();
            if (testvs1.xxx == 4)
            {
                SceneManager.LoadScene("次のシーン", LoadSceneMode.Single);

            }
        }
        if(enter==0)//初期値
        {
            //eden.eden1();例
            //eden.eden2();
            //eden.eden3();
            //eden.eden4();
            if (testvs1.xxx == 4)
            {
                SceneManager.LoadScene("次のシーン", LoadSceneMode.Single);

            }
        }
        if (enter==1)//右押し
        {

            if (testvs1.xxx == 4)
            {
                SceneManager.LoadScene("次のシーン", LoadSceneMode.Single);

            }
        }
        if(enter==2)//今後追加
        {
            if (testvs1.xxx == 4)
            {
                SceneManager.LoadScene("次のシーン", LoadSceneMode.Single);

            }
        }
    }

    // Update is called once per frame
    void Update()
    {

        enter = aimasu.cshape;//左右ボタンを押した際の変化を代入

    }
}
このスクリプトはボタン専用のスクリプトになっております。
hidari()、migi()という関数で、先程のスクリプトに値を挿入しています。
kettei()では後々作成する楽曲のノーツデータの受け渡しを行っております。
関数hidari(),migi()はそれぞれ左右のボタンに、kettei()は決定ボタンにアタッチしてください。
以上でメニュー画面については作成できました。
次回は実際に音ゲー本体を作っていきます。