夏季休暇中はazure漬けになることを宣言したsuttonです。ラズパイでも遊びます。さて、この記事は忘備録も兼ねた手順のメモです。
azure cli は aws cli と同じようなウェブコンソールの操作をコマンドラインから行えるツールセットです。WindowsやLinux、Macなど各種OSで動作するようですが、今回はazureに立てたcentosのバーチャルマシンにインストールしてみました。
◆管理者にスイッチ
$ sudo su -
◆Microsoftの公開鍵をインストール
# rpm --import https://packages.microsoft.com/keys/microsoft.asc
◆azure cliのレポジトリ情報を追加
# echo -e "[azure-cli]\nname=Azure CLI\nbaseurl=https://packages.microsoft.com/yumrepos/azure-cli\nenabled=1\ngpgcheck=1\ngpgkey=https://packages.microsoft.com/keys/microsoft.asc" > /etc/yum.repos.d/azure-cli.repo
◆azure cliをインストール
# yum -y install azure-cli
◆サインインと認証
下のコマンドを実行するとログイン用URLが表示されるのでこちらのサイトをブラウザより開きます。
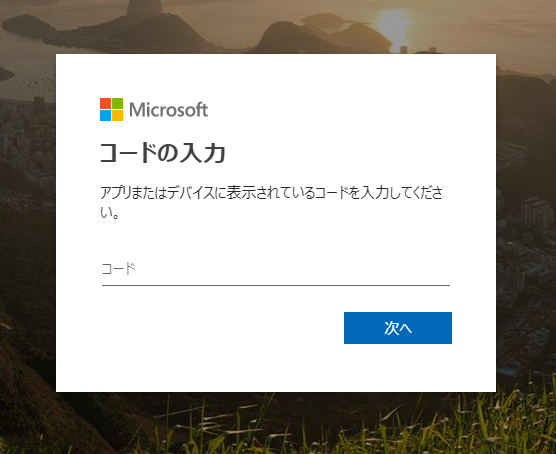
認証キーが表示されますので、 ******** に表示されているキーをクリップボードにコピーします。
# az login
To sign in, use a web browser to open the page https://microsoft.com/devicelogin and enter the code ******** to authenticate.
先ほどコピーした認証コードを貼り付けます。
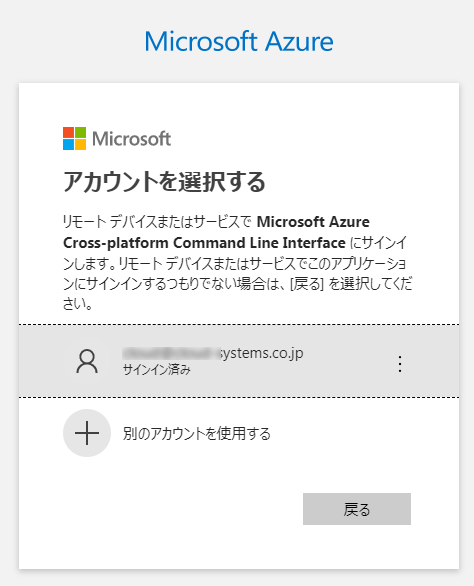
関連付けるアカウントを選択します。(下の例ではアカウントは一つだけですので、そちらをクリックします)
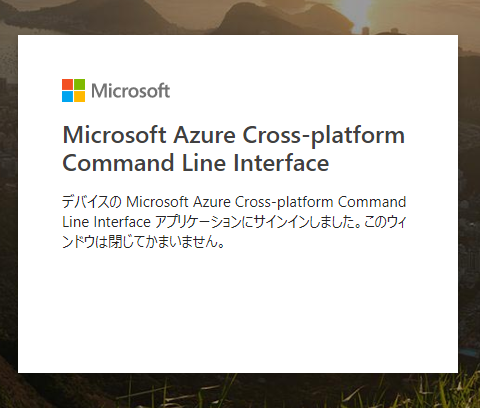
認証が通りました。
◆azure cli を使ってみる
HELPを表示
うまく表示されました。困ったらこれを読めばいいですね。
# az -h
Group
    az

Subgroups:
    account                     : Manage Azure subscription information.
    acr                         : Manage private registries with Azure Container Registries.
    ad                          : Manage Azure Active Directory Graph entities needed for Role Based
                                  Access Control.
    advisor                     : Manage Azure Advisor.
    aks                         : Manage Azure Kubernetes Services.

~(以下省略)~
バーチャルマシンの一覧を表示
一台だけ作った仮想マシンの情報が表示されました。うまく行ったみたいです。
# az vm list --output table
Name         ResourceGroup    Location    Zones
-----------  ---------------  ----------  -------
test-linux1  TEST-RG          japaneast   1
◆azure cli の出力形式
先のコマンドでは --outout オプションで出力形式を指定しました。
# az vm list --output table
azure cli の出力形式は下記の5種類です。
| 形式 | 説明 |
|---|---|
| json | JSONで出力(デフォルト) |
| jsonc | JSON カラー表示 |
| yaml | YAMLで出力 |
| table | テーブルで出力 |
| tsv | タブ区切りの値 (キーなし) |
デフォルトはjsonで出力形式により表示されるパラメータの粒度が異なるようです。
◆標準出力形式を変更し保存
デフォルトは json なので、変更したい方は下記を実行して下さい。
# az configure

Welcome to the Azure CLI! This command will guide you through logging in and setting some default values.

Your settings can be found at /root/.azure/config
Your current configuration is as follows:

[cloud]
name = AzureCloud

Do you wish to change your settings? (y/N): y

What default output format would you like?
 [1] json - JSON formatted output that most closely matches API responses.
 [2] jsonc - Colored JSON formatted output that most closely matches API responses.
 [3] table - Human-readable output format.
 [4] tsv - Tab- and Newline-delimited. Great for GREP, AWK, etc.
 [5] yaml - YAML formatted output. An alternative to JSON. Great for configuration files.
 [6] none - No output, except for errors and warnings.
Please enter a choice [Default choice(1)]: 3

~(以下省略)~
◆Proxy 必須の環境の場合
コマンドラインツールである azure cli に Proxy の設定が必要?と思われるかもしれませんが、azure cli は Azure の REST API を利用して http(s) で通信していますので、Proxyオンリーの環境では HTTP/HTTPS Proxy の設定が必須となります。
Bash を利用している方はホームディレクトリ( /home/user名/.bashrc )にある .bashrc に下記の設定を追加して保存して下さい。そうすれば次回ログイン以降はProxyの設定が不要となります。
# Proxy 認証なし
export HTTP_PROXY=http://[proxy]:[port]
export HTTPS_PROXY=https://[proxy]:[port]

# Proxy 認証あり
export HTTP_PROXY=http://[username]:[password]@[proxy]:[port]
export HTTPS_PROXY=https://[username]:[password]@[proxy]:[port]
以上、azure cli のインストール手順でした。