3Dオブジェクトに応じたHTMLのページを表示させる
マウスからイベントが取得できたので、クリックしたらHTMLを表示するようにします。
予めAssetsにmarkupというディレクトリ内に使用されるhtmlとcssのサンプルがあります。
事前にサンプルを用意していますが、作る際には自分のローカルで作成する必要があるのでご注意ください。
今回は3つの3Dオブジェクトと3つのhtmlを関係を持たせて、
「3Dオブジェクトがクリックされたら、それにリンクするhtmlが表示される」 までを作ります。
ここで使用するscriptはaddhtml.jsですが、これもまたEntityにADD SCRIPTする必要があります。
使用するaddhtml.jsは特定のEntityにADD SCRIPTする必要はありません。
今回はcharaというグループのEntityにADD SCRIPTします。
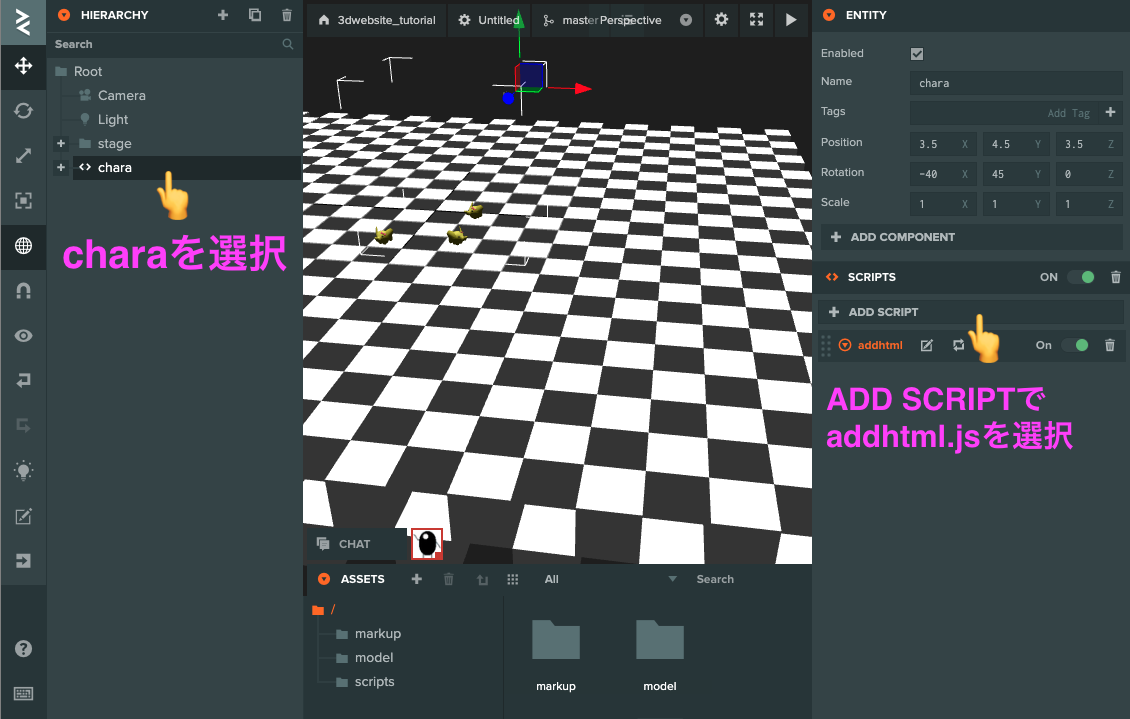
addhtml.jsをADD SCRIPTしたら、コードエディターを開きます。
以下のコードを追加します。
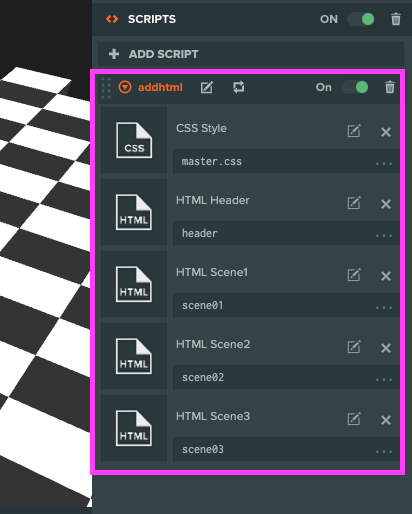
Addhtml.attributes.add("css", {type: 'asset', assetType:'css', title: 'CSS Style'}); // アセットのcss読み込み
Addhtml.attributes.add("header", {type: 'asset', assetType:'html', title: 'HTML Header'}); // アセットのhtmlのheader読み込み
Addhtml.attributes.add("scene1", {type: 'asset', assetType:'html', title: 'HTML Scene1'}); // アセットのhtmlのscene1読み込み
Addhtml.attributes.add("scene2", {type: 'asset', assetType:'html', title: 'HTML Scene2'}); // アセットのhtmlのscene2読み込み
Addhtml.attributes.add("scene3", {type: 'asset', assetType:'html', title: 'HTML Scene3'}); // アセットのhtmlのscene3読み込み
早速、markupディレクトリのファイルを登録していきます。
下のアセットからmarkupというディレクトリに登録するファイルがあります。
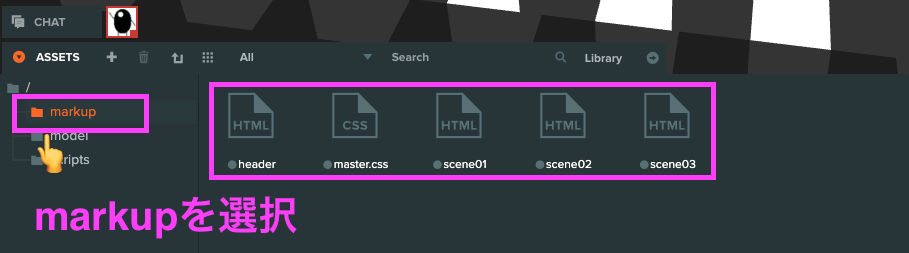
htmlとcssを登録していきます。
登録したコードを追加するために
とのエレメントを取得する必要があります。なぜ取得するのかというと、取得したheadやbodyに対して、appendChild()やinnerHTML、insertAdjacentHTML()などでhtmlを追加するからです。
以下のコードを追加していきます。
var container;

Addhtml.prototype.initialize = function() { // init
    var htmlNameArr = []; // attributesのデータの名前を配列にします
    var arrIndex = Addhtml.attributes.index;
    for(var i = 0; i < Object.keys(arrIndex).length; i++){ // attributesのデータを取得してfor文で回す
        if(!Object.keys(arrIndex)[i].indexOf("scene")){ // 名前にhtmlが入っているデータをif文
            htmlNameArr.push(Object.keys(arrIndex)[i]); // htmlデータの名前だけ配列化する
        }
    }

    var head = document.getElementsByTagName("head")[0]; // headタグ取得
    var body = document.getElementsByTagName("body")[0]; // bodyタグ取得

    var wrapper = document.createElement("div"); // DOMを囲う要素を作成
    wrapper.className = "wrapper"; // クラス名指定
    body.appendChild(wrapper); // bodyタグの最後に要素を追加

    container = document.createElement("main"); // DOMを囲う要素を作成
    container.className = "container"; // クラス名指定
    wrapper.appendChild(container); // bodyタグの最後に要素を追加

		var style = document.createElement("style"); // cssのstyleタグ

    wrapper.insertAdjacentHTML("afterbegin", this.header.resource); // attrで追加したヘッダーを追加

    style.append(this.css._resources[0]);
    head.appendChild(style); // headの最後にstyleを追加

    for(var i = 0; i < htmlNameArr.length; i++){ // htmlのアセットを配列管理するためにfor文でattrの名前の配列を回す

        container.insertAdjacentHTML("beforeend", this[htmlNameArr[i]].resource); // アセットから取得したhtmlを追加

    }
};
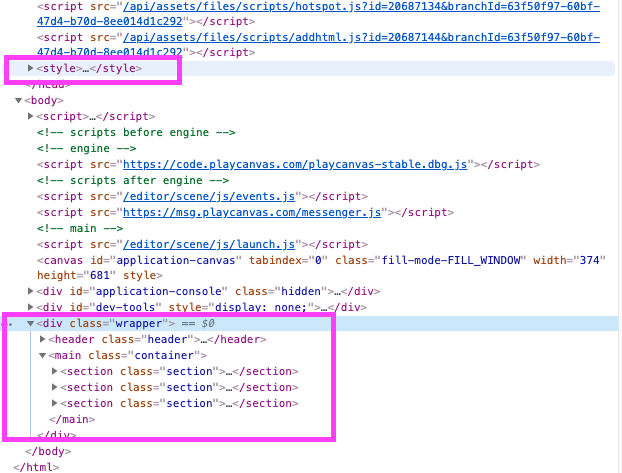
これでhtmlとcssの情報を追加できました。
headの中にcssのスタイルが入り()、bodyの中にhtmlの要素が入っています。
次にオブジェクトをクリックしたらそれに連動したhtmlを表示するやり方です。
attributesで登録したhtmlでscene1、scene2、scene3とありました。
この数字を3Dオブジェクトとの関係性に使います。
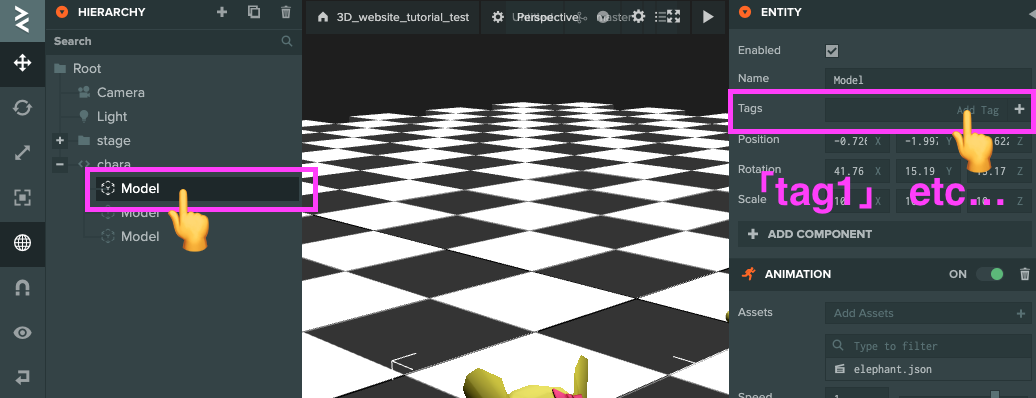
Editorから3DオブジェクトのModelを選択し、インスペクターからTagsを登録します。
tagの名前は任意のもので大丈夫です。数字をそれぞれに入れるのを忘れないように。
登録したtagをクリックした時に取得できるか確認します。
hotspot.jsのdoRayCastでtagを確認します。
Hotspot.prototype.doRayCast = function (screenPosition) { // レイキャスト処理(ある地点から特定方向に直線で線を引いて、その線上で物体があるか検知する処理)
    if (this.hitArea.intersectsRay(this.ray)) { // ヒットエリアとレイが交差した場合
        console.log("click!! : ",this.entity.tags._list[0]);
    }
};
クリックした3Dオブジェクトから各々のtagが取得できたと思います。
これを使ってhtmlとリンクさせます。
addhtml.jsに以下を追加します。
globalPc = {}; // グローバルな変数(オブジェクト)

Addhtml.prototype.update = function(dt) { // update
    if(Number(globalPc.scene) > 0) { // いずれかのsceneが選択されている場合
        if(!container.classList.contains("is-open")){ // 追加したアセットのhtmlにis-openのclassが追加されていない場合(どのhtmlも表示されていない)
            container.classList.add("is-open"); // is-openのclass名をcontainerに追加
            var sectionElements = document.getElementsByClassName("section"); // sectionを取得
            for(var i = 0; i < sectionElements.length; i++){ // sectionをループ処理
                if(sectionElements[i].classList.contains("is-current")){ // sectionにis-currentのclass名を持つかif処理
                    sectionElements[i].classList.remove("is-current"); // is-currentを削除
                }
            }
            sectionElements[globalPc.scene-1].classList.add("is-current"); // 選択されたsceneにis-currentのclass名を追加
            document.getElementsByClassName("section_close")[globalPc.scene-1].addEventListener("click", btnClose, false); // 選択されたsceneの閉じるボタンにイベントをセット
        }
    }

};

function btnClose(e){ // 閉じるボタンが押されたら発火
    e.preventDefault();
    globalPc.scene = 0; // 閉じるボタンなので選択されたsceneはnullにするので、0を代入
    container.classList.remove("is-open"); // containerのis-openのclass名を削除
    var sectionElements = document.getElementsByClassName("section"); // sectionを取得
    for(var i = 0; i < sectionElements.length; i++){ // sectionをループ処理
        if(sectionElements[i].classList.contains("is-current")){ // sectionにis-currentのclass名を持つかif処理
            sectionElements[i].classList.remove("is-current"); // is-currentを削除
        }
    }
}
リンクさせる方法として、global変数のglobalPcで今開いているページを管理できるようにします。
initializeには以下を追加します。
globalPc.scene = 0; // どのシーンページを開いているか保管
先ほど確認したhotspot.jsのdoRayCastでもglobal変数に数字を与えます。
数字のみを代入するようにします。
Hotspot.prototype.doRayCast = function (screenPosition) { // レイキャスト処理(ある地点から特定方向に直線で線を引いて、その線上で物体があるか検知する処理)
    if (this.hitArea.intersectsRay(this.ray)) { // ヒットエリアとレイが交差した場合
        globalPc.scene = this.entity.tags._list[0].replace(/[^0-9]/g, ''); // entityで設定したタグを取得し、scene1、scene2...の数字以外をreplaceで削除し数字のみ代入
    }
};
Launch画面でリロードして3Dオブジェクトをクリックすると、それぞれ該当したhtmlが表示されるようになります。
これで簡単なwebの大枠はできました。
[ hotspot.jsのコード ]
var Hotspot = pc.createScript('hotspot');

// canvasのclickやhoverなどの処理を行う

Hotspot.attributes.add("cameraEntity", {type: "entity", title: "Camera Entity"}); // カメラのentityを取得
Hotspot.attributes.add("radius", {type: "number", title: "Radius"}); // entityのヒットエリアの範囲を指定

Hotspot.prototype.initialize = function() { // init
    this.hitArea = new pc.BoundingSphere(this.entity.getPosition(), this.radius); // ヒットエリアを作成。BoundingSphereがentityの境界エリアを作成(Photoshopでいうバウンディングボックス的な)
    this.ray = new pc.Ray(); // cameraからentityへ直進する線のデータを作成。(Rayは光線の意でstart pointからentityまでの距離を測ったりすることが可能)

    this.directionToCamera = new pc.Vec3(); // Vector座標の型を取得

    this.app.mouse.on(pc.EVENT_MOUSEMOVE, this.onMouseHover, this); // マウスカーソルがホバーした時
    this.app.mouse.on(pc.EVENT_MOUSEDOWN, this.onMouseDown, this); // クリックが押された時
};


Hotspot.prototype.doRayCast = function (screenPosition) { // レイキャスト処理(ある地点から特定方向に直線で線を引いて、その線上で物体があるか検知する処理)
    if (this.hitArea.intersectsRay(this.ray)) { // ヒットエリアとレイが交差した場合
        globalPc.scene = this.entity.tags._list[0].replace(/[^0-9]/g, ''); // entityで設定したタグを取得し、s1、s2...の数字以外をreplaceで削除し数字のみ代入
    }
};


Hotspot.prototype.onMouseHover = function(screenPosition) { // マウスホバー時
    this.cameraEntity.camera.screenToWorld(screenPosition.x, screenPosition.y, this.cameraEntity.camera.farClip, this.ray.direction); // ポジションを2Dスクリーンから3D空間へ変換
    this.ray.origin.copy(this.cameraEntity.getPosition()); // レイのオリジナルのポジションにカメラのポジションをコピー
    this.ray.direction.sub(this.ray.origin).normalize(); // 3次元ベクトルを他の場所から減算し、単位ベクトルに変換

    if (this.hitArea.intersectsRay(this.ray)) { // ヒットエリアとレイが交差した場合
        console.log("hover");
    }
};

Hotspot.prototype.onMouseDown = function(event) { // クリックが押されている時
    if (event.button == pc.MOUSEBUTTON_LEFT) { // 左クリックが押された時
        this.doRayCast(event); // レイキャストを呼ぶ
    }
};
[ addhtml.js のコード ]
var Addhtml = pc.createScript('addhtml');

// htmlを追加などする処理を記入

Addhtml.attributes.add("css", {type: 'asset', assetType:'css', title: 'CSS Style'}); // アセットのcss読み込み
Addhtml.attributes.add("header", {type: 'asset', assetType:'html', title: 'HTML Header'}); // アセットのhtmlのheader読み込み
Addhtml.attributes.add("scene1", {type: 'asset', assetType:'html', title: 'HTML Scene1'}); // アセットのhtmlのscene1読み込み
Addhtml.attributes.add("scene2", {type: 'asset', assetType:'html', title: 'HTML Scene2'}); // アセットのhtmlのscene2読み込み
Addhtml.attributes.add("scene3", {type: 'asset', assetType:'html', title: 'HTML Scene3'}); // アセットのhtmlのscene3読み込み

globalPc = {}; // グローバルな変数(オブジェクト)
var container;

Addhtml.prototype.initialize = function() { // init
    globalPc.scene = 0; // どのシーンページを開いているか保管

    var htmlNameArr = []; // attributesのデータの名前を配列にします
    var arrIndex = Addhtml.attributes.index;
    for(var i = 0; i < Object.keys(arrIndex).length; i++){ // attributesのデータを取得してfor文で回す
        if(!Object.keys(arrIndex)[i].indexOf("scene")){ // 名前にhtmlが入っているデータをif文
            htmlNameArr.push(Object.keys(arrIndex)[i]); // htmlデータの名前だけ配列化する
        }
    }

    var head = document.getElementsByTagName("head")[0]; // headタグ取得
    var body = document.getElementsByTagName("body")[0]; // bodyタグ取得

    var wrapper = document.createElement("div"); // DOMを囲う要素を作成
    wrapper.className = "wrapper"; // クラス名指定
    body.appendChild(wrapper); // bodyタグの最後に要素を追加

    container = document.createElement("main"); // DOMを囲う要素を作成
    container.className = "container"; // クラス名指定
    wrapper.appendChild(container); // bodyタグの最後に要素を追加

	var style = document.createElement("style"); // cssのstyleタグ

    wrapper.insertAdjacentHTML("afterbegin", this.header.resource); // attrで追加したヘッダーを追加

    style.append(this.css._resources[0]);
    head.appendChild(style); // headの最後にstyleを追加

    for(var i = 0; i < htmlNameArr.length; i++){ // htmlのアセットを配列管理するためにfor文でattrの名前の配列を回す

        container.insertAdjacentHTML("beforeend", this[htmlNameArr[i]].resource); // アセットから取得したhtmlを追加

    }
};

Addhtml.prototype.update = function(dt) { // update
    if(Number(globalPc.scene) > 0) { // いずれかのsceneが選択されている場合
        if(!container.classList.contains("is-open")){ // 追加したアセットのhtmlにis-openのclassが追加されていない場合(どのhtmlも表示されていない)
            container.classList.add("is-open"); // is-openのclass名をcontainerに追加
            var sectionElements = document.getElementsByClassName("section"); // sectionを取得
            for(var i = 0; i < sectionElements.length; i++){ // sectionをループ処理
                if(sectionElements[i].classList.contains("is-current")){ // sectionにis-currentのclass名を持つかif処理
                    sectionElements[i].classList.remove("is-current"); // is-currentを削除
                }
            }
            sectionElements[globalPc.scene-1].classList.add("is-current"); // 選択されたsceneにis-currentのclass名を追加
            document.getElementsByClassName("section_close")[globalPc.scene-1].addEventListener("click", btnClose, false); // 選択されたsceneの閉じるボタンにイベントをセット
        }
    }

};

function btnClose(e){ // 閉じるボタンが押されたら発火
    e.preventDefault();
    globalPc.scene = 0; // 閉じるボタンなので選択されたsceneはnullにするので、0を代入
    container.classList.remove("is-open"); // containerのis-openのclass名を削除
    var sectionElements = document.getElementsByClassName("section"); // sectionを取得
    for(var i = 0; i < sectionElements.length; i++){ // sectionをループ処理
        if(sectionElements[i].classList.contains("is-current")){ // sectionにis-currentのclass名を持つかif処理
            sectionElements[i].classList.remove("is-current"); // is-currentを削除
        }
    }
}
次はここまで作成したSceneをPublishして公開します。